Last updated: Apr 19, 2026
Central Ohio winters bring repeated freeze-thaw cycles that can stress shingles, flashing, sealants, and underlayment between cold snaps and milder periods. In this environment, a roof endures the squeeze of ice and water infiltration, then a thaw that lets that stress reset only to repeat. This cycle wears materials gradually, and small failures compound over the season. By the time spring arrives, the roof may show a mix of aging components and newly exposed weak spots, making spring storm damage more likely to reveal itself as you see moisture intrusion or shingle loss after hail or heavy rain.
Springfield homeowners commonly face spring storm exposure from hail, wind, and heavy rain, which can create both visible shingle loss and harder-to-document functional damage. A hail strike may leave dented or cracked shingles that look minor but loosen their seal and allow wind-driven moisture to penetrate. Strong winds can lift edges of shingles or expose the underlayment, while driving rain can force water under flashing around chimneys, vents, and valleys. Because storm activity and winter wear overlap in this region, many Springfield replacements are driven by cumulative damage rather than a single obvious failure event. This means the roof often hides its true condition until a thorough inspection uncovers a pattern: multiple small failures that, taken together, threaten structural integrity.
The most urgent signs are moisture in the attic after a storm, faster indoor temperature fluctuations that point to roof gaps, and obvious shingle loss on multiple sections of the roof line. Look for granule buildup in gutters, curling or cupping of shingles, or dark streaks along the ceiling where leaks have occurred. If flashing around vents, chimneys, or skylights shows signs of movement or corrosion, do not delay in getting a professional assessment. Document visible damage with photos and note the dates of heavy storms, as this helps when evaluating whether the cumulative wear warrants replacement rather than patchwork.
If damage assessment confirms widespread wear rather than a single breakthrough failure, prepare for a replacement approach that anticipates Springfield's spring storm pattern and winter stress. Choose materials that handle freeze-thaw cycles well, with robust underlayment and properly sealed flashing to resist moisture ingress. Prioritize correct installation details for valleys, seams, and transitions that bear the brunt of wind-driven rain. Communicate clearly with a roofing professional about how the roof has endured both winter stress and spring storm events so they can tailor the replacement to the local climate and housing stock. In Springfield, the goal is to replace with a system built to resist recurring stress, not just to cover current damage.
In this climate, roofs that survive winter may still fail during spring rains when ice-related cracking and loosened fasteners are first tested by sustained moisture. That means you should check for small gaps, lifted shingles, and signs of moisture intrusion as soon as the snow has melted and the first heavy spring rains arrive. The combination of thaw cycles and spring downpours can reveal weaknesses that weren't obvious after a dry season. If you're evaluating a roof after harsh weather, look for hairline cracks in shingles, dark spots on sheathing, and any granule loss along the eaves. These are classic indicators that a more thorough assessment is warranted before planning a repair or full replacement.
Warm, humid Ohio summers can expose ventilation problems after a re-roof, making post-installation airflow and attic heat buildup especially relevant locally. If the attic feels unusually hot or humid in July and August, or if you notice condensation on soffit vents and rafters during the shoulder seasons, it's a sign the ventilation strategy needs attention. After a re-roof, the balance between intake and exhaust ventilation matters more than ever in this climate. Addressing ridge or soffit venting, ensuring proper insulation, and verifying that soffit baffles are in place can prevent faster deterioration of roof deck components and help extend the life of the new covering.
Autumn wind and rain can compress contractor schedules in Springfield, so homeowners often need to decide on replacement before late-season weather closes the ideal work window. If your roof shows multiple failed fasteners, curling edges, or wet patches that worsen with every storm, planning for replacement ahead of winter rain is prudent. Early autumn review of roof condition gives you a realistic window to line up materials, coordinate crews, and avoid the scramble that comes with unpredictable late-season weather. A clear plan also reduces the risk of a partial repair that leaves underlying issues exposed to freezing cycles.
When considering replacement, think about how the next few winters could stress the new roof. A warmer season installation can help you take advantage of milder months for better sealing and curing, but the roof must be installed with attention to attic ventilation and vapor control to avoid heat buildup and moisture trapping. If you're weighing material options, remember how freeze-thaw cycles affect edge and clearance details, and how each roofing type tolerates wind-driven rain during autumn storms. The goal is a roof assembly that resists moisture intrusion, resists wind uplift, and maintains stable attic conditions across the full range of local weather.
Start with a thorough roof inspection after spring storms and before summer heat intensifies. Document any cracking, lifted fasteners, or deck staining, and note attic temperatures during peak heat. Have a trusted contractor conduct a moisture test on the decking to determine whether a repair can extend life or if replacement is the safer long-term choice. If replacement is chosen, align the project with an anticipated stretch of dry weather in late summer or early fall to reduce weather-related delays. Finally, ensure the chosen system accounts for ventilation improvements and attic airflow to maximize the performance advantages of a new roof.

Black Bear Roofing & Exteriors
(937) 631-6548 black-bear-roofing.com
7419 Grayson Dr, Springfield, Ohio
5.0 from 135 reviews
Black Bear Roofing & Exteriors, located In Champaign county, is your trusted local roofing expert and top roofing contractor serving surrounding counties. Specializing in residential roofing, we offer comprehensive services including Roofing, storm damage repair, Window & Door Installation, Siding, Gutters and Exterior solutions. Our skilled team provides reliable solutions and services with high-quality materials and expert craftsmanship, ensuring your home exterior is both protected and visually appealing. Recognized as the best roofing company in Springfield, OH- Black Bear Roofing & Exteriors is committed to delivering exceptional service, making us your go-to for all your roofing and home exterior needs.
Dependable Roofing
(937) 323-8647 dependableroofing98.com
937 W Main St, Springfield, Ohio
4.6 from 88 reviews
We’re a local family owned company A+ rating with the BBB. Over 25 years of innovation and holding ourselves to the highest of standards. We have proven to our customers that Dependable Roofing is capable of home improvements on a level that most contractors are not capable of doing. Our goal is to build a good trusting relationship with our customers and this is one of the reasons we don't take any money upfront. Your roof is your home's main defense against the elements. Let us give you free estimate and once you feel comfortable with your choice, we'll handle the complete installation. Most residential roofs can be completed within a day. Specializing in residential and commercial roofing as well as siding, gutters and more.
Rowland Roofing
(937) 323-8948 www.rowlandroofingllc.com
3847 Malaga Cir, Springfield, Ohio
4.8 from 19 reviews
We are your local roofing contractor that has proudly served our community since 1999. Our services that we offer are roofing, siding, gutters and windows.
Double T Roofing
(937) 304-1908 doubletroofing.com
2691 Hustead Rd, Springfield, Ohio
5.0 from 11 reviews
At Double T Roofing, we help homeowners in Springfield, OH and nearby areas keep their homes safe and dry. We are a trusted roofing contractor who handles roof repairs and new roof installations with care and attention to detail. As an experienced siding contractor, we also protect the outside of your home from weather and wear. We even offer painting services to give your home a clean, finished look. With over 16 years of service, we take pride in doing every job right and treating our customers like neighbors.
Deer Roofing
(937) 536-9761 deerroofingllc.com
422 Shrine Rd, Springfield, Ohio
4.4 from 38 reviews
Deer Roofing is Springfield, Ohio's premier roofing company. We are devoted to giving you the best service! Our customers appreciate our friendliness, speed, and dependability.
Cason Roofing
(937) 324-0144 casonroofing.com
410 Power St, Springfield, Ohio
4.6 from 14 reviews
Family-owned and operated since 1963, Cason Roofing provides trusted commercial & residential roofing. We specialize in repairs, replacements, restorations, cleanings and gutter/siding repairs — keeping the rain out for over 60 years.
Roof Dog
(937) 964-8948 www.roofdogspringfield.com
6037 Willow Dale Rd, Springfield, Ohio
3.9 from 28 reviews
We offer 50 years warranty on Shingles and 40 years on METALWith over 20 years of experience, Roof Dog has been serving our customers with honesty and integrity through unmatched roofing construction. Our team is committed to providing high-quality roofing solutions for both residential and commercial properties. With years of experience in the industry, we have earned a reputation for delivering reliable services and exceptional customer satisfaction.

Truitt Roofing
(937) 322-8439 truittroofs.com
929 N Limestone St, Springfield, Ohio
4.4 from 11 reviews
Roofing, siding and window contractor.

All About Roofing of Ohio
Springfield, Ohio
4.3 from 6 reviews
Combining years of experience with a dedication to client satisfaction, All About Roofing Of Ohio has established itself as the local leader in Residential Roofing, Residential Flat Roofs and Slate Roofing.
Clark County Roofing & Gutters
1405 Perry St, Springfield, Ohio
5.0 from 2 reviews
We offer a full service or roofing & gutter solutions. Including all types of gutter and gutter guard options. We sell directly to public cutting out any middlemen and huge mark ups. We offer 5 inch Gutter-6 inch Gutter-Downspouts-Siding-Soffit-Fascia-Roofing-Gutter Guard. We do not sub contract out our work we provide true craftsman to do our work. Our crews are trained to give the best service & in a timely manner. We value our relationship with our customers and we promise to provide you the best product for a fair price. We promise to use quality workmanship and to do the job correctly the first time. This will include proper communication during your project with a professionalism at the job site.
Lance Roofing & Siding
(937) 864-2722 www.lanceroofing.com
Serving
4.2 from 70 reviews
At Lance Roofing & Siding we offer a wide variety of choices for your residential or commercial roofing, siding or gutter installation needs. We have been serving the Miami Valley ~ Southwest Ohio for 32 years. From the moment we receive your call for a free estimate, you and your project are placed in professional, caring hands. Our experienced estimators will thoroughly examine your home or business.
BCS Roofing & Solar
Serving
5.0 from 86 reviews
Since 2014, BCS Roofing & Solar has been the top pick for homeowners in and around Dayton, OH for high-quality roofing services and solutions, in addition to other exterior work such as siding and gutters. As our company continues to grow, our focus and efforts to provide the very best personalized attention to clients and the community as a whole remains the same. Everything BCS Roofing & Solar does goes towards making a positive change in the community. This is our main driving force, and what we will always strive for. Get started with a FREE, no-obligation estimate and inspection today!
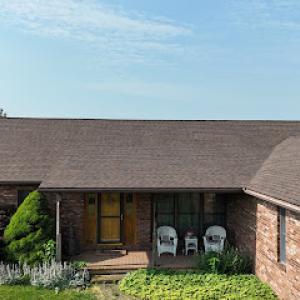
Asphalt shingles remain the dominant choice for Springfield homeowners because they fit the area's large volume of standard residential re-roof projects and are widely used on pitched homes. The practical advantage is straightforward: a familiar installation process, quick curb appeal, and predictable performance through typical freeze-thaw cycles. In this climate, look for shingles with good granule adhesion and a sturdy nail line to resist wind uplift and moisture intrusion during spring storms. Maintenance focus should be on flashing around chimneys, vents, and skylights, since those details often determine whether a roof holds up through repeated freeze-thaw stress. When selecting a shingle profile, a mid-range architectural option tends to balance curb appeal with durable performance under the seasonal moisture swings common to the region.
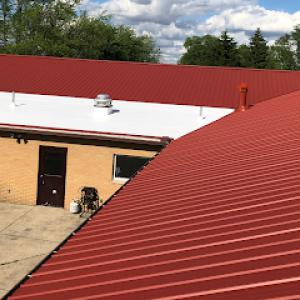
Metal roofing is relevant for homeowners seeking better shedding of rain and snow, but installation quality matters in a climate with thermal movement and seasonal moisture. In Springfield, metal panels or shingles can outperform traditional options in terms of longevity and wind resistance, especially on steeper pitches where fastener openings endure more seasonal movement. Look for metal with a finished coating designed to resist hail and oxidation, and ensure the system includes a robust underlayment and proper attic ventilation to relieve condensation risk during rapid temperature shifts. A skilled installer should address thermal expansion gaps and panel alignment carefully, since improper fit can lead to leaks after heavy spring storms or during rapid freeze-thaw transitions.
Tile products-clay or concrete-offer strong resilience against heavy rain and can deliver long service lives when properly supported. They are heavier, so structure and retrofits require careful assessment for weight load and roof deck condition. Tile can excel in energy efficiency and distinct curb appeal, but the weight and wind-driven debris risk in stormier springs should be weighed against the existing roof framing. Wood shingles and shakes provide a warm aesthetic and good insulation, yet they demand regular maintenance to prevent decay in wet springs and freeze-thaw cycles. Synthetic or composite shingles present a middle ground, combining relief from moisture concerns with easier maintenance and lighter weight; they are commonly chosen when a balance of storm resilience, installation ease, and budget considerations matter most.
In all cases, the overarching goal is to harmonize material performance with the typical re-roof patterns observed in this area. Your choice should align with how a given product tolerates Springfield's spring storms and repeated freeze-thaw timing, while respecting the way pitched homes in the neighborhood are most frequently upgraded.
Provided local cost ranges run about $350-$550 per square for asphalt shingles, $700-$1100 for metal, $1000-$1800 for clay tile, $900-$1500 for concrete tile, $500-$900 for wood shingles or shakes, and $450-$850 for synthetic or composite shingles. Those figures are typical for Springfield's housing stock, where pitched roofs and mixed tile or shingle surfaces show up after winter and early spring wind events. When the project is a straightforward layover-eligible replacement, costs tend to sit toward the lower end of those ranges, especially if the roof deck is solid and ventilation is already adequate. If a full tear-off is needed with added ventilation work and inspection-ready nailing details, expect the higher end and possible minor fluctuations based on roof complexity.
In Springfield, storm-driven demand spikes can push scheduling and pricing pressure after hail or wind events, especially for fast residential re-roof work. If a storm hits and multiple crews are tied up, bids can swing upward, and timelines compress quickly. If your roof is due for replacement but not critical to stay off a storm-facing wall, consider targeting a window after the immediate fallout passes and crews are deconflicted. When storms are active, price discipline matters: confirm material type, square count, and whether a layover is truly eligible for your roof structure. Prepare for variability in color availability and lead times on clay and concrete tiles, which can ripple into scheduling and total project duration.
Costs can also shift based on whether the project is a straightforward layover-eligible style replacement versus a full tear-off with ventilation corrections and inspection-ready nailing details expected by the city. A layover can save on removal and disposal, but it may limit options for attic ventilation improvements or deck repairs discovered during replacement. A full tear-off adds removal labor, disposal fees, deck repairs if needed, and a meticulous nailing pattern to satisfy older decking. If the house has mixed roof pitches or skylights, expect incremental adjustments to both price and schedule, since access and detailing become more time-intensive in a Springfield neighborhood with varied roof angles.
In this area, a full re-roof typically requires a building permit issued by the City of Springfield Building Department. The permit process is straightforward for standard re-roofs and is designed to keep track of work that affects the roof deck, ventilation, and overall structural integrity. The building official will want to see basic project details, including roof area, venting plan, and any changes to attic insulation or ventilation. Your contractor should initiate the permit, but it's wise to verify that the permit is pulled before materials arrive on site to avoid delays.
Local inspections are generally scheduled after the roof installation is complete, not during. Inspectors verify that installation details are correct, with particular attention to ventilation adequacy, nailing pattern, and the alignment of flashing around chimneys, vents, and valleys. The aim is to confirm that the roof layers are properly secured against Springfield's spring wind loads and freeze-thaw cycles. If attic ventilation was altered or added, expect the inspector to review intake and exhaust balance to prevent moisture buildup. Once the visit passes, the permit is closed and the project is officially complete in the eyes of the city.
For standard re-roofs, the process is usually straightforward: existing deck remains in place, underlayment is upgraded if needed, and new shingles or other roofing materials are installed to match or improve the current performance. Structural changes-such as raising the roof line, adding dormers, or modifying trusses-can trigger additional review complexity. In those cases, expect a more detailed plan review and potentially extra inspections before and after work. If there are signs of structural damage discovered during removal, address those findings promptly, since they can impact permit scope and timing.
Spring storm activity and freeze-thaw timing influence scheduling in this area. Projects should aim to avoid peak wet seasons when possible, and work should proceed only when a solid temperature range is maintained to ensure shingle adhesion and proper sealant performance. If a storm drives water intrusion or hidden damage, the contractor may need to adjust the timeline and communicate any revised inspection dates to the Building Department. Early coordination with the permit office helps align weather windows with the required inspection steps, reducing lag between completion and final approval.
Spring storms can leave a surprising amount of wear on pitched roofs, especially after a harsh winter with repeated freeze-thaw cycles. In this market, the occasional hail strike or strong gust can create hidden damage that only shows up after warmer days or additional storms. Springfield and the broader Ohio market see weather-driven roofing claim activity with periodic spikes after severe storms. Knowing that pattern helps you prepare for the next claim window and avoid surprises when the adjuster arrives. Spring thaw and spring storms influence when a full replacement becomes practical, since crews can access roofs more safely during those windows.
Carriers commonly want photo documentation, a clear scope of work, and may send adjusters to verify both storm damage and completed repairs in this market. Before you call your insurer, take clear photos from multiple angles, focusing on shingles edges, flashing, and gutters. Note visible granule loss, curling, or lifting, and keep a record of any interior signs such as attic leaks. A written scope of work that lists materials, labor, and a realistic timeline can reduce back-and-forth and speed up decisions. If you have contractor estimates, organize them with dates and contact information so the adjuster can review them without delay. Keep a dated log of communications and digital copies of estimates so nothing slips through.
Severe weather periods are followed by busy claims seasons, which can stretch response times. While coverage remains generally available in Ohio, severe weather periods can still affect premiums and make thorough documentation more important for Springfield homeowners. When the adjuster visits, be ready with access to the attic and to the damaged areas. If you're unsure what counts as storm damage versus wear from years of service, a trusted local roofer can help you distinguish between immediate repairs and longer-term replacement needs. Understanding local timing helps you plan around busy contractor schedules and avoid delays.
Connect with contractors who help homeowners navigate the claims process from damage assessment to final approval.
Black Bear Roofing & Exteriors
(937) 631-6548 black-bear-roofing.com
7419 Grayson Dr, Springfield, Ohio
5.0 from 135 reviews
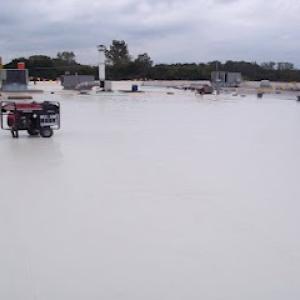
In this market, flat-roof specialization is present but secondary to the city's larger pitched residential re-roof segment. Homeowners with low-slope surfaces typically encounter a mix of crews, warranties, and aftercare offerings, so the choice of contractor matters just as much as the material itself. Springfield's climate amplifies a flat roof's vulnerability, making proper drainage, membrane selection, and edge detailing crucial for long-term performance.
Low-slope roofs here endure repeated freeze-thaw cycles that can stress seams, fasteners, and flashing. Standing water is more than an annoyance on a flat surface; it accelerates membrane wear and can lead to micro-tears that invite leaks during the next freeze. A reliable drainage plan with correctly pitched transitions toward scuppers or internal drains reduces ponding risk. Pay attention to edge metal, parapets, and counter-flashing, since those joints bear the brunt of winter moisture and thaw-related movement. In practice, you'll want a membrane system that handles freeze-thaw movement well and a surface coating that resists algae and UV degradation common to the region.
Because the city emphasizes proper installation and ventilation on completed work, low-slope projects with transitions and penetrations deserve extra scrutiny locally. Every pipe, vent, curb, and HVAC curb must integrate with the membrane seamlessly, without abrupt changes that invite hail-damaged punctures or seam separations. Ventilation details should avoid trapping moisture in roof decks, which can worsen rot and reduce insulation efficiency over time. When discussing warranties, verify that the membrane is rated for UV exposure and for the expected number of freeze-thaw cycles in Springfield, and confirm inspection checklists cover slope, drainage, and edge details. A well-dressed job on a low-slope roof keeps moisture out and the interior comfortable through the changing seasons.
Find specialists in TPO, EPDM, and built-up flat roofing systems for residential and commercial properties.

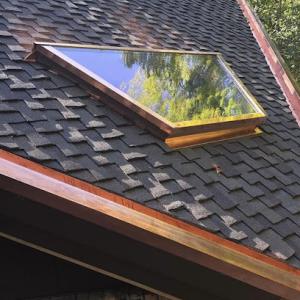
In Springfield, the freeze-thaw pattern over years pushes moisture around roof penetrations harder than a simple field-shingle check would suggest. Flashing around skylights and chimneys faces repeated cycles of expansion and contraction, which can loosen fasteners, bend metal, and open micro-gaps that let water migrate inward even when shingles look intact from the ground. Over time, tiny leaks tend to show up first along the edges of flashing rather than in the broad field, so a close-up assessment of those edges matters more than a casual eyeball inspection.
Local contractor signals underscore that chimney-related roofing work is a common homeowner need. Penetration flashing around a chimney endures heavier stress than most other roof details because of joint movement with the masonry and mortar's own deterioration. If counter-flashing pulls away or step-flashing loses its seal, water can travel down into the attic and find its way through small breaches. Mismatched or aged chimney cricket details also contribute to perched water and ice dam formation near the top of the roof line, amplifying long-term damage.
Skylight flashing sits in a narrower specialty than full storm repair, yet leaks near skylights are a frequent trouble spot after heavy rains and freeze events. The curb, flashing, sealant around the frame, and fasteners deserve careful attention, because failures here can mimic roof-wide leakage while remaining localized. When a skylight shows evidence of moisture, addressing the flashing integrity promptly reduces downstream damage to insulation and ceiling materials.
After major storms or a sudden temperature swing, inspect the attic for damp spots near penetrations and look for staining along chimney flashing and skylight perimeters. If budding leaks appear, engage a roofing professional who specializes in penetrations and flashing, not just shingles. Prioritize timely attention to chimney and skylight details, and plan for a targeted flashing evaluation even if the main roof seems sound.
Find contractors experienced in skylight installation, flashing, and leak repairs to bring natural light into your home.

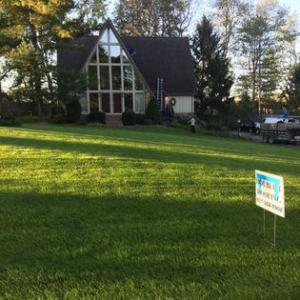
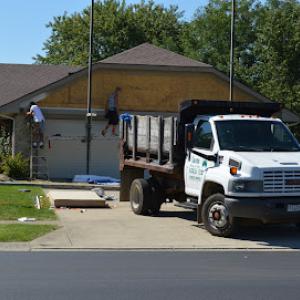
Springfield homeowners appear to hire primarily for residential re-roofing, with affordability and quick response standing out strongly in the local market. In practice, that means you'll notice many small to mid-sized crews offering short lead times and clear, straightforward scheduling. When you call around, ask for a realistic start window and a concrete completion timeline tied to the weather window between freezes and spring storms. A contractor who can commit to a firm schedule and respectful access to the driveway often makes the difference between repeated delays and a solid, single-visit re-roof.
Cleanup is a meaningful local hiring factor, suggesting homeowners here care about jobsite control and post-project condition as much as the roof system itself. Look for crews that mention daily site cleanup, magnetic sweeps for nails, and a clear post-project debris plan. In neighborhoods with mature trees and spring debris, the ability to contain shingles, nails, and scraps prevents later damage to landscaping and gutters. A tidy crew also tends to protect your siding and mulch beds, reducing the chance of accidental damage during installation.
The market also shows a notable presence of long-established firms, indicating that tenure and local track record matter in decision-making. In practice, that translates to reliability when weather shifts from late-wall freeze-thaw cycles to sudden spring storms. Prefer companies with multi-decade local roots, customer references in nearby blocks, and a documented history of successful re-roofs in cul-de-sacs and tight driveways. A veteran Springfield contractor often brings experience with the exact mix of local attic ventilation, roofing products, and rapid storm-response that reduces downtime and protects your interior during spring deluges.