Last updated: Apr 19, 2026
Kelso's chronic dampness from the lower Cowlitz Valley means roofs sit in moisture longer than in drier towns. Shaded sections stay damp, which invites moss, algae, and rot to take hold even on surfaces that look sound. When inspecting or planning repairs, treat moss growth as a moisture indicator rather than a cosmetic issue. If you can't eliminate shade, you still must manage moisture through underlayment, ventilation, and timely debris removal. Pay particular attention to eaves and overhangs where dripping water and persistent shade create a moist microclimate. In practice, that means more frequent cleaning of gutters and valleys, especially after the wet season begins, and a readiness to address any soft spots or lifted shingles caused by moss's moisture-holding capacity.
Moss thrives on the cool, damp weather that dominates Kelso's year. On shaded roof faces, moss can trap more moisture against the decking, accelerating wear and reducing attic ventilation effectiveness. Plan moss control as part of the annual maintenance routine rather than a one-off treatment. Light, regular brushing of lightly mossed areas is safer than aggressive scraping, which can dislodge granules or damage shingles. Consider copper or zinc strips as a long-term preventative measure on the ridgeline if moss regrowth is persistent; these options work with minimal alteration to the roof while addressing the root issue-continuous moisture exposure. When choosing coatings or cleaners, prioritize products labeled for damp climates and compatible with the roofing material you've installed. Always follow manufacturer guidelines to avoid voiding warranties in a damp environment.
Attic airflow stands out as a cornerstone of Kelso roofing strategy. In a climate where rain can appear in any season, ventilation isn't just comfort for the attic-it's a critical moisture-control tool. Ensure a balanced system with soffit and ridge or gable vents that work in concert to pull moisture-laden air out of the attic before it condenses on the underside of the roof deck. If a roof replacement or major repair is planned, verify that the planned underlayment and venting scheme aligns with the need for continuous, unobstructed airflow. In practice, this means checking that attic vents are unobstructed by insulation or new framing, and confirming that ridge vents run the full length of the peak where feasible. If soffit vents are blocked by existing insulation, consider upgrading to a vented baffle system to maintain a clear air path from soffit to ridge.
The underlayment you choose should be rated for sustained moisture exposure and compatible with the chosen roofing material. In Kelso's environment, a peel-and-stick or self-adhering underlayment can provide an extra rain barrier during tear-off and replacement work, even if those projects begin in relatively dry windows. Pay attention to the underlayment's breathability; a good balance between waterproofing and vapor permeability helps prevent condensation buildup beneath the shingles. If moss pressure is high or shade is heavy, consider underlayments with enhanced moisture resistance and seamless coverage across penetrations, valleys, and skylights. Proper installation details-tight seams, careful flashing at chimneys and vents, and continuous coverage over rakes and eaves-are essential to keeping humidity from migrating into the roof deck.
Because rain can occur in every season, even replacement work scheduled for drier months must be planned around sudden moisture exposure during tear-off. Prepare for unexpected rain by staging materials in a dry area, using tarps strategically, and maintaining a rapid, airtight seal on any opened areas when weather changes. The goal is to minimize exposed roof decking during active work and expedite re-covering with new underlayment and shingles once the crew confirms the deck is dry enough to proceed. Establish a contingency plan with the crew for delays caused by rainfall, focusing on maintaining ventilation and protecting the interior from moisture intrusion during a wet spell. A well-coordinated schedule helps keep moisture risk low without sacrificing the necessary pace of a proper replacement.
In this climate, keeping a roof healthy isn't a one-time effort. It's a sustained practice of moss monitoring, vent integrity checks, and proactive moisture control. Regular inspections after heavy rains or windy periods help catch problems before they escalate. Treat any signs of decking softness, lifting shingles, or granule loss as a signal to pause and reassess the ventilation and underlayment setup. With persistent moisture and shade as constants, Kelso roofs benefit most from a plan that treats ventilation, moss management, and moisture barriers as interdependent elements of a durable, long-lasting roof.
Winter storms and heavy rain are a primary local project risk and can both damage roofs and delay active roofing jobs in Kelso. The combination of persistent moisture, moss-prone shade, and wind-driven downpours means weak spots show up quickly after a storm, and otherwise solid roofs can leak if ventilation and drainage aren't up to snuff. When storms roll in with strong gusts, thin spots, missing flashing, or clogged gutters become problem points in a matter of hours. Homeowners should recognize that moisture control isn't just a seasonal concern here-it's a year-round priority, and a single storm can expose vulnerabilities that linger if left unchecked.
The moment you notice a drip or damp ceiling, treat it as an urgent signal. Restrict access to the affected area to prevent further water intrusion and potential slip hazards in slick, mossy surroundings. Place a sturdy, waterproof container under the leak, and use towels or a mop to manage standing water until a professional arrives. If you can safely reach the roof, clear shallow debris and moss from nearby areas away from the active spill line, but do not climb onto the roof during a storm or on wet, slippery surfaces. Document the scene with photos from ground level and, if possible, from attic spaces showing daylight gaps around flashing or roof penetrations. Time and details matter later in insurance reviews.
The local contractor market shows strong prevalence of emergency repair and quick-response service, matching homeowner demand when wind-driven rain exposes weak spots. Seek a contractor who can respond within hours, not days, and who prioritizes weatherproofing measures that hold through the next rain event. A fast-response crew will focus on temporary tarping, securing loose flashing, sealing gaps, and prioritizing ventilation to reduce condensation buildup. In Kelso, reputations hinge on speed and durability under damp conditions, so align with teams that communicate clearly about what they can and cannot guarantee in the first wave of fixes.
Roof claims are common locally after storms and high winds, so homeowners often need immediate leak control plus documentation for later insurance review. Start a dated log of every action taken: timestamps of leaks observed, steps implemented, materials used for temporary fixes, and the weather conditions at the time. Save all photos and note any structural concerns such as sagging eaves, compromised underlayment, or exposed nails. Provide this record to your insurer when initiating a claim and share updates as repairs progress. A clear, continuous record helps avoid delays and supports a smoother review process once the storm season subsides.
When you can't wait, these contractors offer fast response times to stop leaks and prevent further damage.
All Weather Construction & Roofing
(360) 270-4394 www.awcroofing.net
301 Long Ave, Kelso, Washington
4.8 from 34 reviews


Taurus Roofing
(360) 200-2030 www.thebullroofing.com
1310 Elm Pl, Kelso, Washington
5.0 from 37 reviews
Taurus Roofing is located in Kelso, WA but we provide roofing services in Cowlitz, Clark and Lewis County. We also serve the greater Bend Oregon area including Redmond, Prineville, La Pine, Sisters and Madras areas. We offer free estimates and a 50 year warranty on all of our new roofs installed with Malarkey Roofing Products.
All Weather Construction & Roofing
(360) 270-4394 www.awcroofing.net
301 Long Ave, Kelso, Washington
4.8 from 34 reviews
Roofing contractor General contractor

All Top Roofing
(360) 425-5510 www.alltoproofingnw.com
Kelso, Washington
4.6 from 21 reviews
All Top Roofing is an owner-operated roofing company dedicated to serving the community since 2002. As a licensed, full-service roofing company, we strive to ensure every project, large or small is handled with the utmost integrity. Owner, Willie Lucier, and our experienced roofing crews provide the level of service, craftsmanship and professionalism that our customers expect. We are proud residents of this community and understand the importance of giving back. One of the ways we do this is by providing re-roofing projects at affordable costs to churches and charitable organizations.
Safecover Roofing
(360) 916-1430 safecoverroofing.com
Serving
5.0 from 114 reviews
Safecover Roofing serves Longview, Kelso, Kalama, Castle Rock, and Cowlitz County. We handle roof replacement, repair, and inspection for residential and commercial properties — asphalt shingle, metal, TPO, and flat roofing systems. Washington-licensed and bonded with over 20 years of experience. Free inspections with written assessments. No pressure, no gimmicks — just straight answers and quality work.

The Roof Doctor
(360) 727-1446 www.theroofdoctor.com
Serving
4.8 from 88 reviews
Since 1959, The Roof Doctor has been Western Washington's trusted family-owned provider of comprehensive roofing and home improvement services. Specializing in new roofing, re-roofing, repairs, cleaning, and 24/7 emergency services, they ensure homes and businesses remain protected and visually appealing. Beyond roofing, The Roof Doctor offers solar panel installations and various home improvement services, including decks, siding, windows, and doors, enhancing both energy efficiency and property value. With over 60 years of experience, highly trained crews, and a commitment to unparalleled customer service, The Roof Doctor delivers prompt, reliable, and quality craftsmanship tailored to each client's needs.

Weatherguard Inc. | Residential, Commercial, & Industrial Roofing Solutions
(360) 577-7200 www.weatherguardinc.net
Serving
4.5 from 106 reviews
Weatherguard is a local trusted roofing expert, providing high-quality residential and commercial roofing services across Washington, Oregon, Idaho, and Alaska. From new roof installations to repairs and maintenance, we deliver durable, weather-resistant solutions to protect homes and businesses. Whether you need a reliable roofing contractor for your home, or a commercial roofing specialist in the Pacific Northwest, we’ve got you covered. Contact us today for a free estimate!

Black Bear Home Exteriors
(360) 762-4455 www.blackbearexteriors.com
Serving
5.0 from 12 reviews
Your Home, Our Passion! At Black Bear Home Exteriors, we are a family-based home improvement company specializing in roofing, siding, windows, and decks. We provide expert roof installation, replacement, repair, maintenance, inspections (including insurance inspections), and emergency roofing services, backed by trusted GAF warranties. Our team also offers gutter installation, siding repair, window and door upgrades, painting, carpentry, and commercial roofing solutions. Serving Longview, Kelso, Castle Rock, Woodland, Ridgefield, and surrounding WA areas, we deliver quality products, competitive prices, and pride in every project.
VC Contractor
(360) 998-7256 vccontractorllc.com
Serving
4.6 from 13 reviews
VC Contractor is a professional roofing repair in Longview, WA. We provide residential roofing repair, roofing replacement, roofing maintenance and cleaning. We’re based in Longview, Washington but serve Kelso, Castle Rock, Chehalis, Centralia, Kalama, Woodland, and Ridgefield, WA. With over 10+ years of experience in the Pacific Northwest, we are familiar with the common roofing issues that occur in our rainy climate. That is why we offer a wide assortment of roof services to protect your home from damage. We offer a 10-year warranty on roofing installations. If you have any questions or comments, please contact us. We provide free roofing estimates for your convenience.
Salas Roofing
Serving
5.0 from 4 reviews
We provide roofing services that include cleaning, installation, repairs, and even new roof construct needs. I have 12 years of experience and am willing to make house calls to look at the roof work that needs done. All estimates and bids are free. We are insured and bonded with all the proper licenses. License # SALASR*800OH

Pacific Performance
Serving
5.0 from 3 reviews
Pacific Performance INC has been providing services from North WA to South WA, for years. We're a family-owned business. We're looking forward to tackling your next project.
Brush Prairie Roofing
(360) 723-1144 brushprairieroofingllc.com
Serving
5.0 from 24 reviews
Our mission at Brush Prairie Roofing is to provide quality roofing services to our customers. We are a family-owned business that’s dedicated, reliable, trustworthy and most importantly knowledgeable about the products that we use.

A&B Roofing
(360) 936-4976 www.abroofingllc.net
Serving
5.0 from 14 reviews
A&B Roofing: Your trusted roofing experts in Woodland, WA. We provide top-notch roofing services dedicated to protecting your home or business with quality and care. Serving the Woodland area, we're committed to delivering exceptional workmanship and reliable solutions for all your roofing needs.
Kelso sits in a persistently damp valley corridor where repeated wetting and wind-driven storms shape every roofing decision. The priority here is moisture control, moss resistance, and reliable ventilation, with heat resistance playing a lesser role than in drier markets. A roof that dries quickly after rain, sheds moisture efficiently, and minimizes canopy shade to deter moss growth will outperform in the long run. Look for systems that pair a tight, well-sealed underlayment with durable surface materials that tolerate ongoing wetting without degrading.
In this market, asphalt shingles and metal roofing stand out as the practical backbone. Asphalt shingles are familiar to most homes and integrate well with standard flashing details and attic ventilation setups. When choosing asphalt, emphasize architectural or three-tab profiles with good granule retention and wear resistance. Darker tones can trap heat locally, so pairing with a thoughtful ventilation plan and ridge or soffit vents helps keep attic temperatures balanced and reduces condensation risk. Metal roofing, meanwhile, offers excellent shedding of rain and resilience against wind, which is valuable in stormier periods. Metal panels or standing-seam configurations should be installed with careful sealant detailing at hips, ridges, and penetrations to prevent leaks during heavy spring rains and fall gusts. In both cases, ensure a continuous moisture barrier and proper soffit-to-ridge ventilation to keep the roof deck dry and to minimize moss-favorable dampness in shaded areas.
Clay tile and slate can be visually appealing and long-lasting, but they demand a careful fit in this climate. Both materials rely on a robust substrate and precise underlayment to prevent moisture infiltration at fasteners and overlaps. In Kelso's rain-prone environment, tile and slate perform best when the roof is designed around a solid, slip-resistant underlayment and a solid deck, plus meticulous flashing around chimneys and vents. These materials are heavier and sometimes less forgiving for reroofing projects on aging homes with limited attic ventilation or marginal roof framing. If choosing clay tile or slate, plan for premium installation details and a stronger emphasis on roof ventilation and moisture management to avoid recurring repairs.
Synthetic or composite shingles and fiber cement shingles offer a mid-range path that blends durable performance with design flexibility. These materials resist moisture intrusion and can be shaped to mimic other appearances while often featuring built-in moisture resistance and low maintenance. For homeowners seeking a distinct look-without sacrificing moisture control-these options can be appealing, especially when paired with a well-ventilated roof assembly and a high-quality underlayment. Ensure compatibility with standard flashing components and confirm that the chosen product has proven performance in wet, moss-prone environments. Proper installation of fasteners, sealant around penetrations, and a ventilated eave-to-ridge system will help these materials hold up under Kelso's wet, shade-heavy conditions.
Across all material choices, moss resistance hinges on moisture management and airflow. Prioritize roof designs that reduce long dry-out periods but minimize persistent moisture on the deck. Install continuous venting at eaves and along the ridge, and consider moisture-mensing roof vents or fans in particularly shaded zones. Regular inspections after wet seasons, plus timely moss remediation, will preserve the roof's integrity and keep the chosen material performing as intended. Align underlayment and drip edge details with this moisture-forward approach, and choose fasteners and sealants that resist staining and corrosion in damp air.
Explore specialists in steel, aluminum, and standing seam metal roofs built to last 50 years or more.

Weatherguard Inc. | Residential, Commercial, & Industrial Roofing Solutions
(360) 577-7200 www.weatherguardinc.net
Serving
4.5 from 106 reviews
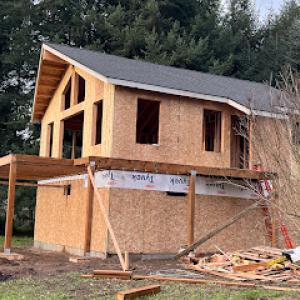
In this part of the year, roofing projects rarely follow a straight path. The dry season is not reliably dry, and rain can interrupt crews even on what looks like a window of clear weather. That means planning for a re-roof needs a built-in cushion for unexpected showers. The neighborhood roofs in the lower Cowlitz Valley are already challenged by shade and moss, so moisture control has to stay front and center from day one. Expect schedules to slip when a front rolls in or a cold front-driven system lingers, and build those contingencies into the timeline so a late week push for dry-in doesn't crash when a weekend storm moves through.
Spring brings its usual wetness, and that raises the stakes if underlayment is left exposed for too long. A prolonged start delay can leave vulnerable decking unprotected and invite moss, mold, or wood rot to gain a foothold during the staging period. To counter this, prioritize a tight sequence: rapid tear-off, swift inspection, and immediate underlayment installation with temporary weather protection if the forecast shows a rain chance. Dry-in speed is not a luxury here; it's a safety measure against moisture seeping into places that don't forgive mistakes.
Winter storm peaks can stall tear-off work, push back inspections, and stretch the finish timeline well beyond the initial plan. Wind-driven rains, freezing nights, and the occasional ice buildup complicate access and material handling. When such conditions loom, insist on a staged approach that accommodates longer weather windows and required setbacks. If a mid-project lull occurs, it's better to pause and reassess rather than push through with compromised waterproofing or rushed detailing.
Coordinate early with the crew to identify the narrowest plausible dry windows, then reserve a backup plan for an additional rain day. Prioritize areas that shed water poorly and are most moss-prone first, so you don't spend valuable dry hours fighting lingering damp in critical joints. Keep pathways clear for quick staging, and verify that protective coverings, temporary tarps, and fasteners are ready before the first cut. In Kelso, patience with the weather isn't a luxury-it's a measurable factor that protects the long-term performance of a re-roof.
When you shop for roofing in this area, the typical per-square (one roofing square equals 100 square feet) costs you'll encounter in Kelso cluster around these ranges: asphalt shingles 350 to 700, metal 650 to 1100, clay tile 900 to 1700, synthetic/composite 500 to 900, slate 1000 to 1800, and fiber cement 400 to 800. Those numbers reflect common local stock and the way crews price in labor, disposal, and matching existing profiles on aging homes. If a roof is steep, tall, or has awkward access, expect the higher end of the range. Reroofing with younger, smoother decks can stay closer to the lower end, but moisture-specific setups tend to tilt costs up rather than down.
In this year-round wet climate, weather can push labor time out by days or weeks, especially during the shoulder seasons when mist and drizzle linger. In Kelso, rain can interrupt reroofing at almost any time of year, and that downtime translates directly into higher overall costs. If a crew has to pause for rain or install extra dry-in protection to avoid moisture intrusion, you'll see premium charges for time and materials. Plan for contingencies in your budget and schedule, particularly if you're choosing more expensive materials that require longer installation windows or specialized moisture-control steps.
An older roof that is lacking venting or moisture-control upgrades often requires extra scope during reroofing. Costs rise when the project must include enhanced underlayment, upgraded ventilation, or moisture barriers to prevent moss growth and condensation in the valley and eaves. Permit-driven expectations can also nudge scope up if new underlayment or venting needs to be added to meet local expectations. In practice, a roof replacement that prioritizes moisture management will use better underlayment and add vents or ridge health checks, which tightens the budget but pays off in fewer leaks and longer roof life.
Get a clear picture of your project costs upfront - no commitment required.

Taurus Roofing
(360) 200-2030 www.thebullroofing.com
1310 Elm Pl, Kelso, Washington
5.0 from 37 reviews
Weatherguard Inc. | Residential, Commercial, & Industrial Roofing Solutions
(360) 577-7200 www.weatherguardinc.net
Serving
4.5 from 106 reviews

A full reroof in Kelso typically requires a permit reviewed by the City of Kelso building department. The process is designed to ensure ventilation, underlayment, and flashing details meet local standards for moisture control and wind-driven storm resilience. Before any shingles are removed, submission materials should be ready to show not just the finish roof, but the full system that will be installed. That means the plan needs to spell out the underlayment type, deck ventilation strategy, and any attic or roof venting changes. The goal is to prove that the roof will handle Kelso's year-round dampness, moss pressure, and wind events without compromising structure or indoor air quality.
In Kelso, permit submittals generally need to show the proposed underlayment and ventilation, not just the finish roofing material. Include details on underlayment vapor barriers, fastener patterns for the chosen roof system, and inspector-approved vent placement. If a roof is partially vented or if a new venting plan is proposed, provide calculations or manufacturer guidance that demonstrates adequate intake and exhaust flow. Shade-prone, moss-friendly environments benefit from a ventilation strategy that moves moisture out of the attic space rather than trapping it. Include roof-to-wall flashing details, drip edge, and any required insulation considerations near eaves and rake edges. Clear, labeled diagrams help the reviewer verify that the plan will perform under Kelso's typical rain patterns and wind exposure.
Inspections are staged locally, with a rough inspection during roof removal and a final inspection after installation, and the department enforces wind uplift and venting requirements. The rough inspection is your opportunity to confirm deck integrity, ventilation openings, and the continuity of underlayment and flashing as the old roof is removed. The final inspection verifies that the finished roof, shingles or other covering, and all connections meet code, including wind uplift resistance and venting performance. Expect inspectors to check for proper valley and chimney flashing, ridge vent compatibility, and correct installation of eave-to-ridge ventilation pathways. Planning ahead for these checks reduces surprises and keeps the project on a steady schedule during Kelso's wet seasons.
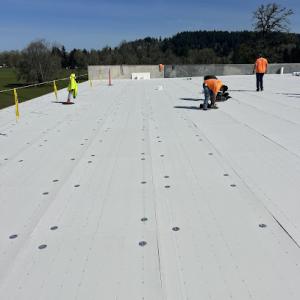
Find specialists in TPO, EPDM, and built-up flat roofing systems for residential and commercial properties.
All Weather Construction & Roofing
(360) 270-4394 www.awcroofing.net
301 Long Ave, Kelso, Washington
4.8 from 34 reviews
Weatherguard Inc. | Residential, Commercial, & Industrial Roofing Solutions
(360) 577-7200 www.weatherguardinc.net
Serving
4.5 from 106 reviews
Kelso experiences frequent wind and rain events that trigger insurer involvement after roof damage. The pattern in this market is that storm-driven damage is often scrutinized for pre-existing conditions and prior moisture intrusion. Insurance adjusters expect clear evidence that new damage resulted from the recent storm and not from ongoing wear. Having a documented trail helps support a timely, fair settlement.
Insurers serving homeowners here often want proof that damage was not pre-existing. Before-and-after photos, dated invoices, and a consistent narrative of conditions are especially important in Kelso claims. When a storm claim is filed, the timeline should show the weather event, the onset of leaks or visible damage, and the first professional assessment. Photos should capture exterior roof conditions after the storm, gutters and flashings, and any interior signs of moisture.
A practical approach is to assemble a storm-damage packet that can move with your claim. Take high-resolution photos from multiple angles before cleanup or repairs begin, then again after initial assessments. Keep invoices from any temporary tarping, moisture cleanup, or drainage work, with dates clearly visible. If possible, obtain a written note from the contractor describing observed storm-related indicators-damage at flashings, shingle uplift, or vent pipe issues-and link each item to the corresponding photo. Document any recent maintenance that could be misinterpreted as pre-existing, so adjusters can distinguish neglect from timely storm response.
Because leak response and claim review often overlap locally, you benefit from contractors who can document storm-related conditions clearly for adjusters. Ask for a written warranty-style statement that ties the observed roof conditions to the storm event, including the date of the storm and the specific deficiencies found. Establish a simple file that pairs each photo with a short caption and the contractor's assessment. This organized approach helps the adjuster see the cause-and-effect sequence quickly and reduces back-and-forth during review.
After a storm, prevent further damage with tarps or temporary coverings as recommended, while preserving the first-claim condition. Photograph the exposed roof and any interior moisture promptly. Notify the insurer with a concise incident description, then hand off the storm-damage packet as the claim progresses. If leaks persist, request a rapid on-site assessment and ensure the contractor's documentation clearly references storm-related findings to support the claim.
Connect with contractors who help homeowners navigate the claims process from damage assessment to final approval.
In Kelso, the contractor mix leans heavily toward reroofing rather than niche specialty work, so you will want crews with solid residential reroof experience and a track record in weather-prone yards. Look for references from nearby homes with similar roof lines and shading, and ask about how they handled moisture and attic ventilation during past projects. A locally familiar crew will understand how the persistent rain dampens crews, slows material delivery, and affects tear-off timetables. Ask about moisture management strategies, such as underlayment choices, ventilation retrofits, moss control plans, and how crews handle ladders and damp facades.
Quick response matters because active leaks and weather interruptions can leave a roof vulnerable in a hurry. Prioritize contractors who will respond within a business day to bid requests and who provide a clear plan for storm-ready protection. During the project, insist on daily or end-of-day cleanup and containment to limit moss spread and debris in rain gutters. Good cleanup is as telling as neat work at corners and penetrations. Also confirm how they protect landscaping during tear-off, and whether they schedule weather windows to minimize delays.
Licensed and long-established or family-owned firms stand out in this market, reflecting homeowner preference for accountable local reroofing crews. Verify they carry current licenses and general liability coverage, and ask for a point of contact who will be available during the project. Read recent customer notes about project management, response to weather delays, and warranty handling. Ask about moss mitigation on steep or shaded roofs.
Start with a short list of two to four local firms, request in-person visits, and compare written timelines. Ask for a detailed scope that includes tarping, leak mitigation, and a plan for moss-prone areas. Confirm access to materials and crew staging near your home to reduce disruption in wet months. End with reference checks and a written agreement that clarifies start and anticipated finish dates.