Last updated: Apr 19, 2026
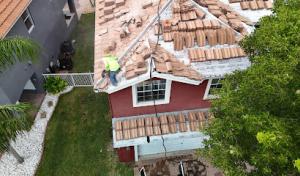
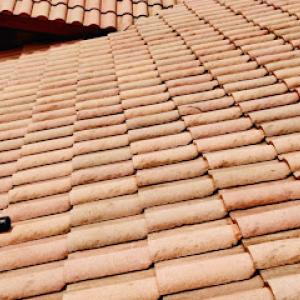
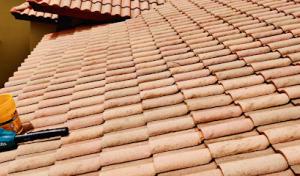
June through October brings frequent thunderstorms, tropical systems, and hurricane-related wind exposure that hammer roofs even when the coast is calm. In Wellington, inland in western Palm Beach County, this means you face strong gusts and sudden downpours that test tile roofs far more than their curb appeal suggests. Tile is a dominant local material, especially in planned communities and equestrian estates, but cracked, slipped, or dislodged tiles become a major concern after high-wind events. The pattern is relentless: hot sun, humidity, and wind-driven rain create a local reality where the roof might look intact from the ground while underlayment, ridge attachments, and flashing have already been compromised.
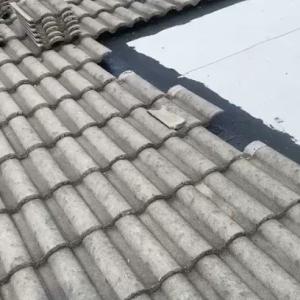
Concrete and clay tile systems anchor large sections of roofs in our neighborhoods, and winds readily pry loose individual tiles or shift several at once. In many Wellington homes, a single cracked tile can channel water under the casing and into the roof deck, initiating hidden damage that only surfaces after a heavy rain. After a storm, a quick walk around the roof line is not enough-look for lifted or shifted tiles, hairline cracks on the surface, and any fine shifting at ridges or hips. Missing tiles or gaps around vent flashing, chimney outlets, and skylights are red flags that wind-driven leaks are already forming.
The sun's intense daily heat dries and stresses underlayment even when the surface tiles look solid. A roof that appears fine from the ground can harbor delamination between tiles and underlayment, or corrosion at metal ridge caps and anchors. Check along the ridge line for gaps or loose clips, and inspect flashing at transitions where the roof meets walls or chimneys. Inside the attic, look for dark stains, dampness, or a musty odor near the eaves-these often point to compromised underlayment or flashing that the eyes can't see from above.
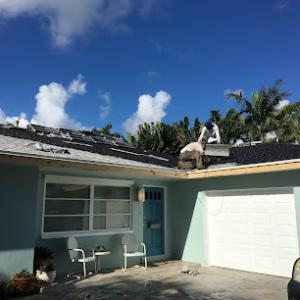
After a storm, perform a careful exterior sweep with a ladder and, if safe, a professional inspection to verify tile condition and roofing attachments. Prioritize replacing cracked or displaced tiles promptly to restore the protective tile seal and prevent water intrusion. If multiple tiles shifted or a few tiles are missing, arrange a professional assessment to evaluate the integrity of ridge attachments and flashing, as wind-driven rain can bypass the visible surface and reach the deck or insulation. Create a plan for proactive maintenance ahead of next hurricane season: address vulnerable ridge lines, reseal around penetrations, and confirm tile clips and fasteners are secure so the next summer storm cycle doesn't erode your roof's resilience.
Find local contractors experienced in assessing and restoring roofs after hail, wind, and severe weather events.
Native Roofing
(561) 469-7930 www.nativeroofing.com
3031 Fortune Way STE A-18, Wellington, Florida
4.7 from 48 reviews
West Palm Beach Roofing Pros Mastercraft
(561) 290-8375 westpalmbeachroofingprosmastercraft.com
Serving
5.0 from 24 reviews
In Wellington, roofing decisions hinge on Florida's tightened insurance market, where carriers increasingly want documented storm damage rather than age alone before approving a replacement. That shift means the condition of a roof matters as much as its age, and a policy decision can hinge on what a recent inspection reveals about how well the roof stood up to the last season's high winds. You'll want a clear picture of the roof's current state before you commit to a full replacement, because a shuttered claim or a higher deductible can shape the long-term affordability of coverage. If a contractor suggests a re-roof, plan for a conversation that translates the roof's real risk profile into an insurance-friendly narrative-emphasizing sustained performance, attachment details, and any evidence of prior storm responses rather than simply the year the roof was installed. The goal is to align maintenance history with insurance expectations so that a replacement, if needed, is defensible and timely.
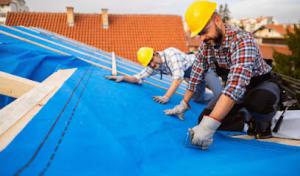
Wind mitigation documentation can materially affect insurability and premium credits, especially for older homes or roofs where attachment details, secondary water resistance, and opening protection matter. In this market, a well-prepared report that documents how the roof is anchored to the structure, the presence of wind-rated underlayment or water-resistant barriers, and the reinforcement at openings can translate into meaningful savings. One practical step is to work with a licensed, experienced inspector who understands common Wellington designs-tile roofs, in particular, bring unique considerations for fasteners, eave details, and parapet connections. If your home uses a concrete or clay tile system, ensure the report highlights fastener patterns, hip and ridge connections, and any retrofits that improve uplift resistance. For more recent builds, look for details that show compliance with current wind provisions, which often carries weight in the underwriting decision. The objective is not only to keep the roof intact but to reflect in the policy how it performs under sustained pressure and through the peak of hurricane season.
Because Wellington sits squarely in a hurricane-prone South Florida insurance environment, homeowners should photograph tile breaks, lifted shingles, interior leaks, and any temporary tarping immediately after storms. Visual records are a practical, immediate way to convey damage or vulnerability that may not be captured in a distant contractor's report. After a storm, take wide and close-up photos of solar exposure on roof surfaces, cracked or displaced tiles, and evidence of water intrusion around vents and chimneys. Inside the attic or ceilings, document any staining, sweating moisture, or sagging decking, and note the date and severity of the event. If tarping or temporary measures are used, photograph the setup with the weather conditions clearly visible. These images can become crucial supporting material when discussing a claim or when pursuing a mitigation upgrade, especially if the roof is older or has distinctive tile attachment patterns. Staying proactive with documentation helps reduce contention and speeds the path to a durable, policy-aligned solution.
Connect with contractors who help homeowners navigate the claims process from damage assessment to final approval.

Florida Coast Contracting & Roofing
(561) 260-3126 floridacoastcontracting.com
8401 Lake Worth Rd Suite 205, Wellington, Florida
4.9 from 44 reviews
Coastal Roofing of South Florida
(561) 783-4185 www.coastalroofingofsouthflorida.com
Serving
5.0 from 136 reviews
Dryout Roofing
(772) 631-3223 www.dryoutroofing.com
8424 Club Estates Way, Wellington, Florida
4.9 from 69 reviews
Dryout Roofing is a family-owned roofing company that provides professional roof repairs and roof replacements since 2013. Besides roofing, we also offer Impact windows and doors installation. We are licensed and insured and our staff is professionally trained, reliable, and effective. We pride ourselves on providing the best roofing materials, labor, and workmanship. Our goal is to complete the job on time, efficiently, and in the most unobtrusive manner for the best value.
Florida Coast Contracting & Roofing
(561) 260-3126 floridacoastcontracting.com
8401 Lake Worth Rd Suite 205, Wellington, Florida
4.9 from 44 reviews
Florida Coast Contracting & Roofing is a family-owned and operated company serving South Florida since 2003. With over 1,000 completed projects, our licensed professionals deliver high-quality roofing and construction solutions for residential and commercial properties. We’re built on integrity, craftsmanship, and community—providing dependable service, transparent communication, and lasting results. From repairs to full replacements, we’re proud to protect homes and businesses across East and West Florida.
Native Roofing
(561) 469-7930 www.nativeroofing.com
3031 Fortune Way STE A-18, Wellington, Florida
4.7 from 48 reviews
Native Roofing ensures your home’s safety & well-being, knowing the importance of sturdy roof. Our professional team specializes in roof repairs in Wellington. Our skilled technicians are trained to address all roofing emergencies, including storm damage, loose tiles, and unwanted leaks. You can rely on our quick and expert roof leak repair in Wellington. We take pride in quick response times, giving you peace of mind when you need it the most. We deliver top-notch workmanship focusing on customer satisfaction. Our staff is open to communication, providing you with honest pricing & clear choices. Call Native Roofing today for tile roof repairs in Wellington. Whether metal roofing in Wellington, or general roof repairs, we've got you covered
Hall Roofing Construction
(561) 601-6492 hallroofingconstructioncorp.com
13454 Northumberland Cir, Wellington, Florida
5.0 from 10 reviews
Reliable license and insured roofer contractor

Roof Repairs Wellington by ApexRoof
(561) 823-5029 wellington.apexroof.pro
13500 S Shore Blvd Suite 321, Wellington, Florida
5.0 from 5 reviews
ApexRoof, located in Wellington, FL, specializes in roof repairs and replacements. Our experienced team is committed to providing top-quality roofing solutions, ensuring durability and reliability. We cater to both residential and commercial properties, offering a range of services from minor repairs to complete roof overhauls since 1982. At ApexRoof, we use the latest materials and techniques, guaranteeing customer satisfaction and a roof that stands the test of time. Choose us for professional, efficient roofing services that safeguard your property and enhance its value.
Wellington Roofing Company
Wellington, Florida
3.7 from 3 reviews
As a trusted roofing company, we proudly provide the most affordable roof repair services in the Wellington, FL area. We are a licensed and insured roofing company that gets the job done right the first time. Our roofing projects include Residential, Commercial and Barn roof repairs. Give us a call today to learn more or to get a Free Quote!
Florida Roofing Society
(954) 669-5044 floridaroofingsociety.com
Wellington, Florida
5.0 from 1 review
Florida Roofing Society prides itself in providing efficient and appealing roofing systems. Our clients come to us when they’re worried that their roof has lost its essential function in providing safety to their home; they’re worried that their appearance has lost its wow factor; or finally they’re concerned that they’re no longer getting the promised white-glove service. FRS is a leader in the roofing industry by providing homeowners the attention and professional personalized service they deserve every step of the way.
Roofing Systems Of Florida
(561) 795-5566 www.myroofsystem.com
Serving
4.8 from 87 reviews
Roofing Systems of Florida, Inc. is a trusted roofing contractor in Royal Palm Beach, Florida, specializing in residential and commercial roofing services. Our licensed and insured team provides expert roof installation, roof repair, and roof replacement using high-quality materials like tile, shingle, metal, and flat roofing systems. We also offer leak detection, storm damage repair, skylight installation, and preventative roof maintenance programs to keep your property protected year-round. With a strong commitment to customer satisfaction, free estimates, and financing options, we deliver durable, long-lasting roofing solutions. Trust our BBB-accredited company for reliable service and exceptional results across South Florida.
O'Neal Jr. Roofing
(561) 656-4945 www.onealjrroofing.com
Serving
4.8 from 87 reviews
Family-owned roofing company serving Palm Beach County for over 20 years. Offering Re-Roofing and repairs. Neil Jr. is a 2nd generation roofing contractor with over 30 years experience.

West Palm Beach Roofing Pros Mastercraft
(561) 290-8375 westpalmbeachroofingprosmastercraft.com
Serving
5.0 from 24 reviews
With mastercraft precision and years of expertise, we've become the trusted choice for roofing services throughout West Palm Beach and Royal Palm Beach. Our commitment to excellence and customer satisfaction sets us apart as true roofing professionals who deliver exceptional results every time. 24/7 Service Available whenever you need us Licensed & Insured Fully certified professionals Quality Materials Only the best for your roof Satisfaction Guaranteed Your satisfaction is our priority
Coastal Roofing of South Florida
(561) 783-4185 www.coastalroofingofsouthflorida.com
Serving
5.0 from 136 reviews
Coastal Roofing of South Florida is one of the leading Roofing Companies proudly serving West Palm Beach and surrounding areas. With a reputation built on integrity, quality craftsmanship, and 5-star customer satisfaction, we specialize in expert roof installation, prompt roof repair, and complete roof replacement services. Our team brings years of local experience and attention to detail to every project, ensuring each roof is built to withstand Florida’s unique climate. Whether you're a homeowner or business owner, you can count on our professional and friendly service to deliver long-lasting value and dependable protection. We are committed to providing trustworthy solutions tailored to your property’s needs.
Louis Roofing
(561) 567-4638 louis-roofingllc.com
Serving
5.0 from 14 reviews
Louis Roofing is the premier name for residential roofing in the South Florida region. We are a company that combines 40 years of roofing experience with new-age innovation. Our services include new roofs, reroof, tile roofs, metal roofs, shingle roofs, and flat roofs. We also provide roof repairs and roof maintenance of all roofs. At Louis Roofing we pride ourselves on doing things the right way the first time and providing our clients with unmatched customer service.
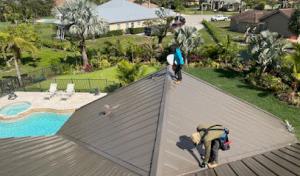
The most practical replacement window in Wellington is typically the drier part of the year, when summer thunderstorm frequency can interrupt tear-off, dry-in, and inspection scheduling. Plan for a mid-fall or early-winter project span when soaking rains are less common and the crew can proceed with fewer weather-related delays. A clear stretch in late spring can work too, but the crucial factor is a reliable stretch of dry days long enough to complete tear-off, underlayment, and tile or shingle installation without repeated weather interruptions. If the weather forecast shows a solid week of dry conditions, that window becomes your target, with contingency days built into the schedule.
Early summer heat and humidity in inland Palm Beach County can affect crew productivity and material handling, which is especially relevant on large tile roofs common in subdivisions and estate properties. Tile roofs demand careful staging because tiles can be brittle when hot, and installers may need to shuttle materials in and out of sun-exposed areas. When planning around tile installations, consider starting earlier in the day and avoiding peak afternoon heat to protect both workers and fragile tiles. If a big estate roof is on the slate, a staggered schedule that spreads the tear-off, underlayment, and tile setting across multiple days helps maintain quality and reduces the risk of heat-related delays or damage.
Demand spikes after tropical weather can tighten contractor availability in Wellington and surrounding Palm Beach County, pushing homeowners into longer lead times if they wait until peak storm season. To minimize this risk, secure a firm start date well before the hottest and most storm-prone months. If a tropical system alters plans mid-season, you'll benefit from having a flexible, communicated plan with the contractor-knowing when to pivot to dry weather windows and how many days are allotted for contingency-so the project does not stall. Coordinating with the crew on sequence, such as how many days are needed for tear-off versus dry-in versus tile setting, helps keep the project moving even when rays disappear behind clouds.
Prepare for late-day and weekend shifts during shoulder seasons when tropical activity is possible. Have a plan for protecting landscaping, walls, and entrances during high-wind days, especially on estates with expansive tile layouts. Pre-ordering common tiles or clay units can reduce lead times if a storm event changes the schedule, and ensuring debris containment is in place minimizes the risk of storm-related setbacks. This approach aligns with Wellington's summer storm cycle, where proactive timing and a clear contingency path keep the re-roof on track.
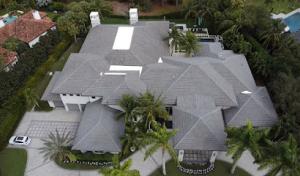
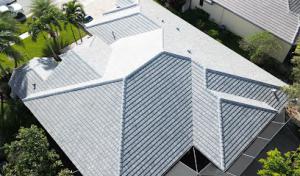
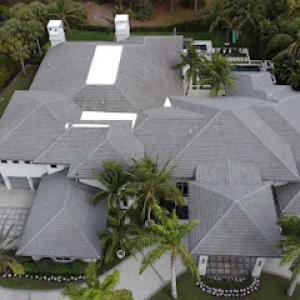
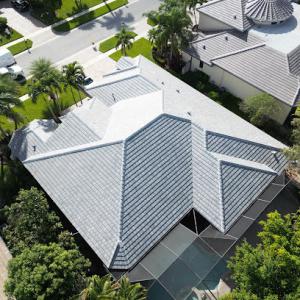
Concrete and clay tile deserve top billing in Wellington because they are widely used on Mediterranean-style homes and planned-community housing common in this part of Palm Beach County. These materials excel under the summer storm cycle, presenting strong resistance to wind-driven rain when properly installed and fastened. Their heavier mass helps against airborne debris, and the expansive escarpments of tile provide good shedding during heavy downpours. For homes with a traditional or courtyard layout, concrete or clay tile also aligns with the aesthetics of estate and equestrian neighborhoods, helping maintain curb appeal while delivering reliable performance over decades. When choosing tile, focus on proven fasteners, correct underlayment, and compatible bright-weather coatings to keep color and finish intact through Florida heat.
Asphalt shingles remain relevant for more budget-sensitive replacements, but in Wellington they compete against tile-heavy neighborhood aesthetics and insurance scrutiny tied to roof age and wind resistance. If asphalt is chosen, consider a higher wind- resistance/material class and a reinforced underlayment, especially for homes with exposed gable ends or transitions to tile sections. Roof lines often meet at hips and valleys that can trap wind gusts, so ensuring proper nailing patterns and sealant integrity becomes essential. Asphalt can blend with some planned-community styles, but care should be taken to pick shingle profiles and colors that harmonize with neighboring tile roofs to maintain the cohesive street view this area often aims for.
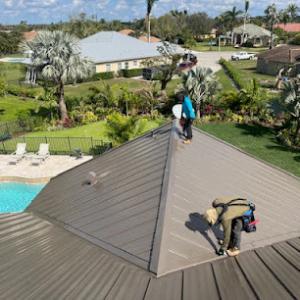
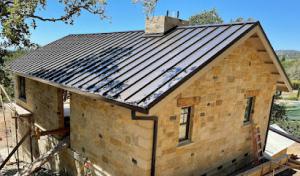
Metal roofing is increasingly attractive for wind performance and longevity, offering excellent resistance to wind uplift and rapid debris shedding during Florida storms. In Wellington, metal roofs pair well with modern add-ons and lanais that sometimes use flat or low-slope sections. Metal's lighter weight reduces structural load concerns on older foundations, and its reflective properties help mitigate heat gain in the high-summer season. For homes with a main tile roof, a metal secondary surface over a porch or architectural transition can deliver a proactive wind-resilience upgrade without compromising the overall style. Ensure simulated or true hip-and-valley geometry is respected so the roof still meets the look of the surrounding communities.
Flat and low-slope sections often appear over lanais, additions, or architectural transitions even when the main roof is tile. These areas are particularly vulnerable to wind-driven leaks if not properly flashed and pitched. In Wellington, pay attention to how these transitions tie into the tile main roof: continuous waterproofing, compatible flashing materials, and adequate slope-even subtle gradients-help prevent ponding and moisture intrusion. For aesthetic continuity, choose low-slope materials that complement tile colors and textures while delivering dependable performance during the summer storm cycle.
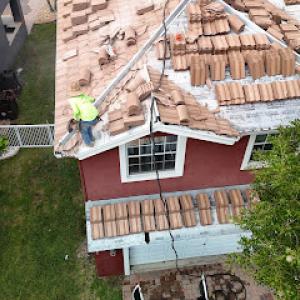
In this market, your project is heavily shaped by the prevalence of tile roofs. Tile requires careful removal and disposal, plus handling that protects adjacent structures and landscapes. Labor time is higher than basic shingle jobs because tiles must be removed without breaking, and underlayment or battens may need to be replaced more often. Expect per-square costs to rise when the crew must mobilize specialized tile-cutting or staging equipment, and when broken tiles must be replaced mid-teardown. This combination pushes final pricing above the same size shingles job in nearby areas with lighter tile use.
Large western Palm Beach County homes-suburban estates and equestrian properties-tend to carry big roof footprints. Even if the per-square rate sits within the local range, the total project cost climbs with more squares to cover. A sprawling footprint translates to longer labor hours, more material handling, and additional time for careful tear-off sequencing so that delicate features (parapets, vents, and skylights) stay intact. When evaluating bids, compare the plan for staged removal and reinstallation that matches the house geometry; a similar roof type on a smaller home will not translate directly to cost on a larger estate.
Hurricane-season wind events create surges in demand that can tighten scheduling windows. Roofer availability tightens when storms loom, and crews may need to adjust to rapid-onset rain patterns that South Florida summers routinely throw. The dry-in timeline-getting underlayment and first-pass materials secured before approaching rain-depends on weather windows and crew coordination. Expect potential price swings tied to rushed pull-and-tear or consolidating multiple local projects into a tight window. A well-communicated plan with the contractor helps mitigate the risk of delays and keeps the project moving when weather holds.
Tile disposal is more nuanced than shingles waste. Crushed tile fragments, broken pieces, and remnants require careful containment to avoid roofline or landscape damage during transport. Material handling costs rise when crews must set up protective drop zones, cover driveways, and employ additional cleanup time after the tear-off. If recycled or specialty disposal options are pursued, price impacts may reflect transportation and processing fees unique to large tile inventories common in Wellington neighborhoods.
When comparing bids, look beyond the per-square number. Request a clear breakdown that shows tear-off method, tile salvage or reuse plan, underlayment choices, and staging strategy for a large roof. Ask how the contractor sequences work to align with typical summer rain windows, and whether they reserve contingency for potential storm-related scheduling shifts. A bid that specifies tile-specific handling, a staged tear-off, and a realistic dry-in plan will typically reflect Wellington's cost realities more accurately than a generic, lower-price estimate.
Get a clear picture of your project costs upfront - no commitment required.
Dryout Roofing
(772) 631-3223 www.dryoutroofing.com
8424 Club Estates Way, Wellington, Florida
4.9 from 69 reviews
Hall Roofing Construction
(561) 601-6492 hallroofingconstructioncorp.com
13454 Northumberland Cir, Wellington, Florida
5.0 from 10 reviews
A full re-roof project requires a permit handled through the town's building department, which manages intake, plan review, and the required inspections. The process is more than an administrative hurdle: it ensures the replacement system meets local wind- and impact-resistance standards that matter in this hurricane-prone area. Expect the department to ask for project details such as roof type, fastener choices, underlayment, and any structural adjustments. Timely submittals help keep the project moving through review without delays.
Wellington projects proceed through staged inspections after framing, after roofing material installation, and a final walkthrough. Do not treat the job as complete at the moment roofing is laid; the final inspection confirms that flashing, ventilation, and sealants are properly integrated with the existing attic and that all penetrations comply with code. Coordinate access for the inspectors and keep records of every inspection milestone in case follow-up approvals are needed.
Depending on the home's age and roof features, the project may trigger wind mitigation-related documentation or inspection requests tied to insurance and code compliance. This can influence framing anchors, nailing patterns, and the selection of shingles, tiles, or metal fasteners designed to resist summer storm cycles. Have the roofer prepare any required wind-resistance details early in planning to avoid last-minute paperwork.
Before the final inspection, verify that all penetrations-hatches, vents, and skylights-have appropriate flashing and sealant, and that gutters and downspouts are secured and functioning. Any retrofit work tied to wind mitigation should be documented with manufacturer specifications and engaged hardware. A smooth final walkthrough reduces reinspection time and helps ensure the new roof remains compliant with Wellington's current standards.
Work scheduling should align with the town's hurricane-season realities, where storms can disrupt timelines. Coordinate closely with the contractor and the building department to anticipate weather pauses that may affect inspections and the final sign-off.
In Wellington, the most stubborn post-storm trouble spots sit along ridge lines, where wind-driven rain can pry loose fasteners or lift edge metal, and at flashing transitions where dissimilar materials meet. Valleys channel rain to vulnerable joints, and the underlayment beneath tile systems can fail well before the surface tiles show obvious damage. The combination of inland hurricane exposure and frequent heavy downpours means a small uplift or gap can become a slow leak that hides behind the tile. Regular inspection of these zones is essential after every major storm.
Wind-driven rain in South Florida often reveals weaknesses around skylights, wall intersections, and low-slope tie-ins on homes with mixed roof geometry. Skylight seals can crack under UV glare and heat, while corner joints and step-down connections collect moisture where tiles butt against walls. If flashing around these features corrodes or shifts slightly, water intrusion can occur quickly during a short, intense downpour. Pay close attention to sealant integrity and track any damp spots that appear near transitions after storms, even if the surface looks intact.
Because many local roofs face intense UV and humidity year-round, sealants, flashings, and exposed accessories can age faster than homeowners expect between major storm events. Cracked caulk, peeling metal edging, and degraded chimney boots create ready-made entry points for moisture. In Wellington, you'll notice wear sooner in areas with sun exposure or persistent humidity. Inspect and reseal susceptible components before the dry season ends, and be mindful of any fresh staining that hints at hidden leaks.
Find contractors experienced in skylight installation, flashing, and leak repairs to bring natural light into your home.
All Roofers Wellington
(561) 486-8310 allroofingllcfl.com
3032 Blue Cypress Ln, Wellington, Florida
4.8 from 25 reviews
Native Roofing
(561) 469-7930 www.nativeroofing.com
3031 Fortune Way STE A-18, Wellington, Florida
4.7 from 48 reviews
Repeated spot repairs can stop making sense when storm seasons keep reopening the same leak paths, especially on aging tile underlayment systems. In this area, summer downpours arrive with quick, heavy bursts that push through marginal seals and fatigued felt. Each repair might buy a short window, but without addressing the continuous loading from wind-driven rain, the leak path returns. A practical path is to track persistent leaks by wall or ceiling location, then map the cycle to identify if the same roof section consistently fails after storms.
Older roofs face a double pressure point: repair frequency is rising while insurance flexibility tightens for roofs that no longer meet carrier expectations. The combination means small fixes can become a money-and-time sink if the underlayment has degraded beneath the tiles. In planned communities or equestrian-area estates, where tile looks matter, the visible damage may mask hidden moisture damage. Before chasing another patch, assess whether the underlayment has lost its continuity and whether the current deck structure still tolerates the wind loads typical of heavy Wellington storms.
Matching replacement tiles or restoring a uniform appearance can be difficult on weathered South Florida roofs. Tile profiles, colors, and textures weather at different rates, especially after years of sun, salt spray, and heat. When tiles become scarce or discontinued, you may face color-matching challenges that stand out on a mature roof. This is one reason some homeowners shift from repair to full re-roof, aiming for consistent look and performance rather than a patchwork that invites more leaks.
If multiple failures cluster on a single roof plane, consider a comprehensive evaluation of the roof assembly, including underlayment, flashing, and deck integrity. Document leak history, test moisture in the sheathing, and discuss with a contractor the feasibility of a targeted re-roof or a full re-roof plan that preserves the home's curb appeal while improving resistance to the next season's storms.