Last updated: Apr 19, 2026
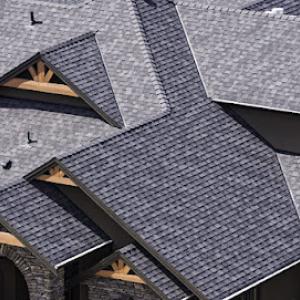
Snowfall in this area follows a familiar pattern: a heavy blanket of snow, then rapid cold snaps that drive meltwater back up under shingles. The resulting ice dams are not a cosmetic nuisance here-they can reopen vulnerable shingle tabs, force leaks around flashing joints, and exploit any roof penetrations you've got, from vents to skylights. Freeze-thaw cycles crack and widen these weak points, especially on steep-slope roofs where re-roofing dominates the landscape. When a storm hits, you don't want to discover your attic is dripping into a stack of boxes or your living room ceiling has a bulging stain. The truth is that winter moisture backup and ice-dam development are not just maintenance questions; they're included in how a reroof job will be evaluated, from ventilation to underlayment quality.
Cold-season access is limited by snow cover and ice, so plan ahead. In the event of a lagging melt or a looming thaw, prioritize quick, decisive stabilization to prevent further damage. If you notice daylight or damp patches along eaves, arrange emergency leak stabilization rather than waiting for a full tear-off in midwinter. Keep eaves clear of ice buildup when it's safe to do so, but never climb a snow-laden roof yourself if ice is present-leave it to pros with specialized equipment. If you do have access to an interior attic space, check for sudden warmth or moisture near the soffit vents after a warm day; symptoms often precede a visible leak on ceilings. When a leak appears, isolate the affected area and contact a roofer who can stage a temporary fix to buy time until the weather permits a proper assessment.
Inspectors in this market don't just scan shingles; they audit ventilation and underlayment as part of the reroof decision. A winter-focused evaluation will look for adequate intake and exhaust ventilation, proper attic insulation, and a continuous water barrier under the roofing deck. If moisture stacks up in the attic during a freeze-thaw cycle, that moisture will undermine any installed underlayment and accelerate shingle deterioration. Expect questions about how the roof handles ice dams: where meltwater is directed, whether flashing around chimneys and vents is solid, and whether penetrations have been treated to resist freeze-thaw cycling. In practice, this means you should see a roofing plan that prioritizes a robust underlayment and a ventilation strategy that keeps the roof deck closer to a stable temperature, reducing the chance of ice dam formation. If a contractor pitches a reroof as a purely cosmetic fix, double-check their approach to ventilation and underlayment-the town's focus is on preventing winter moisture issues from becoming chronic damage.
If a replacement can wait until spring, set a concrete plan with a local roofer to address the root causes: improve attic ventilation and sealant integrity around penetrations, upgrade underlayment where needed, and ensure flashing is securely fastened and properly integrated with the new shingles. In the meantime, establish a rapid response protocol for winter leaks: identify a trusted contractor, prepare access paths for quick on-site stabilization, and confirm temporary moisture-control measures that reduce the risk of cascading damage during ongoing snow events. The goal is simple: minimize ice dam formation, protect the roof deck from repeated freeze-thaw stress, and keep the home dry through Merrimack's harsh winters.
In Merrimack, cold winters and humid summers put repeated stress on seals and underlayment, so material choice here must account for how well the assembly handles thermal movement and moisture. Asphalt shingles and metal roofing are the two steep-slope options most common among local contractors, and both have practical strengths when installed with attention to ventilation, flashing, and proper attic moisture control. The seasonal swing-from deep freeze to hot sun-means the roof assembly needs to flex without losing its seal. Asphalt shingles tolerate irregular movement well enough with solid nailing patterns and quality underlayment, while metal systems shine when you emphasize precise flashing and expansion joints to accommodate temperature shifts.
Snow and ice loading are realities that shape every reroof decision. Asphalt shingles rely on a well-sealed roof deck and a robust underlayment to resist moisture intrusion as the accumulation melts and refreezes. In the right circumstances, asphalt can shed snow effectively if the roof plane is steep and the overhangs are properly flashed. Metal roofs, by contrast, often handle rapid thaw cycles more predictably because their panels and seals move with less resistance. However, metal systems demand meticulous flashing at valleys, chimneys, and transitions to prevent ice dam leaks where the heat from the attic can create uneven melt along the eaves. If ice dams are a recurring concern, pairing either choice with an effective ridge vent strategy and a moisture-controlled attic can reduce risk by allowing cold roof temperatures to prevail at the eave line.
The cold winters and humid summers tighten the relationship between underlayment and roof seals. Asphalt shingles benefit from a roof deck with solid ventilation and a high-quality synthetic underlayment that resists moisture and edge tearing. In practice, this means ensuring baffles are in place and the attic has a clear path for air to move from soffits to ridge. Metal roofs require a compatible underlayment system that can handle thermal movement without creasing or tearing, plus careful sealing at fasteners to prevent moisture ingress at the fastener points. Regardless of material, the critical pieces are continuous ventilation, well-sealed eaves, and a flashing plan that handles the seam transitions cleanly so that freeze-thaw cycles don't create micro-leaks along the roof edge.
Late spring through early fall is generally the preferred replacement window in Merrimack because weather is more favorable for installation consistency than during winter freeze-thaw periods. Both asphalt and metal crews perform best with dry days, moderate temperatures, and nights that don't plunge below freezing. If a replacement is planned for late spring, prioritize a crew that can prioritize attic ventilation upgrades, install a continuous ridge vent, and execute precise flashing details. In practice, you'll want a contractor who understands how to tune the assembly to local humidity patterns, ensuring seals stay pliant through summer heat and winter cold.
Given the house profiles common in steep-slope neighborhoods, both asphalt shingles and metal roofing can deliver solid long-term performance when the installation accounts for thermal movement and moisture management. Asphalt remains a straightforward option with broad compatibility and good value, particularly where a contractor emphasizes nail patterns and underlayment quality. Metal offers durability and a lower weight footprint, but only when flashing, sealants, and fastener patterns are executed with care to accommodate the region's abundant freeze-thaw cycles. For many homeowners, the best path is to align the final choice with a contractor's proven local track record and a plan that prioritizes ventilation, flashing reliability, and prompt leak response.
In Merrimack, claim activity tends to spike seasonally after winter storms, hail events, and high-wind weather rather than from year-round catastrophe exposure. That rhythm matters because it shapes how quickly a roofing issue moves from discovery to repair. Snow and ice can hide leaks, so a small drip after a thaw might suddenly become a larger problem once the temperature swings back. Stay alert to roof seams, vent flashings, and ice dam footprints along gutters in the weeks following a heavy snow or hail event. When a storm passes, the window for mobilizing a fast response narrows if documentation isn't ready, so act with purpose while the memory of the event is fresh.
Insurers commonly expect photos, damage notes, and detailed estimates, and adjuster visits may be scheduled after storms and before payment, which affects how quickly local roof work can move forward. In practice, that means documenting the damage thoroughly-photos that show the extent, notes on suspected underlying issues (like compromised flashing or water intrusion into attic spaces), and rough measurements of affected areas. After a storm, an adjuster will often want to see the site in person before approving work, and the scheduling can be tight if multiple claims are filed in a short period. This sequence can stall long-lead projects, even when a contractor is ready to start. Having a clear file ready for the insurer can keep the process from dragging out.
Spring storm and hail risk can disrupt project timing in Merrimack just as homeowners begin booking the main reroof season. The most practical approach is to align expectations early with the chosen contractor and the insurer. If a roof issue is clearly weather-driven-ice dam damage, for example-document promptly and submit promptly, but be prepared for a short waiting period before the first work day can be scheduled. Consider scheduling a contingency window in early spring to accommodate possible adjuster visits and weather-related delays. When storms are fresh in memory, contractors may see a surge in demand, and delays can ripple through the chain: inspection, approval, material lead times, and finally installation. Having a written plan with a realistic timeframe helps prevent surprises when a favorable window opens for repairs.
Right after a storm, do a careful, non-invasive survey of the roof and attic if safe to access. Photograph damaged areas from multiple angles, note the date of the incident, and compile a simple list of observed symptoms (visible leaks, ceiling staining, or moisture in insulation). Reach out to a reputable local contractor to assess whether temporary protective measures are appropriate and to help translate your notes into a detailed estimate. Keep all correspondence with the insurer organized, and designate a single point of contact to avoid mixed messages during the claim process. By staying prepared and responsive, you can reduce the risk that claim timing adds unnecessary stress during Merrimack's busy repair cycles.
Find local contractors experienced in assessing and restoring roofs after hail, wind, and severe weather events.
A-Z Roofing
(603) 682-0706 www.a-zroofing.net
567 Daniel Webster Hwy, Merrimack, New Hampshire
5.0 from 40 reviews
Merrimack Roofing
(603) 424-8900 www.merrimackroofing.com
Merrimack, New Hampshire
4.8 from 24 reviews
Conde Roofing & Construction
(603) 838-7663 conderoofing.com
33 Elm St, Merrimack, New Hampshire
5.0 from 211 reviews
Serving communities across New Hampshire and Massachusetts, Conde Roofing & Construction, LLC has been a trusted partner in home improvement since 2019. This premier roofing contractor specializes in a wide range of services, including expert roof, siding, and skylight installations and repairs. They also offer professional gutter services to ensure your home is fully protected from the elements. Committed to quality craftsmanship and customer satisfaction, Conde Roofing & Construction is dedicated to enhancing the beauty and durability of your home.
Affordable Roofing / Gutters
(603) 233-9971 1affordablebuilders.com
141 Daniel Webster Hwy, Merrimack, New Hampshire
4.9 from 429 reviews
Affordable Roofing / Gutters specializes for asphalt shingle, rubber roof and gutters at residential and commercial properties with 10+ years experience. The company, also, provides siding and skylight services such as trims, flashing. There are four teams in the company, each team combined of 6-7 people, which means we get a quality job done within hours in one day. Please, visit our website with your questions and concerns. We will make your property look nice and clean.
Ed Cyr Roofing
(603) 560-4961 www.edcyrhomeimprovements.com
100 Peaslee Rd, Merrimack, New Hampshire
5.0 from 41 reviews
Ed Cyr Roofing provides roofing installation, roofing repair, siding, windows and doors, and gutter services to customers in southern New Hampshire.
A-Z Roofing
(603) 682-0706 www.a-zroofing.net
567 Daniel Webster Hwy, Merrimack, New Hampshire
5.0 from 40 reviews
At A-Z Roofing, our story begins with a simple yet powerful goal: to combine exceptional customer service with hands-on roofing expertise that clients can rely on. Our founder, Angel Zamorano, brings over 15 years of industry experience and holds certifications as an Owens Corning Certified Contractor and a member of the NRCA. Recognizing the need for a more transparent and responsive approach to roofing in Merrimack, NH, and across New England, he set out to redefine what homeowners and business owners should expect from their roofing partner.
Choice construction
(603) 661-0365 choiceconstrn.com
33 Iris Dr, Merrimack, New Hampshire
5.0 from 2 reviews
Residential/Commercial Roofing Company. 35+ years of construction knowledge and experience. •Roof Repairs •Roof Inspections •Roof Removal •Rubber Roof (EPDM) •Metal Roofs •Ridge Vents Free Estimate
D's Homeworks
Merrimack, New Hampshire
3.0 from 10 reviews
D's Homeworks has been in roofing business for 20 years. We are a full service roofing company in Nashua, NH. Our service will be ready to respond to your needs!
G & N Construction
Merrimack, New Hampshire
3.7 from 3 reviews
G and N Construction has been going strong for many years. Having construction done on your home or office does not have to be stressful. The next time you have a project call G and N Construction, we have the tools and the experience to get the done right. Serving Nashua , NH and surrounding areas. Our services include but not limited too spray foam insulation, blown in insulation, and batts insulation.
Queen City Roofing
(603) 289-4663 www.queencityroofingnh.com
Serving
4.9 from 317 reviews
Queen City Roofing provides Residential and Commercial roof replacement in Bedford NH, Goffstown NH, Amherst NH, Hooksett NH and Manchester NH and all other local surrounding communities. Our team installs asphalt shingle roofing and low-slope Rubber Roofing Systems ( EPDM) , we offer clean job sites, and clear communication from estimate to final walkthrough. We’re a GAF Master Elite® and Owens Corning Platinum Preferred Roofing Contractor, and we offer free, no-obligation roof replacement estimates. Licensed and Insured. Choose Queen City Roofing for a roof that lasts – quality you can trust, durability you deserve!
Nick Tracey Roofing & Exteriors
(603) 810-8658 nicktraceyroofing.com
Serving
5.0 from 276 reviews
At Nick Tracey Roofing, we specialize in a wide range of roofing services including installation, repair, maintenance, and replacement. Whether you need a small repair or a complete roof overhaul, our team of skilled professionals is dedicated to providing superior craftsmanship and reliable solutions tailored to meet your specific requirements. Asphalt Shingles, Metal Roofing, EPDM Rubber Roofing, and Skylights.
Adam Vaillancourt Roofing & Gutters
(603) 507-6279 www.adamvroofing.com
Serving
4.9 from 1082 reviews
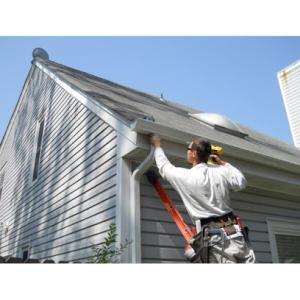
Adam Vaillancourt Roofing & Gutters is Milford’s go-to roofing contractor, proudly serving Southern New Hampshire, Northern Massachusetts, and Southern Maine. We specialize in residential and commercial roof replacement, roof repair, and roof maintenance—including asphalt shingles, flat roofing, and premium metal systems. Our team uses top-quality materials and industry-best installation practices to protect your home for the long haul. We also offer expert gutter solutions with Gutter Shutter® systems, professional roof cleaning and rejuvenation, skylight repair and replacement, and attic ventilation services. With a reputation built on trust, craftsmanship, and customer-first service, Adam Vaillancourt Roofing is committed to you.
Granite State Roofing
(603) 765-0555 www.granitestateroofing.com
Serving
5.0 from 47 reviews
“Quality, Reliable Results…Driven Industry Leader”

Black Swan Roofs - Roofing Contractor
(603) 512-4281 www.blackswanroofs.com
Serving
5.0 from 51 reviews
Our motto is "Your once in a lifetime roof, done once, never twice." At Black Swan Roofs, we are family owned, focused on exceptional roofing services with quality, integrity, and outstanding customer service. Serving New Hampshire, our team specializes in shingle roofs, metal roofs, flat roofs, synthetic roofs and skylights. We do both repair and replacement. As a local trusted roofing contractor near you, we understand the importance of your roof. That's why we use only the highest quality materials and the latest techniques. Whether you need a repair or full replacement, our team is here to ensure your roof is protected for years to come. We offer different payment plans and financing so we can help no matter the circumstances.
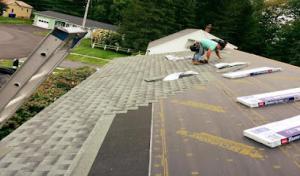
In this part of southern New Hampshire, homes mostly wear asphalt shingles, metal, clay tile, concrete tile, synthetic/composite shingles, or slate. Each material has a different racking order for price and labor, with asphalt shingles typically driving the most price-consistent project, and slate or clay tile pushing up both material and tear-off costs. In practical terms, you should expect the material choice to steer the per-square cost within the ranges shown in the local pricing table, while the roof's slope and the number of penetrations push labor time. If the project involves a shingle-over option or a full replacement with a tear-off, the price ladder climbs quickly due to waste handling, disposal, and mandatory debris control measures.
Costs in Merrimack can rise when winter damage creates surge demand for emergency repairs and when weather delays compress replacement work into late spring through early fall. Snow and ice buildup stress the roof assembly, accelerating the need for timely repairs before the next freeze. Ice dam mitigation, temporary heat tracing, and controlled water runoff become visible cost increments even on otherwise straightforward re-roofs. If an emergency response is required during a storm, expect expedited scheduling fees, overtime crew rates, and prioritized material sourcing that can temporarily lift the price per square beyond seasonal averages.
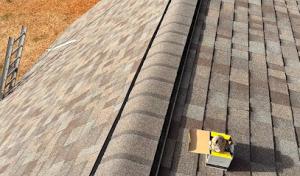
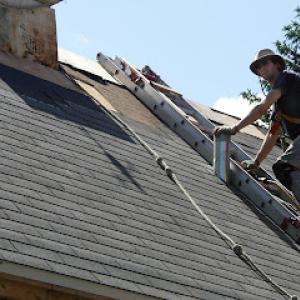
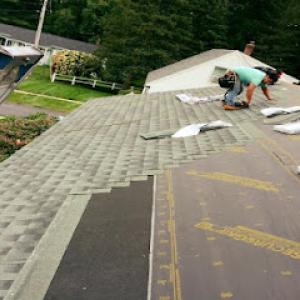
Tear-off complexity stands out as a primary cost driver. Steep slopes demand careful fall protection, more extensive ladder and edge protection, and longer installation times. Flashing replacement around chimneys, skylights, and stack penetrations adds material and labor beyond basic shingle installation. Proper ventilation corrections-ensuring ridge vents, soffit intake, and attic baffles are aligned-can prevent future damage but adds upfront cost. Finally, cleanup is not trivial: steep-slope crews must thoroughly remove debris and haul it away, reducing the risk of ice dams re-forming near property lines and driveways. In Merrimack, these factors collectively shape the practical budget you should plan for when selecting a material and scheduling the project.
Get a clear picture of your project costs upfront - no commitment required.
Choice construction
(603) 661-0365 choiceconstrn.com
33 Iris Dr, Merrimack, New Hampshire
5.0 from 2 reviews
Adam Vaillancourt Roofing & Gutters
(603) 507-6279 www.adamvroofing.com
Serving
4.9 from 1082 reviews
For most roofing projects in this area, a standard roofing permit from the local building department is required. The process helps ensure that steep-slope re-roofs, ice-dam mitigation measures, ventilation upgrades, and flashing details meet Merrimack's building codes, especially given the winter loading and freeze-thaw cycles that affect shingle and underlayment longevity. The permit status signals to inspectors that the project aligns with safety and performance expectations for the town's housing stock and climate realities.
Applications are typically submitted online or in person, with project details and a site plan. Having a clear layout that shows roof pitch, vent locations, fascia and drip edge details, and any addition or repair to attic insulation helps speed review. Expect administrative lead time before work begins; planning ahead is especially important once winter sets in, since weather can influence the timing of inspections and material delivery. If you're replacing steep-slope roofing in an area prone to heavy snow and ice, include notes about protective measures for the eaves and proper drainage to reduce ice dam risk in the coming season.
Merrimack inspections commonly include a rough-in review before covering and a final inspection focused on ventilation, underlayment, flashing, and overall code compliance. The rough-in check ensures that critical components-ventilation ratios, ridge and soffit intake, and attic space ventilation-are in place before shingles go on, which matters for preventing snow-loaded attic pressure and moisture buildup that can compromise roof integrity during freeze-thaw cycles. The final inspection verifies that flashing details around chimneys, skylights, and edge metal meet code, and that underlayment and drip edges are correctly installed to resist leaks during spring thaws and winter storms. If your project includes updates to attic insulation or ventilation, be prepared to show documentation or test results that demonstrate compliance with current energy and moisture control requirements.
Coordinate with the roofer on the timing of permit submission to avoid weather-induced delays, especially in late fall or early winter. Have a site plan ready that accurately reflects the roof footprint and any changes to ventilation or flashing. Understanding that inspections come at defined milestones helps ensure that the project proceeds without rework, which is critical when frost and ice cycles push contractors toward tight schedules. A well-documented plan is particularly valuable when addressing concerns around ice dam prevention and improved venting, both of which can influence permit review and approval timelines in Merrimack.
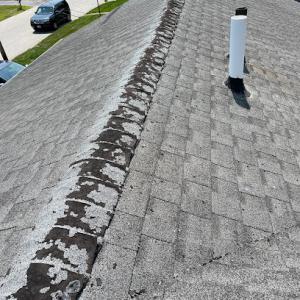
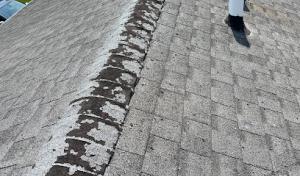
Skylight work is a meaningful specialty in this contractor market, signaling that leak-prone roof penetrations are a common homeowner concern locally. In Merrimack winters, freeze-thaw cycles push water into flashing seams and fasteners around skylights and chimneys, and water can work behind field shingles if the flashing isn't tight. In other words, these penetrations are often the first places to fail after a heavy thaw or a new snowfall sits on the roof.
On skylights, the primary risk is flashing sitting on the curb or around the curb edge where the unit meets the roof deck. If the sealant or bedding around the curb has cracked, winter wind-driven spray can infiltrate the nailing flange. For chimneys, the intersection where brick or stone sits against the roof line is a natural stress point. Flashing transitions here must bend cleanly up the chimney and extend onto the field with a reliable, sloped counter-flashing. Ice dam pressure can pry flashing loose at these points, especially where mortar joints are exposed.
Start with a visual inspection from the attic during a clear day after a thaw. Look for condensation or damp spots near skylight shafts and chimney divots, and trace any staining to the exterior. Outside, check the metal flashing along skylights for lifted edges and ensure the sealant is in good condition without cracks. At the chimney, ensure the base flashing sits under the shingles or shakes, with proper step flashing tied into the chimney mortar joints and a continuous counter-flashing over the top. If any flashing shows signs of movement, plan a targeted reseal or reflash, prioritizing the worst-seen leak paths after a melt. Only use materials rated for cold-weather performance to avoid brittle failure in the freeze-thaw cycle.
Schedule seasonal checks that align with spring and fall melt cycles, focusing on skylight and chimney intersections. Keep snow off the skylight curb when possible after storms, and remove ice dams promptly to reduce backflow pressure against these penetrations. When in doubt, bring in a roofer who regularly handles skylight and chimney flashing, since missteps here quickly become costly water problems.
Find contractors experienced in skylight installation, flashing, and leak repairs to bring natural light into your home.
Conde Roofing & Construction
(603) 838-7663 conderoofing.com
33 Elm St, Merrimack, New Hampshire
5.0 from 211 reviews

Affordable Roofing / Gutters
(603) 233-9971 1affordablebuilders.com
141 Daniel Webster Hwy, Merrimack, New Hampshire
4.9 from 429 reviews
Ed Cyr Roofing
(603) 560-4961 www.edcyrhomeimprovements.com
100 Peaslee Rd, Merrimack, New Hampshire
5.0 from 41 reviews
Flat and low-slope roofing is present in the local contractor market even though the city is primarily a steep-slope residential reroofing area. In winter, the longer surface area, combined with freeze-thaw cycles, can invite more ice and snow buildup than a steep roof would typically tolerate. If drainage slows or water backs up, the consequences show up sooner on these transitions than on nearby pitched sections.
On a typical Merrimack home, low-slope sections are especially vulnerable during snow and ice periods because drainage is less forgiving than on pitched roofs. The extra surface area acts like a catching basin for meltwater and icicles, increasing the risk of ice dam formation at transitions to higher-slope areas. Pay particular attention to edges, eaves, and any low-lying valleys where water may pool or back up.
Inspection attention to underlayment, flashing, and code compliance is particularly important where low-slope transitions meet standard shingle roof areas. Inadequate flashing at the junctures can allow moisture to intrude under shingles and into attic spaces during thaw cycles. Underscoring this are the underlayment conditions, the integrity of fasteners, and the connection details around roof-to-wall interfaces.
During the shoulder seasons, keep an eye on drainage paths and gutter performance to reduce standing water on low-slope sections. When snow accumulates, consider targeted snow removal to prevent heavy loads that stress the transition zones. Should moisture intrusion occur, address it promptly to avoid widespread attic condensation and potential interior damage down the line.
Find specialists in TPO, EPDM, and built-up flat roofing systems for residential and commercial properties.
Ed Cyr Roofing
(603) 560-4961 www.edcyrhomeimprovements.com
100 Peaslee Rd, Merrimack, New Hampshire
5.0 from 41 reviews
Choice construction
(603) 661-0365 choiceconstrn.com
33 Iris Dr, Merrimack, New Hampshire
5.0 from 2 reviews
The market in this area favors re-roofing, quick response, and cleanup-included service. Homeowners typically hire for replacement execution rather than new-construction specialization. When you start talking with contractors, be clear whether the goal is full replacement planning or just a rapid leak triage to get through a cold snap. A firm that can pivot between emergency repair and a complete roof overhaul will save time and reduce frustration when winter storms strike again.
Long-established, family-owned firms that are manufacturer-certified are common here, offering practical ways to compare stability and warranty backing. Ask how long the company has been serving local neighborhoods, and whether they assign a dedicated supervisor to your job. Look for a firm with a local reference list you can contact. A strong warranty should cover both the labor and the material installation, not just the shingles themselves.
Emergency repair crews are accustomed to rushing to a call, sealing leaks, and prioritizing quick fix timelines. Replacement-focused teams plan around the full project scope: decking condition, ventilation, flashing details, and a finished look that stands up to the seasonal freeze-thaw cycle. If winter storms are imminent, confirm they can schedule a full evaluation after the immediate leak is contained, so you don't end up with a temporary fix that fails in a cold snap.
Request a written scope that includes attic ventilation checks, shingle compatibility, flashing around chimneys and skylights, and a phased timeline if you need both emergency and replacement work. Ask about cleanup standards-berries, nails, and shingle scraps should be gone at the end of each day. Require a clear point of contact for weather-related delays and any warranty service calls.
In this corner of southern New Hampshire, the main claim drivers are winter storms, hail, and high winds that can stress roofs built to handle snow but not always the rapid freeze-thaw cycle. Aging roofs often show up as leaks or shingle blow-offs only after a sharp freeze followed by a thaw, so timing around weather events matters. Homeowners should understand that not every aging issue translates into a storm loss, and insurers routinely distinguish between wear and actual storm damage. This nuance means a careful, event-by-event assessment is essential rather than assuming every problem qualifies automatically.
Date-stamped documentation is your best ally after a significant storm. Before and after photos, notes on shingle displacement, gutter damage, frost or ice buildup at the eaves, and any interior signs of leakage help establish a clear narrative for the claim file. Keep a simple record of windspeeds, hail size observed locally, and the exact date of the weather event if possible. In this market, adjusting teams rely on precise weather context to separate incidental wear from storm-related damage, so your organized notes can accelerate the review process.
Claim timelines in this area are shaped by state-level coverage nuances and the scheduling realities of adjusters who manage multiple communities. Repair planning often depends as much on insurer review as on contractor availability. Expect a sequence where the insurer assigns an adjuster, a timeline is proposed for inspection, and then decisions follow about scope and strategy. Having a local roofer ready to provide a detailed, photograph-supported assessment can help align expectations and avoid unnecessary delays.
Root-cause clarity reduces back-and-forth. When you consult a local contractor, ensure they document flashing, ventilation, and potential ice dam issues as part of the evaluation, since these elements are common stress points after Merrimack winters. If an adjuster identifies the need for ancillary work (ventilation improvements, attic insulation checks, or fascia repairs), be prepared to discuss scope and sequencing. Clear communication between you, the adjuster, and the contractor keeps the project moving and helps prevent small issues from becoming bigger, costly surprises during a New Hampshire winter.
Connect with contractors who help homeowners navigate the claims process from damage assessment to final approval.
A-Z Roofing
(603) 682-0706 www.a-zroofing.net
567 Daniel Webster Hwy, Merrimack, New Hampshire
5.0 from 40 reviews