Last updated: Apr 19, 2026
Bellmore homeowners on the South Shore are exposed to fall nor'easters and wind-driven rain events that can turn minor flashing defects into active leaks. That means what seems like a small drip after a windy rainstorm is often the first sign of a larger problem tucked along eaves, skylights, or vent pipes. In these conditions, a single wind gust can peel back the edge of roofing material or lift loose shingles enough to let water track under the surface. You should treat any irregular moisture pattern-stains on the ceiling after a storm, damp spots near soffits, or dark streaks along the fascia-as a genuine alert. Do not wait for a second rain to respond; the window to address flashing, drip edge, or vent boot gaps is narrow once water gets behind protective layers. Immediate action means stopping further intrusion by applying temporary coverings over exposed areas and arranging a prompt professional assessment once weather permits.
Cold snaps after snow in Nassau County create freeze-thaw conditions that raise ice dam risk along eaves, especially where attic insulation and ventilation are uneven. When warm attic air escapes into the roof deck, melted snow refreezes at the eaves, forming ice dams that back up onto shingles and underlayment. The result is a slow but relentless leak that can travel far from the original entry point. Your priority is to ensure attic insulation density is uniform and ventilation streams are balanced so soffit intakes and ridge outlets work in concert. In practice, that means checking for gaps around attic hatches, electrical penetrations, and bathroom fans that vent into the attic itself. If an ice dam is suspected, do not rely on do-it-yourself heat cables alone; a comprehensive approach that combines insulation improvement, venting corrections, and targeted dam treatment is essential to prevent escalating damage through the winter.
Spring wind and heavy rain can disrupt tear-off schedules in Bellmore, making temporary dry-in planning especially important during replacement season. The coastal variability of spring storms can push crews off the roof or force delays in material delivery, leaving your home exposed to wet weather longer than anticipated. Develop a contingency plan with your contractor that prioritizes a secure dry-in approach during any forecasted unsettled spell. This includes robust temporary edge protection, tarping that covers vulnerable roof areas, and a clear sequencing plan for stripping, underlayment assessment, and reinstallation so that a sudden shower does not leave exposed decking or newly installed surfaces vulnerable. In practice, set milestones and secure backup resources, because coastal wind and rain can erupt with little warning and linger for days, jeopardizing both safety and the integrity of the work already completed.
Many Bellmore homes have rear additions, dormers, enclosed porches, or garage tie-ins that create low-slope roof sections even when the main house has asphalt shingles. These transitions are common leak points because water movement slows where low-slope sections meet walls, chimneys, or older shingle roof planes. Contractors frequently market flat-roof work, reflecting how often homeowners need repairs or replacement on these secondary roof areas rather than only on the main pitched roof.
Start with a walkaround after heavy rain or a thaw. Look for pooled water along the seam lines where the low-slope roof meets walls, chimneys, or the edge of the main roof. Pay close attention to the flashing joints at dormers and where a porch roof ties into a larger structure. In winter, ice can dam up at those same transitions, forcing meltwater to back up under flashing and into the interior. If you notice damp spots on ceilings below a low-slope section or damp patches on interior walls near transitions, treat those as urgent indicators that a professional should examine promptly.
During a dry day, run a light rain test by gently spraying water along the low-slope seams with a garden hose from a safe position. Observe for any water seepage at flashing heads, edge metal, or along the wall intersection. If water enters through fasteners or around sealant, that area needs attention. Inspect the edge details at parapet walls, vent pipes, and chimney bases; once sealants degrade, the risk of leaks climbs quickly in a coastal climate with Nor'easters. Keep a note of areas that show moisture intrusion after each storm cycle, as those spots tend to be repeat offenders.
For a known problem area, plan a temporary, protective fix that blocks direct water entry while arranging a proper repair. Use a contractor-approved flashing repair kit or resurfacing sealant that remains flexible in cold weather, and ensure any patching work extends beyond the immediate seam to cover adjacent shingles or membrane edges. When planning longer-term fixes, prioritize upgrading to a reinforced underlayment beneath the low-slope plane, plus improved flashing transitions where the roof meets walls or dormers. Consider a small drainage upgrade if gravity flow is insufficient, such as adding a slight slope or internal drainage plane to direct water toward the nearest scupper or edge.
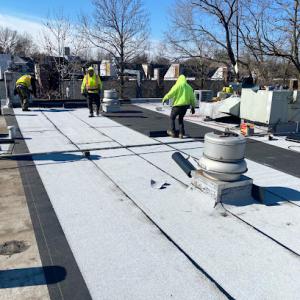
Low-slope sections benefit from materials designed for flat or near-flat applications, including reinforced roofing membranes or modified bitumen options, as well as membrane-coated metal edges where appropriate. If the low-slope area is tied into an aging shingle roof plane, a coordinated upgrade that bridges the transition with a continuous waterproof layer helps prevent future leaks during Atlantic storms. For dormers and enclosed porches, ensure that flashing around the base and along any step-downs is continuous and properly integrated with the main roof flashing. Regular inspections after major storms help catch issues early before interior damage develops.
Find specialists in TPO, EPDM, and built-up flat roofing systems for residential and commercial properties.


Rapid Roofing
(516) 212-2275 www.rapidrestoreny.com
Serving
5.0 from 78 reviews
Getting a new roof or roof repair shouldn’t be a headache – that’s why at Rapid Roofing, we make it easy. As a roofing company built on trust, our expert roofer contractors deliver seamless roofing services with zero hassle and no shortcuts. Whether it’s routine maintenance or emergency roof repair, our residential and local roofers get the job done right – every time. We don’t just claim to be the best roofers, we prove it! From affordable roofing solutions to BBB-accredited roofing contractors, we’re the good roofing company homeowners rely on. A roofing business that stands behind its work, delivers results, and redefines what it means to hire top-rated roofers.
The Way Renovations
(516) 751-4002 thewayrenovationsinc.com
Serving
5.0 from 94 reviews
Are you looking for a reliable and experienced roofer to protect your home from the elements? Welcome to The Way Renovations, your premier roofing contractor in North Bellmore, NY. Licensed and insured with over 40 years of roofing experience, we pride ourselves on transforming homes with precision and a keen eye for detail. Established in 2020, our family-owned and locally operated business has dedicated itself to delivering exceptional craftsmanship with every project. Whether you need reliable asphalt shingle roofing, resilient flat roofing, or stylish metal roof installations, our skilled team is equipped to handle your needs.
Long Island Roofing
Serving
4.9 from 369 reviews
Long Island Roofing is an award winning roofing contractor that provides residential, commercial, and industrial roofing installation and around-the-clock emergency repairs in Long Island, Queens, Brooklyn, New Jersey, and Connecticut. With over three decades of experience, they specialize in roof removals and installations completed within a day, as well as custom copper and metalwork, gutters, downspouts, skylights, and all roof repairs, making them a trusted choice for all your roofing needs.

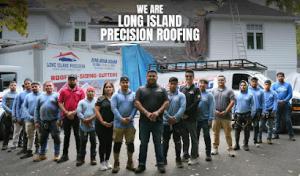
Long Island Precision Roofing
(516) 850-5500 liprecisionroofing.com
Serving
5.0 from 199 reviews
Welcome to Long Island Precision Roofing where our staff is committed to providing our customers with the highest level of service, quality, and reliability in the roofing industry. We believe that every home and business deserves a roof they can trust, and we operate with a steadfast dedication to integrity, transparency, and excellence in all we do. Our mission is simple: to always do right by our customers, delivering honest, straightforward solutions, and maintaining open communication every step of the way. With us, you can count on a job well done, with no surprises—just dependable, top-quality craftsmanship you can trust!
Mk Best Roofing
(516) 615-1791 mkbestroofing.com
Serving
4.9 from 57 reviews
MK Best Roofing is a trusted GAF certified roofing company based in Roosevelt, NY. Since 1998, we have proudly served all of Long Island, especially Nassau County, along with nearby neighborhoods such as Merrick, North Merrick, South Hempstead, Freeport, and Uniondale. Whether residential or commercial, we handle every roofing need such as installation, repair, maintenance, and replacement. Our roofing options range from metal, flat, and shingle to solar and cedar roofs. We are also specialize in providing professional siding and gutter installation for your house. All of our work is fully licensed, insured, and backed with 100% financing options. LICENSED & INSURED
All Island Renovators
(516) 232-5116 www.allislandrenovators.com
Serving
4.8 from 24 reviews
All Island Renovators is a family owned roofing and siding business. We have over 10+ years of experience. we specialize in residential roofs as well as flat roofs. Using only the best roofing brands there is on the market. We also do small roof leak repairs. Siding is also key to a beautiful house renovation. We use everything from vinyl siding, to azek trim and Hardie boards. Servicing all of Long Island NY.
NY's Finest Roofing & Siding
(833) 476-6369 nysfinestroofingsiding.com
Serving
4.9 from 114 reviews
Roof Repair & Replacement Experts in Long Island & Queens! Worried about leaky roofs or outdated exteriors? NY's Finest Roofing & Siding, Inc. delivers peace of mind, lasting value, and superior craftsmanship for your home. We specialize in: Roof Repair Roof Replacement Flat Roof Repair & Replacement Siding Installation Why choose us? Nearly 30 years of experience serving Long Island, Queens, Brooklyn, Manhattan & Westchester. Skilled and certified roofing contractors who use the best materials. Fast and thorough appointment setting to job completion. Highly recommended by satisfied clients. Let us help you fix your roof leak with our roof repair or roof replacement solutions. Long Island's best roofing & siding Contractor!

Nisi Home Improvement Inc. Roofing & Siding
Serving
5.0 from 223 reviews
"NISI Home Improvement is a trusted, family-owned business proudly serving Nassau and Suffolk counties. As a Google Guaranteed company, certified by Directorii, and fully licensed in both counties, we provide top-quality roofing, siding, windows, skylights, and more. Our experienced team is committed to delivering exceptional craftsmanship, backed by trusted warranties and a focus on customer satisfaction. Whether you're repairing, replacing, or upgrading, NISI Home Improvement is your go-to partner for transforming your home with confidence."
Long Island Flat Roof IslandWide Commercial Roofing
(631) 838-9285 www.longislandflatroof.com
Serving
4.9 from 108 reviews
IslandWide Commercial Roofing is full service commercial roofing company located in Amityville NY and have been proudly serving customers throughout the Greater Long Island Area since over 10 years . From urgent flat roof repairs to complete flat roof replacements, we have become one of the most trusted industrial and commercial flat roofing contractors across the li. We believe that offering quality commercial and industrial roofing systems is simply not enough. We also set out ensure that all of our industrial roofing contractors are highly trained to a standard of excellence, and can offer an unprecedented level of customer service."
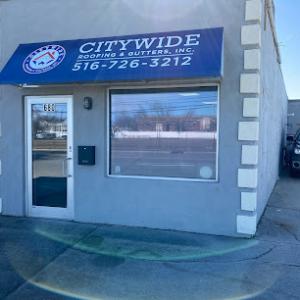
Citywide Roofing & Gutters
(516) 726-3212 www.citywideroofingny.com
Serving
4.8 from 46 reviews
We are a full-service roofing contractor specializing in residential and commercial roofing solutions. Our scope of work includes complete roof replacements, repairs, leak investigations, preventative maintenance, and roof inspections. We work with a variety of roofing systems such as modified bitumen, EPDM, asphalt shingles, and other flat and low-slope applications. Our team is committed to quality craftsmanship, safety, and project efficiency. We take pride in providing honest assessments, durable roofing solutions, and professional service from project planning through completion. Our goal is to protect our clients’ properties while delivering long-term value and peace of mind.
Responsible Remodeling
(516) 481-1723 www.responsibleremodeling.com
Serving
4.7 from 62 reviews
Responsible Remodeling provides roofing, siding, gutters, windows, doors, and decks to Baldwin, NY and surrounding areas.
Four Seasons Roofing & Exteriors
(631) 249-3377 fourseasonsroofingny.com
Serving
4.9 from 683 reviews
A Division of Four Seasons Enterprises, Inc.
Late spring through early fall is the preferred replacement window. In Nassau County, winter snow and freezing temperatures complicate tear-off, sealing, and inspection timing, so aiming for that warmer stretch helps minimize delays and mud season headaches. Plan projects to begin after soils have dried and before the first heavy rain of early fall, so crews can complete the bulk of work without weather-induced setbacks. If a storm or coastal event pushes work into shoulder months, contractors will schedule prioritizing safety and access-but that can compress timelines and push crews toward shorter daily goals.
Summer heat and humidity on Long Island place extra emphasis on attic ventilation, especially on older homes being re-roofed rather than newly built. Before shingles fly, ensure the attic is checked for sufficient intake and exhaust airflow, with louvers, gable vents, or ridge vents functioning as designed. Poor ventilation can trap heat and moisture, accelerating deck damage and reducing roof lifespan. If the attic is currently under-ventilated, the replacement crew should coordinate ventilation upgrades or temporary measures that avoid compromising the new roof's seal during the wind-driven months ahead. In homes with existing insulation issues, consider upgrading insulation once the roof is off to balance cooling in summer and warmth in winter.
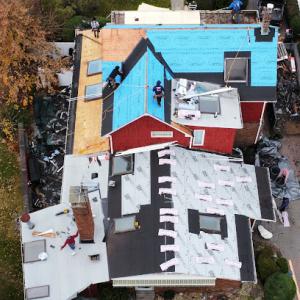
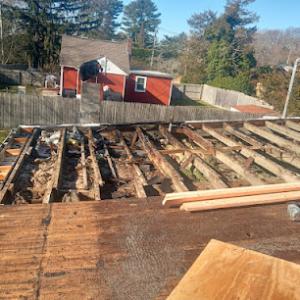
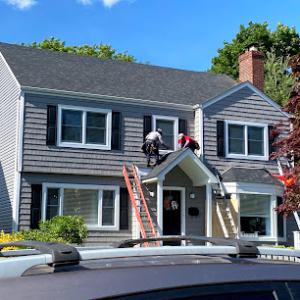
A typical Bellmore project starts with a careful removal plan that protects nearby landscaping and hardscape from shingle debris and dust. For homes with multiple roof planes or low-slope extensions, the crew may stage sections to prevent rapid weather exposure of exposed decking. On re-roofs, attention should be given to flashing transitions around chimneys, skylights, and roof-to-wall interfaces because coastal Nor'easters can exploit weak points after a winter cycle. When a storm aftermath is anticipated, crews often allocate priority sections for quick-diagnosis and temporary seal repairs to prevent rapid water intrusion while waiting for a full replacement window.
Many Bellmore homes blend pitched main roofs with low-slope areas over porches or additions. Those low-slope zones require careful material selection and seam detailing to resist wind-driven rain common after coastal storms. For porch or extension areas, verify that the roof deck is compatible with full-roll or flush-mount membranes and that edge terminations are secured to prevent water tracking under shingles during strong gusts. Communication with the contractor about these micro-areas ensures the overall system holds up through wind, rain, and the spring thaw cycle.
Fall scheduling can tighten quickly as contractors balance routine replacements with storm-response work after coastal weather events. If a delay occurs, prioritize critical leakage points and advise on temporary protection measures, such as tarping, to buy response time without compromising the integrity of the underlying structure. A well-timed replacement plan anticipates typical Bellmore weather rhythms and builds in contingency for coastal weather events that may interrupt steady progress.
Get a clear picture of your project costs upfront - no commitment required.


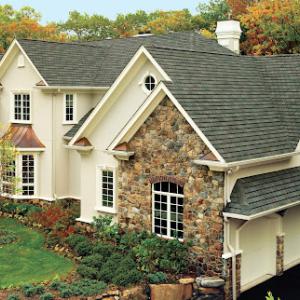
Asphalt shingles are the dominant fit for Bellmore's suburban housing stock because they match the area's common pitched roof forms and are widely used for re-roofing. They handle the winter freeze-thaw cycles, summer humidity, and coastal exposure well enough when installed correctly and vented properly. For most repairs or replacements, asphalt offers straightforward seating and detailing that align with familiar Nassau-style homes, helping maintain neighborhood rhythm while delivering reliable performance. When selecting an asphalt product, look for longer-lasting variants with good granule adhesion and a robust sealant, plus a warranty that covers wind uplift and membrane integrity. A well-sealed installation minimizes susceptibility to wind-driven leaks during Nor'easter storms and the occasional heavy downpour.
Metal roofing is a niche but relevant upgrade for homeowners prioritizing wind performance and lower maintenance in a storm-aware market. In Bellmore, metal panels or standing-seam systems can offer superior resistance to high winds and hail compared to traditional shingles. They also shed rain quickly, which helps during intense spring storms and thaws. Metal requires precise fastener seating and proper panel alignment, especially over low-slope sections or over additions, to prevent leaks at penetrations and seams. If choosing metal, consider profiles that align with the neighboring rooflines to preserve the visual character of the streetscape. In some cases, metal can be paired with a secondary underlayment strategy to enhance ice-dam protection along eaves and flashings.
Tile, wood, and synthetic products appear in the market but are less typical for Bellmore's prevailing home styles and may require closer review of structural load, detailing, and neighborhood fit. Clay and concrete tiles provide long service life but add considerable weight; a structural assessment is essential before planning a tile upgrade, particularly for add-ons or porches with low-slope transitions. Wood shingles and shakes offer classic curb appeal but demand diligent maintenance against moisture and pests; they can be more sensitive to coating wear in humid summers. Synthetic or composite shingles try to mimic traditional looks with enhanced resistance to moisture and fading, and may deliver a balanced performance for moderate wind zones. When considering any non-asphalt option, verify compatibility with existing framing, attic ventilation, and the local storm exposure to prevent unintended vulnerabilities.
In a climate marked by wind, rain, and ice-dam cycles, the best choice blends performance with compatibility to existing roof geometry and neighborhood style. Prioritize materials and profiles that provide dependable water shedding, robust flashing detail, and predictable installation outcomes on pitched roofs with typical intersections, valleys, and dormers. For Bellmore's extensions and porches, ensure seamless transitions and proper flashing to minimize leak pathways. Regardless of material, pairing a high-quality underlayment with sound ventilation and targeted ice-dam mitigation strategies will support a longer roof life amid winter storms and coastal influences.
Pricing in this South Shore village reflects Nassau County labor costs and the prevalence of full re-roofing rather than simple overlays. When a roof is deeply worn or has multiple planes, the project tends to move from cosmetic refresh to full tear-off and rebuild, which drives the per-square costs higher. Asphalt shingles remain the most common option for this climate, but when a home features several roof planes, dormers, or low-slope tie-ins, expect additional labor and waterproofing considerations that push the total up from your baseline.
Concrete tile and clay tile sit at the top of the price spectrum, especially in homes with intricate layouts, multiple penetrations, or chimney flashing that needs careful resealing. Synthetic or composite shingles offer a middle ground, balancing durability and upfront cost in the $600 to $1100 per square range. Metal roofing often lands between $900 and $1600 per square, prized for longevity and wind resilience in storms. Asphalt shingles, the most common fallback for cost-conscious replacements, typically run from roughly $350 to $700 per square, though complex scopes with skylights or dormers can push the total higher.
Costs often rise when Bellmore homes have multiple roof planes, dormers, chimney flashing, skylights, or low-slope tie-ins that complicate tear-off and waterproofing. Those features require more detailed stripping, additional waterproofing steps, and sometimes temporary containment to protect interior spaces during rain events. Nassau County labor rates influence both material handling and crew availability, particularly after major wind or rain events.
Storm-driven demand spikes on Long Island can affect scheduling and pricing, especially after major wind or rain events when emergency and repair crews are stretched. If a large incident hits, expect longer lead times and variable subcontractor availability. For best results, start planning early in the off-season, and build a small contingency into the budget to accommodate rapid rescheduling or expedited tear-offs if lanterning leaks appear during a storm sequence.
Find contractors experienced in skylight installation, flashing, and leak repairs to bring natural light into your home.
For Bellmore-area full re-roofs, permits are typically handled through the applicable local building department in Nassau County, and the exact process can vary depending on village jurisdiction. That means you can't assume a single, universal path-your address may fall under a different village or town procedure, and that distinction matters for how quickly approvals move and which forms are required. Before scheduling a tear-off, verify the correct agency and any village-specific forms or notices to avoid project delays that can leave you with open work or unpermitted materials.
Inspection timing matters locally because tear-off and final inspections are used to verify underlayment, venting, and shingle installation before the job is fully closed out. If inspections lag or miscommunications happen, you risk rework, added costs, or a lien hold on the property. Expect interim inspections to verify stage-by-stage progress, not just the finished roof. Prepare by keeping documentation of underlayment choices, attic venting calculations, and manufacturer installation guides accessible for the inspector.
Bellmore homeowners should confirm whether their property falls under a village or town review path before scheduling work, since processing times and administrative steps can differ. A village path might introduce extra permits or notices specific to that community, while a town path could streamline certain reviews but impose different hold points. If the project includes extensions or low-slope sections, ensure the plan clearly shows transitions and drainage details so the inspecting authority can evaluate the entire system. Misalignment between the design and the local review path is a common source of delays.
After major regional weather events, insurers may request detailed contractor estimates and photo documentation before approving repair or replacement scope. You should keep a well-organized file on hand: record roof age, prior repairs, and pre-loss condition with dated photos from different angles and attic shots showing insulation and sheathing. When a claim comes in, respond quickly with the most complete package you can gather. Delays or incomplete documentation can stall approvals and extend exposure to leaks.
Long Island carriers commonly scrutinize wind- and storm-related roof claims, so Bellmore homeowners benefit from having clear, objective evidence of damage and measurable restoration plans. If shingles are curled, flashing is loose, or there are visible gaps at connections to chimneys or vent stacks, document those specifics with close-ups. A professional inspection that notes damage beyond an obvious spot can prevent a later denial or nickel-and-diming of the scope.
Coverage decisions in Bellmore can be affected by older roofs and higher-risk storm exposure, which may influence deductible choices and replacement timing. If your roof is nearing the end of its expected life, the insurer might push for higher deductibles or a replacement rather than a simple repair after a wind event. In that situation, having an objective, independent assessment ready helps you negotiate a fair path that aligns with the actual damage and your long-term protection.
Prepare an emergency plan that prioritizes tarping and temporary rain fixes to minimize further damage while you navigate the claims process. Choose a local, reputable contractor who can provide detailed, itemized estimates and clear before-and-after photos. Keep a move-forward mindset: documented efficiency now can reduce the risk of delays later and protect your home from a lingering weather cycle.
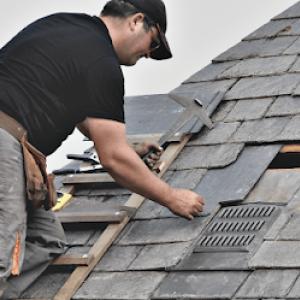
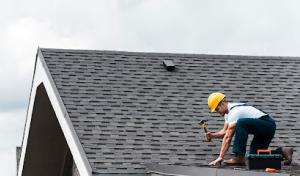
Chimney intersections are a recurring concern in this area because many homes pair older masonry chimneys with newer reroofed shingle systems. Inspect the joint where the chimney meets the roof line for hairline cracks, gaps, or deteriorated flashing. In colder months, freeze-thaw cycles can open small gaps into big leaks. At least twice a year, check the metal flashing along the chimney seam and the counter-flashing tucked beneath shingles. If mortar on the flue is cracked or crumbling, plan a focused repair before the next winter storm. When you notice weeping around the base of the chimney, treat it as a priority and seal with a long-lasting flashing kit or call in a pro to reflash and reseal with compatible sealant.
Skylights and roof penetrations are common service items in the local market, indicating that flashing and seal failures around openings are a practical homeowner concern. Look for loose or lifted shingles around the skylight flange and signs of dried or cracked sealant. Inspect the curb or flashing tape where the skylight meets the roof for moisture tracking. During heavy rain, observe if water travels toward the interior at any joints near the skylight or vents. For flat or low-slope sections over porches, ensure the step flashing is continuous and pressure-sealed with appropriate sealant. If you see fogging, staining, or damp spots on the ceiling near openings, treat it as a leak signal and prioritize resealing or flashing replacement.
Transitions between main roofs and low-slope additions are especially vulnerable in homes expanded over time. Inspect the edge where a steeper main roof meets a low-slope extension-look for gaps in sealant, perched debris that holds moisture, and misaligned shingles that expose underlayment. At least annually, verify that the interior drip edge and gutter lines align smoothly across the transition. If winter ice damming occurs at these junctions, address underlying flashing and ensure proper drainage angles to prevent snow build-up from dumping water behind the flashing.
Find contractors experienced in skylight installation, flashing, and leak repairs to bring natural light into your home.