Last updated: Apr 19, 2026
Oregon sits in Northwest Ohio where spring severe storms and hail are a primary trigger for sudden roof damage and insurance activity. That means you may see rapid shifts from sunny mornings to hail-driven dents and leaking afternoons. The roof you stand on after a storm is often the first indicator of how the season will unfold, so recognizing the pattern early is essential. Weather swings around Lake Erie's influence can push hail sizes and wind speeds higher than you expect, and neighbors who act fast tend to minimize further damage.
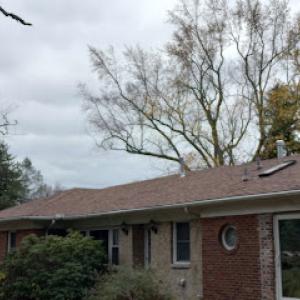
Spring hail can hit without warning and impact a wide area in a matter of minutes. Shingles that look intact can suffer underlayment and flashing damage that leads to slow leaks once temperatures drop. If you notice granule loss, bruised shingles, lifted edges, or granules accumulating in gutters after a storm, treat it as a flashing risk and water entry concern. Wind-driven debris-from branches to siding scraps-can nick roof edges and vents, creating access points for moisture that worsen quickly as cold fronts roll in. An urgent response plan is to document what you see, take clear photos from multiple angles, and mark the date and storm name if you have it. Quick documentation supports claims and speeds up inspection scheduling.
After a storm, you should build a simple damage map: note the longest uninterrupted stretch of roofline and any isolated impact sites. Photograph interior signs of trouble, such as water stains on ceilings or attic condensate tracks, and capture close-ups of damaged flashing, torn shingles, or lifted tabs. Keep a flashlight handy to inspect vents, chimneys, and skylights, especially where ice dams could later form. If you have attic access, check for daylight peeking through rafters-any daylight is a red flag. Maintain a dated file of the images and a brief description of observed conditions. This focused evidence helps insurers assess whether a temporary repair is warranted and what the replacement scope might include.
Autumn wind events and storm debris are a practical concern for Oregon homeowners because wind-driven impact can damage shingles, flashings, and roof edges before winter sets in. As leaves, sticks, and accidental project debris accumulate around the roof line, fasteners and edges become more vulnerable. Do a thorough sweep of the gutters, downspouts, and roof perimeters after each major wind event. Look for lifted shingles, loose granules in gutters, or a sudden uptick in shingle curling along eaves. If you notice any signs of exposed underlayment or compromised seals around vent stacks and flashing aprons, arrange a professional inspection before freezes lock in the damage.
Because Ohio experiences freeze-thaw cycles, emergency leak stabilization and spring-through-fall scheduling take on extra importance. The freeze-thaw pattern can make temporary repairs more effective in milder stretches, but it also means you should avoid prolonged exposure to interior moisture during the cold season. Start proactive assessments in late winter through early spring, aligning with the seasonal lull between heavy storms and the main storm season. If an insurer signals approval for temporary stabilization, act quickly to seal leaks and protect interior spaces, while scheduling a formal roof replacement in the next favorable window. That window typically favors spring through fall, when tarps and quick patches can be replaced by more durable materials, minimizing the risk of repeat storm damage.

Busy Bee Restoration
Oregon, Ohio
5.0 from 2 reviews
We specializes in all facets of storm restoration construction. Roofing, Gutters and Siding. FREE Inspection Just Call and schedule a time that works best for you.

Saturn Precision Plus
(419) 461-5559 www.saturnroofinggutters.com
Oregon, Ohio
5.0 from 2 reviews
At Saturn Precision Plus you can look for top quality service related to Roofing, Siding and Baths
Salgau Roofing
(419) 691-9641 salgauroofing.com
Serving
4.8 from 203 reviews
Salgau Roofing, established since 1998 in Toledo, Ohio, is a trustworthy roofing contractor serving Ohio and Michigan. With an emphasis on craftsmanship and customer service, Salgau Roofing strives to deliver top-notch services for every project. Our extensive range of offerings ensures the best solutions for your roofing needs. Our team's professionalism, reliability, and over two decades of experience ensure a durable and budget-savvy future for your home.
Recovery Remodeling
(419) 460-1483 www.recoveryremodeling.org
Serving
4.9 from 31 reviews
With over 25 years of contracting and home remodeling experience, we are confident as an insured and licensed contracting company. We can complete your project with the desired outcome, leaving you satisfied with the recent work performed. Our team is committed to delivering high-quality, affordable home renovation services with a customer-first approach. We prioritize honesty, clear communication, and fair pricing, making each project an enjoyable and engaging experience for our clients.
LateNight Roofer
(419) 787-1370 www.latenightroofer.com
Serving
4.8 from 22 reviews
Hello, I am Joshua Rawlings, i have LLC, I am the one-man company known as “Late Night Roofer,” recently featured on the P.O live Facebook news. Roofing is my passion, and I provide quality work quickly, It's love not work . Four-one-nine 787-1370 text or call and book today or look me up on Facebook Joshua Rawlings.
Bryer Company
(419) 855-3098 bryercompany.com
Serving
4.9 from 76 reviews
With our wide variety of services, Bryer Company roofing and remodeling can take care of your construction related needs! Bryer company is family owned and operated, with feet on the ground, quality is sure to follow. Serving Toledo, Sylvania, Oregon, Genoa, Monclova, Perrysburg, Maumee, and beyond. Roofing, painting, and asphalt paving there is a good chance we can get your project done. Serving Toledo and the surrounding area in our 30th season as a respected Commercial and residential contractor Bryer Company will get your roofing and painting needs done. We thank all of our Toledo area customers for your support of Bryer Company roofing and remodeling as contractor of choice for Toledo, and beyond.

Victors Home Solutions
Serving
5.0 from 550 reviews
From our free 21-Point Roof Inspection to our 50-Year Leak Free Guarantee, we’ll protect your home and family for years to come. With almost two decades of roofing experience and a BBB Accredited A+ rating, Victors Home Solutions is the superior roofing and home improvement company across Ohio, Michigan, Kentucky, and Indiana. We provide the highest quality workmanship for residential roof repairs and replacements, seamless gutters, and attic insulation services.

Holt Roofing Company
(419) 478-2900 holtroofing.com
Serving
4.7 from 169 reviews
Holt Roofing Company, Inc provides residential and commercial roofing installations and repairs, gutter installations, skylight installations for all types of materials including shingles, metal, flat, TPO, EPDM, PVC, modified bitumen, and roof coating in the Toledo, OH area.
Ryan's Roofing & Repair
(734) 334-3835 ryansroofingandrepair.com
Serving
4.7 from 69 reviews
Why Choose Ryan's Roofing & Repair? We are licensed and insured! You'll want to work with a professional roofing company in Lambertville, MI You can't afford to take shortcuts when the integrity of your roof is on the line. With over 15 years of experience, the local roofers at Ryan's Roofing & Repair can reinforce your existing roof and make sure your new one can withstand whatever Mother Nature can throw at it.

Rocket Restoration
Serving
4.9 from 21 reviews
At Rocket Restoration we offer a wide range of roofing, siding, gutters, and window services for your home and commercial properties. We are Veteran-owned, and BBB A+ rated, trusted experts known for our high-quality installs and repairs. Call us to reduce your power bills and insurance premiums. With financing available for all budgets and serving Northwest Ohio and Southeast Michigan, we are committed to protecting your home!

Great Lakes Home Remodeling
(419) 279-8716 greatlakeshomeremodeling.com
Serving
4.5 from 295 reviews
With over two decades of experience in the home improvement and Stone Coated Metal Roofing industry our Team has the knowledge, skills, and licensing to handle many different home renovations and permanent home solutions for our customers. Our goal is to offer you dependable and permanent home improvement services and craftsmanship. We provide premium roofing and siding products such as Stone Coated Metal Roofing, insulated siding and architectural fiberglass shingles for customers throughout Ohio, Michigan, and Indiana.
Pro Craft Home Products
(419) 475-9600 www.procrafthomeproducts.com
Serving
4.8 from 109 reviews
Pro Craft Home Products is one of the top Roofing Companies Toledo Ohio, offering roof replacement, roof repair, metal roofing Toledo, and asphalt shingle roofing. Our Toledo Ohio roofing contractors provide residential and commercial roofing services, siding replacement, window replacement, gutter installation, gutter guards, and blow-in insulation. Serving Toledo, Northwest Ohio, and Southeast Michigan, our certified Toledo roofing company delivers reliable service, free inspections, and strong warranties to protect homes and businesses.
After hail or high winds sweep through, insurers in this Ohio market rely heavily on what gets documented. A contractor's estimate alone won't carry the day; photos and a clear record of roof condition play a central role in the claim. If there is a storm before the claim opens, gather dated photos from at least two angles per affected area: shingles edges, hip and ridge lines, valleys, and any visible tree damage on the roof. Keep a simple timeline of events-when hail came down, when shingles showed impact marks, when leaks appeared inside, and when crews first accessed the roof. This isn't about fancy equipment; it's about a straightforward, dated trail that adjusters can verify quickly. Ensure the photos are labeled with dates and the location of each shot, and store them in a cloud folder you can share with the insurer or your adjuster.
Adjusters in the region often request detailed condition reports, so having a thorough, readable record matters. Pre-repair photos are not optional; they're part of the claim's foundation. If a storm hits over a weekend and you hire a contractor to begin a safety inspection, document everything you see before any repairs start. Note missing granules, lifted shingles, cracked seals, and any metal flashing corrosion. The adjuster will compare this to their own assessment, so consistency helps. If you've saved any past inspection notes or weather-related damage from previous seasons, keep them handy for comparison. For Oregon homeowners, it's common that the claim hinges on whether the roof condition meets threshold for replacement or can be supported as a spot repair, so the more precise the documentation, the smoother the discussion with the insurer.
Depreciation discussions are a meaningful part of Ohio roof claims, which can affect whether a homeowner pursues spot repair or full replacement after a storm. Depreciation is frequently tied to the age of the roof and the expected remaining life, so articulate clearly what is damaged and what remains functional. If the roof has multiple layers or mixed materials, document which portions were compromised by the storm and which sections show prior wear. When depreciation is considered, the adjuster may propose a split solution: patching where feasible while pursuing replacement for the severely damaged zones. A well-timed, well-documented report supports a stronger negotiation position and reduces back-and-forth during settlement.
Start by notifying the insurer promptly, then line up a licensed roofer who can provide a quick, objective condition report and a photo set. Request a written scope of work that matches the on-roof findings, including a line-item estimate for any required repairs. If you suspect depreciation will limit coverage, ask the adjuster to explain the calculation and request a clear explanation of what the insurer will reimburse for each damaged area. Throughout the process, maintain a consistent photo log, share updates with the adjuster, and confirm the agreed scope in writing before work begins. In this market, a disciplined approach to documentation and a transparent, step-by-step dialogue with the insurer can keep a storm claim focused and on track.
Connect with contractors who help homeowners navigate the claims process from damage assessment to final approval.


Spring through fall is the preferred replacement season in Oregon because Ohio winter freeze-thaw conditions can stress underlayment and flashing details during installation and early service life. For windows, that means your crew can work in milder temperatures without the risk of rapid condensation inside wall cavities or bonded sealants freezing before they cure. Scheduling outside the peak heat months helps prevent glazing materials from sagging or dry-wood expansion that could affect fit. Plan replacements so the most vulnerable rooms-those facing prevailing winds or direct afternoon sun-get addressed before the hottest stretch when heat can accelerate sealant curing and material expansion.
Summer heat and humidity in this part of Ohio can accelerate shingle aging and ventilation-related issues, so attic airflow and install timing matter during peak warm months. When replacing windows, ensure proper attic or wall venting is in place to avoid pushing moisture into the assembly. If a storm front moves through, your window crew should have a plan for tarping and securing exposed openings to avoid wind-driven rain intrusion. In Oregon, a mis-timed install during storm season can leave you with a temporary seal that leaks before the sealant fully cures, so ask for a contingency window in the schedule and a weather buffer in the contract.
Seasonal permit processing and inspection timing can vary, so Oregon homeowners planning around storm season often need to account for both weather delays and inspector availability. When a replacement window is approved, request a clear timeline that includes fabrication lead times, on-site window removal, flashing rework, and interior trim restoration. Keep a simple photo log of the exterior before and after removal, especially if the home experiences strong spring winds. Document any preexisting damage to surrounding siding or flashing so the installer can address those details in one pass, reducing back-and-forth during a late-season window.
In this region, a window upgrade should emphasize air sealing and moisture management. Look for products with low air leakage ratings and proven durability against humidity swings near Lake Erie's influence. Consider laminated glass for high wind or hail exposure zones and external cladding that matches or complements the existing siding to minimize long-term risk of water intrusion at corners. When choosing installation methods, favor systems with precise flashing that integrate with existing roof-to-wall transitions, reducing the likelihood of future leaks around sills and jambs. Ensure the installation crew uses a back-best practice sequence: remove interior trim last, protect interior finishes during exterior work, and verify that flashing and sealants cure fully before replacing interior molding.
Asphalt shingles are a dominant choice in Oregon, aligning with the local contractor base where asphalt specialization is one of the most prevalent material signals. This familiar option blends well with the typical roofing footprints found on mid-sized, timber-supported homes common in the area. In the wake of spring hail and brisk lake-effect winds, asphalt shingles offer straightforward replacement paths and quick patchwork potential after a weather surge. When evaluating this material, look for impact-resistant grades and proper seam alignment to maximize resistance during rapid temperature swings that can occur between late winter and early spring.
Metal roofing has meaningful local presence in Oregon's contractor market, making it a realistic upgrade path for homeowners comparing hail resilience, longevity, and higher upfront cost. Metal panels can shed hail more cleanly than some shingle configurations, which helps limit pitting and immediate roof damage after storms. In the Ohio freeze-thaw cycle, metal also benefits from strong wind performance and ease of inspection after a storm. If choosing metal, consider a panel profile and coating designed for coastal exposure, with attention to fastener spacing and reinforced flashing around vents, chimneys, and skylights. Proper installation matters as much as material choice, given the region's wind-driven roof edge stress and potential for ice formation along eaves.
Tile, wood, and synthetic options exist in the market, but their fit in Oregon must be weighed against Ohio freeze-thaw exposure, installation complexity, and the need for proper structural and flashing details. Clay and concrete tiles add long-term durability in dry stretches but can be heavier and more delicate under hail events. Wood shingles or shakes offer distinctive curb appeal, yet they require meticulous maintenance to prevent moisture-related issues and may suffer under freeze-thaw cycles if not properly sealed and vented. Synthetic and composite shingles provide a middle ground, combining practical resistance with flexibility; however, their performance hinges on correct underlayment and flashing details to handle temperature extremes and heavy rainfall patterns typical of the season. If considering any of these, ensure the roof deck and support structure are rated for the chosen material's weight and that flashing around chimney vents and penetrations is upgraded to handle seasonal moisture shifts.
Oregon homes often feature varied roof lines and roof-to-wall transitions that demand precise flashing, drip edge, and underlayment choices to prevent leaks during rapid weather changes. No matter the material, attention to valley design, seam integrity, and edge protection is crucial for storm resilience. In areas with frequent hail and wind exposure, plan for enhanced nail spacing, wind uplift considerations, and seamless vent boot connections to reduce the risk of wind-driven leaks after a storm. Structural compatibility matters most when selecting heavier options like tile or certain metal configurations; if a roof is already showing signs of age, a detailed assessment may guide whether replacement should prioritize a material with proven performance under freeze-thaw cycles and aggressive spring weather.
In this market, asphalt shingles are the workhorse. You'll see most homes replaced with this material, and the contractor pool accustomed to installing and repairing them quickly after hail and wind events. Metal specialists exist, but they're a smaller slice of the scene, so when you're weighing options, you'll find more local crews with asphalt expertise and faster scheduling. Expect costs to reflect the typical rhythm of Northwest Ohio weather, with a bias toward standard profiles and weather-ready underlayment.
For asphalt shingles, budgeting roughly 350 to 550 dollars per square (100 square feet) covers most replacements, depending on shingle class and roof geometry. Metal roofing commands a higher ceiling, generally 700 to 1,200 per square, driven by panel profiles, fastener systems, and longer warranties. Premium materials such as clay or concrete tile push costs higher still, often around 1,000 to 1,800 per square for tile rooftops, while wood shingles or shakes sit in the 550 to 900 per square range. Synthetic or composite shingles run about 450 to 900 per square, offering a balance between performance and cost.
Storm-driven demand spikes after hail and wind events can compress the window you have to get a roof replaced. In practice, that means you may face faster booking timelines and tighter turnaround, especially for tear-offs and rapid replacements required by weather-driven damage. This isn't just about labor; the supply chain for materials-especially premium or specialty types-tightens as crews shift to high-priority storm work. Having a clear plan and a few backup dates helps keep the process moving when the weather clears but the calendar is already full.
Even when weather cooperates, you'll encounter the stage-by-stage cadence that's common here: initial assessment, material selection, and then the actual tear-off and installation. Local cost patterns reflect the blend of asphalt dominance with a smaller but active metal specialist niche, alongside occasional premium material projects. Some jobs involve review steps and plan reviews for certain material types that can add time and administrative cost to a full replacement. Understand that rush scheduling can drive up price, while stable, off-season timing can trim costs and reduce stress.
Get a clear picture of your project costs upfront - no commitment required.

Tri-State Windows, Siding & Roofing
(419) 478-6577 www.remodelwithtristate.com
Serving
4.8 from 188 reviews
A full roof replacement in Oregon typically requires a permit, with the building department reviewing tear-off and new roofing work. That means you cannot treat a roof as a quick DIY or a simple swap; the paperwork must show both the existing structure and the planned layers. The review process is not invisible-the plans are checked for ventilation, tie-ins to existing gutters, and any historical or zoning considerations that could affect the pitch or overhangs. If the project skirts the permit, you risk costly delays, fines, and the need to undo or redo work.
Inspections are staged during construction and a final inspection is required after completion, so project sequencing must account for municipal sign-offs. In practice, that means your roofer will schedule interim checks as required by the code official, often tied to the removal, underlayment, and shingle installation milestones. A hiccup in one inspection can pause progress for days, so coordinate timing with the crew and the inspector to avoid weather-driven holds that pile up during storm season.
Processing times can vary seasonally in Oregon, and certain material types may trigger plan review rather than simple over-the-counter approval. Plan-review materials tend to come with tighter scrutiny for wind-resistance, ventilation calculations, and drainage details. If a storm-impacted roof is on the docket, fast-tracking is possible, but it still moves through formal channels. Expect some transitions between permit issuance, set of approved plans, and the sequence of tearing off and installing roof systems.
When the final inspection passes, the permit closes and the project is deemed compliant. If any discoveries occur after the roof is in service-ponding near eaves, improper ventilation, or unaddressed penetrations-be prepared for remedial work before the certificate of occupancy or final sign-off is reissued.
Freeze-thaw cycling in Ohio commonly accelerates wear at underlayment transitions and flashing details, making leak points more likely around penetrations and roof edges. In Oregon-area homes, that cycle can push hairline seams and sealants past their tolerance, so small imperfections tend to grow into noticeable drips after a cold snap or a quick thaw. The result is often hidden until a heavy rain arrives, forcing a rushed diagnosis and storm-driven repairs that fail to address the root cause.
Spring hail and debris accumulation can create damage that is easy to miss from the ground, especially on aging asphalt roofs common in the local market. Granule loss on shingles is a warning sign, but dents, soft spots, and lifted edges around valleys or vents can hide under accumulated pine needles and roof clutter. When that damage sits unnoticed, a small exposure can become a larger, shoulder-season leak or accelerated wear during the next storm.
Summer humidity and heat can worsen ventilation-related shingle wear in Oregon-area homes, contributing to granule loss and shortened service life if attic airflow is poor. Poor ventilation allows attic temperatures to spike, accelerating adhesive breakdown and drying out the sealant at flashing transitions. Over time, this weakens perimeters where shingles meet dormers, chimneys, and vent pipes, inviting slow leaks that escalate after hot afternoons.
Edges, rake lines, and flashing details are common failure points because they endure continual weather exposure and shifting structural movement. Freeze-thaw action can pry loose underlayment at these transitions, while wind-driven debris concentrates impact damage at roof perimeters. Regular, careful inspection-especially after storms-helps catch corner delaminations, nail pops, and loose step flashing before they propagate inward.
Find contractors experienced in skylight installation, flashing, and leak repairs to bring natural light into your home.


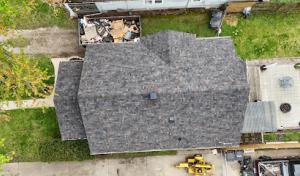
In this market, crews with strong tear-off and replacement experience stand out. The typical Oregon home needs careful debris control, ladder safety, and precise shingle alignment after a substantial removal. A contractor with a history of complete roof replacements, not just patch work, will handle the scope efficiently and reduce the risk of surprises after the first storm season.
When you interview crews, ask specifically about their past projects that required full tear-offs and plywood or underlayment replacement. For homes with steep pitches or multi-story access, insist on evidence of successful, safe elevated work. A local contractor who regularly schedules efficient tear-off days tends to finish faster and with fewer callbacks, which matters when spring hail or wind turns quickly.
Cleanup is a standout local hiring priority. Request a detailed debris plan: tarping, disposal containers, and post-job blow-throughs to check for nails and shingle fragments. Look for photos or references showing tidy job sites from day one, plus a written guarantee that cleanup is included in the contract. In this area, owners often compare contractors on how well the site is left after the crew leaves, not just how the roof looks at completion.
Fast, predictable communication is common in the Oregon market. Test responses to each inquiry and note whether the contractor outlines a realistic work window and follow-up steps. While price matters, the best-fit crew also demonstrates practical scheduling and a clear plan for storm-season timelines. Ask for a point of contact who will be available during the project for quick decisions and site questions.
Verify insurance coverage with certificates naming the homeowners as additional insured and ensure a written lien-release provision is included. Request references from recent projects of similar size and pitch, and contact them about cleanup, on-site conduct, and how the crew managed weather interruptions. Finally, confirm the crew's local presence and a concrete plan for coordinating material deliveries, waste removal, and the final inspection.