Last updated: Apr 19, 2026
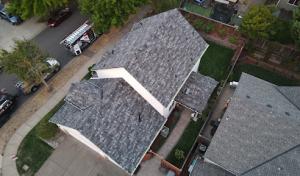
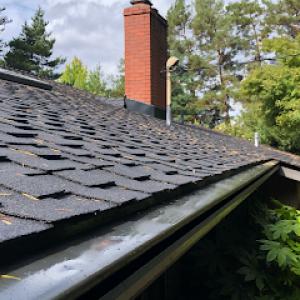
The west-side Portland metro pattern shapes Sherwood's roof life in a real and practical way. Wet winters, frequent drizzle, and cooler temps mean moisture lingers on roof surfaces longer than many homeowners expect. Moss and mildew aren't cosmetic issues here; they're early signs of ongoing moisture retention that can accelerate decking wear and shorten a roof's useful life. Mature neighborhoods with generous tree cover compound the effect by shading roof planes for long stretches, keeping them damp and shaded enough to encourage moss regrowth. In short, the climate turns moss into a primary maintenance concern rather than a one-off cosmetic issue.
Moss and mildew tend to take hold first on shaded, north-facing or west-facing slopes where moisture lingers after rain. Look for dark streaks, crusty green patches, or felt-like growth between shingles and along the ridges. If you notice a smell of mildew or see a dense green mat in any roof plane, treat the situation before it leads to accelerated wear. The danger isn't just surface appearance-moss can lift shingle edges and trap moisture that seeps into the underlayment and decking. Regular inspections after heavy rains or in late fall keep the problem manageable and help you catch underlying decking issues early.
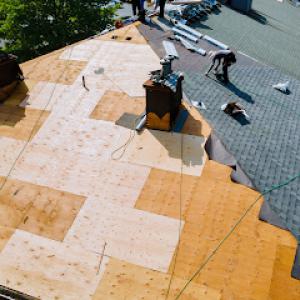
The region's typical pattern means peak tear-off, dry-in, and inspection windows align with the dry season. Winter rainfall and cold snaps can delay each step of reroofing work, stretching timelines and increasing the risk that a cut-in or tear-off is interrupted by a cold snap or prolonged rain. Scheduling during the dry summer window isn't just convenient; it reduces moisture-related delays and gives crews a clearer, more predictable path to finish a project without weather-induced setbacks. The aim is to complete the critical dry-in with a solid, moisture-controlled installation window so the new roof system can seal properly before the next wet season.
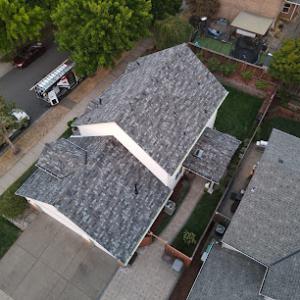
In established neighborhoods with mature trees, roof planes tend to hold shade longer and accumulate moisture more readily. That persistent dampness accelerates moss growth and can mask deck deterioration beneath a dense moss layer. Before reroofing, perform a thorough inspection of the decking and underlayment in shaded sections where moss has thrived. Expect to find soft spots or hidden rot under areas that look relatively sound from afar. Addressing these issues now-while the roof is exposed and open-saves time and prevents rework after the new roof is installed. If a roof is already showing widespread moss and potential deck compromise, plan for a more comprehensive replacement approach rather than a quick cosmetic refresh.
1) Schedule a mid-summer or early-fall inspection of all roof planes, with extra attention to shaded slopes and corners where moss tends to concentrate.
2) Prioritize a thorough cleaning and moss abatement plan before any tear-off, using methods appropriate for the roof material to avoid damage to the shingles or tiles.
3) Confirm the dry-in phase will be completed during the warm, dry stretch, and map out contingency steps for potential weather interruptions.
4) Prepare the deck and underlayment assessment by removing moss-laden debris and verifying flashing and ventilation points so the installation can proceed without rework.
5) Coordinate a staged approach if shading and tree cover are heavy; some crews will start with the most moss-dense areas to reduce moisture retention early in the process.
Keep an edge on moss control with proactive measures after the new roof is installed. Regularly clear debris from eaves and gutters, trim overhanging branches that shade critical roof zones, and consider periodic moss-softening treatments if the local shade pattern remains persistent. By aligning maintenance with Sherwood's wet-winter reality and the dry-window installation strategy, you reduce moisture-driven wear and extend the life of the new roof, even in a landscape where shade and moisture are the norm.
The climate pattern in this area brings extended wet seasons and frequent shade from mature trees, which means moss growth and moisture retention are ongoing concerns for any roof system. In Sherwood, a roof that can shed water promptly and resist moss buildup helps preserve the deck, underlayment, and structure below. Dry installation windows matter, because a prolonged wet spell can stall work and invite moisture into imperfect transitions. When planning a reroof, consider how your chosen material handles dew and rain during the late fall and winter, and how well it dries before the next wet cycle begins.
Asphalt shingles dominate the local housing stock due to familiarity, compatibility with existing underlayment, and straightforward installation. They perform well in wet winters when properly installed and left with good ventilation to prevent moisture pockets. However, algae, moss, and moisture retention are recurring local concerns. In a neighborhood with dense shade, asphalt shingles benefit from a more robust stride of underlayment and a careful slope assessment to minimize water sheeting over the roof surface. Regular moss control and timely cleaning become practical maintenance steps to extend service life without compromising the roof's integrity.
Metal roofing sheds water and debris efficiently during the rainy season, which can reduce surface wear and slow moss colonization on exposed areas. Yet, in a climate with repeated wetting, detailing at penetrations, transitions, and seams is critical. Flashing around skylights, chimneys, and vent pipes should be matched to the metal system and inspected routinely. For Sherwood homes, a metal roof paired with continuous underlayment and well-sealed fasteners can outperform some other materials in durability, but the installation quality at edges and around penetrations often determines long-term performance.
Clay tile and concrete tile have a strong curb appeal and good durability when properly supported, but heavier tile systems require structural confirmation and an updated, moisture-tolerant underlayment. In western Oregon conditions, tile systems must be paired with a ventilation plan that discourages mold and wood rot underneath. Wood shakes and shingles add rustic charm but are more sensitive to sustained moisture, requiring careful ventilation, treated wood choices, and proactive moss management. Synthetic products offer dimension stability and quicker installation, but consider how they handle wind-driven debris, freeze-thaw cycles, and shade-driven moss growth in this market.
Homeowners often encounter a mix of materials within a single neighborhood, reflecting stocking choices and renovations over decades. When selecting among asphalt, metal, tile, or synthetic options, prioritize a system that aligns with existing structure, attic ventilation, and the likelihood of consistent moisture exposure. In Sherwood, the goal is to minimize moisture intrusion during prolonged wet periods while allowing for reliable drying windows between storms. Invest in robust underlayment, appropriate ventilation, and meticulous detailing at transitions to support the roof's long-term performance in this climate.
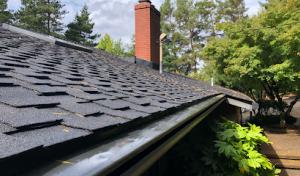
When the rains come, you'll find that leak investigations often center on flashing at skylights, chimneys, valleys, and the roof-to-wall transitions, not just the field shingles themselves. Valleys accumulate runoff from multiple slopes, and curb flashing around skylights and abutments faces a higher risk because those joints endure repeated expansion and contraction from wet winters. If a leak shows up after a storm, start by tracing the water to the nearest flashing detail rather than assuming the shingles failed first. In Sherwood's damp pattern, moisture can travel along light-fast paths through nearly invisible seams before any staining appears.
The local contractor market shows meaningful demand for skylight work, which aligns with the need to monitor curb flashing and surrounding roofing after repeated wet winters. Skylights sit on top of a roof valley of sorts: multiple planes converge there, and improper flashing or aging sealants can channel water inward. If you notice condensation between panes or damp spots around the curb, inspect the flashing apron and counter-flashings first. A small seepage at the curb can become a larger nuisance over several weeks if left unchecked.
Because moisture can linger for long periods in Sherwood, small flashing failures are more likely to become sheathing or attic ventilation problems before summer reveals them. Moist air that migrates under shingles frequently finds a way through compromised flashing near chimneys or vent stacks, where heat and dew create a slow, persistent drip. This means that even a light winter leak can quietly corrode roof deck edges or insulation if not addressed promptly. The key is not to wait for a dramatic waterfall; a creeping damp spot deserves early attention.
Each autumn and after significant winter storms, perform a targeted check: inspect the roof-to-wall transition lines and ensure any sealant around skylights and chimneys remains flexible. Look for lifted tabs near flashing counters or small rust stains on metal flashings, which signal moisture infiltration. If a leak is suspected but not visible from above, check the attic for dark stains, mold smells, or damp insulation along the rafter tails and near vent penetrations. Early intervention can prevent rot, mold growth, and ventilation imbalances that degrade interior comfort and energy efficiency.
When you call a roofer, describe not only the location where water travels inside but also the surrounding features-skylight operability, chimney height, and any recent wind-driven rain events. Emphasize that dwelling moisture and repeated wet seasons can cause small flashing flaws to masquerade as larger roof problems. A thorough inspection should include flashing integrity, sealant condition, and a check of attic ventilation to ensure moisture is moving out rather than pooling around the deck.
Find contractors experienced in skylight installation, flashing, and leak repairs to bring natural light into your home.

Ridgeline Roofing & construction
22716 SW Lincoln St, Sherwood, Oregon
5.0 from 1 review
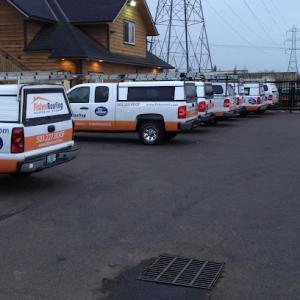
Fisher Roofing
(503) 227-7663 www.fisherroof.com
13580 SW Galbreath Dr, Sherwood, Oregon
4.8 from 238 reviews
Fisher Roofing has the most experienced roofing crews in the Portland area. We never use roofing subcontractors and hold to the highest levels of professionalism.

Ridgeline Roofing & construction
22716 SW Lincoln St, Sherwood, Oregon
5.0 from 1 review
32 years of Roof replacement and repairs. Siding replacement and repairs. Awnings. Skylights.

Exterior Care Pdx
(503) 925-3907 www.exteriorcarepdx.com
Serving
5.0 from 91 reviews
Exterior Care Pdx provides roof replacement, repair and maintenance, deck services, concrete services and pressure cleaning and 24-hour emergency service to the Tualatin, OR area.

Guardian Roofing, Gutters & Insulation
(503) 299-1260 www.guardianroofing.com
Serving
4.9 from 427 reviews
Since 2005, Guardian Roofing, Gutters & Insulation has been the trusted partner for top-of-home solutions in Wilsonville, OR, and throughout the Pacific Northwest. With nearly two decades of experience, our award-winning team specializes in roofing, roof repair, gutter installation and repair, K-Guard clog-free gutter systems, masonry, and attic insulation. As an Owens Corning Platinum Contractor—an honor held by only 1% of roofing contractors nationwide—we offer unmatched craftsmanship and extended warranty protection for the life of your roof. Every project is driven by honesty, precision, and a commitment to doing it right the first time. Schedule your service today and experience the Guardian difference!
Powerful Roofing & Construction
Serving
5.0 from 66 reviews
Powerful Roofing & Construction is a local family owned and operated business in Wilsonville, Oregon. Powerful Roofing is owned by Maria Vega and Diego Arechiga who both are dedicated and driven individuals. Their goal is to provide excellent facilitating customer service and quality work. Their hopes are to continue to connect with the community and demonstrate that Powerful Roofing is mastered in Interior/ Exterior construction services. If you are in the process of looking for a local contractor to guide you through a roof replacement or a home repair, Powerful Roofing Family is prepared to help through this process. Powerful Roofing is ready to provide a complimentary assessment.
Peak Performance Roofing
(971) 979-7325 peakperformanceroof.com
Serving
5.0 from 206 reviews
Peak Performance Roofing is a local, family-owned business specializing in full replacements of roofing, siding, and windows, as well as exterior painting. We proudly serve Portland and it’s surrounding areas.
Affordable Roofing & Gutter Company
(503) 575-7267 affordableroofingandguttercompany.com
Serving
4.7 from 121 reviews
Affordable Roofing and Gutter Company in Tualatin provides professional roofing and gutter services. We specialize in roof installation, new roofing, gutter installation, and leaf guard systems to keep your home well-protected and looking great. Our team also offers thorough gutter cleaning and repair services to prevent water damage and ensure your gutters work efficiently year-round. With a focus on quality and reliability, we’re dedicated to delivering excellent results that enhance your home’s durability. Whether you’re in need of a new roof or routine gutter maintenance, we’re ready to help. Contact us today for professional care you can count on!
Reliance Roof Pros
(503) 303-7180 relianceroofpros.com
Serving
4.9 from 80 reviews
A ROOFING COMPANY DESIGNED BY HOMEOWNERS FOR HOMEOWNERS. Based on interactions and feedback from hundreds of homeowners like you, you told us that you oftentimes felt uncomfortable dealing with salespeople. You didn’t really know if you could trust the salesperson you were dealing with because of the inherent conflict of interest that occurs when the salesperson gets paid based on how much you buy. You also told us that you were uncomfortable with much of the hidden agendas and the lack of transparency. We have designed systems to ensure transparency and give you the process you described to us-- with friendliness, professionalism and quality.

HER Roofing
(503) 946-9068 www.herroofing.com
Serving
4.7 from 71 reviews
HER Roofing will handle all of your roofing needs with Honesty, Equality, and Respect. We're proud to provide comprehensive roofing services to the Portland, Gresham, and Tigard communities and beyond. Our services include roof installation, roof replacements, roof repairs, roof and gutter cleaning and much more, all to keep your home in premier shape. We even offer flat roof repair for commercial and industrial buildings and financing options for your next project. We are committed to providing exceptional customer service, quality craftsmanship, and skilled professional guidance in selecting the best materials for your home. Call us today to schedule your free estimate! Contractor Licensing: OR - 225956 WA - HERRORC807NL
Prime Exteriors NW
(503) 679-8915 primeexteriorsnw.com
Serving
4.7 from 150 reviews
Prime Exteriors NW is the leading Oregon roofing company, servicing the Tigard OR and surrounding Portland Metro Area regions; our company reaches Tigard, Tualatin, Beaverton, Hillsboro, Lake Oswego, West Linn, Oregon City, Gladstone, Milwaukie, SW Portland, NW Portland and SW Washington neighborhoods. Prime Exteriors NW roofers specialize in roof repair, installing architectural, presidential, flat, and metal roofing systems; however, our team of contractors also perform exceptional siding, window, and gutter replacements. Our company strives to provide the finest experience possible through exceptional quality of products and customer service.
Interstate Roofing
(503) 755-5183 www.interstateroofing.com
Serving
4.8 from 718 reviews
Established in 1988, Interstate Roofing has grown into a distinguished, award-winning company, catering to the Portland-Vancouver metro area's roofing needs. Interstate Roofing prides itself on a strong community commitment, treating customers and staff like family, and aligning closely with customer needs to ensure exceptional service and project outcomes. They’ve also earned a reputation as the go-to commercial roofing contractor in the Portland-Vancouver metro area, specializing in both steep-slope and low-slope large-scale projects, from churches to schools, multi-family apartment complexes, and more. Interstate Roofing emphasizes environmental sustainability, recycling roofing debris from their projects, instead of adding to landfills.

HOMEMASTERS - West PDX
(503) 506-6536 homemasters.com
Serving
4.6 from 126 reviews
With decades of experience, HOMEMASTERS West PDX provides expert craftsmanship and comprehensive home exterior solutions. Our team specializes in roofing, siding, and skylight installations, along with gutter cleaning, pressure washing, and window services. Since 1990, we have been a trusted partner for homeowners throughout the greater Portland area, offering durable and energy-efficient solutions to protect and enhance your home. We are dedicated to delivering exceptional quality and care on every project, ensuring your home remains beautiful and safe for years to come.
Sherwood's weather pattern doesn't produce wide hailstorms like some markets, but wind-driven rain and fallen branches are a common disruptor. The roof often bears the brunt when a winter storm moves in and moisture hangs around shaded areas for longer. In the years when branches scrape against shingles or the canopy keeps parts of the home damp, documentation becomes the hinge for any claim. Older roofs tend to face closer scrutiny, so a careful record from the start helps keep the conversation productive with an adjuster.
Start by ensuring safety and then capture clear, date-stamped photos of every affected area from multiple angles, including gutters, flashing, and any interior signs of moisture intrusion. Take close-ups of moss edges, lifted shingles, or visible leaks inside attic spaces. Note the weather conditions at the time of the photo, such as wind direction, rain intensity, and any nearby tree damage. If you can, obtain a professional inspection promptly to document condition as of that moment, not just as you recall it weeks later.
Moss and deferred maintenance are common in this climate, so the distinction between sudden storm damage and gradual aging matters. Compare the storm photos with the prior roof condition reports or maintenance records. Look for new granule loss, bruising, or punctures that line up with a recent event, rather than wear that appears consistent through multiple seasons. For any claim, a straightforward before-and-after narrative helps. Include notes about moss coverage, shade patterns, and how long those conditions have persisted before the event.
Documentation is the backbone of an approved restoration plan. Expect the adjuster to request inspection notes and photos that support weather-related damage. Provide a concise summary of the storm, dates, and the exact areas affected, along with the professional assessments. If moisture intrusion is confined to areas shielded by trees or under-eave drip lines, document those zones clearly and tie them to the storm sequence rather than chronic leaks alone. Be prepared to show how subsequent rain events could exploit any existing weak spots.
In neighborhoods with abundant tree cover, fallen branches and wind-driven debris commonly initiate damage conversations. Keep a steady record through the claim process, updating photos after any temporary tarp fixes or repairs. Clear, well-labeled documentation reduces the chance of disputes over whether damage was storm-caused or a preexisting condition, and helps guide the repair plan to restore the roof's function under Sherwood's damp, moss-prone climate.
Find local contractors experienced in assessing and restoring roofs after hail, wind, and severe weather events.

In Sherwood, cost expectations line up with the local market ranges, with asphalt shingles generally at the lower end and tile systems at the upper end due to weight, labor, and accessory complexity. When you map this to a typical full reroof, asphalt shingles land around 350 to 650 USD per square, while metal roofing sits roughly from 600 to 1,200 USD per square. Clay and concrete tiles push higher, about 1,000 to 2,000 USD per square for clay and 900 to 1,800 USD per square for concrete. Wood shingles or shakes run from 700 to 1,400 USD per square, and synthetic or composite shingles occupy a middle ground, 600 to 1,100 USD per square. In practice, the final number reflects roof slope, attic ventilation needs, and any additional flashing or underlayment upgrades that the project uncovers.
Costs in Sherwood can rise when moss-related tear-off reveals wet decking or when older roof assemblies need venting, flashing, or deck modifications before final approval. Moss-covered roofs often hide moisture damage that isn't obvious from ground level, so a thorough inspection after removal is essential to keep the job on track and prevent surprises. If decking or structural members show moisture damage, expect extra days of work and material, which shifts the project cost upward. Tile systems, in particular, demand careful handling and sometimes heavier substructure support, so early evaluation of roof framing and deck integrity pays off. If you're choosing clay or concrete tiles, plan for the added weight and the potential need for upgraded fasteners and underlayment to maintain performance in our wet winters.
Scheduling during the dry season can reduce weather delays, but that same timing can tighten contractor availability and affect labor pricing for full reroofs. A tight spring or late summer window means you may pay a premium for preferred crews or encounter longer lead times. If your project encounters moss-removal or decking repairs, the dry window can still work to your advantage, but you'll want a contingency plan for possible delays that push work into shoulder periods with fewer crews. For best-value outcomes in the Sherwood climate, plan for a window with a solid stretch of dry days, and build in flexibility for potential decking or venting upgrades once the roof comes down.
Don't let upfront costs delay a critical repair - these contractors offer payment plans to fit your budget.

Most full reroofs require a permit handled through the City of Sherwood building department, often administered through Washington County processes. This means your roofing project will be tracked through formal reviews, inspections, and record-keeping. The permit step helps ensure the work aligns with local codes, drainage, and setbacks, and it signals to neighbors that safety and quality controls are in place.
Reroofs typically include a mid-project inspection and a final roof inspection, with the latter focusing on installation, flashing, and venting. In a climate with long wet seasons and shaded roofs, the timing of inspections matters to avoid weather-driven delays. The contractor should coordinate with the building department to book windows during dry spells, and the final inspection usually occurs after decking and underlayment are in place but before re-covering.
Reroof projects typically involve permit application, inspection scheduling, and possible plan review when structural changes or significant deck modifications are part of the job. If the project includes skylights, adding ventilation, or restructuring eaves, plan review may require structural notes and load calculations. Be prepared to provide drawings or diagrams of changes.
Before work starts, ensure you have the permit number, confirm inspection dates, and share any neighborhood covenants if applicable. Have a clear communication plan with your contractor and verify access for inspectors. During wet spells, ensure drying conditions for underlayment and flashing details are observed, and keep walkways clear for mid-project checks.
While Sherwood is primarily a pitched-roof market, local contractor activity shows enough flat-roof demand that homeowners with porches, additions, and low-slope sections need material-specific guidance. In these zones, water lingers longer and drainage paths are less forgiving, so seam integrity and proper termination become critical. The long wet season amplifies these issues, making timely maintenance and careful material selection essential to avoid slow leaks that seem to appear during cold, damp stretches.
On a low-slope surface, runoff doesn't shed as quickly as on steeper planes. That means even small imperfections in seams, transitions, or flashing can turn a routine shower into a drip-pattern problem. Pay close attention to how water is directed away from the roof at any header, skylight, or edge detail in these areas. If a porch roof or rear addition sits at a gentler angle, ensure the chosen membrane or overlapping system is specified for that slope. In practice, that often means prioritizing continuous drainage paths, robust edge detailing, and redundant flashing where two roof types meet.
Mixed-roof homes in Sherwood can fail first at transitions between steep-slope roofing and low-slope membranes, especially where runoff concentrates. Those transition zones deserve proactive inspection before winter. Look for signs of pooled water, staining along the membrane edge, or moss establishing itself at seams. When planning work, require precise detailing for any corner, penetration, or former seam that could trap moisture. A conservative approach to these junctions helps prevent water from chasing its own path through the structure.
In practical terms, you should keep vegetation trimmed away from shady, moss-prone areas, which commonly accumulate moisture on low-slope sections. Regular inspections after heavy rains or wind-driven storms help catch edge failures early. If you notice persistent dampness, damp wood edges, or unusual staining near transitions, treat it as a warning sign rather than a harmless anomaly. The goal is to protect the dwelling by staying ahead of water where it takes the longest to shed.
Find specialists in TPO, EPDM, and built-up flat roofing systems for residential and commercial properties.
Fisher Roofing
(503) 227-7663 www.fisherroof.com
13580 SW Galbreath Dr, Sherwood, Oregon
4.8 from 238 reviews
In this market, the wet winters shape contractor behavior. Look for crews that break down the project into clear, rain-aware phases and can adapt when unexpected showers roll in. A solid plan includes protecting warm days for decking inspection, staged tear-off, and a threshold window for shingle install that minimizes time spent exposing underlayment. Ask how long crews stay off a roof during rain events and what weather criteria trigger work pauses. The right crew will explain their rain contingency in practical terms, not just as a generic caveat.
Molten shade from mature trees makes Sherwood homes prone to moss and moisture intrusion. The tearing-off phase should include a thorough debris plan and a stated method for handling moisture-damaged decking if discovered. Request a tour of how decking is evaluated on a sample section and how repair decisions are communicated and priced. A reliable contractor will document visible rot or soft spots, propose immediate stabilization if needed, and document changes to the scope before proceeding. Expect a clean, tarp-covered work zone at each end of the day to minimize pine needle contamination and moss transfer to living spaces.
Residential projects in this area often hinge on keeping occupants comfortable during leak events. Seek a crew that coordinates exact arrival times, prioritizes housekeeping between shifts, and reduces the time a home is exposed to the weather. Confirm how crews protect interior spaces, keep ladders and tool access orderly, and any temporary containment used near doors or skylights. A well-run operation respects your daily routines and returns the space to pre-work conditions each evening.
Long-established, family-owned, and residential-focused firms are well represented here, and that matters for warranty follow-through and post-job service. Inquire about the typical response time for warranty questions, who handles follow-up visits, and how service calls are logged. Favor contractors who assign a primary point of contact and provide a written plan for post-install support. A neighborly, locally rooted firm often translates into clearer communication when weather-related adjustments become necessary.
After the last shingle is laid, the crew should walk the property to remove debris, nails, and loose tarps, leaving the yard as it was found. Ask how debris is disposed of and what guarantees cover storm-related clean-up after heavy rain or wind events. A dependable crew treats cleanup as an essential finish, not an afterthought, so occupied homes stay safer and drier through the process.