Last updated: Apr 19, 2026
Cold winters with regular snow and repeated thaw cycles produce a relentless stress test for aging roof systems. When snow melts during the day and refreezes overnight, the resulting ice and water flow exert unusual pressures on flashing, valleys, and intersections where seams meet. In homes with older steep slopes, those micro-cycles become opportunities for slow leaks to develop long before any visible drip appears inside the attic. The cycle is especially hard on ridge caps and transitions where a simple freeze-thaw cycle can widen gaps or push water under shingles that have already started to lose their protective granules or underlayment. The result is not just a leak, but accelerated wear that shortens the system's remaining life and forces repairs that could have been prevented with timely attention.
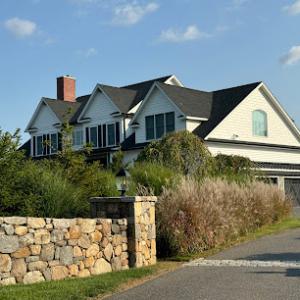
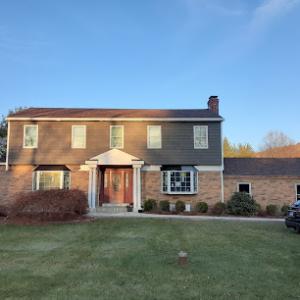
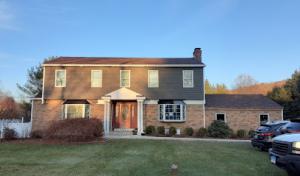
The housing stock in this area leans heavily toward steep pitches, with generous valleys, dormers, and masonry chimney intersections. Each of those features creates a weak point where melting snow can pool, back up, or funnel toward the most vulnerable joints. Valleys that are not properly flashed or sealed tend to trap meltwater, while dormer intersections introduce additional planes and edges where water can intrude. Chimney intersections complicate everything because mortar joints and flaunching deteriorate with freeze-thaw exposure, allowing moisture to work between brick, masonry, and roof deck. In short, the very architectural details that give Ridgefield homes their character also create avenues for water to exploit during thaw events if the roof isn't carrying solid protection at every angle.
If a roof is older than two decades and shows any of the following, the risk multiplies during thaw cycles: hairline or visible gaps along flashing, dark staining or staining accompanied by soft wood in the eave or soffit area, peeling or missing shingles at the valleys, and any lingering dampness in the attic after a thaw. Leaks that appear only after a few days of thaw or after heavy wet snow melt are especially concerning, because they signal that water is bypassing the exterior defenses and moving into the structural components. The cascading effect can compromise insulation, decking, and even interior ceilings if left unchecked. Do not ignore a recurring damp patch or a musty attic odor that follows a thaw-the problem is often more advanced than it appears.
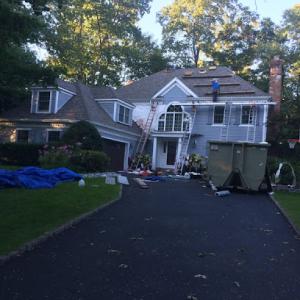
Replacement timing in this climate is often pushed toward drier, milder parts of the year because winter conditions can hide damage until leaks appear during thaw events. If signs of wear are present but interior leaks are not yet obvious, it is still prudent to plan ahead. Scheduling a professional inspection in late winter or early spring, after the peak thaw period, helps verify whether flashing, underlayment, or decking have suffered submersion damage and need attention before the next winter cycle. Consider coordinating a mid-to-late spring evaluation for aging roofs with multiple slopes or complex details. Proactive planning reduces the likelihood of mid-winter failures, when repairs are harder to coordinate and more likely to disrupt living spaces.
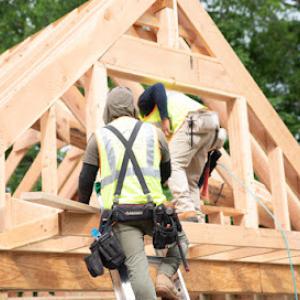
Begin with a focused inspection of flashing along chimneys, dormers, and roof-to-wall junctures. Look for loose or lifted shingles at the rake edges and along the eave, which can allow water to gain entry during thaw events. Ensure attic ventilation is adequate and that insulation is sufficient to minimize ice dam formation on upper slopes. If a leak has been present, address it promptly by drying and assessing the underlying cause rather than patching only the surface staining. For older steep roofs, every thaw cycle compounds risk; sequencing a targeted maintenance plan-flashing reseal, shingle edge alignment, and valley protection-offers the most practical way to extend life and reduce surprise leaks when January thaw turns suddenly aggressive.
Ridgefield's spring storms, with occasional hail, are a major local trigger for shingle loss, cracked tiles, and sudden leak calls after winter wear has already weakened the roof. The combination of tree cover, steep slopes, and freeze-thaw cycles means a shaken or damaged surface can deteriorate quickly once rain returns. If you notice missing shingles, granule loss, or damp spots on ceilings after a storm, treat it as an urgent roof issue that could expand with the next round of weather.
Because storm damage and emergency response are both active specialties in this market, homeowners in Ridgefield are clearly shopping for contractors who can both stabilize leaks fast and support claim documentation. The first priority is to stop active leaks and prevent interior damage, even if it means temporary tarping or rapid temporary flashing. A quick securement plan buys you time to arrange a proper fix, but do not let a temporary patch become a cast-in-place solution for weeks. Schedule a professional assessment as soon as it's safe to do so, ideally within 24 to 48 hours after a storm.
Connecticut insurers commonly require photo documentation, contractor bids, and adjuster review before settling wind or hail claims, so Ridgefield homeowners need to document damage immediately after storms. Take clear photos from ground level and from the ladder line, capturing both the roof surface and interior signs such as ceiling stains. Keep a dated log of each storm event and any observed damage, including dates, times, and weather conditions. Secure any previous repair invoices or roof notes to present a coherent history of the roof's condition when you file a claim.
Local homes with older steep-slope roofs demand experience with both high-access work and wind-driven damage scenarios. When you're interviewing contractors, focus on two capabilities: rapid leak stabilization and solid support for claim documentation. Ask for examples from Ridgefield projects that involved hail or wind impact, verify that the crew can handle steep pitches safely, and request a streamlined process for documenting damage for insurers. A reliable contractor should offer a concise plan for immediate stabilization, a transparent assessment of underlying wear from freeze-thaw cycles, and a clear timeline for permanent repairs.
After initial stabilization, expect a thorough assessment that targets the most vulnerable areas: ridge lines, valleys, and flashing around chimneys or dormers, all of which are prone to failure after winter's stress. In this market, you'll want a repair path that prioritizes preventing recurrent leaks during the next thaw and storm cycle. Ensure the scope includes a protective approach to fascia, gutters, and any overhangs that affect drainage on steep slopes. With the right partner, you'll restore resilience quickly and keep your claim moving forward without delays.
Find local contractors experienced in assessing and restoring roofs after hail, wind, and severe weather events.

Mighty Dog Roofing of Fairfield County
(203) 455-9058 www.mightydogroofing.com
37 Danbury Rd Suite 2024, Ridgefield, Connecticut
5.0 from 96 reviews
Double R A Construction
(914) 775-7550 www.doubleraconstruction.com
Ridgefield, Connecticut
5.0 from 16 reviews

Mighty Dog Roofing of Fairfield County
(203) 455-9058 www.mightydogroofing.com
37 Danbury Rd Suite 2024, Ridgefield, Connecticut
5.0 from 96 reviews
Mighty Dog Roofing of Fairfield County is a trusted roofing contractor serving Ridgefield, CT and surrounding communities. We specialize in residential and commercial roofing including roof replacement, roof repair, roof installation, roof inspection, storm damage restoration, siding, gutters, and windows. Our experienced team uses advanced drone technology and premium materials to deliver durable solutions that protect your property. Whether you need emergency roof repair, complete roof replacement, or exterior services, we provide honest assessments, same-day response, and dependable workmanship backed by strong warranties. Licensed, insured, and locally owned. Serving Ridgefield, Wilton, Weston, and Redding. Schedule Free Inspection!
Double R A Construction
(914) 775-7550 www.doubleraconstruction.com
Ridgefield, Connecticut
5.0 from 16 reviews
We come from humble beginnings, as Peter G. Sotire and Anthony Cerone founded the company in 1960 selling and installing storm windows out of Peter’s home. The pair named Double R after their wives, Rosemarie and Ruth, and the family values the company was founded upon are still our driving force today. We based our business on honesty, hard work and reliability, which is how we’ve grown into the complete home improvement contractor we are today. When you call Double R A Construction, you know you will be getting the best products, the highest quality work, and an enjoyable experience.
J. Osorio Inc - Exterior Weatherproofing
Ridgefield, Connecticut
5.0 from 7 reviews
J Osorio is a roofing company in lower Westchester county. We specialize in high quality, affordable roofing solutions that truly last a lifetime. unlike typical roof installs that don’t make it to 10 years, we have proven the effectiveness of our flashing techniques for over 900 roofs throughout 27 years in business, ONE ROOF AT A TIME. Our dedication to customer satisfaction and continuous training and education make us THE choice for all roofing and gutter needs. Check out our reviews. Ask about us on linkedin fB Insta and nextdoor
Apex Roofing & Siding
(203) 456-9070 apexroofingandsiding.us
18 Highview Rd, Ridgefield, Connecticut
5.0 from 6 reviews
We are your local roofing contractors, dedicated to providing an outstanding customer experience while protecting your residential or commercial property with high quality, affordable roofing materials and worksmanship. We can service buildings of any size while creating a positive working environment. Contact us to arrange your free inspection and meet your new favorite roofers at Apex Roofing and Siding. You can count on our roofing contractors for speedy, reliable service when you need it the most. No job is too big or too small for our experts.
Xpert Roofing Pro
(475) 750-0330 www.xpertroofingpro.com
Serving
5.0 from 85 reviews
Xpert Roofing has been helping homeowners and businesses with roofing, gutters, and siding since 2009. We are based in Danbury, CT, and work hard to give you the best service and quality. Whether you need a new roof, a repair, or gutter work, our skilled team is here to help. We are fully licensed, insured, and always make sure the job is done right. At Xpert Roofing Pro, we care about keeping your home safe and looking great.
Prizio Roofing & Siding
(203) 322-9009 www.prizioroofing.com
Serving
4.5 from 30 reviews
For something as important as your home, you can only trust a licensed, insured, and experienced roofing and exterior home services company. With Prizio Roofing & Siding in New Canaan, CT, customer service is our #1. Led by owner Jonathan Prizio, the 50+ year old company remains unrivaled across Fairfield County, CT for roofing, siding, gutter and window installation services. What makes Prizio Roofing & Siding the best contractor for roofing, siding, windows, and gutters? Owner Jonathan Prizio will personally oversee every project from beginning to end. No pushy salesmen or project managers here! Whether you need to fix window trim, sagging gutters or your entire roof, Jonathan will treat every project as if it’s his own.
Connecticut Commercial
(475) 271-8523 connecticutcommercialroofing.net
Serving
5.0 from 11 reviews
Connecticut Commercial Roofing is your trusted source for top-tier commercial and industrial roofing solutions across the state of Connecticut. With years of hands-on experience, we specialize in delivering strong, reliable, and long-lasting roofing systems tailored to meet the unique needs of your business or industrial facility. Our certified roofing experts use cutting-edge technology and follow industry-leading best practices to ensure every project is completed efficiently, on time, and to the highest standard. From new roof installations and repairs to routine maintenance and full roof replacements, we are committed to excellence keeping your operations running without interruption and safeguarding your commercial roof investment.

Bumble Roofing of Fairfield County
(203) 819-7789 bumbleroofing.com
Serving
5.0 from 23 reviews
Bumble Roofing of Fairfield County makes roofing easy with expert solutions tailored for both homeowners and businesses. Our trusted roof contractors are committed to delivering quality workmanship with honesty and transparency. With over 60 years of combined experience and more than 2,700 successful roof installations, repairs, and replacements, we’ve built a reputation you can count on. We offer one clear, upfront price and a full, detailed roof report—no haggling, no hidden fees, no gimmicks. Whether you need a simple repair or a full roof replacement, we’re here to make the process smooth, reliable, and stress-free. Visit us today and experience the Bumble Roofing difference.
D & M Roofing & Home Improvement
Serving
5.0 from 22 reviews
Free estimates We do Roofing, Siding, Kitchen Remodeling ,Bathroom Remodeling, Additions, Remodels, Painting windows, doors and much more
KBL Roofing
(203) 331-5919 kblroofingco.com
Serving
5.0 from 21 reviews
KBL Roofing is established in 2007, offering professional roofing services such as replacement and repair, in Bridgeport, CT and surrounding areas.
Elite Construction Solutions
(203) 491-1808 www.myecspro.com
Serving
5.0 from 21 reviews
Elite Construction Solutions is a Connecticut company specializing in roofing, siding and gutter services. With years of experience, we offer a wide range of solutions including installation, repair, and maintenance for both residential and commercial properties. Contact us for a free quote today!
Home Exteriors
Serving
4.7 from 30 reviews
Home Exteriors Roofing is a Roof Replacement experts licensed and insured roofing contractor. With many years of experience in roof replacement, we provide high-quality roof services for residential and commercial customers. For affordable new roofs, our expertise is ready to work for you. We are located in Danbury, CT and serving entire Connecticut. Our mission is to provide the highest level of professionalism and customer service possible, Home Exterior Roofing has the expertise to do quality work completed promptly and with long-lasting results. We treat every customer like family, so we’ll be there for you when you need us.
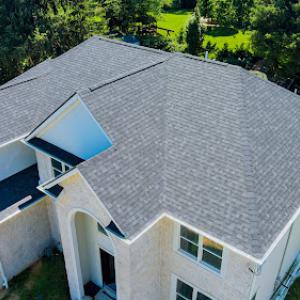
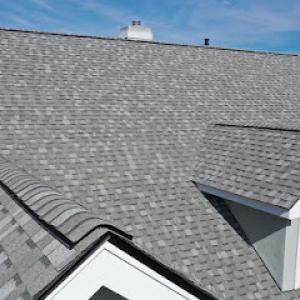
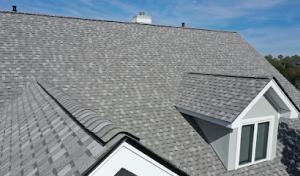
Asphalt shingles remain the dominant practical choice in Ridgefield, especially for older steep-slope homes where the roofline and framing are common. They handle the freeze-thaw cycle reasonably well when installed correctly and with a proper underlayment. In wooded lots, blowing leaves and needles accumulate on the slope, so choosing a shingle with good algae resistance and a sealed edge helps keep moisture away from the decking during winter. Regular cleaning of valleys, gutters, and at the eaves is a simple step you can take to reduce the risk of ice dams and moisture ingress. For steep pitches typical of the area, ensure the installation uses appropriate fasteners and a solid ridge vent to promote consistent cold air movement across the roof surface.
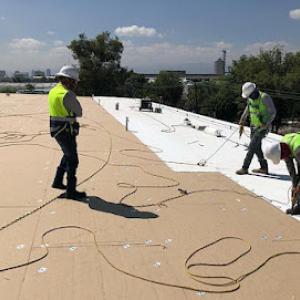
Metal roofing offers durability in a climate with repeated freeze-thaw stress, and it can be a logical upgrade on steeper, more challenging roof geometries. In Ridgefield, metal can be a good match for modern additions or homes with mixed materials, especially when a strong, clean line complements the property's character. Look for panel profiles and coatings rated for snow shedding and rain dispersion, and consider a through-fastened or snap-lock system designed for cold climates. Metal's reflective surface helps mitigate heat build-up in summer, but ensure proper ventilation and airtight sealant at joints to guard against moisture trapping in winter. Debris management remains important; keep roof valleys clear to maintain uniform drainage.
Wood shingles and shakes bring texture that fits wooded surroundings but require strict maintenance to withstand weathering and the region's moisture. Cedar can show wear after several freeze-thaw cycles, so plan for periodic cleaning, sealing, or re-staining to preserve the wood's integrity. Textured surfaces trap more debris, which can retain moisture and promote rot if not addressed. On steeper roofs, ensure flashing is in excellent condition around chimneys and dormers, and inspect for lifting edges after heavy snow. If you choose cedar, budget for more frequent inspections and potential replacement of saturated sections, especially in shaded, damp corners where drying takes longer.
Clay and concrete tiles exist in the market but require careful evaluation on older homes with complex roof geometry. Heavy materials demand a solid supporting structure, which may require reinforcement on steeper slopes or irregular layouts common in Ridgefield houses. Freeze-thaw cycles can stress tiles in cooler months, so look for tiles with proven freeze resistance and a competent substrate. On complex geometry, slow, precise installation matters; misfits around hips, ridges, or valley intersections create leak paths that are hard to seal later. If considering tile, plan for professional assessment of the roof deck's capacity and the ability to manage snow loads without compromising drainage.
Synthetic or composite shingles offer a more uniform look with good resistance to cracking in cold weather. They can be a flexible option on older homes when roof lines are irregular or when adding a modern touch to a traditional silhouette. In this climate, choose products with proven performance in freeze-thaw cycles and solid warranties. They pair well with a variety of underlayment systems and can simplify integration with nearby slate or tile accents. For steep pitches and wooded sites, synthetic options can provide a consistent surface that's easier to maintain and repair over time.
When you're weighing a roof replacement in this area, the cost picture starts with the local material options and how the house sits on the lot. Typical Ridgefield material pricing runs about $450-$900 per square for asphalt shingles, $600-$1100 for metal, $1200-$2400 for clay tile, $1100-$2100 for concrete tile, $700-$1400 for wood shingles or shakes, and $500-$900 for synthetic or composite shingles. Those ranges give you a baseline, but the specifics of your home push costs up or down from there.
Older steep-roof homes common here, plus multiple dormers, valleys, and chimney flashing work, add complexity that shows up in the bill. If your roof has two or more dormers or deep valleys, expect extra labor for precise flashing, insulation considerations, and ensuring drainage works properly across all planes. Clay and concrete tiles, while long-lasting, are particularly sensitive to the underlying roof deck and the need for careful alignment over steep slopes. On steeper pitches, crews often need more time to set up safe access and protect landscaping, which translates into higher labor costs. Even with a straightforward asphalt replacement, a roof with extensive flashing around chimneys or skylights will push the price toward the upper end of the asphalt range or beyond.
Demand spikes after spring storm events and during winter leak seasons tighten scheduling and labor availability. That tightening tends to push both price and project timing a little further out, especially for higher-end materials. If you're coordinating a replacement after a bout of winter freeze-thaw cycles, you'll want to plan for potential lead times on materials and crews. In practice, you'll notice the difference most on tiles and metal, where long-lead options and backorders are common after severe weather.
Asphalt remains the most common, offering predictable pricing in the $450-$900 per square range with solid performance for Ridgefield's winters. Metal, while more expensive upfront, can offer better resistance to ice dams and wind uplift on steep slopes, typically running $600-$1100 per square. If clay or concrete tiles are in the mix, budget for higher installation complexity and potential structural checks; clay is $1200-$2400 per square, concrete $1100-$2100. Wood shingles or shakes pull in $700-$1400, and synthetic/composite shingles sit around $500-$900 per square, often appealing for mixed exposure or lighter deck load.
Get a clear picture of your project costs upfront - no commitment required.
A full roof replacement in Ridgefield typically requires a building permit before work begins. The local Building Department expects the project to be properly documented, with plans or a scope that clearly shows the roof replacement and agreed-upon materials. If a contractor or a neighbor is assisting with the work, confirm up front who is responsible for pulling the permit and submitting the required paperwork. This early clarity helps avoid delays once the crew is on the roof and weather windows narrow during the winter freeze-thaw cycles typical of this town.
After the permit submission and approval, inspections are coordinated through the Ridgefield Building Department. Inspections are performed during the project as needed to verify that the work complies with state and local codes, especially important for steep-slope roofs and older homes that may have structural considerations. Expect an initial inspection to confirm roof framing, underlayment, and flashing details align with code requirements, followed by progress checks if the project spans several days or involves significant material changes. Because Ridgefield relies on a cautious approach to weather exposure, scheduling inspections with your contractor and the Building Department helps prevent weather-related delays.
A final inspection is usually performed when the roof is complete. This final step confirms that all aspects of the installation meet code, manufacturer requirements, and local ordinances. The final approval matters for project closeout, official records, and the documentation that may be needed for future home sale disclosures. Retain any inspection stickers, certificates, or notes provided by the Building Department and store them with your home records. If any issues are noted during the final inspection, address them promptly with the contractor and the inspector, since a clean final stamp can avoid post-project disputes or delays in recording the work with the town.
Keep a single, accessible file with all permit numbers, inspection dates, and inspector contact information. Before work begins, verify who will be the permit applicant and whether the contractor or homeowner will coordinate scheduling. If your home has unique features-such as older rafters, vintage rooflines, or challenging eave details-discuss these with the Building Department early to align on any special inspection requirements. Finally, plan for a window of time around the permitting process that aligns with Ridgefield's typical winter exposure, so the project moves smoothly from permit approval to final clearance.
In Connecticut, wind and hail roof claims remain available but vary significantly by carrier and policy terms, which directly affects Ridgefield homeowners deciding whether to repair or replace. The local climate-winter freeze-thaw cycles, sudden gusts after storms, and the wooded setting-means insurers see roof damage that isn't always obvious from the ground. When a claim is opened, the carrier will assess everything from shingle damage to hidden moisture that could threaten the attic or structure. That process can stretch across days or weeks, especially after a heavy storm that hits several neighborhoods at once.
Ridgefield homeowners should keep date-stamped photos, interior leak evidence, and contractor scopes because insurers commonly ask for detailed documentation before approving payment. Screenshots and notes from professionals who pinpoint the damage help separate storm-related issues from preexisting wear. A simple attic moisture map or a contractor's repair plan can be the difference between a stalled claim and timely funds for a proper fix. If you've had recent freeze-thaw cycles, capture any hairline cracks, lifted shingles, or flashing gaps as these often appear gradually but worsen after a thaw.
Adjuster inspection is often part of the process in Connecticut, so temporary repairs in Ridgefield should stabilize the roof without discarding evidence of storm-related damage. The goal is to prevent further damage while the evaluation unfolds, but a temporary patch should be documented and left intact until the adjuster sees the site. Do not remove storm-related debris or clear water intrusion too aggressively; this can complicate coverage determinations. Having a clear, organized file of photos, dates, and contractor notes helps you respond quickly if an adjuster requests clarification or additional documentation.
The local contractor market prioritizes re-roofing and major repairs on existing homes over niche specialty work. That means you'll find crews who can assess widespread wear from repeated winter freeze-thaw cycles, propose a full or stepwise replacement, and handle the project from deck prep to finish. Expect options that come with solid warranties and a portfolio of steep-slope homes similar to yours, especially when the roof has stood up to heavy foliage and storm debris.
Cleanup and rapid response are top hiring signals. Homeowners in this area often juggle occupied residences, storm debris, and occasional leak emergencies. Contractors who emphasize daily site cleanup, tarps and containment during bad weather, and prompt, clear communication about scheduling are the ones that stay reliable once a project starts. Look for crews that treat the job like a temporary extension of your home: they protect interior spaces, haul waste promptly, and leave a tidy, walkable yard after each workday.
Chimney-related experience stands out in this market. Older homes in the area frequently blend roofing with masonry flashing concerns, so a contractor who can address both shingles and masonry joints in one pass reduces call-backs. Prioritize teams that can diagnose flashing around chimneys, parapets, skylights, and dormers, and that can integrate chimney flashing with appropriate sealants and flashing materials for the season's freeze cycles.
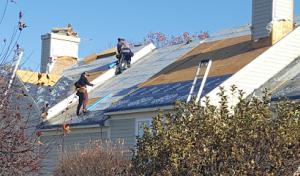
Because steep slopes are common here, the right contractor provides safe access, fall protection plans, and clear staging to minimize disruption to neighboring properties. Ask about the crew's equipment for high-angle work, their process for staging materials on narrow driveways, and a written sequence that keeps weather exposure to a minimum. In practice, you'll notice the strongest hires move with deliberate pace but steady progress, coordinating with you to avoid leaks while meetings and inspections are scheduled.