Last updated: Apr 19, 2026
Yorktown Heights experiences cold winters with snow and repeated freeze-thaw cycles that stress shingles, flashing, sealants, and roof penetrations. Those cycles cause micro-cracks to form in asphalt shingles, loosen sealants around vents and chimneys, and gradually push moisture into the roof deck. When spring arrives, those vulnerabilities can become visible as granule loss, light leaks, or damp spots that weren't evident during winter. In contrast, the heat of summer can soften underlayment and stress fasteners, which compounds any earlier damage if a replacement is rushed into peak heat or high humidity. Understanding this pattern helps you plan a replacement that holds up through the next round of cold weather.
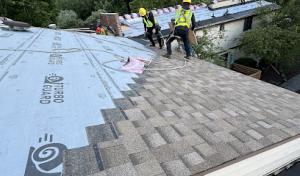
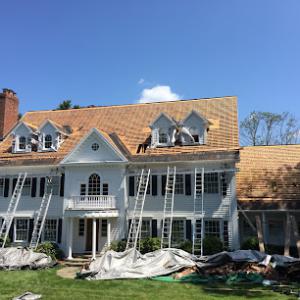
Late spring and early fall are the preferred replacement windows locally because winter conditions and summer heat both create installation and performance challenges. In late spring, crews can work through longer days with moderate temperatures, which reduces the risk of adhesive failures on flashing and sealants and minimizes the chance of heat-related warping. Autumn offers cool, dry days that help shingles set properly and give crews a comfortable working environment before the first freeze. Plan around typical Westchester weather swings: aim for a stretch of several consecutive dry days, ideally with daytime highs in the 50s to 70s and nights well above freezing. This balance supports rapid sealing of penetrations and stable adhesion of underlayment and new shingles.
Spring and fall storms in this part of Westchester can both delay roofing schedules and expose older moisture damage that was hidden during calmer weather. A storm front can push a project back by a few days or a week, particularly if wind-driven rain questions the integrity of the roof deck or if power outages interrupt compressor and nail gun usage. When a storm rolls in, the priority shifts to securing the site, protecting interior spaces, and preventing wind-driven debris from undermining exposed roof lines. If older moisture damage is found during these windows, crews will often pause to complete surface assessment and temporary mitigation before proceeding. That means a flexible timetable is essential to avoid compromising the long-term performance of the roof.
As the replacement window approaches, look for indicators that timing should be accelerated or adjusted. Recurrent ice damming in late winter or early spring, unusual interior staining around ceilings or attic spaces, and sections of shingles that curl or lift even after a wind event signal that the roof is closer to needing replacement than a routine repair. In the fall, if you notice coating failures around flashing, softened sealants around vents, or rotting plywood in the attic floor distinctly after a wet spell, those are practical prompts to align the schedule with the late-spring window in the following year. The goal is to complete the project before the next round of freeze-thaw cycles, preserving the deck and ensuring the new roof carries through another long Westchester season with minimal maintenance.
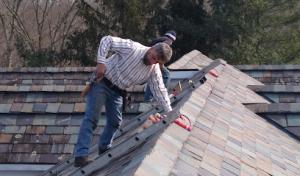
The dominant local material mix includes asphalt shingles, metal roofing, clay tile, concrete tile, slate, and copper roofing rather than a single-material market. That variety matters because each option interacts differently with the town's mix of chimneyed, pitched roofs and frequent tree coverage. When choosing a material, you're not just picking a look-you're selecting how the roof will handle wind-driven debris, shade from mature maples, and the timing of freeze-thaw cycles. In practice, mixed homes often end up with one dominant material on the main slope and a secondary material on the ridges, valleys, and dormers to manage weight, detailing, and performance where the roof sees its harshest exposure.
Yorktown Heights experiences notable seasonal swings that stress roof assemblies. Freeze-thaw cycles push water into small gaps and joints, and rapid temperature changes can cause fasteners to work loose if not installed with proper spacing and backing. Asphalt shingles require careful nailing patterns and compatible underlayment to prevent curling in winter and lifting in spring rains. Metal roofs benefit from precision panel installation and thermal expansion gaps to keep flashing and seam connections tight across temperature shifts. Slate and tile bring impressive durability, but their weight and fragile edges demand precise rafter support and secure, continuous flashing around chimneys and valleys. Clay and concrete tiles, while offering long life, demand careful substrate checks and integration with ridge vents and cap tiles to avoid water intrusion during heavy spring storms or winter thaws. The practical takeaway: coordinate fastener type, underlayment, and flashing details for the specific material you choose, and plan for professional alignment of all transitions where the roof meets chimneys, skylights, or valleys.
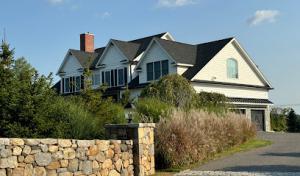
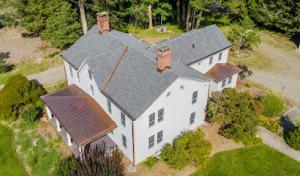
Heavier materials common in Westchester-area upscale housing, such as slate, tile, and copper accents, require attention to existing roof structure and detail transitions around chimneys and valleys. If a home already has a lighter deck or older rafters, upgrading to heavier coverings may trigger a need for structural reinforcement or updated rafter spacing. Copper accents, while beautiful and long-lasting, impose different load paths and flashing connections that must be integrated with the drainage plane and gutter system. Balance aesthetics with the underlying structure: a visually striking tile or copper roof should still prove robust against the spring and fall weather windows, but only if the supporting framework is up to the task and the transitions from the main roof to chimneys, vents, and skylights are executed with precision.
In the selection phase, ask about how each material handles heat expansion and contraction, especially around chimneys and valleys. In single-story vs multi-story homes, verify that the flashing around roof penetrations is continuous and well-sealed, not just spot-checked. For homes with mixed materials, confirm that the installer's detailing preserves watertight seams where different products meet-such as a slate field transitioning to a clay ridge, or a copper cap over a clay tile field. Request an assessment of roof deck condition, especially if the existing system shows signs of previous leaks, soft spots, or hail impact. A thorough inspection should map out potential problem areas: the valley lines, chimney abutments, vent stacks, and dormer connections. The goal is a cohesive system where material choices complement each other and the local climate, minimizing the risk of sudden repairs during spring thaws or autumn misfires.
In this area, the typical home stock blends standard suburban roofs with higher-end details like slate, tile, and copper. Asphalt shingles show the broadest price band, from 350 to 600 USD per square, which captures straightforward replacement jobs on ordinary roofs. But as soon as slate, clay tile, or copperwork comes into play, labor becomes considerably more complex, lifting the project cost and the schedule. Copper roofing, for example, ranges from 2600 to 4200 USD per square, reflecting the specialty work and longer install times. Concrete and clay tiles sit between the asphalt and copper in price, with concrete at 1000 to 1700 and clay at 1100 to 1900 per square, driven by the need for precise underlayment, roof deck assessment, and careful tiling patterns on steeper pitches or multi-faceted roofs.
Freeze-thaw cycles in the winters, followed by spring thaw and fall preparation, shape wear patterns here. The long-term effect is accelerated micro-cracking, shingle loss at edges, and tile or slate delamination when attic ventilation is inconsistent. You'll often see more concentrated wear around chimneys, dormers, and valley locations where water flow concentrates. In practice, this means that planning for replacement windows should align with milder springs or falls when crews can work without winter-induced delays. Storm-driven demand spikes in spring and after hail or wind events can tighten contractor availability in Westchester, potentially raising pricing or extending lead times for any project that touches the high-end material categories.
The mix of roofs in town means that you may be choosing between simple re-roofing with asphalt and a more involved upgrade to metal, slate, or tile in the same neighborhood block. If the house features multiple chimney chases, skylights, or complex ridge lines, expect extra labor hours that push costs up, particularly for clay, concrete, or slate. A straight asphalt replacement on a 20-squares basic hip-and-gable roof tends to stay near the lower end of the spectrum, while adding a copper cap, copper flashings, or decorative metal valleys can push the total well into a higher price tier.
When budgeting, set aside flexibility for weather-related delays in spring or fall, which are the most practical installation windows in this market. If a project involves high-end materials, request a clear sequence to manage heat conditions and seasonal material deliveries, since slate and copper shipments may influence timing and pricing. For a homeowner, obtaining a fixed, written schedule with material lead times helps avoid surprises during storm seasons, and it's wise to discuss contingency costs for necessary rapid repairs if a leak emerges during the wait for crew availability.
NY Home Remodeling Contractors
5 Mohawk Ln, Yorktown Heights, New York
5.0 from 4 reviews
Siding-Roofing-Windows
RJM Best Roofing
(914) 565-9391 www.rjmbestroofing.net
Serving
4.9 from 53 reviews
RJM Best Roofing. provides expert roofing services across Westchester County and Rockland County, specializing in roof replacement and emergency roof repair for residential and commercial properties. Serving White Plains, New Rochelle, Port Chester, Yonkers, Mount Vernon, Mamaroneck, Rye, Scarsdale, Larchmont, and Eastchester, our team delivers premium materials, precise craftsmanship, and fast response when you need it most. Recognized as a trusted roofing contractor and emergency roofing service, we focus on durable installations and customer satisfaction. Whether upgrading your home or addressing urgent storm damage, RJM Best Roofing. ensures professional results that protect your property year‑round.
Cristian Home Improvement
(914) 257-1081 cristianhomeimprovement.com
Serving
5.0 from 10 reviews
Cristian Home Improvement specializes in high-quality roofing services in Shrub Oak, NY, offering expert installation, repair, and maintenance to ensure your home is protected for years to come. Whether you need a new roof or repairs from storm damage, our team is committed to providing durable solutions that enhance your home’s curb appeal. In addition to roofing, we offer a wide range of home improvement services, including siding, remodeling, flooring, and painting, all designed to transform your space and increase its value. Trust us to deliver exceptional craftsmanship and reliable results—contact us today for a free estimate!
High Ridge Carpentry & Roofing
(914) 243-0437 highridgecarpentry.net
Serving
4.9 from 28 reviews
High Ridge Carpentry specializes in Roof Repair. Vic Tozzo, the owner of High Ridge, takes great pride in solving your roof leak. We repair your Slate, Spanish Tile, Ludowici when other contractors can't. The right repair can save your roof and prevent leaks.
Weston Builders
(914) 588-3469 westonbuildersny.com
Serving
5.0 from 27 reviews
Weston Builders is a general home improvement contractor located in Westchester County, NY. Having over 15 years of experience in the industry, we understand the importance of customer satisfaction while delivering projects on time and on budget. We strive to complete all jobs in a clean and timely fashion. Our mission is to be the most reliable general home improvement contractor in Westchester County, NY by providing quality products, services, and warranties at affordable prices.
MCAS Roofing & Contracting
(914) 455-0976 mcasroofing.com
Serving
4.9 from 163 reviews
MCAS Roofing and Contracting is a licensed and insured, family owned roofing company serving Westchester, Putnam, and Rockland Counties since 1972. Homeowners choose MCAS for honest guidance, skilled workmanship, and roofs done right the first time. As a GAF Master Elite roofer, MCAS offers access to GAF’s strongest warranties, along with additional manufacturer certifications that allow the right warranty to match each roofing system. The team specializes in residential and commercial roof replacement and repair, chimney repair, skylights, and shingle, slate, flat, and custom metal roofing. No sales pressure. No shortcuts. Just quality work, fully warranted materials and labor, and safe, clean job sites. Request a Free Roof Inspection.

Miracle Home Improvements
(914) 271-9119 www.miraclehomeimprovements.com
Serving
4.9 from 108 reviews
Miracle Home Improvements, a locally owned family business thriving for over two decades, has mastered the art of perfecting home exteriors within Croton-on-Hudson and neighboring areas. Specializing in everything from roofing and siding installations to window replacements, gutter cleaning, and skylight installations, their dedicated team ensures meticulous attention to detail is provided in every project, delivering a truly personalized service and owner supervision on every job. With experienced in-house installation teams, you can rest easy knowing your home improvements are in the hands of expertise. Local services for roofing, roof repair, roof installation, siding, siding repair, & more for your home improvement. Book online or call.
P&J Roofing
(845) 287-4193 pandj-roofing.com
Serving
4.9 from 27 reviews
P&J Roofing Company is a trusted provider of professional roofing services. With years of experience in the industry, we specialize in delivering top-quality roofing solutions for residential and commercial properties. Our dedicated team of skilled professionals is committed to excellence, ensuring that every project is completed with precision and attention to detail. Contact us today for a free consultation and let us help you protect your property with a durable and visually appealing roof.

Westchester Roofing Group
(914) 885-7400 westchesterroofing.com
Serving
4.9 from 117 reviews
With over two decades of dedicated service, we specialize in delivering roof and gutter solutions. Our comprehensive services include: Asphalt Shingle Roofs Flat Foam/Single Ply Roofs Metal & Copper Roofs Natural Slate Roofs Traditional Tile Roofs Wood Shake Roofing Chimney Copper Flashing Gutter Installation Gutter Maintenance Roof Heating Cables Built on solutions, experience, and excellence, we provide high-quality roofing services designed for durability and reliability. With expert craftsmanship and a commitment to excellence, we ensure every project meets the highest standards, delivering long-lasting protection for your home or business.
Montevello Carpentry & Roofing
(914) 224-4320 montevellocarpentryroofing.com
Serving
5.0 from 9 reviews
Montevello Carpentry & Roofing stands as a beacon of excellence in the carpentry and roofing industry. With 18 years of experience under our belts, we've honed our skills to offer not just services, but solutions that embody quality, durability, and beauty. Our journey began in Peekskill, NY, rooted in a passion for creating and a commitment to excellence. Our founder's vision was to build a company that could transform any space into a masterpiece of craftsmanship. Behind every cut, every joint, and every nail, there's a story of dedication and passion at Montevello Carpentry & Roofing Our commitment to our craft has not only earned us a reputation for excellence but also a family of satisfied clients. THUMBTACK REVIEWS
David's Roofing & Restorations
(914) 494-9094 www.davidsroof.com
Serving
5.0 from 63 reviews
David's Roofing and Restorations has developed a reputation within the Westchester community for being prompt, hard-working, courteous, professional and responsive to all roofing needs. David and the crew have years of experience in roofing and renovation, including superior customer service. The goal for our company is to make sure you feel safe and secure under your roof - from the beginning of the process to the very end. Some of the services we offer include: Asphalt roof installation/repairs, Flat roof installation/repairs, Cedar roof installation/repairs, Gutter replacements/installation/cleaning, roof inspections, skylight installation/repair, chimney repairs, and siding work. David provides free quotes on any of our services!
Late spring and early summer hail is a stated local seasonal risk and can damage roof surfaces enough to justify prompt inspection. After a hail event, you should assume there may be micro-dings, cracked shingles, and dented metal vents that compromise shingles' protective layers. In Yorktown Heights, the impact is magnified by tree canopy and frequent wind gusts that scatter hail across exposed slopes. Schedule a quick roof check within 24 to 72 hours after a storm, focusing on missing granules, exposed or curling edges, and dented flashing or chimney caps. If you notice damp attic spots or fresh roof discoloration, don't delay-these are signs that water has found its way through.
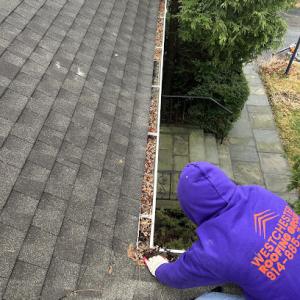
Spring and fall heavy rain and wind events in Yorktown Heights often reveal preexisting flashing and underlayment failures rather than creating only obvious blow-offs. Loose step flashing where the roof meets chimneys, skylights, or dormers, plus deteriorated underlayment, can fail quietly but relentlessly when soaked by heavy downpours. Inspect gutters and downspouts for overflow or ice dam remnants, and look along eaves for visible sagging or separation. If flashing appears loose or granules are washing into gutters after a storm, treat it as a higher-priority repair item rather than a cosmetic issue. Quick fixes are rarely enough; persistent leaks signal the need for targeted flashing resealing or deck protection restoration.
The local contractor signal mix shows meaningful demand for emergency repair and storm-damage work, indicating homeowners here often need fast leak response after weather events. If a leak is actively dripping during rain, avoid waiting for a perfectly dry day; place a temporary container and establish a tarping plan with a trusted contractor. Having a rapid-response contact is especially valuable in this market, where weather windows can compress and after-hours emergencies surge. Before the next storm, identify two local roofers known for prompt mobilization and confirm they can reach your property quickly and safely after a storm, including access to elevated areas and rooftop safety gear.
Coordinate a post-storm roof check within 48 hours whenever feasible, with a more thorough inspection in late spring and early summer to assess hail impact and flashing integrity before the next weather cycle. Prioritize chimney and attic vent areas, exposed ridges, and valleys where wear tends to accumulate. If you observe shingle cracking, curling, or lifting, or see moisture staining on interior ceilings after a storm, treat as urgent and contact a local pro for a detailed assessment and a targeted repair plan.
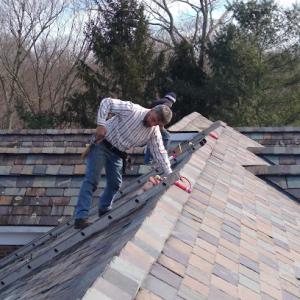
Find local contractors experienced in assessing and restoring roofs after hail, wind, and severe weather events.
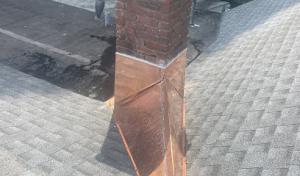
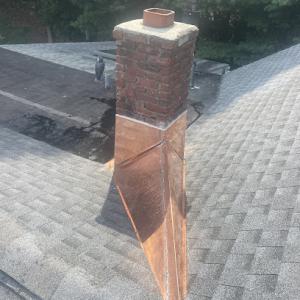
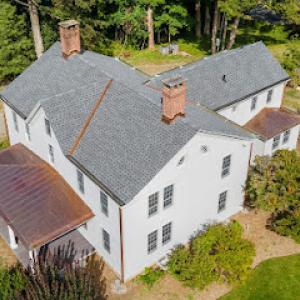
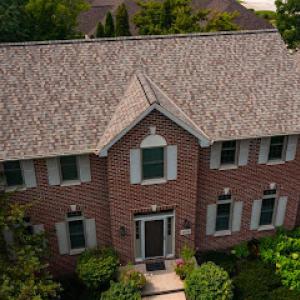
Chimneys and masonry penetrations are a common feature on many homes here, reflecting the area's traditional, pitched rooflines. In this market, a significant share of roof work revolves around flashing around chimneys and counterflashing against brick or stone masonry. Because chimneys sit at the roofline and connect through multiple planes, you'll often see vented caps, cracked cement joints, and worn flashing that can invite leaks after a heavy storm or rapid temperature swing. The local contractor pool regularly handles these projects, but the skill set matters: improper flashing or neglected chimney-step details can lead to slow, creeping leaks that are missed until winter freezes sharpen the damage.
Freeze-thaw cycles threaten chimney-related transitions in particular. When moisture works into flashing seams, counterflashing, or the overlaps where shingles meet the chimney chase, repeated freezing and thawing can pry gaps wider and cause repeated small leaks. The most vulnerable spots are where shingles butt up to metal or masonry, along the top edge of the flashing, and where step-flashing meets the side of the chimney. If you notice staining, spalling brick, or damp attic rafters near a chimney, treat it as a sign that a careful, thorough inspection is in order. Rushed repairs that don't address the full flashing system can shift the problem to nearby shingles, creating a domino effect across a roof plane.
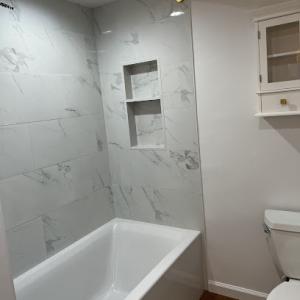
Skylight service is also an active local specialty, making roof-window flashing and curb details a recurring concern. Skylight seals, curb flashing, and the transition from curb to roofing material can crack or separate with seasonal moisture movement. Leaks often present as damp spots along interior ceilings adjacent to skylights after a thaw or a heavy precipitation event. A quality sealant job paired with properly flashed curbs reduces the chance of condensation-driven rot in the roof deck and minimizes the risk of water backing into the surrounding shingles during rapid temperature changes.
When planning or evaluating work around chimneys or skylights, prioritize a twice-a-year peek: inspect the flashing at the chimney or skylight during fall preparation and after the winter thaw. Look for loose metal, rust stains, displaced shingles, or any signs of moisture intrusion in the attic near these penetrations. If the roof has multiple layers, pay attention to how the older layers interact with new flashing; mismatches here are common sources of failure. In a neighborhood with many chimneyed roofs, selecting a contractor who specializes in masonry penetrations and roof-window flashing can save headaches down the line-and prevent small issues from becoming major repairs.
Find contractors experienced in skylight installation, flashing, and leak repairs to bring natural light into your home.
Miracle Home Improvements
(914) 271-9119 www.miraclehomeimprovements.com
Serving
4.9 from 108 reviews

In this suburban ridge of Westchester, a building permit is typically required for a full re-roof rather than being treated as purely over-the-counter maintenance. The town's process assumes a visible project with new underlayment, flashing, and a roof covering that affects drainage and wind resistance on multiple slopes and chimney slips. When planning, you prepare to file with the town building department in advance, since weather windows still matter in this area. The process centers on submitting project details and contractor information before work proceeds, including crew qualifications and the roof type being installed.
Inspections may occur after work begins and again at completion so the town can verify the installation matches code expectations and the approved permit scope. Expect a rough-in check for underlayment, nailing patterns, and roof-to-wall connections, followed by a final inspection after shingles or tiles are set. Keep a clear path for the inspector to access eaves, chimneys, and hips, especially on neighborhoods with tight lots and mature trees. Fall and spring are preferred for schedules to avoid freeze-thaw stress and to align with permit review cycles.
Work with a contractor who understands Yorktown's quiet winter transitions and typical chimneyed pitched roofs. Confirm that the permit number, address, and scope are visible on the job site, and that a copy of the approval is kept for the homeowner's records. Here in Yorktown Heights, ensuring the paperwork aligns with the actual installation reduces the chance of a rework or a failed inspection after a storm season. Coordinate timing with school calendars and local trash and recycling days to minimize disruption for families and neighbors nearby.
In Westchester, roof-related claims are generally handled under standard homeowners policies rather than a uniquely restricted local insurance regime. When a storm, freeze-thaw cycle, or the spring and fall weather windows stress a roof in this area, the claim pathway follows the insurer's typical steps, but the quality and organization of documentation can shape the speed and outcome of the review. The local housing stock-chimneyed, pitched roofs common in wooded neighborhoods-means that damage patterns may be gradual or concentrated on flashing, hips, or ridge lines. Your claim file benefits from a clear, project-specific narrative that links conditions to observed damage.
Adjusters may request pre-project and post-project photos, contractor estimates, and itemized invoices. In this market, documentation quality directly affects claim handling. Lead with a concise description of the roof's age, material, and any known previous repairs. Include weather reports or local news snippets about storm events that correlate with the damage. Keep a log of communication with the contractor, including dates, names, and what was discussed, so the file presents a coherent timeline.
Photographs should capture the roof in a way that highlights affected areas: close-ups of damaged flashing, hail or impact marks, and brittle or missing shingles, plus wider shots of the entire roof to show condition context. Take before-and-after images from multiple angles, and include the surrounding chimney stack and vent areas where wear often starts. Organize images by location and date, and annotate any measurements or observations that support the claim narrative.
Older roofs in this market may face depreciation or higher deductibles depending on policy terms even though broad state-level insurer pullbacks are not a prominent local issue. Prepare to document the roof's remaining useful life, recent maintenance, and evidence of wear caused by freeze-thaw cycles. This helps the adjuster assess whether replacement or repair aligns with the policy's depreciation rules and the claim's scope.
Connect with contractors who help homeowners navigate the claims process from damage assessment to final approval.