Last updated: Apr 19, 2026
In Wallingford, the combination of cold winters with snow and repeated freeze-thaw cycles creates daily stressors on shingles, flashing, and roof penetrations. When the temperature swings above and below freezing, water works its way into small gaps, freezes again, and pries apart shingle edges and sealants. You may not see the damage right away, but every melt-down cycle deepens the risk of hidden leaks that show up as soon as spring rains arrive. This is not a slow-build problem-it compounds quickly once the thaw starts.
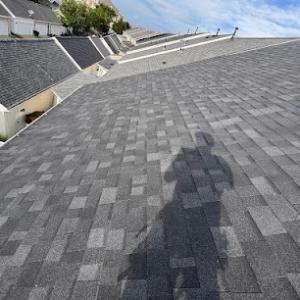
The year-round precipitation in this area keeps surfaces damp, which means ice can form where gutters, valleys, and vents intersect with the roof deck. Ice dam formation is not just an aesthetic concern; it creates backpressure that pushes water under shingles and into underlayment seams. In walls and dormers, flashing sits at vulnerable angles where movement from expanding and contracting materials can open gaps. When warm days follow icy nights, the resulting water flow exposes roofing planes that looked intact after a single season. The key warning signs are damp patches on ceilings after snowmelt, moisture staining along interior cornices, and granular loss along the lower edge of shingles-each a red flag indicating a fast-moving risk, not a distant threat.
Local experience shows that ice-barrier compliance isn't optional-it's central to any re-roofing project here. The barrier protects against water intrusion where eaves and rake areas see the most snow buildup and meltwater flow. Prioritize a continuous ice barrier across eaves, along valleys, and up the hips and ridges where water can back up during storms. Flashing around chimneys, plumbing stacks, skylights, and roof-to-wall transitions must be mechanically fastened and sealed with compatible products that tolerate repeated freeze-thaw cycles. If flashing has lifted, corroded, or pulled away from the deck, that flaw is a direct invitation for water intrusion once spring moisture returns. A proactive re-flashing with durable sealants and corrosion-resistant metal is a critical step in preventing slow leaks that escalate into costly repairs.
You can't overemphasize the role of roof penetrations in Wallingford's climate. Pipes, vents, and electrical conduits are low spots for ice dam formation and bugging points for water tracks. Ensure all penetrations are sealed with high-quality, frost-resistant materials and their collars are properly flashed. Attic ventilation is another frontline defense; inadequate airflow traps warm roof deck air that accelerates ice dam formation from above. In practical terms, verify that soffit intake and ridge or roof vents are unobstructed and sized for your roof area. When winter breathes down hard, even small ventilation gaps become large trouble spots.
Spring is the moment when damage that develops in winter surfaces as leaks. Plan a thorough inspection when the first long stretch of wet, warmer days arrives. Focus on edge shingles, flashing seals around outgoing water paths, and any interior signs of moisture tracing back to the roof. If the system has endured multiple freeze-thaw cycles, treat every spring exposure as a warning shot: address compromised shingles, reseal vulnerable edges, and confirm ice-barrier integrity before the next winter sets in. Acting now reduces the likelihood of patchwork repairs turning into full re-roofs down the line.
Spring storms bring heavy rainfall that can overwhelm a weakened roof, especially on shingles or flashing already stressed by winter freeze-thaw cycles. In this climate, every leak after a downpour isn't just a nuisance-it's a sign that moisture has found a path through compromised underlayment or flashing details. When heavy rain hits, you may notice interior staining, damp ceilings, or musty odors indicating hidden leakage. In these moments, prioritize rapid roof stabilization: locate the source if safely possible, place sturdy containment on the affected area to keep water from spreading, and call a local pro who can mobilize quickly. The aim is to stop the torrent at the roof line, not chase it into the attic or walls where damage compounds.
As summer winds fade and temperatures drop, fall wind events become a documented concern for this area. Gusty shifts can lift aging shingles or shove debris under flashing, creating new leak paths just before winter showers begin. If you hear fast-moving wind through your attic or see shingles fluttering on high-stress areas, treat it as a red flag. Temporary tarping or quick shingle reseating by a skilled contractor can prevent a small opening from turning into a full-season problem. This isn't cosmetic-it's about preventing ice-dam precursors and protecting attic insulation, which pays dividends when the real cold arrives.
The local contractor market shows unusually strong demand for emergency repair and storm-damage work, signaling that homeowners commonly need rapid leak stabilization rather than waiting for a full replacement. That dynamic means you should expect a fast response as the first line of defense. When a storm hits, have a trusted contact ready and do not hesitate to describe the exact symptoms you're seeing-dripping from overhead, damp insulation odors, or water cascading from a vent pipe. A quick, decisive assessment helps crews lock down the leak, protect valuables, and outline the most effective path forward, whether that's temporary weatherproofing or a targeted repair that buys time before a full roof solution.
If you suspect a leak, start with the simplest, safest steps: collect buckets under active drips, remove valuables from the affected area to prevent water damage, and clear outdoor debris from drip edges and gutters to maintain drainage. Document the damage with photos and note the storm's timing; this supports a faster triage by the responding crew. For the rest, rely on a qualified local roofer who can deliver rapid stabilization, assess the underlying cause-be it failed underlayment, compromised flashing, or a damaged hip or valley-and map out a plan that stops the leak now and lines up the right remedy before the next storm.
Find local contractors experienced in assessing and restoring roofs after hail, wind, and severe weather events.
Empire Construction
(203) 269-3559 empireconstructionct.com
323 N Cherry St Ext, Wallingford, Connecticut
4.8 from 19 reviews
Rob's Roofing
(203) 980-7933 www.robsroofingct.com
329 Main St Suite 206, Wallingford, Connecticut
4.9 from 29 reviews
Established in 2015, Rob's Roofing, has become a trusted name for professional roofing services in Wallingford, CT and surrounding areas. As a leading roofing contractor, we specialize in high-quality installations, repairs, and maintenance for both residential and commercial properties. Our team of experienced professionals is dedicated to delivering exceptional craftsmanship and reliable solutions, ensuring your roof is built to last. We are committed to protecting your most valuable asset with integrity and expertise.
MLM Home Improvement
7 N Turnpike Rd, Wallingford, Connecticut
4.7 from 37 reviews
MLM Home Improvement is a premier storm restoration company specializing in full replacements for roofing, siding, and gutter systems. We offer free, no-obligation inspections and estimates to assess storm damage and provide transparent recommendations for replacement solutions. Our expert team is dedicated to delivering exceptional quality and service in every project we undertake.
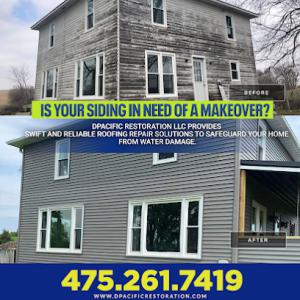
D Pacific Restoration LLC | Roofing, Gutters, Siding Experts
(475) 261-7419 www.dpacificrestorationct.com
272 Ward St, Wallingford, Connecticut
5.0 from 12 reviews
D Pacific Restoration is your trusted local expert based in Wallingford, CT, proudly serving homeowners across all of Connecticut. We specialize in roofing, siding repair, water and fire damage restoration, and landscaping services. From emergency water cleanup and fire damage repair to full roof replacements, siding upgrades, and outdoor transformations, our skilled team delivers reliable craftsmanship with honest, compassionate service. We’re available 24/7 for urgent needs and offer free inspections with bilingual support. Call today to schedule your free consultation and experience the D Pacific difference
Empire Construction
(203) 269-3559 empireconstructionct.com
323 N Cherry St Ext, Wallingford, Connecticut
4.8 from 19 reviews
Welcome to Empire Construction, your premier roofing contractor in Wallingford, CT, serving Meriden and Cheshire as well. With over 30 years of experience, our dedicated team specializes in providing top-quality roofing services. Whether you need a roof installation, repairs, or damage restoration, we have the expertise to handle any project with precision and efficiency. Our mission is to deliver exceptional craftsmanship and customer satisfaction, ensuring that your roof is built to last and withstand the elements. Contact us today for all your roofing needs and let Empire Construction be your trusted partner in protecting your home or business. Don't wait until it's too late, take action now and secure the safety and longevity of your p
Coastal Exteriors
(203) 627-6053 www.coastalexteriorsllc.com
10 Winding Brook Ln, Wallingford, Connecticut
4.8 from 6 reviews
Commercial and Industrial Roofing Contractors specializing in silicone and elastomeric coatings.

LA Roofing contractor
(860) 877-3006 www.laroofingct.com
Wallingford, Connecticut
5.0 from 3 reviews
LA Roofing is one of the best Roofing Companies in Hartford, CT. An old or damaged roof can result in costly repairs and depreciated value of your home if not corrected. As a premier Roofing company specializing in residential and commercial roofing services, Whether you have a new construction project or need to replace an old or damaged roof, we offer roof repair and roof replacement services. La Roofing Company will provide you with a full consultation to explain all of your available options so that you can choose the roof that’s right for your home or business. We will work with you and adhere to your personal needs. Check our recent project in Instagram & Facebook
Skyway Roofing
(203) 234-1906 www.skyway-roofing.com
Serving
4.9 from 312 reviews
Skyway Roofing is a full-service roofing company delivering residential and commercial roof solutions in North Haven and throughout New Haven County, Middlesex County, and the surrounding areas. Our fully licensed and insured roofers go above and beyond for our neighbors—pairing best-in-class materials with unmatched craftsmanship and compassionate customer service.
Ace Top Roofing
(475) 302-9209 acetoproofing.com
Serving
5.0 from 48 reviews
Ace Top Roofing delivers reliable, high-quality roofing services for homeowners and businesses across Connecticut. We specialize in full roof replacements, repairs, storm-damage restoration, and offer expert gutter and siding services to protect and elevate your property. Our team is known for honest communication, dependable craftsmanship, and using premium materials that stand the test of time. As a fully licensed and insured company, we show up with integrity, clear expectations, and workmanship you can trust. Whether you need a minor repair or a full exterior upgrade, Ace Top Roofing is committed to keeping your home safe, strong, and looking its best.
The Roof Girl
(203) 463-5075 www.theroofgirl.net
Serving
4.9 from 133 reviews
The Roof Girl, LLC is a woman-owned business with a focus on providing exceptional, highly personalized customer service and superior workmanship. We strive to enhance the value and your enjoyment of your home. Our commitment to high-quality roofing is backed with a 12 year workmanship warranty. In order to personalize each roof, The Roof Girl is proud to offer all customers a detailed proposal outlining the job, tailored to the customer's needs and taste. We make roofing fun! It's a whole new way to do roofing.
Evans Commercial Roofing
(203) 886-9851 evanscommercialroofingct.com
Serving
5.0 from 29 reviews
Residential and commercial roofing contracting Company fully licensed and insured serving all of Connecticut and Westchester County New York
ENH Restoration
(203) 453-5571 www.enhrestoration.com
Serving
5.0 from 46 reviews
ENH Restoration is your trusted roofing contractor, gutter service, and siding specialist proudly serving the Connecticut Shoreline. We provide professional roof installation, roof repair, roof cleaning, gutter replacement, and siding services for residential and commercial properties. Fully licensed and insured, our team delivers top-quality results for new construction, remodeling, and restoration projects. From small repairs to full exterior upgrades, ENH Restoration ensures your home or business is protected and built to last. Contact us today for a free estimate and let your roof shine!
KLS Construction
(203) 565-9188 klsconstructionllc.com
Serving
5.0 from 44 reviews
KLS Construction is a family-owned business specializing in roofing, siding, and windows. We are well trusted and ensure that our customers are happy and satisfied with our work. KLS Construction prides itself on professionalism.
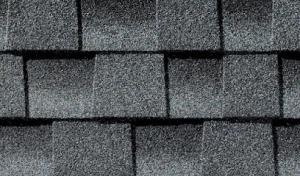
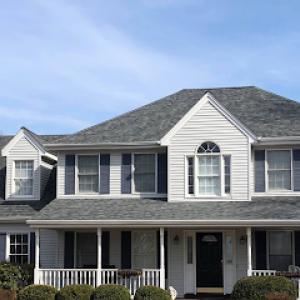
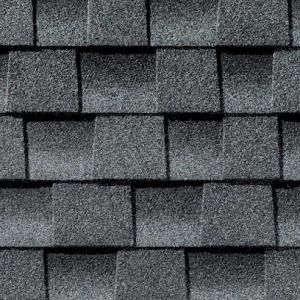
Asphalt shingles are the dominant practical choice here, balancing cost with performance in a climate that includes snow, summer humidity, and year-round rain. They're familiar to local crews, easy to repair, and compatible with standard venting and ice-barrier requirements that many Wallingford re-roofs rely on. For best resilience against freeze-thaw cycles, choose a high-quality fiberglass or asphalt product with an appropriate underlayment and a solid ice-dam barrier along the eaves. In areas that see heavy snow, a darker shingle can help with snow melt patterns, while ensuring proper attic ventilation to reduce condensation and moisture buildup.
Metal roofing is locally relevant because it handles snow shedding and freeze-thaw exposure well, and there is a meaningful specialist presence for it in this market. If you expect long winters or heavy ice buildup, metal can reduce ice dam risk and future maintenance. Look for standing-seam or other concealed-fastener systems installed by a local contractor who understands Wallingford's typical roof lines and chimney details. Pay attention to valley and flashing transitions around chimneys, skylights, and dormers; improper detailing in these spots is a common source of leaks. A well-sealed southern or western exposure with adequate attic ventilation will help metal perform at its best during alternating freeze-thaw cycles and humid summers.
Clay tile, concrete tile, and related products are present in Wallingford, but their suitability depends heavily on structural load and moisture exposure, and how well details are executed around chimneys and flashing. Tile roofs require a strong, reinforced deck and careful nailing schedules to withstand winter wind-driven rain and freeze-thaw movement. If you're considering tile, have a structural assessment done first and ensure the underlayment and flashing detail around chimney bases, rake edges, and eave lines are upgraded to resist moisture ingress. A tile roof can be attractive and long-lasting, but it demands precise installation and ongoing maintenance to remain watertight in this climate.
Wood shakes and synthetic/composite products are present in Wallingford, yet their suitability hinges on structural support and moisture exposure. Wood shakes offer a traditional look but can be sensitive to persistent moisture and ice damming if ventilation isn't adequate. Synthetic or composite shingles provide moisture resistance and consistent performance, but still require proper flashing, underlayment, and ventilation. For any wood or composite choice, insist on a roof deck inspection, solid underlayment, and seamless integration with chimney flashing and dormer details to minimize water intrusion in freezing conditions.
Start by confirming that any re-roof plan includes robust ice-dam protection at eaves and proper attic ventilation. Consider metal for snowy sections or high freeze-thaw exposure, asphalt as a cost-effective, flexible baseline, and reserve tile or shake choices for well-supported structures with careful flashing around chimneys and penetrations. In all cases, ensure contractors prioritize seamless flashing, venting, and an approach that accommodates Wallingford's seasonal swings without compromising long-term watertightness.
Typical Wallingford material pricing runs about $350-$550 per square for asphalt shingles, $700-$1100 for metal, $900-$1800 for clay tile, $800-$1500 for concrete tile, $600-$900 for wood shingles or shakes, and $500-$950 for synthetic or composite shingles. Those ranges reflect a local market used to inland Connecticut freeze-thaw cycles and year-round precipitation. If your roof presents unusual complexities-like a steep pitch, multiple penetrations, or obtrusive chimney detailing-expect costs to press toward the upper end of these ranges. In most neighborhoods, the first estimate will separate the tear-off, disposal, and new roofing portions, making it easier to compare bids on a like-with-like basis.
Costs in Wallingford can rise when winter damage creates urgent spring demand, because storm-related scheduling pressure is common in this market. When a thaw reveals concealed damage, contractors may need to fast-track orders for underlayment, ice barriers, and specialized flashing. This squeeze can push material selection toward readily available options and shorten the decision window. If you're replacing during or right after a winter surge, prepare for potential shorter lead times on certain products and a premium for expedited scheduling. Budgeting a small contingency for weather-driven delays helps keep the project moving smoothly.
Ice-barrier and wind-compliance details can add labor and scheduling costs compared with a simple tear-off in a milder climate. An ice-dam resistant installation typically requires a continuous ice-and-water shield along eaves and into rakes, plus proper venting and insulation checks. Wind-resistant underlayment and secure fasteners for high-wind exposures (common on exposed ridge lines) add time and materials. These steps improve long-term performance in freeze-thaw cycles but can elevate both material and labor costs beyond a basic replacement. Expect bids to itemize these features so you can compare the true value of each approach.
Clay and concrete tiles deliver excellent durability and wind resistance, but their weight and cost are higher, so structure may need reinforcement. Metal roofs offer standout storm resistance and lighter weight with a broad price band toward the upper end of the range. Asphalt remains a common, cost-effective option when a quick return-to-service is desired, yet it may require more vigilance against ice dams in recurring winters. Wood shingles or shakes bring a distinct look but can be less forgiving under ice-damming conditions and may demand additional underlayment or sealing in this climate. Synthetic or composite shingles aim to balance cost, ease of installation, and freeze-thaw resilience, often performing well in this market.
To avoid sticker shock, request line-by-line bids that separate tear-off, disposal, underlayment, ice barrier, flashing, and finish materials. Confirm expected lifespan and warranty terms for the chosen product in this climate, and plan for a multiple-day window to accommodate weather and inspection sequencing. A well-planned schedule helps minimize the risk of storm-driven delays pushing labor costs upward.
Get a clear picture of your project costs upfront - no commitment required.
D Pacific Restoration LLC | Roofing, Gutters, Siding Experts
(475) 261-7419 www.dpacificrestorationct.com
272 Ward St, Wallingford, Connecticut
5.0 from 12 reviews
A full re-roof triggers a building permit in this area, not merely arranging a contractor on the weekend. When you file, the Building Department expects a clear scope, a stamped plan if required, and proof that the chosen crew carries current licensing and insurance. The emphasis is on ensuring the entire system-from underlayment to drip edge-is properly documented before any hammering begins. In practice, this means you should expect your project to start only after the paperwork clears and a permit is in hand.
The local Building Department tends to review project plans and contractor licensing before work proceeds. That review is not a formality; it checks that an ice barrier is installed where winters grip hardest and that attic ventilation and flashing meet Code expectations. If something is missing, delays can cascade, pushing a scheduled start into the following week or longer. Have your contractor submit detailed drawings and product specifications, including the chosen underlayment and ice-dam mitigation strategy. Wallingford's climate makes this step especially consequential.
Inspections are commonly conducted at milestones such as underlayment installation and final completion. Expect a site walkthrough from a inspector who will check nailing patterns, drip edge, and proper fastening. If a problem is found, repairs may require re-inspection, which can stall progress and complicate weather timing. Your crew should keep the job site accessible for the assessor and document any changes to the plan with written notes. Understanding this rhythm helps prevent surprises, especially when winter-proofing is the goal.
Weather quirks and tight windows can affect timing, and inspection slots do not always align with sunny days. Frozen mornings, mid-winter snow, or a late fall rain can push a re-roof from a convenient weekday start into a less predictable window. Plan ahead with your contractor for the permit review calendar and the anticipated inspection dates, and build a little flexibility into the schedule. If a project stalls, keep in touch with the Building Department rather than improvising on your own. This keeps your re-roof compliant and safer for the long term.
Proper documentation matters not only for the Building Department. You may need to share permit and inspection records with neighborhood associations or condo boards, and keep copies for future maintenance. Make sure exterior work stays tidy and that protection is in place during bad weather. Clear communication with neighbors reduces complaints during delays.
When a significant wind or hail event rattles the neighborhood, a documented paper trail becomes a homeowner's best ally. In Wallingford, insurers scrutinize aging roofs more closely after storms, and a detailed record can help support timely decisions about repair versus replacement. Track the roof's age, note any prior repairs, and keep storm-date photos organized in a timeline. A simple photo log showing shingles lifted by wind or hail impact can prevent later disputes and clarify the timeline of damage.
Connecticut insurers have tightened documentation requirements for aging roofs, and the temperate but punishing winters in this area mean wear compounds quickly after a hail season or a severe wind event. Homeowners benefit from keeping a ready-to-present history: when the roof was installed, any coatings or resealing attempts, and the dates of notable storms. This practice supports clearer communication with the insurer and helps ensure that coverage decisions align with the roof's actual condition rather than assumptions about age alone.
Because local contractors frequently market storm-damage and insurance-claim help, homeowners in Wallingford are navigating claim-driven roof decisions more often than in a purely cash-pay market. That reality can tempt expedited settlements or replacements that aren't the best long-term fit for the home's structure or climate. Approach this with measured judgment: verify the contractor's assessment against your documentation, seek independent second opinions when possible, and ensure any proposed repair or replacement aligns with ice-dam resilience and the area's freeze-thaw cycles.
After a storm, photograph the roof from multiple angles, then document interior signs of water intrusion and attic condensation. Collect prior repair receipts and warranties, and prepare a concise summary of changes since the roof's installation. When talking with insurers or contractors, reference specific storm dates and cumulative wear patterns rather than vague descriptions. The goal is to convert weather-driven events into a clear, defendable record that supports durable, climate-resilient roofing decisions.
Connect with contractors who help homeowners navigate the claims process from damage assessment to final approval.
D Pacific Restoration LLC | Roofing, Gutters, Siding Experts
(475) 261-7419 www.dpacificrestorationct.com
272 Ward St, Wallingford, Connecticut
5.0 from 12 reviews
Chimneys and masonry intersections are a common focal point for local roofers, and flashing at these joints tends to wear faster than adjacent roof areas due to freeze-thaw cycles and recurring moisture. When inspecting or planning work, look for hairline cracks around the chimney base, loose mortar, and any uneven flashing that could trap ice or water. A proper cap flashing extends beneath the chimney counter-flashing and should be backed by solid, well-sealed step and boot flashings along each side. In practice, this means checking after heavy rain or a mid-winter thaw for any damp spots or staining along the fireplace chase. If you notice spalling brick or deteriorated mortar, address it promptly to reduce the risk of leaks traveling into the attic or ceiling, especially on roofs with ice barriers in place.
Skylight units are a frequent local service target, and weak curb or flashing details can fail under freeze-thaw pressure and heavy rainfall. When inspecting, start at the skylight curb: look for gaps where sealant has cracked, flashing that isn't fully integrated with the surrounding roof deck, or any pooling water at the base. A properly flashed skylight should shed water away from the bedding and onto roof shingles rather than toward the interior. In colder months, icicles forming along the skylight edge can indicate poor drainage or improper slope. If replacement is needed, consider a curb-mounted unit with a reinforced sealant bead and upgraded flashing that overlaps the main roof plane to discourage water intrusion during rapid temperature swings.
Fall leaf buildup is a documented seasonal risk and can slow drainage enough to magnify minor flashing or valley defects into interior leaks. Before the first hard freeze, clear debris from gutters and downspouts, paying special attention to valleys and step flashings near dormers or chimneys. Regularly inspect roof valleys after storms when leaves are fresh; a small blockage in the valley can become a big leak when ice forms. In late autumn, trim back nearby branches to reduce debris shedding onto the roof, and consider temporary covers for valley outlets during peak leaf drop periods. Timely maintenance here helps prevent the cascade of problems that ice and rain can cause along roof-to-wall intersections.
Find contractors experienced in skylight installation, flashing, and leak repairs to bring natural light into your home.
Empire Construction
(203) 269-3559 empireconstructionct.com
323 N Cherry St Ext, Wallingford, Connecticut
4.8 from 19 reviews
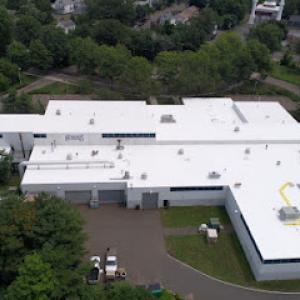
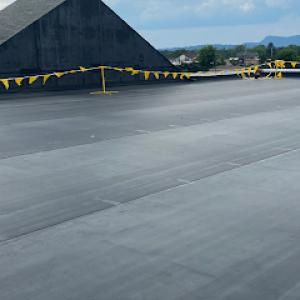
While Wallingford is primarily a pitched-roof market, there is still a meaningful local presence of flat-roof specialists for porches, additions, garages, and some commercial or mixed-use structures. That mix means you'll encounter a range of membrane systems, from elastomeric coatings to fully adhered and mechanically fastened sheets. On any project touching a low-slope section, expect attention to detail on flashing, edge metal, and tie-ins to existing pitched roofs. The climate-year-round precipitation and winter freeze-thaw-puts a premium on thoughtful drainage and durable detailing from the gutter line to the drip edge.
In this climate, water movement matters as much as the membrane itself. You'll want a low-slope system that channels runoff efficiently to proper drainage points and away from walls. Slope, though modest on many low-slope areas, is still enough to influence membrane selection and installation methods. Pay particular attention to field seams, penetrations, and transitions where ice and snow can back up; these are common failure points in Wallingford homes with porch roofs, sunrooms, or add-ons. A robust edge detailing and secure flashing at any parapet or curb will help reduce ice dam risks that can propagate under the membrane.
A smaller but real local market for roof coatings suggests some owners are exploring restoration on qualifying low-slope roofs instead of full replacement. Coatings can provide a weathered surface refresh and extend life when the substrate is sound and the slope remains in good shape. When considering coatings, evaluate cure resistance to cold cycles, ponding water, and UV exposure, as Wallingford's winters and sun exposure can stress coatings differently than in milder climates. For already-compressed budgets or historic pocket roofs, a properly chosen system can offer meaningful protection without a full tear-off, but it must be paired with a careful inspection of deck condition and flashing integrity.
Find specialists in TPO, EPDM, and built-up flat roofing systems for residential and commercial properties.


Cleanup is a major hiring priority in Wallingford, indicating homeowners expect tear-off debris handling and site protection to be part of the job, not an upgrade. When evaluating bids, look for specifics about daily debris removal, dumpster use, and drop cloths or tarps to protect landscaping and driveways. Ask how ladders, tarps, and waste nets will be used to prevent asphalt shingle granules and nails from migrating onto neighboring properties. A contractor with a clear cleanup plan and a proven track record of leaving the yard as clean as before work begins is more reliable in a high-wet, freeze-thaw climate where stray fasteners pose a slip risk in spring.
The local market includes many long-established and family-oriented contractors, so workmanship reputation and post-job responsiveness matter alongside price. Seek references from nearby homes with similar roof styles and climates, and verify how the contractor communicates delays or weather-related interruptions. In Wallingford, where freeze-thaw cycles test roof seams and ice barriers, reliable follow-up after completion-whether for minor touchups or warranty questions-often correlates with a contractor's local footprint and customer service ethic. Expect clear milestones, documented approvals for repairs, and a designated point of contact for warranty inquiries.
Because permit inspections and weather delays are part of the local process, homeowners should clarify both manufacturer coverage and contractor-backed workmanship support before signing. Ensure the warranty covers ice-dam resilience and flashing integrity, with explicit terms for insulation and ventilation compatibility given inland Connecticut winters. Confirm who handles warranty claims, the expected response time, and whether workmanship warranties align with or exceed manufacturer terms in the event of storm-driven damage or freeze-thaw stress. A solid plan includes a written commitment to timely inspections after harsh seasons and a process for addressing material or installation defects promptly.