Last updated: Apr 19, 2026
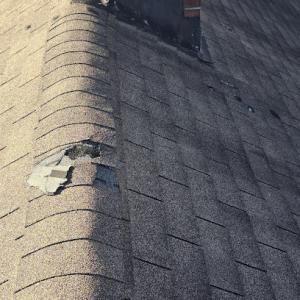
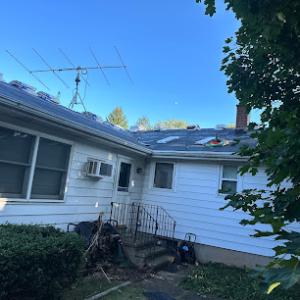
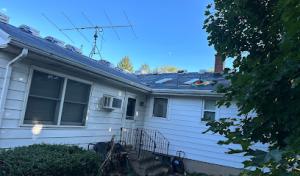
New Haven experiences harsh winter swings that push water into vulnerable roof joints. Freeze-thaw cycling regularly opens joints at eaves, valleys, step flashing, and around older masonry chimneys. When meltwater refreezes at eaves or in gutters, ice dams form and back up into roof edges, driving moisture under shingles and into attic spaces. The result can be costly, repeated leaks that weaken roofs over years, especially on older homes with less robust insulation and ventilation.
Snow and ice issues hit the city's older housing stock hardest. Attic insulation and ventilation often do not meet modern standards, so heat loss through the roof can melt snow from above while cold exterior surfaces refreeze along eave lines. That uneven temperature distribution promotes ice dams and spike leaks at vulnerable joints. Homes near the coast or harbor carry an extra burden: damp marine air and frequent precipitation keep moisture lingering after storms, extending wetting cycles and accelerating deterioration of flashing, masonry, and gutters.
Start by looking at the eaves and roof edges for any visible gaps where water can back up behind the shingles. Cracked or loose step flashing along walls and near chimneys is a common entry point in New Haven's climate. Valleys can collect debris and thawing water, so ensure those intersections are clean and properly sealed. Masonry chimneys on older homes deserve special attention: deteriorating mortar joints or cracked brick allow moisture to migrate into the attic or wall cavities when ice damming occurs. Gutters and downspouts should be clear of leaves and ice, with secure connections to prevent drift and pooling at the fascia.
Prioritize reducing heat loss into the attic. Add or improve insulation and ensure the attic floor is well sealed against attic air leaking into living spaces. Validate that soffit vents, roof vents, and gable vents are clear and unobstructed to promote balanced ventilation. In the short term, keep eaves clear of heavy snow accumulations using safe removal methods, and gently remove first layers of ice along the gutter line to prevent dam buildup. Check chimney flashing from the attic or upper level; look for loose metal, gaps, or deteriorated sealant around joints, and schedule a professional assessment if flashing shows signs of movement or corrosion. For roofs with a history of ice damming, consider installing an ice-and-water shield in critical overhangs if a retrofit is planned, as this helps direct water back to the surface rather than behind the shingles.
If you notice recurring damp spots on ceilings or walls well after storms, active ice dam formation during thaws, or jagged shingle edges near the eaves, bring in a local roofer who understands New Haven's coastal moisture and freeze-thaw patterns. A seasoned pro will inspect flashing around chimneys and transitions to masonry, evaluate gutter integrity, and assess attic ventilation and insulation with an eye toward reducing heat loss that fuels ice dams. They should also assess valley crickets and roof-to-wall terminations for proper slope and sealant continuity, since these joints are prime leakage pathways in older homes.
Plan for a durable, layered approach that combines improved insulation, balanced ventilation, and robust flashing details at all critical joints. Prioritize upgrading attic insulation to minimize heat transfer, ensuring baffles or vent channels maintain clear paths for air movement from soffit to ridge. Re-fastening or replacing step flashing around chimneys and along sidewalls with corrosion-resistant metal, plus targeted repairs to mortar joints and brick, will dramatically reduce moisture ingress during repeated freeze-thaw cycles. In coastal-adjacent blocks, consider additional protective measures to shield vulnerable eave lines from persistent dampness and salt exposure.
Document spots where ice damming has occurred in previous winters and plan targeted repairs to flashing, gutters, and chimney interfaces first. Coordinate a plan with a reliable New Haven roofer who can tailor flashing, insulation, and ventilation improvements to your specific house type and location, especially if your home features historic architecture or slate or clay roofing that demands careful handling during repairs.
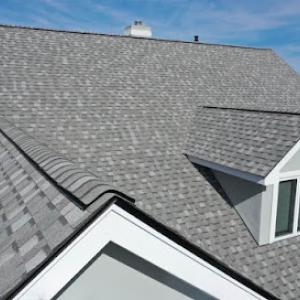
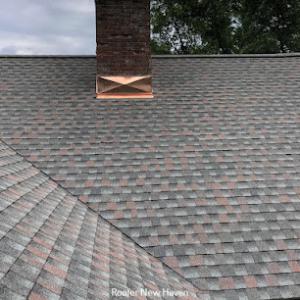
East Rock and Wooster Square showcase rooflines that speak to a century of construction: slate and wood shingle surfaces, steep gables, and dormers that tuck into attic spaces. The look you see on a row of rowhouses or a restored brick building often comes with a practical constraint-replacement materials must match the historic character. When a roof is due for repair, the goal isn't merely to stop leaks; it's to preserve the visual cadence of the skyline. Slate and wood shingles, while durable, require careful maintenance around chimneys, dormers, and transitions where the roof meets walls. Steep slopes aid drainage but demand precise flashing detail to handle freeze-thaw cycles. In practice, that means paying attention to ridge cap integrity, the condition of knee walls, and any decorative trim that could trap moisture.
In these neighborhoods, leaks rarely originate solely from worn field shingles. Instead, the weak points are often roof-to-wall transitions, dormer assemblies, and flashing at chimneys. Dormers introduce boxed-in voids where moisture can linger, and their flashing must be inspected for continuity with the surrounding roof deck. Chimneys, especially brick stacks rising through older roofs, are frequent trouble spots: deteriorated mortar joints, step flashing gaps, and improper counter-flashing can let meltwater travel down into wall cavities. Wood-shingle or shake roofs demand close scrutiny around overhangs and eaves, where ice buildup is common. A typical New Haven winter can push water up and under shingles at the eave if ice dams form, then refreeze, lifting or cracking shingles and loosening flashing. Slate roofs, while long-lasting, require vigilant maintenance around slating patterns, nail heads, and repairs that preserve the original lay lines. The important practice is to trace leaks not to the nearest visible stain, but to the last place where efficient drainage or flashing fails-often at a transition, rather than in a bare field area.
Material choice should honor the surrounding architecture. In East Rock and Wooster Square, you'll encounter brick veneers, terra cotta details, and wood cornice work that narrow replacement options. Slate remains a favored option where the roof geometry and budget align, but it may demand custom detailing and selective replacement to match neighboring roofs. Wood shingles or shakes can be appropriate on lighter façades or on buildings with timber cornices, provided the finish and profile mirror the historic look. When appearance constraints push toward alternatives, consider lighter-toned materials or profiles that echo the steepness and rhythm of the original roofscape, while ensuring modern underlayment and flashing practices are in place to handle moisture and freeze-thaw stress. In all cases, preserve visible skylight placements, dormer proportions, and the silhouette that defines the streetscape.
New Haven's winter can stress the roof through rapid temperature swings and heavy snowfall that lingers on eaves. Seasonal planning should prioritize pre-season inspection of chimney flashing, dormer step flashing, and eave overhangs. Early detection of degraded mortar joints around chimneys, and loose or cracked shingles or shakes, helps prevent moisture intrusion during thaws. If a roof has sustained previous repairs, review the compatibility of patch materials with the surrounding historical fabric, since mismatched textures or colors can draw attention away from the roof's original character and complicate future maintenance.
With multiple transitions, a proactive maintenance schedule is essential. Inspect after heavy storms for displaced shingles, lifted flashing, and infiltrations at roof-to-wall joints. Pay special attention to areas where gutters terminate near masonry, since clogged or overflowing gutters can back up water onto the eaves and create ice dams at vulnerable eave lines. For older homes, it's prudent to document the roof's original patterns, flashing configurations, and any dormer or chimney work, so future repairs can stay faithful to the historic fabric while addressing modern performance needs. Regulared caulking around masonry joints, careful cleaning of debris from dormer valleys, and resealing wood elements will extend the life of the roof and reduce the likelihood of interior water damage during freeze-thaw cycles.
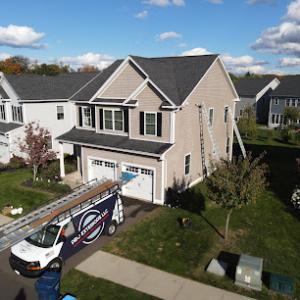
Pro Exteriors
(203) 909-8075 proexteriorsct.com
90 Hamilton St, New Haven, Connecticut
4.9 from 412 reviews
Pro Exteriors was established by a team of industry professionals dedicated to providing the highest quality solutions. Whether you are searching for a roofing contractor, siding or gutter contractor, our team is one of the best in Connecticut. Our efficiency allowed us to quickly become one of the top residential roofing companies, siding repair and replacement contractors, as well as the top gutter company in Connecticut. Pro Exteriors is family owned and operated and committed to delivering the best customer experience on every job. It is time to make Pro Exteriors your preferred roofing, siding, and gutter contractor!
REVMA Roofing
New Haven, Connecticut
5.0 from 56 reviews
REVMA is a premier roofing company located in Queens, NY. We specialize in various roof replacements such as asphalt shingles, slate, cedar, composite, metal, and flat roofs. Our installation and replacement services further extend to aluminum gutters, copper gutters, and skylights. Our customer service is second to none and our quality of work is what sets us apart from the rest. Our philosophy is simple, do it right the first time!
Giant Roofing
50 Fitch St, New Haven, Connecticut
5.0 from 26 reviews
We are a trusted roofing company serving New Haven and surrounding Connecticut areas. We specialize in roof repairs, leak detection, roof replacements, and storm damage repairs for residential and commercial properties. Our team provides fast service, fair pricing, and high quality workmanship to make sure your roof is safe and built to last. Contact us for a free inspection and estimate.

Gerard Remodeling
(475) 434-9786 gerardremodeling.com
278 Clinton Ave, New Haven, Connecticut
5.0 from 19 reviews
WE ARE A FAMILY COMPANY WITH MORE THAN 20 YEARS WORKING AND HELPING PEOPLE IMPROVE THEIR HOMES.
Restoration Roofing
186 Sheffield Ave, New Haven, Connecticut
5.0 from 15 reviews
"We are a roof installation and replacement company since 2016 in New Haven Ct. and will be happy to review any written estimate from a competitor and offer a second opinion. For same-day service, contact us today.Restoration Roofing is your place for roofing, siding installation!
AED Roofers Water Proofers
(203) 850-4221 aedroofersandwaterproofers.com
51 Maltby St, New Haven, Connecticut
5.0 from 3 reviews
We specialize in flat roofs, offering expert services in EPDM and rubber roofing, TPO and torch down rubber systems, preventative maintenance, and a variety of coatings including silicone, acrylic, and aluminum. Our services cater to both residential and commercial properties. Fully insured and certified, we ensure quality and reliability in every project
CT Roofing Services
63 Burr St, New Haven, Connecticut
5.0 from 2 reviews
Serving all CT with professional roofing services since 12 years! Commercial & Residential.

Manoly Remodeling & Roofing
(203) 640-9820 manolyroofing-ct.com
22 Oakley St, New Haven, Connecticut
4.0 from 4 reviews
Manoly Roofing was founded in 2003. We pride ourselves on a record of quality work and craftsmanship in the roofing industry. Only the best materials approved by regional codes are used. Family and locally owned and operated serving all of Connecticut. Benito Urgiles, the owner of Manoly Roofing is involved in every project to make sure the job is done correctly. All work is done by our crew. Projects from roof installation, tear off and replace, chimney flashing and skylight installations.
Solid Rock Roofing
(475) 301-4540 solidrockroofingllc.net
Serving
4.8 from 44 reviews
SOLID ROCK ROOFING offers a variety of different options. We pride ourselves with serving the community with honesty, aggressive, pricing, quality, safety, and integrity. We have over a decade of experience in providing leak free roofing solutions for our customers! Let us show you the solid rock way you got a drip. We can fix it in one trip call today.
Salinas Roofing Gutters Siding Contract
(203) 815-6002 salinasroofingct.com
Serving
4.8 from 66 reviews
Salina's Roofing Siding & Gutters offers a comprehensive suite of exterior home improvement services in West Haven, Connecticut. From roof repair and replacement to siding installation and gutter installation, they provide expert solutions to maintain and enhance your property's exterior.
Cinco Home Improvements
(203) 927-5999 www.cincoct.com
Serving
5.0 from 35 reviews
Cinco Home Improvements has been delivering trusted home improvement services in New Haven, CT, since 2005. We’re owner-operated, hands-on, and built on a foundation of clear communication, fair pricing, and high-quality, coordinated work. With a crew that cares and truly loves what he does, we bring exceptional results.

Kohler Roofing Solar & Construction
(203) 339-1619 kohlerroofing.com
Serving
5.0 from 12 reviews
Kohler Roofing Solar & Construction provides solar installation, roofing, siding, gutters, decks, and more in Milford, CT, and the surrounding area.
New Haven's shoreline exposure means coastal wind-driven rain can exploit lifted shingles, failed ridge caps, and flashing gaps even when damage is not dramatic from the ground. The path of a storm often starts at the eave, where wind grabs loose edges and pulls at underlayment. Shingles may lift along the rake and around chimneys, dormers, and vents, creating tiny leaks that quietly worsen over days of spray and spray-back. Checkments after a storm should focus on those high-tension zones: ridge lines, flashing around chimneys, vent pipes, and where the roof meets the brick or masonry parapets. If you can see daylight from the attic or hear wind howling between gaps, action is needed immediately.
Storm timing matters locally because spring rain and coastal systems can leave roofs exposed during tear-offs and delay dry-in schedules. If a contractor loses a dry-in window to wind or rain, water infiltration can sit behind a barely visible barrier, freezing later and expanding cracks. Plan pre-storm reinforce-and-seal actions: ensure any loose flashing is secured before a front arrives, and have temporary tarps or peel-and-stick patches ready to cover open gaps. After a storm, perform a careful exterior ring check-around eaves, parapets, and skylight flashings-before the next front moves through. Delayed dry-in periods are not just inconvenient; they amplify the risk of ice dam formation once melt cycles resume.
Older roofs in this area are more likely to face insurance scrutiny after wind events because age and pre-existing wear affect replacement eligibility. Evidence of recurrent wind-driven leaks-staining near ceilings, condensed attic air, or deteriorated gutters that no longer shed water effectively-can raise red flags. Treat any sign of compromised flashing or ridge cap failure as a severity cue: even if the visible damage looks minor, underlying deck moisture can worsen with freeze-thaw cycles. Proactive sealing, flashing replacement, and proper venting reduce the chance that an insurer questions the need for a full replacement later.
Inspect gutters and downspouts for sag or detachment, because blocked or misaligned systems force water to back up under the eaves. Examine chimney cricket and step flashing where brick meets shingles; any gaps should be resealed with compatible sealant and, if needed, flashing replaced to restore a solid water barrier. If shingles show lifting or curling, arrange prompt professional assessment before the next storm season. Keep a simple storm-response kit: heavy-duty tarp, duct tape, roofing cement, and a small pry bar for quick emergency access under loose edges. This targeted, action-oriented approach reduces the chance of slow damage becoming a costly repair later.
Find local contractors experienced in assessing and restoring roofs after hail, wind, and severe weather events.
Pro Exteriors
(203) 909-8075 proexteriorsct.com
90 Hamilton St, New Haven, Connecticut
4.9 from 412 reviews
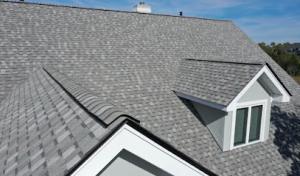

Asphalt shingles dominate many replacements because they fit the city's broad mix of older single-family homes and moderate reroof budgets. In neighborhoods with steep gables and slate-adjacent appearances, asphalt can be selected to mimic color and profile while offering quick installation and a straightforward repair path. For most mid-century colonials and bungalows, they strike a practical balance between durability and ease of maintenance, especially when paired with proper underlayment and drip edges to handle freeze-thaw cycles.
Slate remains especially relevant because of the city's older historic housing stock, but repairs and replacements are labor-intensive and structurally demanding. If the home has the existing slate, you may consider full or partial replacement with matching material, preserving curb appeal and historic character. For those without slate, you should anticipate higher installation requirements, careful substrate assessment, and potential upscaling of flashing around chimneys and masonry. In short, slate offers longevity and authenticity, but it tests roof structure and professional skill.
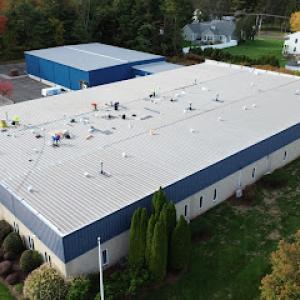
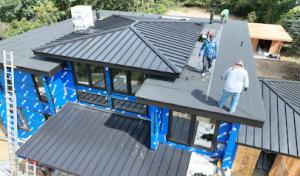
Metal roofing is a practical local upgrade for homeowners concerned about snow shedding, coastal moisture, and long-term maintenance. It sheds snow more predictably, resists moisture intrusion along coastal air corridors, and can reduce ice dam risk when installed with a solid continuous underlayment and proper ridge venting. Metal is a sensible choice on steep or commercial-style roofs common on midtown and coastal blocks, and it tends to perform well over decades with lower maintenance needs than some other surfaces.
Tile is less common and usually tied to specific architectural styles. When present, clay or concrete tile brings a distinctive look but imposes heavier loads and more complex flashing details. In areas with historic or architecturally sensitive facades, tile can be a respectful option if the roof structure and eave clearance are designed to support it. For most homes facing strong thermal shifts and moisture exposure, tile calls for careful detailing around chimneys, gutters, and parapets to prevent water intrusion.
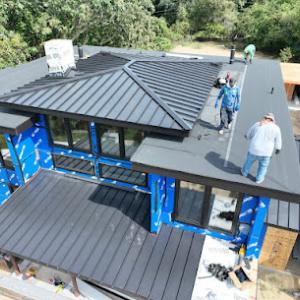
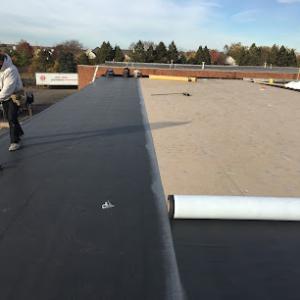
Flat roofs on multifamily and mixed-use blocks are a common sight in the city's dense urban grain. The combination of long winters, spring rain, and a maritime air makes drainage performance and membrane integrity crucial. You will see open decks, roof terraces, and commercial-grade membranes that are meant to handle a steady load of moisture, but these roofs also face unique stresses from neighboring HVAC equipment, parapet walls, and frequent foot traffic. Pay attention to standing water on low-slope sections, especially near drains, penetrations, and edge details where debris can accumulate.
On these roofs, standing water is a more urgent concern than missing shingles. Inspect for clogged scuppers, clogged internal drains, and poor slope transitions between sections. Seams and flashings around penetrations, vents, and parapets are prone to early failure when water sits or moves with traffic. If you notice water staining indoors after rain, track the path to find a likely seam or drain issue. Regularly remove leaves and debris from gutters, scuppers, and internal drains, and confirm that downspouts discharge away from masonry walls to prevent seepage into parapet penetrations.
Flashing around shared walls, chimneys, and roof edges tends to degrade first in freeze-thaw cycles. Look for loose or lifting membrane laps, gap openings at counter-flashings, and rusted metal components that can corrode and widen over winter. For flat roofs, changing conditions near parapets and mechanical curbs demand proactive checks after heavy snowmelt or thaw cycles. If you find a loose seam or raised edge, address it promptly before it can trap more water or ice.
Repair work on a flat roof is especially sensitive to spring rain and winter conditions. Open seams or wet substrates reduce adhesion and shorten the window for quality patching. Plan repairs for dry stretches, and avoid long-term patching in late winter when frost can crack new asphalt or modified bitumen. If a leak is active during a wet spell, implement temporary containment and schedule a proper repair once temperatures rise and precipitation eases.
Establish a quarterly inspection routine focusing on drainage performance, seam integrity, and parapet conditions. Keep debris clear from rooftop trenches and around drains, and document any issues with photos and dates to track progression. For properties with frequent foot traffic, designate maintenance pathways or protective walkways to minimize membrane wear around high-use zones. A proactive, resident-aware approach helps preserve flat-roof performance across heavier-use multifamily buildings.
Find specialists in TPO, EPDM, and built-up flat roofing systems for residential and commercial properties.
AED Roofers Water Proofers
(203) 850-4221 aedroofersandwaterproofers.com
51 Maltby St, New Haven, Connecticut
5.0 from 3 reviews

Replacement costs in this city reflect a housing stock with steep, cut-up rooflines, dormers, valleys, and chimney lanes that complicate both labor and material handling. Historic materials like slate or wood detailing can push the bill higher than standard asphalt reroofing, even when only partial sections are replaced. When late-winter thaws and coastal storms hit, crews may be stretched thin, and scheduling pressure can move pricing or push crews toward emergency or expedited work.
Asphalt shingles remain the most economical option, but the city's characteristic roofs often require extra care at valleys and around dormers, which adds hours to the project. Metal roofing is more resistant to freeze-thaw cycles but costs more up front and may need specialty profiles for steeper pitches. Clay or concrete tile is attractive and durable yet heavy and labor-intensive to install on older structures, increasing structure-related considerations. Slate is prized for longevity and matching historic detailing, but it commands premium prices and careful, skilled labor. Wood shingles or shakes can be especially costly here due to moisture exposure and matching existing grain and texture.
Begin with a precise inspection of flashing, chimneys, gutters, and eaves prone to ice damming. Expect longer timelines and higher quotes if there are multiple dormers or complex ridges. After winter, call for an assessment before heavy coastal storm seasons to avoid last-minute price surges. When comparing bids, prioritize workmanship, site access, and how they plan to protect masonry and flashing in freeze-thaw cycles.
Don't let upfront costs delay a critical repair - these contractors offer payment plans to fit your budget.
Pro Exteriors
(203) 909-8075 proexteriorsct.com
90 Hamilton St, New Haven, Connecticut
4.9 from 412 reviews

A full re-roof in the area generally requires a building permit before work begins, and the local building department reviews the project scope to confirm it meets current codes and neighborhood expectations. The review often zeroes in on flashing around chimneys, junctions where masonry meets the roofline, attic ventilation, and the way eaves and gutters are prepared for freeze-thaw cycles. In this climate, improper detailing at these points can invite recurring leaks and accelerated deterioration, so the permit step is not a bureaucratic hurdle so much as a necessary safeguard against future damage. Expect the plan review to request measurements, material types, and means of supporting structural components, especially on older homes with mixed materials or steep-gable roofs.
Inspections are commonly scheduled during and after installation to verify code compliance rather than relying only on contractor self-certification. In practice, that means a building inspector will look at the sheathing, underlayment, flashing, chimney termination, and proper alignment of valleys and eaves to prevent water intrusion during freeze-thaw cycles. Don't view inspections as a box to check off; use them as an accountability checkpoint that can catch issues that would otherwise show up as leaks in the first winter thaw. If stairs, access paths, or scaffold setup affect egress or structural load paths, the inspector will note those too.
Some nearby jurisdictions require the licensed contractor to pull the permit and keep permit paperwork posted on-site, so homeowners should confirm who is responsible before signing. This clarity helps avoid disputes if a delay, noncompliance, or corrective work arises after the initial inspection. In practice, you want a clear point of contact for the permit folder, a posted notice that the project is active, and prompt notification if the scope shifts due to discoveries at flashing lines or around chimneys. Keeping everyone aligned reduces the risk of the project stalling when winter sets in.
Connecticut insurers commonly cover wind and hail losses, but in this city older roofs may face closer underwriting review because age and condition affect claim outcomes. The mix of dense historic neighborhoods with slate and steep-gable roofs, plus coastal exposure from Long Island Sound, means carriers scrutinize how well a roof has held up to freeze-thaw cycles. In practice, that means a claim on a vintage roof may hinge on the documented condition of flashing, masonry connections, and eaves, not just the weather event itself. Being prepared for a more evaluation-focused decision helps avoid surprises when a claim is filed after a storm.
After a coastal wind or winter event, homeowners should document the roof with photos, leak locations, and contractor findings before temporary repairs obscure evidence. Take wide and close shots that show flashing around chimneys, valleys, and vent penetrations, then note any damage to gutters or masonry buttresses. A dated photo log paired with a simple map of where leaks are observed helps an adjuster assess the true scope. In New Haven, where freeze-thaw cycles repeatedly stress joints, this record becomes critical to separate pre-existing wear from isolated wind or ice damage. Keep contractor notes plain and specific, focusing on materials, fastener conditions, and visible deterioration.
Adjusters may inspect the roof directly before approving replacement, so homeowners should expect condition-based decisions rather than automatic full-roof approval. If flashing, chimneys, or eave areas show chronic wear, a claim may favor targeted repairs rather than a full replacement, even after a significant event. The emphasis is on evidence of new damage versus long-standing issues. In practice, coordinating a timely, transparent inspection plan with the insurer and the contractor helps ensure that what is damaged is accurately represented and that the resulting recovery reflects the actual needs of a roof shaped by New Haven's climate.
Connect with contractors who help homeowners navigate the claims process from damage assessment to final approval.
Pro Exteriors
(203) 909-8075 proexteriorsct.com
90 Hamilton St, New Haven, Connecticut
4.9 from 412 reviews