Last updated: Apr 19, 2026
New Castle homeowners face a combined risk pattern of winter ice damming and freeze-thaw stress followed by spring hailstorms and high winds. That sequence is not cosmetic; it means attic leaks, accelerated shingle wear, and accelerated flashing failures can hide in plain sight until a big storm hits. When spring hail rattles off metal roofs and asphalt alike, damaged spots propagate quickly, and wind can peel back already-stressed edges. The result is a roof that looks fine from the ground but is structurally compromised just above your living space. The window you choose for replacement matters too: spring and fall are the best seasons in this climate because cold-weather freeze-thaw cycles and humid summer installation conditions both affect roofing work. If a storm already exposed vulnerability, delaying is a risk you cannot take.
During a brutal Indiana winter, ice dams form at the eaves when warmed roof sections meet cold exterior air, forcing meltwater to back up under shingles and into soffits. In your attic, that means hidden water stains, warped decking, and musty odors after a thaw. Freeze-thaw cycles in early spring crack and widen existing gaps in flashing, vent boots, and chimney penetrations. Come spring, hail impacts show up as pockmarks on shingles, dented metal trim, and bruised edges that can prematurely degrade protective granules. High wind events can peel back corners, lift edges of shingles, or bend valley flashing if ice-dam damage already loosened the fasteners. The cumulative effect is a roof that rapidly loses its defensive line against moisture-precisely when the next storm is just around the corner.
If you notice a spike in attic condensation, drywall staining, or a sudden uptick in energy bills, schedule a roof check after the thaw but before the next big storm. Inspect for soft or sagging decking from beneath the attic hatch; delamination or spongy feel under feet when walking the attic is a red flag. On the exterior, look for lifted shingles, cracked or curled edges, and missing granules-especially along the eaves and in windy exposure corners. Flashings around chimneys, dormers, and vent pipes should be tight and corroded-free; any gaps invite water intrusion under freeze-thaw cycles. Don't rely on cosmetic fixes alone-if flashing is loose or if roof decking feels soft, plan a professional evaluation promptly. In spring, pay attention to sudden leaks after storms and keep gutters clear; clogged drainage accelerates backing water and damming, turning a minor issue into a full replacement trigger.
Begin with an annual pre-winter roof check that focuses on sealing seams, repairing loose edges, and testing attic insulation and ventilation. After winter and during spring thaw, arrange a storm-damage inspection that prioritizes hail impact assessment, wind-stripping damage, and flashing integrity. If any damage is found, document with photos and notes; timing matters, because rapid mitigation can prevent a small repair from becoming a full replacement after multiple freeze-thaw cycles and next-season hail. When estimating replacement, align choices with typical New Castle exposure: roofs need durable underlayers, resilient flashing, and edge protection that can endure repeated cold snaps and wind-driven rain. As seasons shift, keep moisture management in mind-adequate ventilation and a well-sealed attic are your best defenses against the costly cascade of freeze-thaw and storm damage.
The dominant materials used in New Castle are asphalt shingles, metal roofing, clay tile, concrete tile, wood shingles or shakes, and synthetic or composite shingles. Understanding how each behaves in freeze-thaw cycles and humid summers helps you pick a system that will hold up between spring hail, winter winds, and the edge-to-edge expansion and contraction you see around the eaves and rakes. In this climate, brittle roof edges and flashing can crack sooner if the material is overly rigid or improperly sealed. The key is to balance hardness with a forgiving installation that tolerates movement without losing its seal or trapping moisture.
Freeze-thaw cycling is especially relevant for brittle roof systems. Repeated expansion and contraction can shorten service life, particularly along attic edges, drip edges, and at fastening points where nails meet sheathing. In spring, after a harsh winter, inspect for hairline cracks in shingles or tiles and signs of edge curl or wind uplift on steeper sections. Humid summers matter for material movement and installation quality, which is one reason spring and fall are favored for larger reroofing projects. When planning replacement, aim for a window with moderate temperatures and low humidity to allow sealants and underlayment to set without rapid drying or sweating into the attic space. This climate pattern also means you should schedule inspections after severe hail events or strong late-season winds, since impact damage often starts small and progresses under heat cycles.
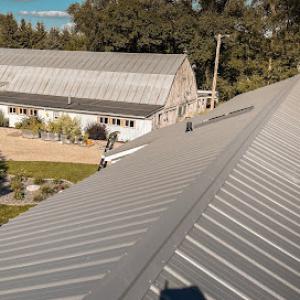
Asphalt shingles are usually the most forgiving choice if you want a balance of cost, ease of repair, and wind resistance. For sections with frequent wind gusts, consider upgraded asphalt or a shingle with a longer nail line and reinforced backer to resist uplift. Metal roofing offers excellent longevity and a tight seal against wind and hail, but edge detailing and panel transitions require precise installation to prevent thermal movement gaps in humid summers. Clay and concrete tiles resist impact well but are heavier and require a sturdy deck with proper fasteners and underlayment; in freeze-thaw conditions, ensure the substrate is adequately ventilated to prevent ice dams along eave lines. Wood shingles or shakes provide a traditional look but can be more vulnerable to moisture and wind-driven impacts; if chosen, ensure treated or naturally rot-resistant varieties and consider a sealed or breathable finish suitable for the local humidity cycle. Synthetic or composite shingles strive to imitate natural materials while offering better resistance to cracking in freeze-thaw cycles; verify their performance in high-wear, hail-prone pockets and confirm a warranty that covers impact and UV degradation.
Before choosing, perform a close-up examination of current edge details, flashing at chimneys, and any existing penetrations. In homes with multiple roof joins, pay special attention to ridges and valleys where movement concentrates; these are common failure points when humidity and temperature swing rapidly. If a roof is showing persistent granule loss, darkened patches, or a halo around fasteners after a thaw cycle, plan for resealing or panel replacement in the near term to avoid larger leaks. For any material, invest in high-quality underlayment and proper attic ventilation to mitigate humidity-driven expansion and contraction. The goal is to select a system that remains flexible enough to resist cracking while maintaining a tight, weatherproof envelope across seasons.
Neal's Custom Exterior
(765) 529-6087 www.nealscustomexterior.com
9216 2224 IN-3, New Castle, Indiana
4.4 from 42 reviews
Add value to your home with Neal's Custom Exterior. Neal's Custom Exterior is a family-owned company providing roofing, gutters, windows, and siding.
Fredericks Construction
618 N 26th St, New Castle, Indiana
5.0 from 1 review
Building Contractors specializing in Roofing, Siding, Window/Door installation, Decks/porches, and minor Interior work.
HDC Roofing (Hale Design & Construction, LLC)
(765) 591-3822 www.hdcroofing.com
Serving
5.0 from 33 reviews
Dreaming of a home that turns heads? HDC Roofing & Exteriors is your trusted partner for transforming your home's exterior. We offer complete solutions for exterior remodeling and new construction, ensuring seamless project management from start to finish. Specializing in roofing and siding, we also expertly handle gutters, leaf guards, windows, doors, soffit and fascia. Let HDC Roofing & Exteriors bring your vision to life and create the stunning, durable home you've always wanted.
Red Sail Roofing
(866) 500-7245 www.redsailroofing.com
Serving
5.0 from 44 reviews
We are a family owned local business with over 10 years of experience in the roofing contractor, roofing supplier and insurance side of the industry. We focus on building relationships with our clients so we can best understand their needs. Customer service is our number one goal and we strive to achieve that with every new customer. At the end of the day shingles are shingles but if you can trust and rely on the person installing them, then we have done our job. So give us a call and lets start building a relationship and your roof!!
Wilstone Roofing Systems
(765) 779-7663 www.wilstoneroofing.com
Serving
5.0 from 76 reviews
Wilstone Roofing Systems, llc provides comprehensive roofing services throughout Muncie, IN, and Madison County. Established in 2019, this family-owned business serves East Central Indiana, emphasizing quality materials and craftsmanship without cutting corners. Customers can expect clear communication, transparent estimates, and fair upfront pricing. Wilstone Roofing stands out for its environmentally friendly shingles by GAF and Malarkey and offers free roofing and attic inspections, financing options, and assistance with insurance claims. With over 20 years of experience, Wilstone Roofing prides itself on offering honest service reminiscent of an old-school business approach, connecting with customers as real people.
Clemens Home Solutions
(765) 999-4135 clemenshomesolutions.com
Serving
4.9 from 1456 reviews
Since 1998, Clemens Home Solutions has helped Indiana homeowners protect and improve their homes with dependable, custom exterior solutions. As a family-owned company, we focus on solving your home’s challenges with honesty, expertise, and the highest-quality materials. Whether you need a new roofing system, seamless gutters, LeafX gutter guards, premium replacement windows, or energy-efficient exterior doors, our professionals deliver long-lasting performance and unmatched value. Discover how easy exterior remodeling can be with a trusted partner who puts people first & excellence always.

Weathertight Roofing
(765) 256-2089 weathertightroofingllc.com
Serving
5.0 from 19 reviews
Roofing is an extremely important characteristic of your home, as it ensures that you stay protected while allowing you to control the atmosphere of your indoor spaces. If your roof needs work in Delaware County, IN and all nearby surrounding areas, you can count on your expert roofers at Weathertight Roofing We have over a decade of experience in offering homeowners intuitive roofing services at affordable prices, and are committed to adding value to your home with quality solutions that last. Weathertight Roofing is a locally owned and operated business which has served central Indiana since 2012. From roof repair to window installation, we have you covered.
RDM Contracting
(765) 278-7495 www.rdmroof.com
Serving
5.0 from 50 reviews
A family-owned and operated roofing business serving Anderson, Muncie, Pendleton, Fishers, Indianapolis and all surrounding areas. We provide roofing solutions with a detailed and personalized approach to each roofing project.
Rodeffer Roofing
(765) 729-5622 www.rodefferroofing.com
Serving
4.9 from 155 reviews
Rodeffer Roofing is a family-owned and -operated roofing company that holds itself to the highest standards of customer service. We install some of the best roofing materials on the market, including asphalt shingles from Owens Corning, a renowned manufacturer for which we're a proud Preferred Contractor. Our specialized roofing services provide peace of mind for our customers, who know they will receive a quality roofing system that is built to last. We look forward to proving to you why we're the best roofing contractor for your home.
Allen Bontrager Carpentry - Indiana's Roofing & Exterior Specialists
Serving
5.0 from 17 reviews
For over 20 years, Allen Bontrager Carpentry has been Indiana's go-to for top-notch roofing and construction. Specializing in steel and shingle roofing, siding, windows, doors, and more, our seasoned team combines traditional values of honesty and uncompromising craftsmanship. Our fully insured team offers free estimates, competitive pricing, and prompt service to every residential and commercial project. We are your premier local construction contractors in Muncie, Indiana — call us for your next project!

Frontline Services
(844) 766-3748 frontlinegc.com
Serving
5.0 from 20 reviews
At Frontline Services, we're dedicated to providing the greater Indianapolis area with top-notch roofing solutions at an affordable price. Our expert team of certified contractors is available 24/7 to tackle any roofing emergency and offer insurance claim assistance. With offices located in Pendleton, Indiana, our team is ready to serve your home or business with 5 star service.
TrueView Exteriors
(317) 207-9161 trueviewexteriors.com
Serving
5.0 from 15 reviews
TrueView Exteriors provides roofing, gutters, siding replacement, window replacement, and exterior remodeling and design. We take an honest approach to pricing with unparalleled transparency and 3D rendering technology to providing customers with a TrueView of their investment.
In this market, pricing tends to cluster by material, with asphalt shingles remaining the most common and lowest entry point. Expect typical New Castle pricing for asphalt shingles around $350 to $650 per square. Metal roofing sits higher, generally $600 to $1100 per square, while clay tile runs $900 to $1700 per square and concrete tile $800 to $1500 per square. Wood shingles or shakes usually fall in the $450 to $900 per square range, and synthetic or composite shingles are commonly $400 to $800 per square. These ranges reflect the local housing stock, climate-related wear, and the mix of replacements following severe weather events. If a home has existing venting, attic insulation, or underlayment needs, those line items can nudge the total higher but often in predictable increments tied to the chosen material.
Storm-driven demand spikes after Indiana hail and wind events can tighten contractor availability in this area and push scheduling and pricing upward. When a hail day hits, crews migrate to the most urgent jobs, and the closest available crews may fill appointment slots for weeks. In practice, that means if a replacement is framed as urgent, there's often a premium for expedited service or for securing a preferred contractor before the spring surge ends. Planning ahead after a damaging hail season can help lock in a reasonable window and avoid a rushed material choice or overpayment for last-minute scheduling.
Project timing can affect labor availability and total replacement cost in this market. Local projects commonly proceed more smoothly when the roof has a clear through-season window and a daytime schedule that aligns with typical contractor hours. If a permit or inspection process comes into play, the timeline can stretch, and that can reverberate into labor cost and material picks, since crews may need to return for re-inspections or adjustments. Matching the start of work to a lull in storm activity, when feasible, tends to keep both scheduling and pricing steadier. For asphalt shingles, a well-timed start can capitalize on favorable weather windows, reducing the risk of weather-related delays that push costs higher. For higher-end systems like clay or concrete tile, anticipate longer installation times and the possibility of staging materials, which can impact overall project timing and budget.
For a full roof replacement, a building permit is typically required. The process protects you and your property from weather-related vulnerabilities that become obvious only after shingles are lifted and decking is exposed. In this community, a permit is more than paperwork-it signals to the city that the project follows the appropriate structural and safety standards to stand up to Indiana's freeze-thaw cycles and spring hail. A building permit is typically handled by the contractor rather than the homeowner, so you will likely interact with the contractor's administrative team more than with city clerks directly. This arrangement tends to streamline scheduling around weather windows and permit review timelines.
The contractor generally applies through the City of New Castle Building Department. This means you should expect your contractor to submit the plan, scope, and any required drawings or documentation on your behalf. If you ever need to verify a permit's status, you can contact the Building Department with the project address and the permit number provided by the contractor. It helps to keep a simple folder of correspondence and inspection notices, especially during a year when storms or unusual wind events push projects into tight windows.
New Castle commonly uses inspections during installation and again after completion. The in-progress inspection checkpoints are designed to confirm that structural components, underlayment, ventilation, and roof penetrations meet code requirements while the work is visible. Being prepared for these checks reduces delays: keep access clean, ensure proper attic ventilation, and coordinate with the contractor on any shingle-nailing or vent-boot adjustments that inspectors tend to scrutinize. The city's emphasis on proper installation is particularly important after a harsh winter or a busy hail season when damage might necessitate more robust fasteners or upgraded underlayment.
A final inspection occurs after completion to verify that the entire roof replacement complies with local codes and the permit scope. In many cases, the final step confirms that the roof is weather-tight, all penetrations are flashed correctly, and any dormers or skylights are properly sealed. Permit turnaround in this area is typically in the 1 to 2 week range, depending on permit volume and whether any issues surface during in-progress inspections. A modest fee is charged for the permit and inspections, and paying promptly helps prevent delays that could push the project beyond favorable weather windows.
Coordinate with the contractor about inspection windows so you're not left waiting during a sudden storm gap. Keep access to the roof area clear of vehicles and debris on inspection days. If the project stalls, contact the Building Department early to understand whether a temporary permit extension is appropriate. Finally, request a written inspection checklist from the contractor so you can confirm onsite that each required item-from ice and water shield placement to starter course alignment-is in place before inspectors arrive. This proactive approach helps ensure the permit moves smoothly from issuance to final approval.
The Indiana insurance environment surrounding hail and wind is real and active enough that roof age and material choice can shift underwriting risk. In this area, carriers often scrutinize whether a roof is a repair or a full replacement, and a long history of performance-especially after a severe storm-can influence how a claim is evaluated. The timing of damage matters too: a hail event in spring followed by a hard freeze can create a cascade of issues that makes documentation even more valuable when a claim is filed.
Insurers serving Indiana expect a clear, well-documented story when a roof claim comes in. Photos should show the condition before and after the event, close-ups of hail hits, wind-driven shingle lifting, and any skylight or flashing damage. Measurements of areas affected, including roof slope, attic condensation signs, and interior water intrusion if present, support the claim's narrative. A straightforward timeline of the wind or hail event, plus the roof's prior condition and any previous repairs, helps underwriters assess the real scope of damage.
Recent tightening in carrier underwriting across Indiana makes records more important for homeowners deciding repair versus replacement. Freeze-thaw cycles can make minor issues look like major failures if there's a gap between the event and your documentation. In this market, a thorough file-photos, measurements, a dated incident summary, and notes on subsequent weather exposure-can influence whether a carrier approves a repair patch or flags for a full replacement. When storms roll through east-central Indiana, the better you capture the evidence, the clearer the claim path becomes.
Start a storm-damage packet as soon as weather passes: timestamped photos of the undamaged roof (seasonal photos help), then fresh shots of any new damage. Keep a simple log of dates, winds, hail sizes if known, and any interior signs of leakage. If a contractor can provide a professional assessment, ask for a written summary that ties observed damage to the event and the roof's current condition. In a market where underwriting decisions hinge on documentation, having a precise, organized record can be the difference between a repair plan and a full roof replacement.
Spring and fall are generally the preferred reroofing seasons in this area because they avoid the worst winter freeze-thaw stress and peak summer humidity. When you plan for spring, aim for the window after the last freeze and before early spring storms pick up, so installation crews can work at steady temperatures without rapid temperature swings. In fall, target a period with dry days and cooler nights to help shingles seal properly before any next round of winter weather.
Spring hailstorms and high winds in New Castle can both create damage and disrupt contractor schedules, so homeowners often need to balance urgency against weather delays. If wind-driven hail has affected your roof, inspect for obvious damage early but be mindful of sudden storms that can expose crews to unsafe conditions. When a hail event is recent, you may have a narrow window to pursue inspections, but be prepared for weather-driven postponements that push work into calmer weeks.
Autumn wet conditions in New Castle can complicate roof access and sequencing even when temperatures are otherwise favorable. Wet decking or muddy ground can slow material deliveries and movement around the site, so plan for extra staging time and lane access for trucks. If you must reroof later in the season, coordinate with the contractor on protective measures to prevent water intrusion during occasional showers and to preserve seal integrity as outdoor temps drop.
A reroof in this climate benefits from a deliberate pace that respects local weather windows. Avoid placing shingles during high-humidity days or right before ground-blown storms that could disrupt material handling. Clear the area of loose debris after strong winds, and ensure attic ventilation remains functional during and after installation to minimize condensation and heat buildup as temperatures swing.