Last updated: Apr 19, 2026
Leominster's cold, snowy winters create repeated freeze-thaw cycling that can open shingle seals, stress flashing, and widen small roof penetrations into active leaks. On steep slopes rare but real, that cycle forces water to migrate under layers where it can refreeze and push apart fasteners or lift edges. You'll notice hairline cracks around vent boots or where two surfaces meet, and attic condensation often mirrors external stress, signaling hidden moisture. Prioritize early detection: inspect after every major thaw, and chase soft spots, curling edges, or granule loss as warning signs before they become active leaks.
Nor'easters are a major local roofing event because they combine wind-driven precipitation with prolonged snow loading, which can delay repairs and expose weak roof areas all at once. In practice, a single storm can bury a small leak and complicate access for crews, leaving vulnerable flashing and seals exposed for days. After a heavy nor'easter, perform a quick external scan for lifted shingles, exposed underlayment, or ice dams along the eaves. If gaps or lifted edges are found, treat them as urgent: delaying repairs multiplies risk as the next round of wind and snow approaches.
Replacement timing in Leominster is strongly seasonal, with late spring through early fall preferred because winter conditions can interfere with tear-off, underlayment drying, and safe crew access. If a roof is approaching the end of its service life, plan for a window when temperatures stay above freezing for extended periods and daylight lasts longer. In the interlude, focus on immediate protective measures: seal obvious penetrations, ensure proper attic ventilation, and clear snow away from eaves to reduce ice dam formation. Waiting through a harsh winter to replace a compromised roof invites accelerated damage and hazardous work conditions.
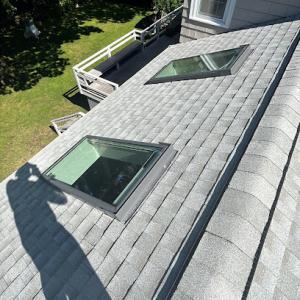
During shoulder seasons, schedule targeted inspections of valleys, step and rake flashing, and the interface where roof and chimney or vents meet. Small penetrations-chimneys, plumbing stacks, skylights-are the first channels for water when seals soften from freeze-thaw. If shingles show lifted corners or if granules accumulate heavily in gutters, treat these as red flags. Proactively reseal flashing, re-bed and re-flash questionable joints, and verify attic insulation and ventilation are balanced to minimize interior condensation. A proactive approach now reduces the risk of a winter cascade of leaks and extensive repairs later.
If a leak is observed during or after a snow event, prioritize a prompt temporary fix to divert water away from interior finishes. Avoid relying on temporary tarps alone for roofs with active leaks in harsh winter conditions; such measures can fail quickly under wind-driven snow. Contact a local roofer who understands Leominster's winters and can coordinate a careful, non-disruptive tear-off during the milder window. In the meantime, keep interior areas dry, protect valuables, and safely clear ice and snow from the immediate roofline to slow further intrusion.
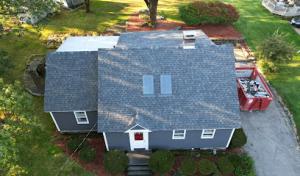
Asphalt shingles are the dominant practical choice in Leominster because they fit the city's broad mix of older homes and cost-sensitive re-roofing projects. They handle the winter swings and snowfall without demanding the richest preparation on the roof deck. For most residential roofs with standard pitch, asphalt shingles provide reliable resistance to freeze-thaw cycles when installed with proper nailing and correct shingle alignment to shed moisture efficiently. Choose architectural or laminated shingles if the roof line is visible from the street, as they provide a durable look that still balances cost and performance. When older homes need re-roofing, the lighter weight and quick installation of asphalt help minimize weight transmission to aging decking and joists, which is a practical concern in neighborhoods where structure ages vary widely.
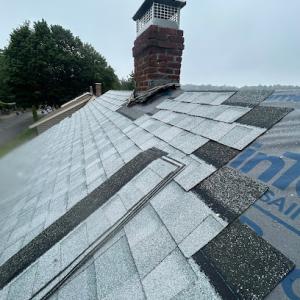
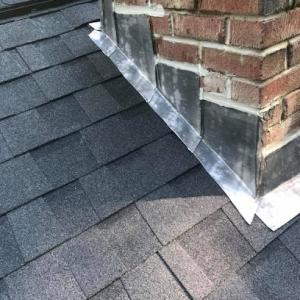
Slate remains locally relevant because central Massachusetts has an older housing stock where original or replacement slate roofs still affect repair methods, weight considerations, and insurance discussions. If a home already features slate, repairs should match the existing slate profile and nail pattern to avoid creating mismatched expansion points. When replacing slate, consider the weight load on roof framing and the feasibility of upgrading supports if the current structure was not designed for heavy tiles. Insurance discussions often hinge on the roof's ability to handle winter stresses, so slate's longevity and repair history can matter for premiums, especially on steeper slopes where shedding snow matters most. For homeowners evaluating slate, a careful assessment of attic ventilation and ridge line integrity becomes crucial to manage condensation and long-term fastener corrosion.
Metal, synthetic/composite, clay, and concrete systems appear in the market, but Leominster's winter expansion-contraction cycles and snow-shedding behavior make detailing and installation quality especially important. Metal roofs can shed snow effectively and resist freeze-thaw spall, yet improper panel laps or insufficient fasteners at eaves can invite leakage during heavy winter wind-driven storms. Synthetic or composite shingles attempt to blend the best of both worlds, offering lighter weight and good freeze resistance, but fastener exposure and sealant longevity must be verified on the roof edge and vent flashing. Clay and concrete tiles bring strong resistance to impact and long service life but demand a solid structural deck and precise roof slope; in mixed neighborhoods with aging homes, a retrofit often requires reinforcing the sheathing to handle the weight and to prevent attic heat buildup that affects ice damming. When considering any non-asphalt option, ensure the installer is experienced with local snow loads and has a plan for secure edge detailing, snow guards, and proper underlayment.
In this climate, installation quality matters more than in milder regions. A trustworthy crew will seal every valley, cap every chimney, and secure the underlayment to resist wind-driven moisture during winter storms. Confirm that fasteners penetrate into solid framing rather than sagging or deteriorated decking, and verify compatibility between roof material and flashing materials to prevent galvanic corrosion or differential movement as temperatures swing. A steep slope adds complexity: ensure snow guards or clips are integrated in a way that controls shedding without creating ice build-up along eave lines. Finally, consider attic ventilation and insulation as a package deal with any roof type-proper air flow reduces ice dam risk and improves energy efficiency through Leominster's prolonged winter season.
Leominster homeowners face a two-part damage pattern: winter snow and ice stress followed by spring wind and hail events that can turn marginal roofs into claim-worthy losses. The freeze-thaw cycle pushes shingles, flashing, and joints to the brink, while heavy, wind-driven storms in March and April rake at ridges, vents, and skylights. After a brutal winter, even solid asphalt or metal roofs can reveal concealed weaknesses once warmer air hits and gusts sharpen. Stay vigilant for rapidly shifting conditions that make what looked like a simple leak into a bigger, more expensive problem.
Because local contractors heavily advertise emergency response, sudden leak containment and temporary tarping are a real part of the Leominster roofing market rather than a rare service. If a storm pushes water indoors, your first move is safety: avoid walking on a wet or icy roof, and limit access to the affected area inside the home. Contact your insurer promptly and request an emergency assessment if water is actively intruding. A contractor with a proven rapid-response team can secure the site, place a tarpaulin, and mitigate further damage while you arrange a longer-term repair plan. Document the damage with photos from multiple angles, including interior sights of leakage, attic condensation, and exterior flashing or vent faces.
Storm-related damage often overlaps with skylight, chimney, and flashing trouble because wind-driven rain finds weak transitions after winter wear. Pay close attention to roof-to-wall transitions, vent collars, and chimney crickets-areas where ice, weight, and thaw cycles have stressed caulk, sealant, and fasteners. If you notice lifted shingles, exposed underlayment, or granule loss concentrated around valleys and edges, flag these as high-priority concerns for your roofer. After a leak is contained, you'll want a careful inspection of skylights and flashing to determine whether the problem is isolated or part of a broader system failure.
On renewal days when the wind dies down, do a careful, ground-level check for missing debris, lifted shingles, or displaced flashing along eaves and chimneys. Use binoculars if ladders aren't safe. Document suspected trouble areas and prepare a concise summary for your contractor: prior winter damage, spots of active leakage, and any hail impact you've observed this spring. When choosing a local roofer for the follow-up repair, prioritize teams that can provide a clear, staged plan-immediate emergency containment, then a full assessment of winter damage, and finally a targeted repair path that addresses flashing, skylights, and transitions together to prevent repeat incidents.
Synergy Skylights & Roof Replacement
(978) 233-1622 www.synergyskylights.com
55 Tanzio Rd, Leominster, Massachusetts
4.9 from 187 reviews
Synergy Skylights and Roofing provides expert skylight installation, replacement, and repair, along with full roof replacement services using premium materials and certified crews. As a VELUX Signature Skylight Specialist and GAF Certified roofing contractor, we deliver long-lasting results with trusted products. We proudly serve homeowners across New England, with a strong focus in Central Massachusetts including Shrewsbury, Westborough, Northborough, Hudson, West Boylston, and Boylston. Our team is also trusted by homeowners in Holden, Acton, Sudbury, Wayland, and Weston for high-end roofing and skylight solutions backed by expert workmanship and personal service.
W Oliveira Construction
(978) 790-1938 www.woliveiracorp.com
22 Lois St, Leominster, Massachusetts
5.0 from 16 reviews
Ours is a well-esteemed construction company in Leominster, MA, where we are dedicated to turning your vision into a tangible reality. Whether it’s a simple roof repair or a complex carpentry project, our skilled team delivers unparalleled results. Using top-quality materials, we ensure your project is not only built to last but also elevates the aesthetics and functionality of your property. Moreover, our top-notch gutter services in Leominster, MA, are designed to protect your home from water damage, preserving its structural integrity. From installing a new gutter system to repairing a damaged one, we have you covered. With us, you can ensure the proper functioning of your gutters. So, if you need our expert assistance, call us today.
Capital Roofing
(508) 507-7444 capitalroofingma.com
10 Green St, Leominster, Massachusetts
5.0 from 8 reviews
Capital Roofing has over 20 years in experience, with great customer service. We specialize in Asphalt Roof Replacement/Installation, Repairs, Rubber Roof Replacement/Installation, Skylight Replacement/Installation. Vinyl Siding, James Hardie Cement Fiber Siding Installation/Replacement, Wooden Siding Installation, PVC Trim Replacement.

Five star roofing contractors
(917) 673-2840 fivestarroofingcontractorsinc.com
25 Mohawk Dr, Leominster, Massachusetts
4.4 from 14 reviews
- COMMERCIAL ROOFING SYSTEMS. - INDUSTRIAL ROOFING SYSTEMS. -RESIDENTIAL ROOFING SYSTEMS. ROOF INSPECTIONS. WE PROVIDE 24 HOUR EMERGENCY ROOF LEAK SERVICES.
Royal Construction & Roofing
36 Stephens Rd, Leominster, Massachusetts
4.1 from 14 reviews
Why we are the best in the roofing and construction business. We're not just doing a job, we're building relationships!
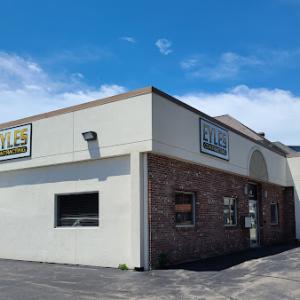
Eyles Contracting
(978) 422-3342 www.eylescontracting.com
Serving
4.9 from 126 reviews
Eyles Contracting is your trusted roofing and exterior renovation expert serving Fitchburg and Central Massachusetts since 1988. We specialize in residential and commercial roofing, gutters, skylights, roof repairs, and storm damage restoration. With 37 years of experience, we’re committed to high-quality workmanship, honest communication, and reliable service. From full roof replacements to emergency repairs, our videos showcase real jobsite footage, helpful tips, and customer success stories. Proudly serving Fitchburg, Leominster, Sterling, and surrounding areas.

Red Dog's Roofing
(978) 625-9150 www.reddogsroofing.com
Serving
4.8 from 265 reviews
Red Dog’s Roofing is a company dedicated to providing professional service and solutions. Founded on the principles of integrity, professionalism, and exceptional customer service, Red Dog’s Roofing has established itself as a trusted name in the roofing and exterior renovation industry. We believe in giving back to the community, and are engaged in local initiatives. One example is our ground-breaking, in-depth training program for the next generation that encompasses both professional and crucial life-skills. Our focus is to give the youth today a positive direction for tomorrow. We are your neighbors, friends, and trusted roofing and exterior project experts. Protect your home with generations of experience.
Dion Roofing & Remodeling
(978) 602-3977 dionroofing.com
Serving
5.0 from 227 reviews
Local Roofer and References. 50 Year Golden Pledge Warranty Fully Licensed, Insured, GAF Master Elite Certified Installer. "Outstanding communication, responsiveness, service and quality."

Empire Building Construction
(774) 223-0898 empirebuildingcorp.com
Serving
5.0 from 42 reviews
At Empire Building Construction, we specialize in transforming homes with expert craftsmanship and premium materials. From roofing and home renovations to kitchen and bathroom remodels, our team delivers projects that enhance comfort, style, and property value. Whether you need roof repair, basement finishing, complete remodeling, siding, gutters installation, or deck builders we combine efficiency and quality to exceed expectations. ✅ Licensed & insured contractors 🏠 Serving Massachusetts with reliable, affordable solutions.

EAW Roofing & Construction
(978) 733-1435 www.eawroofing.com
Serving
4.5 from 48 reviews
EAW Roofing and Construction is the premier comprehensive roofing and construction services provider servicing Massachusetts and Beyond Our Office/Showroom is located at #1042 Main St. Clinton Ma. From roofing installation and replacement to repairs and additional general construction services such as siding, framing, decks, gutters, windows, and masonry work, our skilled team ensures exceptional results for all your residential, commercial and Industrial needs. Trust our expertise for top-quality solutions.
TRUEHOME Roofing
(774) 224-8668 truehomeroofing.com
Serving
4.9 from 178 reviews
As a homeowner, you deserve honesty and integrity from your trusted Worcester roofing contractor. TRUEHOME Roofing installs durable roofing systems that add beauty, strength, and value to area homes in Worcester, Shrewsbury, Holden, and nearby communities. We’ve seen too many dishonest roofers give subpar service, but TRUEHOME Roofing is committed to providing exceptional workmanship, industry-leading products and reliable results. Contact your favorite roofing company in Worcester for a free estimate!

Tip Top Roofing
(508) 835-4777 www.tiptoproofs.com
Serving
4.9 from 367 reviews
Established in 2007, Tip Top Roofing & Siding is the premier provider of exceptional quality roof installation services in all of Central and Southeastern Massachusetts. Our skilled roofing professionals are GAF-certified installers, and average 13 years of experience in the roofing trade.
In Leominster, reroof pricing is heavily influenced by the city's dominant steep-slope residential work, where tear-off labor, staging, and cleanup matter more than large-scale flat commercial production. That means the price you see per square tends to reflect the extra setup and waste handling needed on tall, pitched roofs common in older neighborhoods and newer subdivisions alike. When you compare bids, ask each contractor to itemize tear-off, disposal, and staging separately so you can see how much of the cost goes to labor and logistics rather than materials alone.
Costs can rise after major winter or spring storm periods when demand surges for re-roofing and leak response across North Worcester County. After a heavy freeze-thaw cycle or a sequence of Nor'easter events, crews are busier, and lead times tighten. If you're contemplating replacement in late winter or early spring, you may encounter scheduling pressure and higher mobilization fees. Budget for potential short-term price bumps, particularly if a storm creates urgent leaks or temporary fix work that precedes a full tear-off.
Material choice matters sharply in Leominster because the local market spans budget asphalt reroofs and much higher-cost slate or tile projects that require more specialized labor and handling. Asphalt shingles typically run in the low to mid range, roughly 350 to 650 USD per square for a tear-off and replacement. Metal roofing sits higher, about 600 to 1,000 USD per square, reflecting faster install times and different finishing needs on steep slopes. For those seeking premium reads, natural slate can range from 1,000 to 2,500 USD per square, while clay or concrete tiles generally fall between 700 and 1,700 USD per square. Synthetic or composite shingles provide a middle ground, often 450 to 800 USD per square. The right choice balances long-term performance under freeze-thaw cycles with upfront budget and local labor familiarity.
A typical Leominster project requires clear scoping: confirm if a tear-off is needed, estimate waste disposal quantity, and verify staging requirements for steep roofs. Since labor and cleanup drive a significant portion of cost, consider a phased approach if your budget is tight-covering critical leak areas first, with a full re-roof scheduled after securing favorable weather windows. When reviewing bids, ensure each quote accounts for wind-driven snow considerations, underlayment compatibility with steep pitches, and the contractor's plan for safe snow load management during installation. If a storm surge period is looming, discussing temporary emergency fixes alongside the full replacement can help manage both risk and cost.
Set aside a contingency of 5-15% for unexpected surprises on an older home with multiple roof penetrations and potential sheathing needs. Use the local price ranges as a framework, but tailor expectations to the slope, complexity, and chosen material. Remember that longer lead times and tighter crews during peak demand can extend project duration and labor costs, so align your schedule with favorable dry spells to minimize weather-related risk and reduce staged mobilization fees.
Get a clear picture of your project costs upfront - no commitment required.


Before any full reroof begins, Leominster requires a building permit. The process is designed to keep projects aligned with local code and the unique conditions that come with our inland Worcester County winters. The contractor or the property owner must submit a clear project scope and site details to the city, outlining materials, ventilation strategy, underlayment, and the expected sequence of work. Having these details documented up front helps prevent delays when weather strains and stubborn snow loads push the schedule. Expect to provide roof area measurements, eave and ridge locations, attic venting plans, and the method for handling any existing ventilation or soffit configurations. Because snow and freeze-thaw cycles can aggravate moisture issues, the plan should explicitly address how underlayment will be installed on pitched surfaces and how attic ventilation will be maintained during the project.
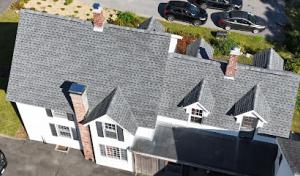
Inspections in Leominster occur at key stages rather than only checking the finished roof. This approach recognizes that the roof is part of a larger climate-resilience system, especially in winters with sharp freeze-thaw swings and heavy snow events. At the underlayment stage, a inspector will verify that the chosen underlayment is properly secured, overlaps are correct, and that moisture barriers are continuous from eave to ridge. When venting or soffit details are installed, the inspector will assess that the intake and exhaust paths provide adequate airflow to mitigate ice damming and moisture buildup in the attic. If the project uses a metal, shingle, or tile roof, the fastener pattern and flashing transitions are reviewed to ensure they deliver the necessary wind and snow-load performance. Throughout, the focus is on meeting code requirements and the specific demands of our climate, not merely satisfying a checklist.
A final inspection is an integral part of the Leominster process. Once the roof is installed, inspectors verify that the completed work matches the approved scope and reflects proper installation of underlayment, ventilation, flashing, and addressing of any penetrations or skylights. If discrepancies exist between what was approved and what was produced, the permit closeout can be delayed until the project aligns with the initial plan. Homeowners should expect clear documentation from the building department confirming that all inspections have passed and that the project has conformed to the approved scope. With the final approval, the permit is closed and the roof is officially deemed compliant with Leominster's roofing standards and winter-related performance expectations.
In Leominster, storm-related roof claims generally follow Massachusetts norms: active policies typically cover sudden storm damage, but homeowners need prompt photos, notes, and filing after a loss. When a winter nor'easter or heavy snowfall hits, take clear photos from multiple angles as soon as it's safe, and jot down dates and symptoms like new leaks or loose shingles. Prompt documentation helps the claim move from assessment to repair without unnecessary delays, especially when temperatures are fluctuating and hidden problems can worsen quickly.
Adjusters in this market may ask for contractor estimates, which matters in Leominster because storm damage and emergency repair services are common enough that documentation quality can affect claim handling. If repairs look urgent, obtain a written assessment from a licensed roofer, including the cause of damage, scope of work, and any temporary fixes. Provide the adjuster with both photographic evidence and the written estimate, and keep a record of all communications. The more precise your notes, the smoother the process tends to be, particularly after a challenging winter with repeated freeze-thaw cycles.
Premium considerations can shift for Leominster homes with slate or tile roofs because those materials can change repair cost expectations even when coverage availability remains generally stable. If you have slate, clay, or concrete tile, be prepared for potential differences in cost evaluation and repair timelines due to material fragility and specialized labor needs. Document the type of roofing material, its age, and any prior issues, so the adjuster can gauge repair strategy accurately. Even with solid coverage, advanced roof materials can influence how quickly a claim progresses and what temporary measures may be permitted during cold snaps.
Connect with contractors who help homeowners navigate the claims process from damage assessment to final approval.

In this market, speed matters. When winter thaws turn to spring storms, leaks demand quick fixes. Homeowners expect contractors who answer calls fast, schedule promptly, and stage crews to minimize interior damage during a leak response. That expectation shapes every phase, from the initial inspection to the final cleanup.
Cleanup is not afterthought. Tear-off debris control, plastic barriers, and meticulous site protection are standard. Leominster crews are judged by how clean the driveway and yard stay after the roof is stripped, and by how well gutters and landscaping are safeguarded. Leominster crews also value a plan for storm season, including temporary tarping, drainage protection, and a contingency for unexpected thaw-thaw cycles. Clear updates during the project keep neighbors confident.
The local signal emphasizes replacement work on existing homes rather than fancy new-construction techniques. A contractor with solid reroofing track records in older houses and suburban lots often delivers more practical results under freeze-thaw stress and snow loads. Locals value honesty about what can wait until dry days and what must be done before the next storm.
Prioritize installers who cover ventilation assessment, proper underlayment, and secure fasteners for steep slopes. Ask for evidence of weather-resistant detailing that holds up through heavy snow and repeated freeze-thaw without leaks. Expect practical plans that minimize disruption and maximize long-term performance.
Expect clear timetables, written warranties, and proactive owner-site supervision during the project. The best teams coordinate with you on weather windows, protect pets and shrubs, and leave you with a roof that resists spring rains as well as winter freezes. Clear updates during the project keep neighbors confident.