Last updated: Apr 19, 2026
Waltham winters regularly put roofs through freeze-thaw cycling that can open up flashing joints, expose nail pops, and worsen small shingle and slate defects into active leaks. The combination of repeated freezing nights and warmer days creates micro-cracks and gaps that slowly widen, then ice backs up against the fascia and eaves. When the next thaw hits, those compromised spots become channels for water to work its way under shingles, underlayment, and into attic spaces. This is not a distant danger-it's the pattern that shows up in late winter and early spring with live leaks and damp ceilings.
Nor'easter snow followed by thaw conditions is a key local trigger for ice damming at eaves, especially on older homes where ventilation and insulation have been upgraded unevenly over time. When heavy snow piles up along the roof edge and a melt-freeze cycle starts, ice can back up behind the dam and push under shingles. The result is water intrusion at vents, flashing joints, and along roof-to-wall transitions. Homes with mixed roofing materials or older chimney flashing are particularly at risk, since gaps and mismatches provide ready paths for moisture to travel inward.
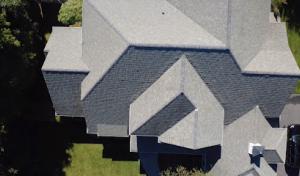
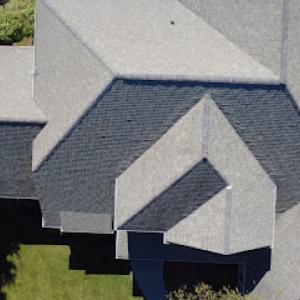
Spring thaw in a typical Waltham home often reveals whether underlayment, valley metal, and chimney flashing held through winter, making late winter and early spring leak calls especially common. Look for wisps of moisture in the attic after a warm day, or staining along ridge lines and in ceiling corners below valleys. Outside, inspect flashing at the chimney, step flashing along the side walls, and the joint where the roof meets the gutter line. If shingles show cupping, missing granules, or lifting at the edges, those are warning signs that ice-related stress has already begun to compromise the roof.
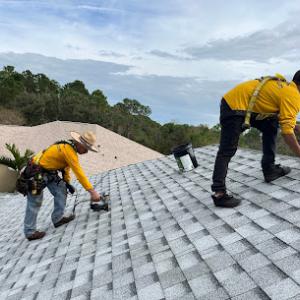
Start by addressing obvious vulnerabilities: re-nail loose shingles, reseal flashing joints, and ensure attic ventilation is balanced with insulation in the attic floor and rafter bays. Clear gutter debris so meltwater can shed rather than back up, keeping path clear for drainage. For older homes with slate or clay/shingle transitions, pay special attention to valley metal integrity and chimney flashing, as those are common failure points after a long winter. If you spot active leaks or see water marks on ceilings during a thaw, treat the situation as urgent: cover the area with a temporary tarp to minimize damage while arranging a professional assessment. Remember, the first significant warm-up after a snowslide is when the risk peaks and patches that seem minor can escalate quickly if left unchecked. Having a trusted local roofer inspect flashing joints and exposed nail lines after the season's harsh cycles can prevent the domino effect from freeze-thaw wear to full-on leaks.
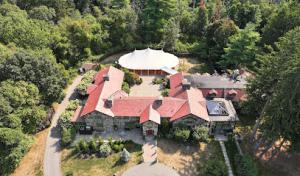
Waltham's roofing mix is unusually broad for one city, with asphalt shingles most common but slate, wood, clay tile, concrete tile, and synthetic products all relevant because of the city's older housing stock and varied architectural eras. In many blocks, the dominant asphalt shingle roof sits on a practical frame, while a surprising number of nearby properties retain elements of earlier materials. That mix means a roof plan in one neighborhood can look markedly different from the next, even on homes that appear similar from the street. When you survey options, you're balancing the familiar performance of modern asphalt with the visual and historical cues that other eras of construction bring to the fascia, rake, and dormers.
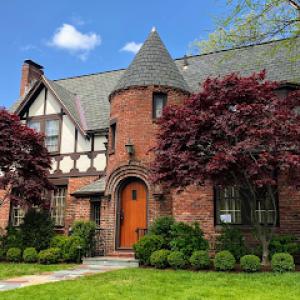
Older neighborhoods include homes where original slate or wood roofs have been partially repaired over decades, creating transition details and flashing conditions that differ from straightforward modern re-roofs. Sections of a slate roof may be reinforced with modern underlayment, while nearby portions retain antiquated nailers and counter-flashing that suspectably trap ice. Those patchwork realities matter because ice dam risks and leak pathways often track along mismatched layers and flashing junctions. In practice, that means if you're considering a retrofit, pay attention to how existing transitions-valleys, step flashing at chimneys, and intersections with parapets or dormers-will integrate with any new material. A seamless look isn't just aesthetic; it's a practical shield against moisture migration through older flashing seams.
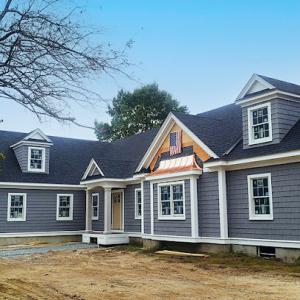
The city's mix of detached homes, multifamily properties, and some low-slope sections means homeowners often need material decisions that account for both historic appearance and modern winter performance. For single-family houses, slate or synthetic options can offer a traditional profile while delivering improved wind resistance and a durable underlayment system. In multifamily buildings, you'll frequently encounter flatter or low-slope sections that require carefully chosen membranes and drainage considerations to prevent shared leaks between units. When you stand back from a row of townhomes and compare roof silhouettes, you'll notice that the architectural eras-colonial revival, Italianate-influenced forms, and early 20th-century urban housing-often set the blueprint for which materials look authentic and age gracefully versus which choices lean into low maintenance and weather resistance.
Waltham's climate features repeated freeze-thaw cycles and Nor'easter exposure along the Charles River corridor and Route 128 belt, so winter performance can't be an afterthought. Asphalt shingles remain a workhorse due to ease of installation and repair, but their life in northern exposure areas hinges on quality underlayment, attic insulation, and proper ventilation. For roofs with historic character, synthetic or composite shingles can offer a closer match to the weight and appearance of older materials while delivering better impact resistance and a longer membrane life under freeze-thaw cycling. Clay and concrete tiles bring durable textures and a classic look, yet they demand careful structural assessment on older homes to ensure the supporting deck and rafters can handle the weight, especially in regions with heavy snowfall. Slate remains a premium option for those pursuing an authentic historic presence, but its installation and repair require experienced craft to preserve the delicate balance between beauty and a reliable leak barrier around flashing details.
In transition areas-where a historic slate or wood roof has been augmented with newer layers-attention to detail matters more than the material itself. Flashing around chimneys, vent pipes, skylights, and roof-to-wall intersections should be inspected for signs of uplift, corrosion, or mastic degradation after winter storms. When considering a re-roof or a substantial repair, you should plan for a detailing approach that respects old geometry while upgrading to modern sealants and a continuous ice-and-water shield in key overlapping planes. In homes with low-slope pockets, specify a seamless membrane that runs through the field and into the parapets without laps that could trap meltwater. The goal is to create a durable, weather-tight envelope that complements the house's historic profile while delivering reliable performance during the brutalest weeks of winter.
Chimney-related roof work is especially relevant in Waltham because many homes predate modern flashing standards and still have masonry chimneys that become leak points during freeze-thaw weather. When brick and mortar face repeated cycles of freezing and thawing, small cracks widen and water finds its way behind metal step flashing or counter-flashing that wasn't installed to modern tolerances. In practice, expect a leak path to run along the intersection where the chimney meets the roof, not just from the middle of a shingle field. Before a repair, inspect for cracked mortar joints, damp masonry staining on the interior ceiling, and any rusting or loose flashing at the chimney base. If flashing shows gaps, lifting, or corrosion, plan a targeted remedy rather than a full roof replacement. A common, durable approach is to replace or seal counter-flashing and re-bed step-flashing with appropriate sealant and a compatible roofing material, ensuring proper slope away from the chimney and a tight seal at every joint. For slate or wood shingle roofs, matching the transition detail to the existing roof edge is vital to prevent cold-weather leaks from backing up under roofing layers.
Skylight repairs matter locally because snow retention and spring rain can expose failed curb flashing and aged seals faster than in milder climates. In older homes, skylight curb flashings are frequently the first failure point after a heavy winter. Start by checking the sealant around the skylight base and the condition of the curb itself. Look for hairline cracks or silicone that has dried out and separated from metal or flashing. When snow sits on a low-slope roof, water can back up at the skylight and penetrate through a marginal curb seal. If the curb flashing shows any bend, corrosion, or detachment from the roof plane, re-flashing with a continuous metal strip and a properly mated sealant is advisable. If the skylight glass or plastic shows condensation between panes, failed glazing seals may be at fault and warrant replacement or resealing. In many cases, a combined curb flashing repair plus reseal of the glazing units yields the most durable result.
On older Waltham roofs, leak tracing often involves intersections between chimneys, dormers, valleys, and patched sections rather than a single obvious field-shingle failure. Start a diagnostic by tracing the interior water entry to the exterior roof line and map water staining on ceilings to the closest up-slope features. A sagging or warped valley, misaligned dormer flashing, or a chimney base with cracked mortar can channel water into the attic space or eaves. In practice, the most effective fix addresses the entire intersection: re-flash the chimney or dormer, reseal the curb, and restore valley integrity with proper flashing that overlaps with the adjacent shingles or tiles. If patched sections exist, verify they do not create a false sense of security; patches can trap moisture and fail under freeze-thaw cycles. When a leak is traced to an old section where multiple roof planes meet, plan a coordinated repair that ties into the surrounding flashing so water is shed away from the vulnerable joints.
To reduce sudden failures, schedule seasonal inspections focusing on flashing details, mortar joints, and sealants around chimneys and skylights. After heavy snow, clear debris from eaves and around chimney tops to prevent ice buildup that can push flashing out of place. In spring, inspect curb flashings for soap-like efflorescence or staining that signals moisture intrusion behind the flashing. If any flashing shows movement, looseness, or corrosion, address it promptly before freeze-thaw cycles resume. Regardless of roof age, maintain consistent sealant replacement at all flashing joints to preserve the barrier against water intrusion during harsh winters and rapid spring rains.
Find contractors experienced in skylight installation, flashing, and leak repairs to bring natural light into your home.

Late spring through early fall is typically the preferred replacement window for roofs in this area. Snow, ice, and winter workload can disrupt scheduling and push projects into delays. By starting in late spring, you gain ditable daylight, predictable temperatures, and less risk of ice dam complications as the drip edge and attic ventilation are addressed under steadier conditions. This period also aligns with schedules of nearby suppliers and crews who are accustomed to the regional freeze-thaw cycle and occasional Nor'easter after the heat of summer starts to rise.
Autumn can still be productive, but one must plan with care. Wind events become more common, and shorter daylight reduces the daily window for safe lifting, nailing, and decking checks. If a late-summer or early-fall start is chosen, inspection plans should anticipate a brisk pace and ensure material delivery aligns with daylight end times. In neighborhoods with mature trees near ridge lines, fall work can face leaf and debris cleanup challenges that require proactive attention to keep underlayment and flashing functioning properly.
Winter emergency repairs are common locally, but full replacements are more often deferred until weather allows proper decking review, underlayment installation, and final inspection. Frozen conditions complicate nail driving, sealant performance, and shingle adhesion. If a leak forces attention in deep winter, prioritize temporary fixes that stop water intrusion and protect attic contents, then schedule a full replacement when conditions permit a thorough assessment of decking condition and ventilation.
To maximize a successful roof project, coordinate with a crew that understands Waltham's climate and housing stock. Ensure decking is accessible for inspection, underlayment can be installed without freeze-related delays, and flashing around chimneys and vents receives proper attention. When autumn arrives, confirm that daylight hours and wind forecasts are suitable for safe work, and have a contingency plan for a potential late-fall delay. In all cases, approaching work with a flexible, weather-savvy schedule will reduce disruptions from snap storms and seasonal shifts.
Get a clear picture of your project costs upfront - no commitment required.
Visocchi Roofing
(781) 953-1508 visocchiroofing.com
35 Nutting Rd, Waltham, Massachusetts
5.0 from 26 reviews
Storm Works Roofing & Restoration
(844) 786-7696 www.stormworksroofing.com
Serving
4.8 from 143 reviews
Erie Home
230 2nd Ave #130, Waltham, Massachusetts
4.7 from 277 reviews
Since 1976, Erie Home has manufactured, supplied, and installed the best-performing roofing on the market. By providing ironclad warranties and convenient financing, we ensure that every homeowner we work with receives top quality service and value for their homes and properties. Erie Home professionals are the roofing company of choice in the greater Boston, MA area. Whether you need roof inspections or roof damage repair services, Erie Home has been the go-to roofing contractor for nearly 50 years because of our attention to detail and dedication to making sure our customers are satisfied with their results. Contact us today for a quote and see why we're the trusted roofing company Boston counts on.
Visocchi Roofing
(781) 953-1508 visocchiroofing.com
35 Nutting Rd, Waltham, Massachusetts
5.0 from 26 reviews
Visocchi Roofing, your most trusted roofing company in Waltham, specializes in residential and commercial roof installations and repairs. We are a family-operated business since 1982 that services all of southern Middlesex County. Clients love us because of our 30 Year Product Warranty for GAF Shingles. Moreover, we also offer Free Gutter Cleaning On Roof Replacements and have exceptional roofing service to guarantee 100% customer satisfaction. Contact your most trusted Waltham roofing contractor today for a free estimate.
E.M. Snow
971 Main St, Waltham, Massachusetts
4.2 from 45 reviews
Whether your project is a residence, condominium project, commercial building, new construction or an older building, E.M. Snow’s licensed professionals can meet your needs. Our professionally trained team will work with you to select the right products and service for your home or business.
OneGuard Roofing
(781) 999-1745 oneguardroofing.com
Serving
5.0 from 25 reviews
OneGuard Roofing is Roof Repair and Replacement Contractor in Lexington MA and surrounding cities. We specialize in Asphalt roof shingle repair replacement, Flat Roof repair replacement, EPDM Rubber roof repair, metal roofing, Chimney flashing repair, skylight repair and replacement and gutter installation. We do fix roofs right from first time.
Fowler Brothers Roofing
(617) 474-6189 fowlerroofmargate.com
Serving
5.0 from 41 reviews
Fowler Brothers Roofing is known for going the extra mile to protect your home or business. Our team brings a family tradition of craftsmanship and integrity to every project, whether you need a small repair or a full roof replacement. We start with a thorough inspection, walk you through your options, and handle every detail so you feel confident at each step. Customers appreciate our clear communication, tidy work, and the respect we show for every property. When you call Fowler Brothers Roofing, you get experienced professionals who care about lasting quality and your peace of mind.

Pinnacle Roofing Newton
(617) 237-2855 pinnacleroofingma.com
Serving
5.0 from 44 reviews
Pinnacle Exteriors is a full service roofing contractor based out of Newton, MA. Our team is proud to offer an array of roofing services, including roofing installations, roof leak repairs, roof inspections, siding installation, and more. We offer services throughout the Greater Boston community. Our team is dedicated to customer satisfaction and job quality. As a fully licensed and insured roofing provider, we understand the importance of getting the job done right the first time. Chris, our owner, also offers free roof inspections and free estimates for all services that we provide.
Mike Leary Contracting
(781) 862-1108 www.mikelearycontracting.com
Serving
5.0 from 19 reviews
Your Complete Roofing & Exterior Solution in Lexington. Since 1975, our family has been providing top-quality service for all your residential and commercial exterior needs, big & small. From expert roofing and seamless gutter installations to beautiful new windows, skylights, durable siding, and meticulous carpentry – plus reliable snow removal – we're licensed, insured, and proud to serve Lexington and surrounding towns. Experience the peace of mind that comes with over 50 years of local excellence.
Newton Roofing Residential
(617) 244-9901 www.newtonroofingresidential.com
Serving
4.4 from 21 reviews
I founded Newton Roofing Residential on two principals, treat our customers with respect and stand behind our work. Whether its a new roof, a simple repair, or just would like to deal with an honest, professional, quality-orientated roofing company. You’ve found your roofer. Newton Roofing Is a woman owned, professional roofing contractor serving our neighborhood area with a hands on approach and over 32 years of roofing management experience. Consider hiring Newton Roofing for all your roofing project. When you support a local business, you are supporting your neighbors and your local economy. Thank you for your business. Founder and CEO Toni Bryan Newton Roofing Residential 69 Howard Street Watertown, MA, 02472 Tel: 617- 244-9901
Storm Works Roofing & Restoration
(844) 786-7696 www.stormworksroofing.com
Serving
4.8 from 143 reviews
Belmont, MA, boasts of various roofing contractors that offer an array of services but none parallel the experience and quality provided by Storm Works Roofing & Restoration As a premier roofing contractor in the area, we have set the benchmark for excellence in both residential and commercial roofing projects. While there are many who provide roofing services, what sets Storm Works Roofing & Restoration apart is our sheer dedication to every project. Whether it's a new roof or a repair job, our team ensures that every home is treated with utmost care and precision. Serving all of New England with quality roof repair services for over 30 years! Schedule a free estimate with the expert roofers at Storm Works Roofing & Restoration today.

RB Farina Roofing
(781) 648-5446 www.farinaroof.com
Serving
4.8 from 524 reviews
RB Farina Roofing has been providing top-quality roofing services in Arlington, Massachusetts, for over 41 years. As a trusted roofing company, we specialize in roof installation, repair, and maintenance for both residential and commercial properties. In addition to roofing, we offer expert gutter services, including gutter cleaning and siding solutions to enhance your home’s protection and curb appeal. Our experienced team is committed to delivering reliable, long-lasting results with exceptional customer service. Whether you're in need of roof repair or a complete roof replacement, choose RB Farina Roofing—your trusted roofing contractor in Arlington, Massachusetts.

Daniel Fox Roofing
(617) 965-1294 foxroofinginc.com
Serving
5.0 from 48 reviews
Daniel Fox Roofing is a full-service roofing contractor in Newton, serving the Metro West & Greater Boston areas. When you need a roof repair or roof replacement, there is no better company to call than Daniel Fox Roofing! We've been fixing and replacing roofs in Newton for more than 40 years. Danny works with all types of roofs, from common asphalt shingle roofs to exotic materials like slate, copper, or clay tiles. Plus gutters, flashings, and other aspects of your roof. Your job will be handled professionally, on time, and within budget. Call me today for a free quote.

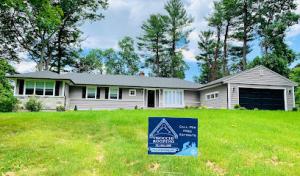
Ranch Roofing
(866) 298-4393 ranchroofing.com
Serving
5.0 from 114 reviews
When Ranch Roofing was born, with four employees two decades ago, the mission was to provide residential roofing services to home owners with only Ranch-Style homes. Bob O’Sullivan, President and founder, had the idea that if he could perfect a roofing system on one single style home, he could build customer relationships with consistent quality installs. Today, Ranch Roofing has grown to a trusted expert in the Boston roofing community that provides roofing installation on all styles of houses in Arlington, Cambridge, Lexington, Newton, Belmont and surrounding communities in the greater Boston area. We are proud to be known for quality work.
Provided local pricing ranges per square run from about $400 to $750 for asphalt shingles, $800 to $1600 for clay tile, $700 to $1400 for concrete tile, $700 to $1200 for wood shingles or shakes, $550 to $1000 for synthetic or composite shingles, and $1100 to $1900 for slate. These numbers reflect the mix of dense, older housing stock in the area and the variety of roof lines you'll encounter on a typical Waltham street. If a roof already has a lot of legacy materials or unusual deck configurations, those base material costs can tilt higher once debris removal and careful tear-off are included in the work. In practice, the decision between asphalt and a more premium option like slate or tile is often driven by the home's original build era, the attic insulation, and the presence of chimney systems that need careful sealing.
Costs in a project can rise quickly when older roofs require decking replacement, chimney and flashing rebuilds, or careful tear-off of slate, wood, or layered legacy materials common in the city's older housing stock. For a slate or wood shingle roof, expect additional hours for removal, disposal, and potential structural repairs. If decking shows rot or sagging, the price per square foot climbs beyond the base material, and replacement may be necessary to guarantee a watertight finish. Flashing around valleys, dormers, and chimneys adds another line item that is not major on a clean, modern installation but is essential to preventing leaks in freeze-thaw cycles that frequently test roofs near the Charles River corridor.
Labor and scheduling pressure can increase pricing after major winter damage periods and during the late spring to early fall installation window when demand is strongest across the Route 128 and Greater Boston market. That seasonal spike is real in Waltham, where multiple projects compete for crews during the blue-sky stretch after January thaws. To minimize disruption and price volatility, plan with a preferred contractor for a window several weeks out, and be prepared for a tighter calendar if winter damage creates multiple urgent replacements in the same neighborhood.
Don't let upfront costs delay a critical repair - these contractors offer payment plans to fit your budget.


When a full roof replacement is on the table, the Building Department requires a formal permit rather than treating the job as simple maintenance. The process typically starts with submitting project plans for review. This isn't a "fill-in-the-blank" step; plans should show deck condition, underlayment method, ventilation strategy, and attachment details for the chosen roofing system. In neighborhoods where slate and shingle stocks are common, the plan may need to address multiple layers, attic ventilation, and potential snow load considerations. Expect questions about how the roof will handle freeze-thaw cycles and Nor'easter exposure, especially along the river corridor and Route 128 belt.
After work finishes, a required final inspection ensures the installation meets code and local standards. Inspectors will verify decking condition prior to and during installation, confirm proper underlayment choices, check attic ventilation adequacy, and scrutinize the attachment method of roofing materials. They'll also assess penetrations for vents, flashing around chimneys, valleys, and dormers, since failures in these areas commonly lead to ice dam issues and leaks in older homes. A thorough inspection saves trouble later, particularly for homes with historic or mixed-material roofing.
Inspection timing can be sensitive to weather and Building Department workload. In periods near winter or during busy storm-repair seasons, delays are common. When planning, build extra time into the project calendar to accommodate plan review backlogs or weather-induced holdouts. If a replacement overlaps with a freeze-thaw cycle, coordinate closely with the contractor to ensure deck and underlayment conditions stay compliant with the scheduling window. Clear, proactive communication with the Building Department and the contractor helps prevent last-minute hiccups that could compromise roof performance through the next freeze-thaw season.
In this area, roof claims are commonly tied to wind-driven leaks, shingle uplift, and ice-dam-related interior water damage rather than a single dominant catastrophe pattern. Nor'easter exposure along the Charles River corridor and Route 128 belt means roofs face repeated freeze-thaw cycles, and older homes with slate- and shingle-heavy roofs are particularly vulnerable to sudden weather events. This means a storm can arrive with modest winds but leave behind hidden damage that leads to interior leaks weeks later. Knowing the typical pattern helps set expectations when talking to your insurer after a storm.
Massachusetts insurance availability remains generally stable, but some carriers have tightened wind and hail coverage options regionally, making policy review more important before storm season. A carrier that once offered broad wind protection may now place more exclusions or higher deductibles for certain roof types or damage causes. The tighter landscape means proactive coverage shopping and careful phrasing of wind, hail, and ice-dam language can pay off when a claim is needed, especially on older homes with mixed roofing materials.
Waltham homeowners should document damage with dated photos, interior leak evidence, and licensed-contractor findings because carriers increasingly want clear proof that damage came from a covered event rather than deferred maintenance. Photos of wind-related uplift, missing shingles, and ice dam formation, plus timestamps of when the damage was first noticed, create a credible narrative. Have a licensed contractor prepare a brief assessment that links observed conditions to a weather event rather than building-age wear, should the claim reviewer question causation.
When a storm passes, make temporary safety fixes as needed, but avoid permanent repairs that could obscure causation for the insurer. Collect and organize all documentation in one place: incident dates, weather notes, contractor assessments, and any interior moisture maps or measurements. If a claim is filed, respond promptly with the documented evidence and keep a steady line of communication with the insurer, focusing on the sequence from weather event to visible damage to interior impact. This approach helps protect coverage for the kinds of wind, ice, and freeze-thaw damage that are most common here.
Connect with contractors who help homeowners navigate the claims process from damage assessment to final approval.
Storm Works Roofing & Restoration
(844) 786-7696 www.stormworksroofing.com
Serving
4.8 from 143 reviews