Last updated: Apr 19, 2026
Winter in this town carries a sharp duo: heavy snow followed by quick warm spells that melt, then refreeze along the eaves. Those cold snaps push meltwater back up under shingles and into underlayment, where ice dams form and push against flashing, gutters, and valleys. Older New England rooflines, with their mix of slate, wood, and asphalt over decades, are especially vulnerable. If the attic and venting aren't ready to shed heat, the same freeze-thaw cycle that tests your siding and foundation also gnaws at roof joints, leaks, and insulation. The risk isn't theoretical here-ice dams show up first where winters bite hardest.
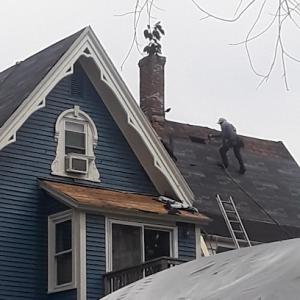
The town's housing stock blends colonials, capes, and aging dwellings, many with complex roof geometry. Valleys that intersect dormers, chimneys that break lines of the roof, and narrow eaves create pressure points where backed-up ice and water accumulate first. When snow sits on a roof and a rapid thaw follows, water can nest behind flashing or pinch against a drip edge, then back up into soffits and into the attic spaces. In practice, you'll notice staining, moisture along the ceiling or walls near chimneys, and peeling paint around cornices where cold air isn't circulating properly to keep the roof warm from above.
Needham also endures hot, humid summers that heat attic spaces and accelerate the drying out of underlayment. A roof that behaves well in a New England winter won't stay durable if attic ventilation is weak or underlayment is aging. Heat buildup expands and contracts roofing joints, causing small gaps that water can exploit during thaws. In these conditions, the risk isn't just ice dams; it's a general decline in the roof's ability to shed moisture efficiently, which weakens wood and accelerates wear on flashing, skylights, and transitions where water tends to collect.
When snow is on the ground, keep eaves clear of excessive ice buildup with careful removal only if safe and feasible, since improper removal can damage shingles or gutters. If ice dams form, avoid shoveling forced channels through the dam, which can push water under shingles; instead seek professional assessment to remove the dam safely and address the backing of water at the source. Check attic access and insulation: ensure there's sufficient insulation and that soffits vent properly, allowing warm air to escape and preventing heat from riding up the roof deck. Inspect flashing around chimneys and dormers for gaps, buckling, or corrosion, and plan for targeted repairs rather than broad, reactive fixes. For complex rooflines, any signs of sagging or uneven snow melt should trigger a professional evaluation as soon as possible.
Seasonal inspections are not optional in this climate. After heavy snows and thaws, look for new drips on ceilings, staining near interior rafters, or loose shingles along valleys. Pay close attention to roof-to-wall intersections, where backed-up ice often hides. A proactive approach combines better attic ventilation with a durable underlayment and well-seated flashing, especially around chimneys and dormers. If a professional finds compromised underlayment or weakened flashing, address it early-small issues now dodge large, costly repairs later. In a town where the winters bite and summers bake, a durable roof system hinges on smart ventilation, robust underlayment, and precise flashing at every transition.
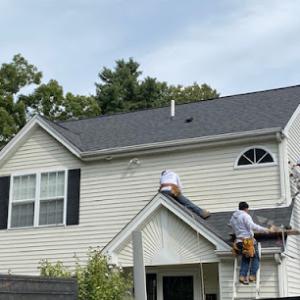
Asphalt shingles are the dominant practical choice for many homes with pitched roofs in town. They pair well with the typical roof lines found on older Needham neighborhoods and are easier to replace after winter wear, which is a common turnover after harsh seasons. When choosing asphalt in this area, look for thicker courses and 50-year or more warranties that emphasize wind resistance and sealant longevity. The priority is a durable installation that manages ice and wind-driven snow without inviting costly maintenance down the line. A robust underlayment and well-seated flashing become especially important in areas where Nor'easter winds push snow against eaves and valleys.
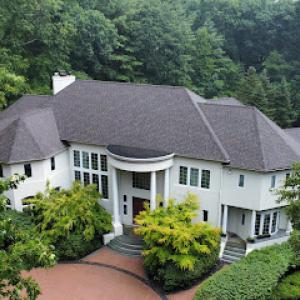
Needham's older and higher-value homes support slate, wood, clay, and concrete roofs. These systems require contractors who understand heavier assemblies and the nuances of repair matching rather than simple tear-offs. Slate and clay tend to perform well in freeze-thaw cycles, but a careful assessment of roof structure, attic ventilation, and proper flashings is essential before committing to replacement or major repairs. Wood shingles or shakes bring a distinct look and good insulation, yet they demand regular maintenance to prevent rot and insect issues, especially on exposed slopes. Concrete tiles offer good durability and a brawnier profile but require a solid roof deck and careful drainage planning to avoid ice dams. In all cases, sourcing skilled crews with local experience is critical to ensure that transitions between older and newer work blend aesthetically and functionally.
Metal roofing is relevant locally not just for longevity but because snow shedding, flashing quality, and trim detailing matter on roofs exposed to Nor'easter wind and winter accumulation. A metal roof can provide strong protection against wind uplift and ice dam formation if installed with carefully designed drip edges, ridge vents, and compatible flashing around chimneys and skylights. In Needham, metal works best when installers pay close attention to the transition zones where old dormers meet the main roof, as missteps there can undermine performance in heavy snow years. If you opt for metal, consider panels that allow for expansion and contraction without compromising sealant joints, and plan for updated soffits and rake details to maintain overall ventilation and moisture control.
Across all roof types, storage of heat and moisture in the attic heavily influences ice dam risk and freeze-thaw damage. Ensure attic spaces are well insulated and ventilated to keep roof temperatures even, reducing snow melt at the eaves that refreezes into dams. For older homes, this often means adding ridge or soffit vents, sealing air leaks, and upgrading insulation without overloading the structure. When specifying any roof replacement or major repair, insist on a plan that coordinates shingle or panel selection with a comprehensive ice dam mitigation strategy. The goal is a cohesive system: a durable roof covering, a properly ventilated attic, and precise flashing around hips, valleys, and penetrations.
When a Needham home features heritage styling or a mix of old and new materials, matching repairs matters as much as the primary roof material. A seamless blend in color and texture helps maintain curb appeal and preserves the home's value. For slate or cedar, this means sourcing compatible replacement pieces and hiring crews experienced in integrating new sections with existing, historically sensitive layouts. The best outcome preserves both performance and appearance, ensuring that winter weather, ice dams, and wind do not disproportionately tax the roof system in the years ahead.
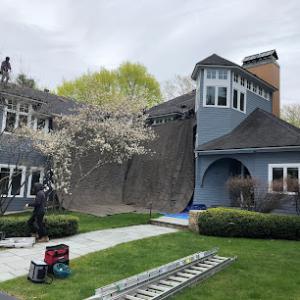
During Nor'easters, the local roofscape faces accelerated wear from wind-driven rain that finds its way through fragile spots around flashing, ridge caps, and chimney lines. Older stock with slate or wood components is especially vulnerable to these pressure pulses, and a small weak seam can become a fast-growing leak once meltwater pools against a cold surface. You'll notice fascia, eave details, and vents taking the first hits, with attic dampness creeping in long before the storm ends. In this market, the threat isn't gradual deterioration-it's abrupt, high-stakes exposure that requires immediate attention to prevent interior damage and costly repairs.
The local contractor signal strongly favors emergency response when active leaks appear during winter storms or heavy rain events. If water is actively dripping, ice is forming around the leak, or the ceiling shows bulging spots, treat it as an urgent situation. The first action is tarping: lay a sturdy tarp to seal the affected area, anchoring it securely to prevent wind blow-off. Don't wait for a full repair crew if you feel rain continuing to pour in; the goal is to keep the interior dry long enough to stage a proper fix. Call a contractor who can provide a rapid on-site assessment and temporary protection, followed by a durable, code-compliant repair plan. The sooner a roof line is stabilized, the less moisture migrates into ceilings, insulation, and walls.
Fall leaf drop and storm debris are especially relevant before winter because clogged drainage can worsen moisture backup once snow and ice arrive. Clear gutters, downspouts, and exterior scuppers so meltwater has a clean path away from the roof deck. Ensure drainage paths from parapets and around chimneys aren't obstructed by fallen leaves or pine needles. Secure or replace damaged drainage components and verify attic ventilation; without proper flow, warm air can intensify ice dam formation along roof edges. Before the first big storm, walk the roof with a professional to identify flashing seams, ridge cap weathering, and chimney-to-roof transitions that look stressed or salt-stained from past winters.
During a Nor'easter, keep interior rooms dry by catching drips with buckets placed under active leaks and photograph any visible damage for insurance purposes. After the storm, schedule priority repairs on the most vulnerable areas: flashing joints, ridge lines, and chimney penetrations. If multiple areas show signs of movement or sealing failure, a comprehensive roof assessment is warranted to prevent repeat events.
Loyalty Exterior Roofing Solutions
(508) 719-7205 loyaltyroofingsolutions.com
945 Great Plain Ave Suite 17, Needham, Massachusetts
5.0 from 226 reviews
Recognizing the distinctive essence of every residence, our comprehensive exterior remodeling expertise extends to a wide spectrum of services, including solar solutions, residential roofing, shingle roofing, emergency roofing services, roof repair, and roof replacement. With a profound respect for the individuality of each property, we meticulously tailor our remodeling solutions to amplify both its inherent allure and practicality. We pride ourselves on offering the best roofing solutions in Needham, MA! We offer peace of mind when it comes to all of our roofing services. We guarantee you'll be pleased with your roof repair, roof installation or roof maintenance! Contact our team of roofing experts today to learn from a pro.
Mighty Dog Roofing of MetroWest Boston
(781) 206-2864 www.mightydogroofing.com
50 Dedham Ave R2, Needham, Massachusetts
5.0 from 168 reviews
Handling a roofing project without the right expertise or guidance by your side is hard, but worry no more because Mighty Dog Roofing MetroWest Boston is at your service. We have numerous years of experience handling unique roofing needs and delivering excellence in every project we undertake. Additionally, we use the highest quality materials and equipment, which further enables the delivery of a service that meets customer satisfaction. Also, we offer a free roof inspection, which guides us in providing you with a durable roofing structure. Contact us today for a reliable roofing service that meets all your needs and gives you a stress-free experience.
GF Sprague Exteriors
45 Kearney Rd, Needham, Massachusetts
4.8 from 842 reviews
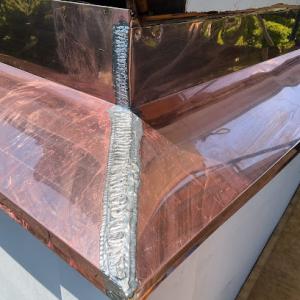
GF Sprague has been part of Boston’s architectural fabric since 1969, starting with slate roofs and hand-formed copper details on the city’s most historic sites. Those projects taught us precision, pride, and craftsmanship that can’t be rushed—values that remain our foundation today. We’ve expanded to all roofing types, as well as windows, gutters, siding, and chimneys, bringing the same commitment to detail, durability, and integrity to every project. What sets us apart isn’t just our skill—it’s treating every customer like family. Every roof is a promise to protect a home and uphold Boston’s tradition. Many clients have trusted us for generations, passing down their loyalty as we’ve passed down our craft.
Golden Group Roofing & Solar
(508) 545-3062 goldengrouproofing.com
1492 Highland Ave #6, Needham, Massachusetts
5.0 from 19 reviews
Golden Group Roofing & Solar in Needham, MA helps Greater Boston homeowners protect and upgrade their homes with premium roofing, siding, skylights, and integrated solar. We provide roof replacement and new installation, prompt leak repairs, detailed inspections, and storm-damage assessments. Our team also installs quality siding and energy-efficient skylights, plus roof-attached solar designed by roofers to protect the integrity of your roof. Certified crews, clear proposals, strong warranties, and flexible financing. Proudly serving Needham, Newton, Wellesley, Dedham, and nearby—schedule your free consultation today.
Admiral Roofing & Home Improvement
(781) 706-2132 admiralroofingma.com
Serving
4.9 from 17 reviews
Admiral Roofing and Home Improvement is a trusted roofing and remodeling company serving Braintree, MA and surrounding areas. We provide quality service for all roofing and remodeling needs, including repairs, installation, maintenance and inspections. Our experienced team of roofers use the latest techniques to ensure your roof is in top condition. You can trust us to make sure your home is safe from the elements.
Trident Home Solutions
(781) 489-5392 tridenthomesolutionsne.com
Serving
5.0 from 43 reviews
Trident Home Solutions provides professional Roofing, Siding, and Painting Services. Trident Home Solutions is extremely responsive, dependable and believe in total transparency from estimate to completion of the project. Trident believes communication is important so that there are no surprises while we work on your beautiful home. Trident takes pride in offering quality protection for your home. My office is located in Wellesley and if you would like to look at samples of shingles and siding, please call me. I would be honored to meet you to discuss your upcoming project.
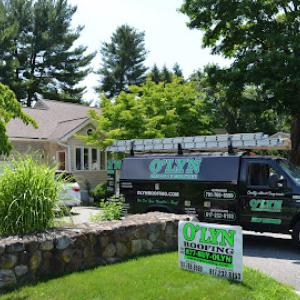
O'LYN Roofing
(781) 705-5383 www.olynroofing.com
Serving
4.8 from 58 reviews
For over 51 years, O’LYN Roofing has been a trusted roof replacement contractor in Wellesley, MA. We specialize in providing affordable and environmentally friendly roofing services, including roof replacements in Wellesley. Our services cover a wide range of roofing materials such as slate, copper, wood, asphalt, and flat roofs. Since 1974, we have prioritized our customers and consistently delivered high-quality results in every job. We also offer gutter, downspout, and skylight services to enhance the functionality and aesthetics of your roofing system. As the local Owens Corning Platinum Preferred Roofing Contractor, we ensure your roofing needs are met with precision and professionalism. Contact us today for a free roof assessment.
Daniel Fox Roofing
(617) 965-1294 foxroofinginc.com
Serving
5.0 from 48 reviews
Daniel Fox Roofing is a full-service roofing contractor in Newton, serving the Metro West & Greater Boston areas. When you need a roof repair or roof replacement, there is no better company to call than Daniel Fox Roofing! We've been fixing and replacing roofs in Newton for more than 40 years. Danny works with all types of roofs, from common asphalt shingle roofs to exotic materials like slate, copper, or clay tiles. Plus gutters, flashings, and other aspects of your roof. Your job will be handled professionally, on time, and within budget. Call me today for a free quote.

Certified Roofing Systems
(617) 958-8659 certifiedroofinginc.com
Serving
4.9 from 123 reviews
Serving businesses since 2006, Certified Roofing specializes in roof coatings, full roof restorations, and commercial roof replacements for Metal, TPO, Flat, PVC, Single-Ply roofs across Massachusetts, including Newton, Boston, Medford, Malden, Cambridge, Brookline, Somerville, Waltham, Quincy and nearby. 🏗️ We work with metal, PVC, TPO, EPDM rubber, and flat roofs, using top-quality Gaco Products for lasting protection. 🏢 We provide excellent roof replacement and installation solutions for all types of commercial and industrial buildings. ✅ Get a Free Thermal Drone Inspection and Free Commercial Roof Estimate today! 📞 Call 617-958-8659 or book online. Quality, reliability, and energy-efficient solutions for your business! 🌟

Pinnacle Roofing Newton
(617) 237-2855 pinnacleroofingma.com
Serving
5.0 from 44 reviews
Pinnacle Exteriors is a full service roofing contractor based out of Newton, MA. Our team is proud to offer an array of roofing services, including roofing installations, roof leak repairs, roof inspections, siding installation, and more. We offer services throughout the Greater Boston community. Our team is dedicated to customer satisfaction and job quality. As a fully licensed and insured roofing provider, we understand the importance of getting the job done right the first time. Chris, our owner, also offers free roof inspections and free estimates for all services that we provide.
Otukan Roofing Company Boston
(781) 798-9009 otukanroofing.com
Serving
5.0 from 21 reviews
Otukan Roofing is the top roofing company in Boston, MA, offering a wide range of expert services to protect and enhance your home. Our skilled professionals specialize in any flat roof repair, replacement, and inspection, as well as gutter cleaning, repair, and replacement. We also provide expert skylight installation and repair services. Whether you need routine maintenance, emergency repairs, or a complete roof overhaul, our team is dedicated to providing exceptional customer service and top-quality workmanship. Count on us for prompt, reliable, and affordable solutions to all your roofing needs. Contact Otukan Roofing today to schedule your appointment!
Natarelli & Son Roofing & Gutters
(508) 509-5128 www.natarelliandsonroofing.com
Serving
5.0 from 51 reviews
Protect your largest investment with our reliable roofing services. We are a locally owned and operated roofing company currently serving Natick, MA and surrounding communities. We offer roofing contracting, roof installation, and roofing repairs, seamless gutters, and more!.
In this town, a full roof replacement typically requires a building permit issued through the Inspectional Services Department. Before any shingle or slate work begins, you'll want to pull the permit and have the project details ready, including the scope, materials, and working plans. The permit process in Needham is designed to ensure that older homes with slate, wood, and other traditional sheathing receive appropriate updates that stand up to freeze-thaw cycles and Nor'easter stress. Expect the initial review to focus on whether the planned underlayment, ventilation, flashing details, and drainage strategy align with local expectations for this climate. Because a large subset of Needham homes has complex rooflines and historic features, the inspector may request specifics about attic ventilation and eave drainage to prevent ice dam-related damage.
As the project unfolds, you should have a clear path for underlayment, ventilation, and flashing that matches both the roof's age and the local weather realities. Ice dam risk rises when ventilation is insufficient or when flashing around chimneys, skylights, and abutments isn't properly integrated with the drainage plan. The permit holder is responsible for maintaining a safe worksite and providing access for inspections. If any change to the plan is needed-such as switching materials or altering roof penetrations-an amendment may be required and should be submitted through the same department. Maintaining good records of weatherproofing details, installation methods, and material certifications can help during inspections, especially on homes with slate or wood components that demand careful treatment to avoid future leaks.
Local inspections commonly verify underlayment, ventilation, flashing, and drainage before the permit can be closed out. An inspector will typically visit at key milestones: after the roof deck is prepared and underlayment is installed, during ventilation installations to confirm proper airflow paths, and around flashing and dormer areas where water intrusion is most likely in freezing conditions. On Needham homes, where Nor'easters and freeze-thaw cycles place unique stresses on roof-to-wall connections, inspectors pay close attention to how hips, valleys, and roof penetrations are flashed and how drainage channels are configured to minimize ice dam formation. Your contractor should schedule these inspections promptly to avoid delays.
A final inspection is required before release of the permit. At this stage, the inspector checks that all approved work aligns with the permit and that drainage and ventilation systems function as intended, with particular emphasis on preventing ice dam buildup and ensuring long-term performance under Needham winters. Once the final seal is granted, ensure all documentation-for permits, inspections, and any required amendments-is filed and accessible for future home records. If any issues are found during the final review, address them quickly through the permitting office to keep the project on track and avoid extended timelines that can complicate winter weather realities.
In this town, asphalt shingles typically run from 350 to 700 USD per square, while premium options like slate can stretch from 1100 to 2500 USD per square. The mix of standard and premium roofs reflects a wide housing stock, from older, legacy structures to newer, higher-end applications. When planning a replacement, you'll see wide swings depending on material choice, the roof's pitch, and the complexity of the project. If a home uses clay or concrete tile, expect higher end of the spectrum, with comparable drivers-weight, roof access, and the need for specialized installation details.
Costs in Needham can rise on older homes where tear-off reveals decking repairs, chimney flashing work, or ventilation upgrades needed to satisfy inspection. Older decking can be softened by years of freeze-thaw cycles, and neglected flashing around chimneys, dormers, and valleys often needs reinforcement. Ventilation upgrades, such as adding soffit or ridge vents or addressing insulation gaps, can be required to prevent future ice dam issues and reduce indoor condensation. These factors push a straightforward "square" price into a higher range, particularly with premium materials.
Pricing pressure can also increase after Nor'easters and during short spring and fall scheduling windows, when many homeowners try to avoid winter installation delays. Heavy snow seasons can delay access, compress timelines, and raise contractor demand, which nudges material and labor costs upward. For a roof replacement aimed at reducing ice dam risk, expect to invest more in robust underlayment, improved ventilation, and precise flashing details, especially on older houses with irregular eave lines or multiple chimneys.
When estimating, start with the base material cost per square and then add the anticipated add-ons: decking repairs, flashing work, and ventilation upgrades. Get multiple written quotes that itemize each component, so you can compare long-term value against the upfront price. If you're aiming to minimize future ice dam risk, prioritize installers who demonstrate a thorough approach to insulation, attic ventilation, and attic-to-roof transitions. Keep in mind that in tight windows, scheduling and material availability can affect both timing and final price.
Get a clear picture of your project costs upfront - no commitment required.
Golden Group Roofing & Solar
(508) 545-3062 goldengrouproofing.com
1492 Highland Ave #6, Needham, Massachusetts
5.0 from 19 reviews

You know this area faces Nor'easters and hail that test slate, wood, and aging asphalt. Keep dated photos of the roof before a loss occurs so the claim can be evaluated against existing wear. In Massachusetts, adjusters in this market often weigh storm-related damage against age-related wear, which matters on older roofs.
Contractors' estimates and documentation of visible storm damage matter more here than generic wear notes. Have a clear contractor report that ties damaged gutters, flashing, and shingles to the storm event. Capture ice dam indicators, gutter lift, and attic conditions with close-ups and timestamped shots.
Because a full roof replacement can be treated as a major loss, keep permit records, inspection sign-offs, and progress photos together for claim support. Store reconciliation notes that show date of installation, material type, and any repairs that preceded the loss. Having a timeline helps the adjuster follow the sequence from storm impact to current condition.
Walk the roof carefully from the ground if safe, noting flashing integrity and vent seals. On ice-dam-prone days, photo attic insulation and ventilation conditions to demonstrate potential contributing factors. If you hire a contractor, request a written, dated damage assessment and a rough timeline for repair so you can present a coherent case to the insurer.
Older Needham roofs often blend slate and wood remnants with newer overlays, making the line between storm damage and age wear blurry. Document not only the damaged areas but also the general aging pattern observed across multiple seasons. Photographs taken across different months show how freeze-thaw cycles have reshaped the roof's surface, which can influence how an adjuster assesses causation.
Everyday record-keeping keeps a dated file of roof correspondence, estimates, and receipts to assemble a complete claim package if a Nor'easter hits.
Connect with contractors who help homeowners navigate the claims process from damage assessment to final approval.
Golden Group Roofing & Solar
(508) 545-3062 goldengrouproofing.com
1492 Highland Ave #6, Needham, Massachusetts
5.0 from 19 reviews

New Stage Roofing & Home Improvement
(844) 616-0054 www.newstageroofing.com
Serving
4.9 from 124 reviews
Needham's older homes often pair masonry chimneys with steep roof sections, a combination that makes step flashing and counterflashing common leak points. When you inspect these areas, look for hairline gaps where shingles meet the chimney base, as well as any shifting or cracking in the mortar. In freeze-thaw cycles, small flashing gaps can widen as water freezes and expands. A practical approach is to run a careful hand along the chimney seam after a thaw, noting any feel of looseness in the flashing. If mortar is deteriorating or flashing pieces are loose, plan a targeted repair before winter stress returns. For repairs, prioritize resealing at the transitions with metal counterflashing integrated into the chimney's sides and a continuous drip edge to guide meltwater away from the brick.
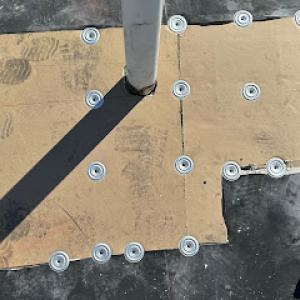
Local contractor signals show meaningful skylight specialization, which fits a market where additions and remodeled upper floors often introduce new roof penetrations. Skylight flashings should form a continuous water-tight cradle around the dome or curb, with a low-profile curb flashing that seats neatly under surrounding shingles. In Needham's climate, skylight seals must resist repeated expansion and contraction from winter cold and summer humidity. If you notice condensation at the glass edge, or streaking along the flashing during heavy rain, treat it as a sign that the flashing has aged or shifted. Have the seals and flashing reworked with a curved, continuous counterflashing that locks into the skylight frame and ties into the roof's upper shingle line to prevent ice dam build-up at the edge.
These detail areas are especially vulnerable in the freeze-thaw climate because small flashing failures can widen after repeated winter expansion and summer humidity. Check around all roof penetrations-vents, exhausts, and any vented dormers-for loose or cracked sealant, and for lifted shingles near the flashing. A practical testing step is to gently lift a shingle near the flashing with a blunt pry bar; if the shingle shifts or the underlayment shows exposed, schedule a flashing re-seating. In winter, ensure there is proper attic ventilation and insulation to reduce heat transfer toward these edges, which helps keep flashing from becoming the first ice dam weak point. If you see recurring ice dam-related leakage at a chimney or skylight, address the flashing height and any capillary gaps immediately, before the next thaw.
Find contractors experienced in skylight installation, flashing, and leak repairs to bring natural light into your home.
Loyalty Exterior Roofing Solutions
(508) 719-7205 loyaltyroofingsolutions.com
945 Great Plain Ave Suite 17, Needham, Massachusetts
5.0 from 226 reviews

Mighty Dog Roofing of MetroWest Boston
(781) 206-2864 www.mightydogroofing.com
50 Dedham Ave R2, Needham, Massachusetts
5.0 from 168 reviews
GF Sprague Exteriors
45 Kearney Rd, Needham, Massachusetts
4.8 from 842 reviews
In Needham, warranty value is tied closely to installation quality because winter ice, wind-driven rain, and summer heat quickly expose poor flashing and ventilation work. You should view a warranty as a promise about how the roof is installed, not just what shingles are on top. If flashing or attic ventilation is sloppy, ice dams form, shingles lift, and leaks show up after a season of freeze-thaw. The warranty will reflect how rigorous the installation was.
The local market includes meaningful share of warranty-offering and manufacturer-certified contractors, which matters most on full replacements rather than patch jobs. For a full replacement, look for a contractor with both manufacturer certifications and a solid workmanship warranty that covers labor and installation details for several years. If a contractor can't demonstrate training specific to your roof type, that's a red flag in a climate where roof lines and venting strategies differ by era and material.
For older homes with premium materials or complex roof geometry, homeowners should compare workmanship coverage separately from material coverage. Premium materials can carry strong manufacturer warranties, but if the workmanship is thin or inconsistent around chimneys, valleys, and dormers, the system tolerances that prevent ice damming fail. In Needham, extensive ridge lines, slate, or wood elements demand careful flashing details and dedicated attic ventilation; evaluate whether the warranty explicitly addresses these elements and who is responsible for repairs if those features fail.
Practical steps for protecting warranty value include verifying that the installer documents attic ventilation, confirming the flashings around dormers are sealed, and insisting on a warranty map that shows where labor coverage applies on roof planes.