Last updated: Apr 19, 2026
Riverhead sits on Long Island in a coastal Northeast climate where winter storms, spring and fall Nor'easters, and regular rainfall are central drivers of roof wear. The mix of older village homes and newer suburban roofs means edges, penetrations, and flashing are often aged past their prime. Storms arrive with surprising speed, and a single strong gust can drive rain under shingles that were fine last season. The first sign of trouble is often a damp ceiling or discolored attic insulation after a Nor'easter rolls through. Acknowledge that your roof is a line of defense against repeat exposure to wind, water, and salt spray carried along the coast.
Wind-driven rain from Nor'easters is a recurring local concern because storms approach Long Island with strong coastal gusts that can exploit aging shingle edges, flashing, and roof penetrations. On homes with seasoned asphalt shingles, lift along the eaves or near dormers is a telltale warning sign. Metal flashing that has begun to corrode or lift creates channels for water to pry upward under shingles, especially where roof-to-wall transitions exist. If gutter splash is audible during a heavy rain, that is a cue you may be dealing with compromised flashing or an undersized drip edge. During a storm, check the attic for sudden trampolining drafts, unusual wind noises, or warm spots that hint at moisture infiltration behind the roof plane. Immediate action-secure loose components, reseal flashings, and consider edge reinforcements-can prevent widespread seepage and costly interior damage.
Freeze-thaw conditions in winter raise the risk of ice dams along eaves, especially after snow events followed by cold nights and daytime melting. When heat from the attic escapes into the roof deck, snow melts near the ridge and refreezes at the overhanging eaves, forming an ice dam that forces meltwater to back up under shingles. Over time, this can lead to water intrusion, staining on interior walls, and rotten sheathing. In Riverhead's climate, repeated freeze-thaw sequences are common after a snow event, so any roof area where heat loss is evident becomes a high-risk zone. Ice dams can also push against gutters, causing separation and gutter failure that further compounds water intrusion. The cue here is dry, warm attic spaces can create a hidden problem; damp spots on ceilings after a thaw are a red flag.
Identify high-risk areas around dormers, skylights, and roof-to-wall transitions, where flashing has likely aged or degraded. If a storm is forecast, remove loose debris from the roof that can act as a dam or cause impact damage during high winds. Ensure attic insulation is evenly distributed and not concentrated near eave lines, reducing heat escaping into the roof deck and limiting ice dam formation. Consider upgrading edge protections and flashing where wind exposure is greatest, and plan for a proactive inspection after the next Nor'easter or significant snowfall. If you notice recurring damp spots, interior staining, or ice buildup along eaves, do not delay professional assessment-early intervention can avert major interior damage and more extensive repairs.
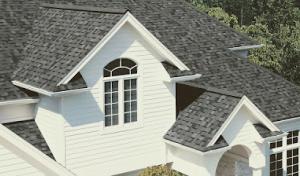
Provided local pricing ranges run from 350 to 550 USD per square for asphalt shingles. In Riverhead, a common roofing choice for older village homes and newer suburban builds, asphalt can be a practical starting point, especially where budget and quick turnarounds matter. Note that coastal moisture and Nor'easter winds heighten the risk of wind-driven lifts and early granule loss, so a high-quality underlayment and properly sealed flashing are essential. In storm season, costs can spike if tarping or emergency leak response is needed before a proper repair or replacement can occur. For a standard, well-installed asphalt roof, plan for a robust underlayment and attention to edge trims to resist wind-driven rain along the perimeter.
Metal ranges from 700 to 1100 USD per square. Metal panels perform well in wind exposure and can shed moisture efficiently after a Nor'easter, making them a common preference for newer homes and some coastal-adjacent neighborhoods. The upfront premium buys durability against repeated freeze-thaw cycles and rapid drying after rain events. In Riverhead, where seasonal temperature swings amplify wear on cheaper options, investing in metal with a corrosion-resistant coating and solid flashing details pays back in reduced maintenance. Expect the need for precise attic venting and sealants around penetrations to minimize ice-dam risk near eaves and skylights.
Clay tile runs 900 to 1500 USD per square. While visually striking on some Riverhead homes, clay tiles require careful substrate preparation and robust underlayment because coastal humidity and wind-driven rain can stress the fasteners and overlapping laps. Tile roofs hold up well under freeze-thaw when installed with proper nailing patterns and backer rods at ridges. In Nor'easter conditions, ensure roof-to-wall transitions and chimney flashings are integrated to mitigate moisture intrusion. Costs rise if roof shape demands more complex tile layouts or additional battens for stabilization.
Concrete ranges from 900 to 1700 USD per square. Similar to clay, concrete tiles tolerate temperature swings but are heavier and demand a strong deck structure and meticulous flashing. In Riverhead, where storm events strain aging homes, a reinforced substrate and high-quality sealing around penetrations are prudent. Concrete tiles can outperform in wind and moisture control when paired with modern underlayment and continuous eave detailing, but installation precision matters to prevent cracking in cold snaps.
Wood shingles or shakes run 600 to 1000 USD per square. They can offer a classic look, but coastal moisture and Nor'easter exposure increase maintenance needs and shorten service life if moisture management isn't tight. Treating wood with appropriate coatings and ensuring solid ventilation beneath the roof deck helps resist swelling and decay. In storm-prone periods, wood roofs benefit from reinforced flashing at valleys and careful maintenance around any tree debris or standing water that could accelerate rot.
Slate is 1300 to 2800 USD per square. It delivers long life and strong wind resistance but comes with a high upfront cost and structural requirements. In Riverhead, slate roofs are most practical on homes with existing heavier roof decks and dedicated support. To prevent moisture ingress during thaw cycles, slate installations should use corrosion-resistant fixings and meticulous grout or sealant lines at joints. In high-demand storm periods, slate work can see price volatility due to material availability and specialty labor needs in Suffolk County.
Roof Repair Specialist
(631) 880-5775 www.roofrepairspecialistlongisland.com
Riverhead, New York
5.0 from 112 reviews
For reliable roofing services in Suffolk County NY, make us your first choice. At Roof Repair Specialist Long Island we provide services for roof installation and roof repairs with expertise you can trust, all at affordable rates. Working with you to design a roof that will fit your budget and needs, we ensure that each roof will last for years to come.
Safeway Roofing & Siding
(631) 505-1305 www.eastendroofingandsiding.com
Riverhead, New York
5.0 from 58 reviews
Safeway Roofing & Siding is your local, family-owned roofing and chimney specialist, proudly serving the East End of Long Island for over 20 years. We provide expert roofing, siding, and chimney repair, replacement, and installation with a commitment to quality craftsmanship and customer satisfaction. Our certified and experienced team specializes in shingle, tile, cedar shake, metal, and flat roofing systems, as well as masonry, prefabricated, metal, and wood stove chimneys. Whether you need a quick repair, a full roof replacement, or expert chimney work, we’re here to deliver durable, high-quality solutions. Contact us today for a free estimate and experience the Safeway difference—where reliability meets excellence in every project!
Done Right Roofing & Chimneys
(888) 909-3505 www.donerightroofingandchimneys.com
Riverhead, New York
5.0 from 37 reviews
Done Right Roofing and Chimney is a family-owned and operated Roofing Company with years of experience in repair, replacement, and installation for residential, retail, and commercial Roofing, Chimney, Skylights, and Gutter Repair, Replacement, and Installation. Our Roofers are available now for 24/7 Emergency Roof Repair, which includes Roof Leak Repair and Roof Tarp Installation. Whether you need a complete Roof Installation or Chimney Cleaning, you can count on us at Done Right Roofing and Chimney to get the job done right the first time.
Roof Squad
(631) 945-4664 www.roofsquadny.com
110 Peconic Ave Suite 101, Riverhead, New York
5.0 from 31 reviews
Roof Squad strives to provide homeowners with timely and quality repairs and maintenance for their roofs. By using our professionals, you can expect your roof to last for years without needing to be replaced prematurely. We provide licensed, certified, and experienced Roof Repair services in Long Island. As well as keeping our professional insurance up-to-date, we guarantee the protection of everyone we work for. The integrity of your roof is our top priority, which is why we are often your roofing contractor of choice.
Done Right Roofing & Chimney
(888) 796-2557 www.donerightroofingandchimneyinc.com
Riverhead, New York
5.0 from 29 reviews
Done Right Roofing and Chimney provides top-quality residential and commercial Roofs and Chimneys services. We use only the highest quality materials so you can ensure your home is in good hands. Our services are fully licensed and insured, and we are a family-owned and operated business dedicated to delivering exceptional customer service. Whether you need a roof repair or a complete roof replacement, you can count on Done Right Roofing and Chimney to get the job done right the first time.
Solution Home Renovations
Riverhead, New York
5.0 from 25 reviews
Solution Home Renovations is a family owned and operated. Free estimates with no obligation.
Payless Roofing & Gutters
(631) 729-8570 www.paylessroofingandgutters.com
Riverhead, New York
5.0 from 22 reviews
Payless Roofing and Gutters is a family-owned and operated roofing company that specializes in providing top-quality roofing and chimney services. Whether you're in need of emergency roof repair or simply looking for a free estimate, Payless Roofing and Gutters has got you covered.Their team of professionals are committed to providing affordable and reliable roofing and chimney services that are tailored to meet the unique needs of their clients. From chimney repair to chimney restoration, roof repair, gutter cleaning, and skylight installation, Payless Roofing and Gutters has the expertise and experience to handle all of your roofing needs.

All Ways Construction, roofing & chimney
(631) 800-1615 allwayconstruction.com
1800 Osborn Ave unit 21E, Riverhead, New York
5.0 from 13 reviews
Roofing .chimney.siding .gutters.doors.windows.masonry .decking.much more
S&O Roofing & Construction
(855) 697-6639 www.soroofs.com
Riverhead, New York
5.0 from 13 reviews
At S&O Roofs, roofing is not just our job; it is a skill set rooted by our passion and commitment to always ensuring that we do right by you. We provide Attic venting, Gutter installation, Roof inspection, Roof installation, Roof repairs, Skylight installation, Skylight repair, Storm/wind damage roof repair, asphalt shingles, and other general contracting services. We provide our services in the following areas: Huntington, NY Hicksville, NY South Huntington Syosset, NY East Northport, NY Elwood, NY Deer Park, NY Suffolk County, NY Kings Park, NY Plainview, NY Commack, NY Jericho, NY Dix Hills, NY Melville, NY And surrounding areas. Call us now if you are looking for roofing services for residential or commercial sites.
Our Family's General Contracting
(631) 495-7355 www.ourfamilygc.com
Riverhead, New York
5.0 from 12 reviews
Are you thinking about updating your home? Whether you're looking to reimagine an existing space, add a Backyard Oasis, or build your dream home, Our Family's General Contracting is here to make it happen. We are family owned and operated located in Medford, NY. Our company is committed to quality work, efficient processes and treating each homeowner like family. Contact us today for all of your General Contracting needs.
Empire Gen Cedar Roofing East Hampton
(631) 284-4933 empiregenroofing.com
Riverhead, New York
4.7 from 13 reviews
Trusted by homeowners across East Hampton, NY — we specialize in expert roof replacement, roof repair, and premium cedar shake roofing. Our skilled team delivers durable, beautiful roofs built to handle Hamptons weather. Fast, reliable, and done right the first time. Protect your Hamptons home by scheduling a Free Estimate appointment today!
JA Roofing of Long Island | Your Local Roofing Experts
Riverhead, New York
5.0 from 5 reviews
JA CONSTRUCTION | Many homeowners don’t even realize that their roof isn’t functioning as effectively as it should – and since no two houses are exactly the same, there’s no reason to expect that there’s one solution for roofing problems. Seemingly harmless environmental conditions, like nearby trees or less protection from other buildings during snow and hail storms, can create vastly different needs for neighboring houses. Even if your neighbor’s roof is holding up spectacularly, it’s very possible that yours could be falling apart. The experts at JA Roofing a Suffolk roofing company can assess the needs of your home, and they can create a custom installation or repair plan just for you.
In Riverhead, a building permit is required for a full roof replacement. This is not something to skip or improvise; the Town Building Department expects a formal process, and skipping steps can result in delays or a non-compliant roof that blocks closeout later. Knowing how the permit works helps you plan around Nor'easter season and winter freeze-thaw cycles, so the project stays on track and your new roof performs when you need it most.
The Town Building Department issues roofing permits and conducts inspections, including a final inspection needed to close out the permit. For most full replacements, plan review is typically not required unless the project includes structural changes, such as reinforcing rafters, changing the pitch, or altering load paths. If the scope stays within a standard replacement-shingles to shingles, or metal to metal-the review tends to be straightforward, but permits still must be secured before striking the first nail. Gather a clear scope of work, all manufacturer specifications for the chosen roofing system, and any required code compliance documents before applying. A minimal plan review saves time if you're not altering structural components.
Be prepared for the fact that permits may expire if work does not begin within the required period. The clock typically starts when the permit is issued, not when you sign the contract, and pauses only with approved extensions. If a project stalls because of weather delays or supply issues common to the North Shore, talk to the planner early about a temporary extension rather than letting the permit lapse and facing a restart.
Begin at the Town Building Department's office or online portal, depending on how the local system is set up that year. Have your contractor pull the permit, but you should review the application yourself for accuracy and completeness. Common required items include proof of property ownership, a description of the roof replacement, anticipated start and end dates, and structural notes if applicable. If any ventilation work, skylights, or chimney flashing are involved, note those details so they appear in the permit package. Ensure the contractor's license and insurance are up to date before submission; the permit is tied to both project scope and responsible parties.
Inspections happen at key milestones. The initial inspection often occurs after the old roofing is removed and the underlayment and deck are in place, or when the first new material is installed. A mid-project inspection may be requested if structural components are altered or if the roof line changes. The final inspection is essential; it verifies that the roof installation meets code, manufacturer requirements, and the terms of the permit before the occupancy or closeout is completed. Expect confirmation or a list of minimally invasive corrections, if any, so the crew can return promptly.
Track your timeline against typical seasonal weather windows. Nor'easters and wind-driven rain in late winter or early spring can complicate inspections or require weather-ready scheduling. Coordinate with the contractor to ensure that the final inspection appointment is secured soon after crew wrap-up, and have any warranty documentation, maintenance notes, and material certifications ready for the inspector. A clean, accessible attic and properly sealed penetrations around vents and chimneys help the final review go smoothly. Once the inspector signs off, the permit is closed, and you can move forward with enjoying the new roof with confidence that it's built to Riverhead's standards.
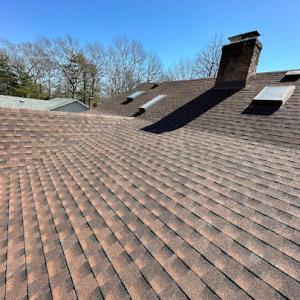
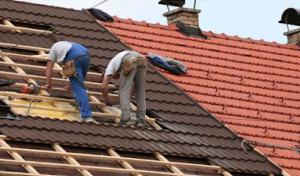
In this coastal corner of Long Island, roofing decisions are shaped by wind-driven rain, Nor'easters, and the freeze-thaw cycles of winter. Asphalt shingles are common on many homes because they fit the large re-roofing market, but wind uplift and granule loss after repeated storm cycles are real concerns. Homes in the area often face gusts that can lift edges if the fasteners aren't correctly installed or if the shingles have aged. Riverhead experiences moisture buildup from frequent coastal spray and carves out long-lasting wear patterns around protrusions, valleys, and chimneys. A roof system that accounts for wind pressure zones, proper nailing patterns, and a robust underlayment is essential to slow water intrusion during storms.
The local mix includes asphalt shingles, metal roofing, clay and concrete tile, wood shingles or shakes, and even slate. Asphalt remains practical for the typical re-roofing project, but its performance hinges on proper installation, edge protection, and periodic granule maintenance. For higher wind events, metal roofs offer strong wind resistance and a clean edge profile, though attic heat management and sound under rain should be anticipated. Clay and concrete tiles bring durability and a distinct look, yet their weight, installation geometry, and snow/ice behavior demand a capable structure and experienced installers. Wood shingles and shakes add character but require meticulous maintenance to resist moisture absorption and decay in the eye of Nor'easters. Slate, while premium and long-lasting, meets heavier structural needs and often appears on older or higher-end homes where specialty crews are available.
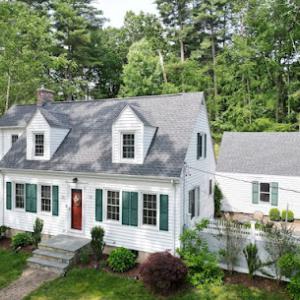
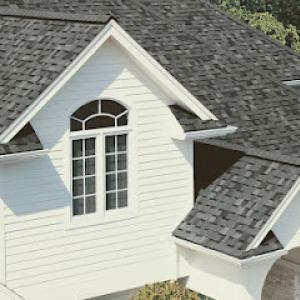
Older East End housing stock often pairs weathered aesthetics with seasoned construction details; for those homes, a roof system that harmonizes with the existing structure while delivering modern moisture control is key. If upgrading a shingled roof, consider a high-witness underlayment and upgraded flashing at dormers, chimneys, and transitions to prevent ice damming and wind-driven leaks. For tile options, confirm that the roof deck and support structure can bear the load, and evaluate the potential for ribbed or interlocking configurations to improve wind performance. For slate, ensure proper fastening methods and compatible underlayment to maximize longevity and minimize risk of seam failures under heavy wind and freeze-thaw cycles.
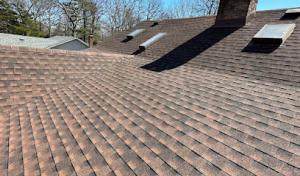
A Riverhead roof benefits from proactive inspection after major storms, looking for lifted edges, damaged tiles or shingles, and compromised flashings. In the shoulder seasons, clear debris from valleys and gutters to prevent ice dam formation, and verify that attic and roofline ventilation remains balanced to reduce condensation and ice buildup at eaves. Address any soft spots or signs of moisture intrusion promptly, as small issues can escalate quickly under the bay's exposure. Selecting a contractor familiar with the local material mix and a track record with Nor'easter resilience will translate to more durable performance and fewer mid-season surprises.
The most popular roofing material in the US. Find pros who install, repair, and replace asphalt shingles.
Safeway Roofing & Siding
(631) 505-1305 www.eastendroofingandsiding.com
Riverhead, New York
5.0 from 58 reviews
C&D Suffolk Siding & Roofing
(516) 253-2338 reliableconstructionguys.com
Riverhead, New York
5.0 from 49 reviews
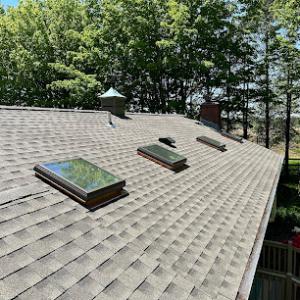
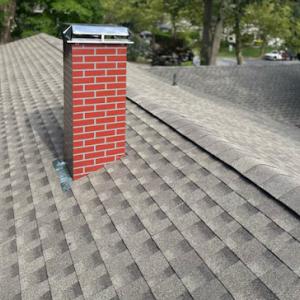
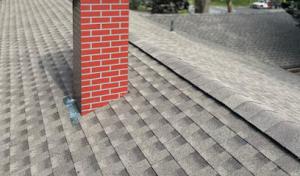
Wind-driven rain is a constant companion along Peconic Bay, and a roof's most vulnerable spots are where it can slip in: around curb-mounted skylights and where chimneys meet the roof. In this area, flashing and masonry-to-roof transitions are common troublemakers for homeowners. The combination of Nor'easters, freeze-thaw cycles, and aging sealing materials means that what looked solid a few years ago can start leaking after a seasonal storm front. This isn't about a single bad component; it's the cumulative effect of wind pressure, salt-laden air, and shifting roof edges that stress common joints.
Skylights in this market are widely installed for daylight and a sense of space, but curb-mounted units have a built-in risk: the interface between the curb, flashing, and surrounding roofing is where rain can funnel in under pressure. If the curb sealants or the step-flashing aren't properly integrated with the roof plane, wind-driven rain will exploit any tiny seam. The result can be interior discoloration, musty odors, or damp patches that appear far from the center of the roof. Regular inspection should focus on the curb flashing, the sealant joints around the glazing, and the venting to prevent moisture buildup behind the curb.
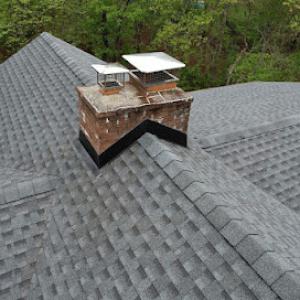
Chimney-related exterior work is unusually prominent in the local contractor market, signaling that flashing and masonry-to-roof transitions are a common homeowner concern. Brickwork absorbs and releases moisture differently than asphalt or tile, and the surrounding roof plane must flex with temperature swings. Worn step-flashing, loose masonry caulking, or deteriorated sealants at the chimney crown provide easy access for wind-driven rain. If you notice loose shingles adjacent to the chimney or damp patches near the chimney base after storms, the culprit is often the chimney flashing or crown integrity rather than the shingles themselves.
Start with a visual walk along the chimney footprint and skylight edges after significant storms, looking for gaps, bubbling sealant, or dark streaks that signal moisture intrusion. Listen for small leaks during light rain-sometimes the first sign is a damp attic corner or a faint drip into a hidden joist bay. If you see frost patterns in cold snaps around flashing, that's an ice dam warning that should be addressed promptly to prevent larger roof failure. Prioritize flashing reseals and crown maintenance before interior damage escalates.
Find contractors experienced in skylight installation, flashing, and leak repairs to bring natural light into your home.
Done Right Roofing & Chimneys
(888) 909-3505 www.donerightroofingandchimneys.com
Riverhead, New York
5.0 from 37 reviews
Done Right Roofing & Chimney
(888) 796-2557 www.donerightroofingandchimneyinc.com
Riverhead, New York
5.0 from 29 reviews
Payless Roofing & Gutters
(631) 729-8570 www.paylessroofingandgutters.com
Riverhead, New York
5.0 from 22 reviews
New York's homeowners insurance market generally still offers broad coverage on Long Island, and wind or hail claims are common after storms. In Riverhead, you should expect your carrier to take storm-related questions seriously and to review both the macro storm effects and any pre-existing roof conditions. The process tends to move faster when you can show a clear trail from before the storm to after the event, with honest appraisals of what failed and what held up.
Before a Nor'easter hits, take clear photos of your roof from ground level and, if safe, from a ladder line of sight that shows shingles, flashings, and any existing damage. After the storm, photograph how broad the damage looks, then zoom in on ice dam patterns, displaced shingles, cracked flashing, and gutter overflow. Expect the adjuster to request on-site assessments and contractor estimates. Have a recent maintenance log ready as a contrast to storm damage, since coastal homes commonly show wear that can complicate the claim.
Because storm-related roof damage can overlap with older wear on coastal Long Island roofs, documentation before and after a Nor'easter is especially important when separating covered damage from maintenance issues. If a roof shows pre-existing granule loss, soft spots, or aged underlayment, be prepared for the adjuster to probe whether those elements contributed to the storm impact. A seasoned local contractor who can provide a condition report with dated photos helps the narrative, showing what the storm alone caused versus what the roof already risked from coastal exposure.
An adjuster will verify the extent of damage and may request a scope of repairs with itemized components. Be ready to discuss sequencing: ventilation, ice dam prevention measures, and flashing integrity alongside shingle replacement or panel repair. If there is wind-driven rain or ice dam involvement, ensure the documentation highlights water entry points and attic moisture indicators. Clear, organized records shorten review time and help keep the claim focused on restorative work rather than disputed wear.
Connect with contractors who help homeowners navigate the claims process from damage assessment to final approval.
Safeway Roofing & Siding
(631) 505-1305 www.eastendroofingandsiding.com
Riverhead, New York
5.0 from 58 reviews
C&D Suffolk Siding & Roofing
(516) 253-2338 reliableconstructionguys.com
Riverhead, New York
5.0 from 49 reviews
Done Right Roofing & Chimney
(888) 796-2557 www.donerightroofingandchimneyinc.com
Riverhead, New York
5.0 from 29 reviews
Winter storms and freezing temperatures can slow access and make tear-offs or repairs harder to schedule to completion in Riverhead. Ice buildup, frozen gutters, and frozen ground can delay material deliveries and worker travel, so plan for a window when weather is reliably above freezing and roads are clear. If possible, aim for a stretch when there is a forecast lull between major storms, not right after a Nor'easter that left debris and wind damage behind.
Spring and fall Nor'easters can delay projects and expose open roof areas to wind-driven rain, making weather windows especially important on Long Island. When crews pull off old roofing, wind can lift exposed underlayment in sudden gusts. Schedule tear-offs to avoid peak Nor'easter periods, and have tarps ready to cover exposed sections if a storm shifts in abruptly. Understanding how these storms track helps you coordinate a start date that minimizes rework from wind-driven moisture.
Summer heat and humidity can affect material handling and crew scheduling, so Riverhead homeowners often benefit from planning replacements before peak storm or heat periods. Heat can slow down installations and affect adhesive set times for certain underlayments, while humidity impacts fastener performance. If a replacement must occur in high summer, prepare for longer dry/run cycles and ensure shade or midday breaks for crews.
Before work begins, inspect for any water intrusion that could worsen during a tear-off, and seal attic penetrations to reduce moisture entry. Have a clear path for debris removal and a plan for securing access during potential weather changes. A well-timed start aligns crew availability with expected dry spells, reducing the risk of weather-related delays during a critical phase of the project.
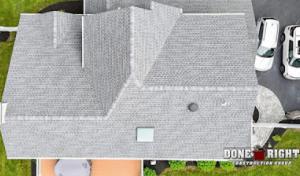
Flat-roof specialization is active in the Riverhead market even though pitched residential roofs dominate, indicating a meaningful share of low-slope sections on additions, porches, mixed-use buildings, or commercial properties. The coastal exposure from Peconic Bay means many low-slope roofs face more wind-driven rain and spray than inland homes. Understanding how moisture moves across a flat surface helps you avoid recurring leaks and rapid wear on edge details and flashing.
Regular rainfall and wind-driven storm water on Long Island make drainage details and membrane condition especially important. On low-slope roofs, check that there is a positive slope toward drainage points and that scuppers or internal drains remain free of debris. The primary concerns are membrane punctures, seam failures, and fastener corrosion where wind can lift edges. In Riverhead, expect seasonal freeze-thaw cycles that stress bonding at laps and penetrations. Look for consistent adhesive performance around penetrations and at terminations, and verify that flashing transitions to vertical surfaces are secure and continuous. A high-quality, properly installed continuous membrane reduces the chance of slow leaks that migrate into attic or ceiling spaces.
Common choices for low-slope roofs in this area include reinforced bitumen and single-pply membranes, with careful attention to surface prep on substrates that might include older layers or structure decks. When replacing a full low-slope section, ensure that the substrate is dry, clean, and structurally sound to support the membrane and any ballast or protective layers. Pay close attention to edge detailing at parapets, wall terminations, and roof-to-wall joints; these are frequent leak pathways after storms. In mixed-use and additions, ensure that transitions from flat to pitched sections are flashed to maintain a continuous weather-tight envelope.
Plan an annual inspection after winter and again before the peak storm season. Look for blisters, punctures, or lifted seams, especially around penetrations such as vents, skylights, and HVAC curbs. Inspect drainage components for clogs and verify that all drains drain freely. On Riverhead roofs, address small issues promptly to prevent rapid degradation under wind-driven rain and freeze-thaw cycles, and consider resealing or re-flashing vulnerable seams in areas with repeated moisture exposure.
Find specialists in TPO, EPDM, and built-up flat roofing systems for residential and commercial properties.
Safeway Roofing & Siding
(631) 505-1305 www.eastendroofingandsiding.com
Riverhead, New York
5.0 from 58 reviews
Done Right Roofing & Chimneys
(888) 909-3505 www.donerightroofingandchimneys.com
Riverhead, New York
5.0 from 37 reviews
Premier Roofing & Siding
(631) 793-9195 premierroofing-siding.com
Riverhead, New York
5.0 from 4 reviews