Last updated: Apr 19, 2026
Patchogue sits on Long Island's South Shore, where coastal storms and nor'easters whip in from the Atlantic and drive wind-blown rain straight at roof edges, flashing, and older penetrations. The salty air accelerates corrosion on metal flashings and fasteners, while steep-slope shingles battle pounding spray during active squalls. In homes with low-slope sections over porches or additions, those transitions become temptation points for water intrusion when the wind shifts or a heavy downpour lasts longer than a few minutes. The risk is not just a sudden drip-it's a creeping leak that follows rafters and travels along decking until it finds a quiet interior path. In practical terms, this means you should treat any wind-driven rain as a weather event that can overwhelm even well-installed roofs if edges and penetrations aren't sealed and maintained.
Claim activity in New York tends to rise after major Northeast storm events, making post-storm photo documentation especially important for Patchogue homeowners. After a storm, take clear photos of roof edges, flashing joints, vent boots, dormers, and intersections where shingles meet flat or low-slope sections. Focus on any displaced or lifted shingles, detached flashing, and signs of moisture around soffits and interior ceilings near exterior walls. Time-stamped images show the sequence of damage and help distinguish pre-existing wear from new leaks, which matters when coordinating with insurance or a contractor. If you notice water stains or damp spots inside within hours of a storm, document them quickly and keep track of the date and the weather that followed. This practice translates to faster triage and tighter repair windows during the coast-to-harbor swing between storms.
Local contractor signals show emergency repair and storm damage work are highly prevalent, indicating leak response is a front-of-mind issue in this market. When a roofer arrives after a storm, expect an emphasis on temporary tarping, quick-seal fixes around flashing, and securing loose shingles to prevent further wind uplift. In Patchogue, busy periods after nor'easters can create backlogs, so recognizing urgent versus non-urgent leaks helps you triage. If a leak appears around a dormer or overhang, or where a low-slope section meets a steeper roof, consider immediate temporary solutions to slow water ingress while arranging a longer-term plan. Keep a close eye on attic entry points during repairs; gaps here can let you know whether temporary fixes hold under the next gusty front.
Inspect the most exposed edges of your roof after storms and look for lifted shingles, torn underlayment, or flashing gaps at valleys, chimneys, and vent penetrations. Seal vulnerable gaps temporarily with exterior-grade sealant if you have access and the weather is stable enough to work safely. Clear clogged gutters and downspouts so water can shed away from eaves rather than pooling over the edge. For any visible damage, photograph and note the location, then call a qualified local roofer with storm-response experience to assess whether a temporary tarping or more permanent patch is needed. If you hear wind-driven rain pounding near a roof edge, treat that as a red flag and prioritize a safety-first triage plan to prevent interior water intrusion.
If multiple edges show lift, flashing seams separate, or if water is actively penetrating into insulation or ceiling spaces, escalate to professional help immediately. Patchogue roofs have a tilt toward rapid weather shifts, and the difference between a quick fix and a longer-term repair often hinges on timely assessment and sturdy temporary protection. A local roofer with storm-repair experience can provide a targeted plan that minimizes further water entry while scheduling a more comprehensive restoration.
Long Island winters bring freeze-thaw cycling that can widen small shingle, flashing, and masonry-related roof defects over time. In Patchogue, that means hairline cracks and hairline gaps may enlarge when water freezes in narrow joints, then expands again as it thaws. Over several seasons, those tiny weaknesses become leaks or wind-driven issues, especially where roofs meet dormers, porches, or low-slope transitions. Knowing this helps you plan a proactive approach: inspect after the coldest spells, and before the spring rain shifts into summer humidity. The goal is to catch small issues before they become bigger problems that complicate replacement or repairs.
Hot, humid summers on Long Island can accelerate asphalt aging and make attic heat and moisture management more important during replacement planning. When the attic runs hot, shingles and underlayment expand and contract more, which can speed wear around edges, valleys, and vent penetrations. A humid summer will push any latent moisture in sheathing or decking toward the interior, increasing the risk of mold or wood rot if ventilation is insufficient. During a replacement window, pay attention to attic ventilation, ridge vent performance, and soffit intake. Adequate exhaust and airflow help maintain a cooler roof deck and reduce the chance of moisture-related swelling after installation.
Replacement timing in this region is commonly pushed toward late spring through early fall because winter snow, spring rain, and summer heat each affect installation conditions differently. In practical terms, plan for dry, moderate days with low wind for shingle or tile work, and aim to avoid peak heat or heavy humidity when possible. If a project must span shoulder seasons, expect a bit more scheduling flexibility for weather delays, and coordinate ventilation measures to minimize attic heat buildup during the work. For patches where low-slope sections meet steep slopes, the cooler parts of spring or fall can be ideal to manage sealants and flashing without stressing the roof deck in high heat.
Shingle aging on our coastfront blocks often begins at roof-to-wall penetrations and along edges where wind-driven spray meets the decking. Look for curling, granule loss, or dark streaks near penetrations like vents, chimneys, and dormers. In additions or porches with a low-slope transition, watch for standing water after rain and for any soft spots in the decking. These are early indicators that a replacement window or targeted repairs are worth prioritizing before a larger project.
After any freeze-thaw cycle, you can do a focused walkabout after a light rain to spot active leaks or moisture trails inside the attic. Check attic vents, soffits, and the ridge line for signs of condensation or inadequate airflow. Inspect flashing around chimneys and dormers from both the attic side (if accessible) and the exterior, looking for loose or puckered metal, lifted sealant, or corrosion. When planning replacement, align the scheduling with seasonal windows that favor dry conditions and manageable temperatures, and ensure the chosen roofing system and underlayment are compatible with Patchogue's coastal humidity and wind exposure.
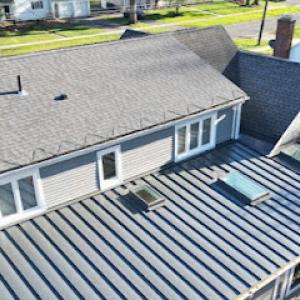
The dominant local material mix includes asphalt shingles, clay tile, concrete tile, slate, EPDM, and PVC, which means Patchogue guides must address both steep-slope and low-slope systems. Asphalt shingles are common on the traditional Cape and ranch styles, while tile and slate show up on older, masonry-backed roofs and on higher-end upgrades. EPDM and PVC appear on flat or near-flat sections-often over additions, porches, or dormers. When a leak appears, the origin isn't always under a visible shingle line; the water can travel along eaves, tie-ins, or low-slope pockets where a single material fails at a seam or edge. Understanding the material family on a given house helps target the weak points quickly, especially when a storm-driven leak is suspected.
Low-slope roof sections are common enough in this market that flat-roof specialization shows up in contractor signals, especially for additions, porch roofs, and mixed-roof homes. On these surfaces, failures tend to cluster around membrane seams, edge detailing, penetrations, and transitions to steeper roofs. In Patchogue, wind-driven rain combined with salt-laden air can lift edge flashing or cause micro-tears in EPDM or PVC membranes. Pay particular attention to perimeter flashing along walls and around skylights or dormers, where flashing may have oxidized or curled under decades of coastal exposure. If a flat or low-slope area is prepped for a retrofit, ensure the contractor verifies compatibility with adjoining steep-slope materials to prevent a new leak path.
Chimney-related work is highly prevalent among local contractors, reflecting how roof-to-masonry intersections are a recurring concern in older Long Island housing stock. The brick or stucco chimney chase often creates a complex junction with the roof planes, where flashing, counter-flashing, and mortar joints can deteriorate. Water can wick from mortar gaps into the underlayment, causing hidden rot or delayed leaks. Expect frequent attention to crown sealer, flashing boots where the stack penetrates the roof, and resealing along the chase. Even a small failure here can produce long, creeping moisture effects that mimic a larger area problem.
Storm-driven leaks are a primary driver of repairs in this area. Coastal swings between humid, salt air summers and brisk, stormy winters mean that fast-moving changes in wind and rain stress the roof assembly differently throughout the year. Schedule preventative checks in late fall and early spring to catch micro-cracks, lifted shingles, or degraded sealants before the next storm season. If a major weather event has passed, a careful post-storm inspection can prevent a small issue from turning into a larger expense.
Inspect around hips, valleys, and transitions where different roof types meet. Look for mismatched sealants on vent pipes and around dormers, and for any staining that trails from chimneys or roof edges. For mixed-material homes, verify that materials with different expansion rates-tile against asphalt, or rubber against metal flashing-are properly integrated. Regularly clear debris from gutters and scuppers to prevent backed-up water, and watch for moss or algae growth on shaded areas that can degrade shingle life or create hidden moisture pockets.
In this market, asphalt shingles typically run about 350 to 800 USD per square, a familiar price range for many Patchogue homes with steep-slope roofs. If the project leans toward higher-end options, slate sits in the 1600 to 3000 USD per square neighborhood. Clay tile and concrete tile land between those two extremes, roughly 900 to 1800 USD per square for clay and 850 to 1600 USD per square for concrete. For low-slope sections over porches or additions, EPDM Rubber Roofing is priced per square foot, about 5 to 8 USD, while PVC Roofing is roughly 6 to 12 USD per square foot. These per-square-foot figures reflect the way long-slope and low-slope sections are often combined on the same project.
Costs in Patchogue can rise when homes combine multiple roof types, such as a main shingle roof with EPDM or PVC over additions or porch sections. That combination changes material orders, flashing details, and installation sequences, and it can also affect waste handling and edge details. When a main roof uses asphalt shingles and a porch or dormer is surfaced with EPDM or PVC, expect the square footage method on the primary roof and a per-square-foot approach for the low-slope portions. Contractors may also price out transitions more carefully to ensure watertight seams in salt-air environments, which can modestly raise overall labor time.
Storm-driven demand spikes on Long Island tighten scheduling and labor availability after major weather events, affecting pricing and replacement timing. When a severe coastal storm hits, crews can be stretched thin, and lead times lengthen for both materials and labor. Plan for possible delays if a late-season storm creates a backlog, and be prepared to adjust start dates by a few days to a few weeks. That reality can influence your material choice and sequencing, especially if you're coordinating multiple roof sections with different slope angles and materials.
Begin by mapping each roof area: main steep-slope shingles, any low-slope porch or addition sections, and any dormers. Get at least two detailed written quotes that itemize materials by section and note transitions between types. Consider color-matched flashing and edging to preserve curb appeal when different materials meet. Confirm that the contractor's plan includes proper ventilation and attic insulation work to support the new roof's performance in coastal humidity. Finally, discuss timing preferences that align with typical Patchogue shoulder seasons to minimize storm-related delays.
Right Angle Roofing & Siding
(631) 849-8988 www.rightangleroofingandsiding.com
448 Medford Ave, Patchogue, New York
5.0 from 893 reviews
We are a fully licensed and insured GAF Master Elite Roofing contractor specializing in the steep roof and low slope applications. We have an A+ rating with BBB, no complaints with the department of consumer affairs, and have the best google rated/reviewed roofing company on long island. With a decade of experience in this industry comes extensive experience and knowledge of homeowner insurance claims and we will facilitate the entire claim process from initiating a claim to meeting with the adjuster, reviewing the claim, finding additional money owed to the homeowner, and facilitating payout... at no charge to our customer!
Ji Roofing & Exteriors Suffolk County
31 W 1st St, Patchogue, New York
5.0 from 107 reviews
We Work On All Types Of Roofs In Long Island. New Roof Install or Repairs. Asphalt Roof, Gutters & Downspouts, Flat Roof, Cedar Wood Roof, Metal Roof, Custom Copper Roof, Slate Roof & Composite Roof. We Are A Locally Owned & Operated Roofing Company That Values Honesty & Integrity & Treats Your Home As If It Were Our Own. We Offer A Variety Of Roofing Contractor Services That Are Customizable To Each Individual Project. You Will Find Us To Be Competitively Priced, On Time & On Budget. We Guarantee Your Satisfaction. All Work Is Licensed And Insured. We Use The Best Roofing Materials Available Including: GAF, CertainTeed, James Hardie, Owens Corning, Leaf Guard. We Serve All of Suffolk County, NY. QX9C+4J Patchogue, New York

Unified Home Remodeling
(631) 612-2510 www.unifiedhomeremodeling.com
298 Medford Ave, Patchogue, New York
4.0 from 40 reviews
OPEN BY APPOINTMENT 7 DAYS A WEEK! Call 888-631-2131 to schedule an Appointment with our Home Remodeling Experts to meet you at this showroom at a time & date that works for you! Unified Home Remodeling’s Patchogue, NY location at 298 Medford Ave serves Patchogue and Suffolk County with exterior upgrades backed by three generations of experience. We deliver windows, doors, roofing, siding, masonry, gutters, decking, insulation, and more—using top brands like Andersen, Owens Corning, CertainTeed, ProVia, and GAF. As a family-owned and BBB A+ rated contractor since 1989, we’ve completed over 350,000 jobs with a 99.6% customer satisfaction rating. Fully licensed, insured, and factory certified, we offer lifetime warranties!
Non Stop Home Improvements
(631) 379-2109 www.nonstophome.com
Serving
5.0 from 26 reviews
Founded in 2004, Non Stop Home Improvements is proud to have provided quality home improvement services to our Long Island neighbors for 20 years. Offering expert roofing and window installation services.
Ready Roof
(631) 766-5656 readyroofli.com
Serving
5.0 from 167 reviews
Ready Roof is a fully licensed and insured roofing company serving Bohemia and all of Long Island, from Nassau to Suffolk County. We specialize in roof repair, roof replacement, flat roof systems, chimney flashing, siding, and gutter installation for both residential and commercial properties. Our team focuses on delivering fast, dependable service with durable, high-quality materials built to handle Long Island’s tough weather. Whether it’s a small leak or a full roof replacement, we make the process smooth, affordable, and stress-free. With a strong commitment to customer satisfaction and workmanship you can rely on, Ready Roof is here to provide the expert roofing solutions your property deserves.
Sav A Roof
Serving
4.9 from 130 reviews
Sav A Roof is here to help you every step of the way with your roofing project. We will work tirelessly to ensure your roof is secure from the elements. Our most basic roof starts with some of the best materials known in the roofing industry, because we wouldn't have it any other way. Unlike other roofing companies we buy our materials in bulk, storing them ourselves in our own warehouses. We do this so that we can pass on those savings to you in the form of premium building materials. We won't compromise by using sub standard roofing materials in any of our projects. It doesn't matter to us the size of your project, from a shed to a condominium complex, we'll treat every customer the same - as if you're family.
Top Notch Roofing
(516) 373-9573 topnotchroofingny.com
Serving
5.0 from 231 reviews
Top Notch Roofing has been a trusted name in the roofing industry since 1998. Serving Long Island NY Over the years, we've built a reputation for excellence in both residential and commercial roofing services. From roof repairs to complete roof replacements, we've got you covered.
Valor Roofing
(631) 602-7071 www.valorli.com
Serving
4.9 from 69 reviews
At Valor Roofing, we’re not just another roof company – we’re a roofing business built on trust, speed, and peace of mind. From roof repair to full roof replacement, our residential roofers handle every detail with service and care. Need emergency roof repair? We’ve got you covered fast. Looking for a new roof? We make the process smooth, from start to finish! As BBB accredited roofing contractors and proud local roofers, we deliver quality without the stress. That’s why homeowners call us when they want an affordable roofing business they can count on.
King Quality Roofing & Siding
(631) 817-4359 www.kingquality.com
Serving
4.9 from 2897 reviews
Since 1990, King Quality’s team of award-winning contractors has been transforming Long Island homes into castles fit for a king or queen. Trust us for expert installation of roofing, siding and windows for your home. Serving Nassau and Suffolk Counties on Long Island, New York, King Quality installs industry-leading roofing, siding and window products to ensure your home looks beautiful and is protected against damage from bad weather. Get peace of mind for a lifetime with exceptional protection provided by quality products backed by lifetime warranties. We also offer low monthly payment options. King Quality's dedication to personalized service will make your experience exceptional. Call 631-573-0642 to schedule a free consultation.
Safeway Roofing & Chimney
(631) 651-1990 www.safewayroofingandchimney.com
Serving
5.0 from 52 reviews
Safeway Roofing and Chimney is a local Family Owned & Operated Long Island Roofing, Siding, Gutter and Chimney Company, and is here to take care of all your Roof Repair, Roof Leak Repair, Skylight Repair, Chimney Repair, Chimney Cleaning, Chimney Liner Installation, Gutter Cleaning and Siding Repair needs. We believe in maintaining the highest standards of quality without ever compromising. We are a full-service, licensed and insured company Serving Long Island, Suffolk County NY and Nassau County NY for over 20 years.
J & J Fernandez Roofing
(631) 984-0094 jjfernandezroofing.com
Serving
5.0 from 18 reviews
J&J Fernandez Roofing is a trusted roofer in Long Island, proudly serving Suffolk and Nassau Counties, including Huntington, Islip, Smithtown, Babylon, Brookhaven, Hempstead, and Oyster Bay. We provide expert roof installation, repair, and replacement, as well as gutter, drip edge, fascia, siding, and deck repair services. With over 15 years of experience, our licensed team delivers high-quality, weather-resistant workmanship homeowners rely on. So, if you’re searching for a roofing company near you that combines reliability, neat finishes, and honest service, J&J Fernandez Roofing is your local choice for durable results built to last.
Triple Crown Exteriors - Roofing & Siding
(631) 682-5572 www.triplecrownext.com
Serving
5.0 from 111 reviews
Triple Crown Exteriors is a roofing, siding, and exterior home improvement company based on Long Island. We specialize in providing high-quality services such as roof repairs and replacements, siding installations, and gutter services. Being known for our attention to detail and customer satisfaction, we ensure durable and aesthetically appealing results to enhance the protection and curb appeal of homes across Long Island.
In this area, roof work isn't handled by a standalone city roofing office; instead, submissions for a full roof replacement travel through the Town of Brookhaven Building Department. That means your project will follow town-wide procedures rather than a Patchogue-specific permit desk. If a contractor claims a permit isn't needed because it's "just a roof," push back and verify through the Brookhaven portal or the building department counter. The process is designed to catch issues before storm-season pressure ramps up, especially when your home has a mix of steep-slope shingles and low-slope sections over porches or additions.
A complete roof replacement generally requires a building permit. The application will expect clear project details-scope of work, roof geometry, and the materials to be installed. The form isn't just bureaucratic red tape; it's a checklist that helps ensure connections between roof lines, attic ventilation, and drainage will perform under Patchogue's coastal climate. If the plan includes venting changes, skylight substitutions, or any structural alterations to support a new roof, those specifics should be spelled out in the permit packet. Missing or vague information can stall review and slow the project's start, which is particularly painful when a late-season storm threatens undertakings around long, humid, salt-air days.
Town review will look for compatibility between the proposed roofing material and existing deck/baffle ventilation, attic insulation, and the home's overall moisture management. For coastal exposure and salt-air conditions, material selection matters because certain options tolerate wind-driven rain and humidity differently. If a dormer, porch roof, or low-slope section is part of the replacement, expect the plan to address flashing details, underlayment transitions, and how these pieces tie into the town's requirements. The final decision hinges on how well the plan coordinates with drainage, ventilation, and the surrounding roofscape, not on aesthetics alone.
Final approval depends on an inspection after the work is completed. Inspections verify that the installed roof matches the permit scope, that flashings are properly integrated, and that the roof's drainage path will function through seasonal weather swings. Turnaround can vary with Brookhaven's workload and how thoroughly the plan review is completed. If inspections lag or issues surface, fixes may extend the timeline and potentially impact scheduling for storm-season readiness. Being prepared with complete, detailed submission up front reduces the chances of delays and helps ensure a smoother path to a weather-tight roof.
When a storm knocks out shingles or leaves the roof vulnerable, insurers in this area often ask for storm-damage documentation that includes date-stamped photos and building department records. That makes permit paperwork especially relevant in Patchogue claims, because the more organized the record-keeping, the smoother the claim process can be. Start by photographing the roof from multiple angles in good light, noting any missing shingles, lifting, or granular loss, and keep these images organized by date. If a dormer or porch roof is involved, capture the transition points where water can travel from a steep slope to a low-slope section. Preserve augments like tarps or temporary covers with time stamps, but avoid delaying essential repairs in hopes of perfect documentation.
Severe-weather claim volume rises after major Northeast storms, so Patchogue homeowners benefit from documenting damage before temporary repairs and before debris is removed. Do not delay initial photos or measurements for fear of seeming to "claim" too soon-insurers appreciate a clear, proactive record that shows when and where damage occurred. If a contractor provides an assessment, request a written summary with dated observations that align with your photo timeline. In a coastal shift, salt-air and humidity can accelerate deterioration in attic spaces or under eaves, so pay attention to hidden signs like damp insulation, rusted flashing, or nail corrosion. Keep receipts for any temporary repairs and note the weather window during which repairs were performed, since insurers may correlate claim timing with storm events and seasonal patterns.
Begin a simple, consistent routine: photograph after every significant wind event, after hail impacts, and after a heavy rain spell that follows a storm. Store images in a cloud album with timestamps and be prepared to share copies quickly with your insurer. If a claim is filed, provide a concise damage map: note color-coded areas-shingles lifted, flashing exposed, edge detaching-so adjusters can visualize the scope without guesswork. Remember that insurance availability can vary by company and region in New York, so Patchogue homeowners may need to compare carrier requirements before replacing an aging roof, ensuring your chosen path aligns with what your insurer expects for documentation and repairs.
Winter ice damming and heavy snow can both strain roofs and delay active replacement work in the Patchogue area. If a project starts in late fall or early winter, plan for intermittent interruptions caused by thaw-freeze cycles and rising meltwater that can back up under shingles. Insulation and ventilation checks should be completed ahead of the coldest weeks, so crews can pivot quickly when a roof is ready for tear-off, while noting that cold snaps can slow adhesive and underlayment work. A tightly weatherproofed vented setup helps prevent hidden ice damming later in the season.
Spring storms on Long Island bring heavy rain and wind that can interrupt tear-off and dry-in schedules. Expect frequent plan shifts as fronts move through coastal lanes, and anticipate mud and soggy access around porches, dormers, and additions. Schedule contingency days for wind advisories and brief hail events that can pause work. Prioritize roof sections most exposed to westerly winds first, so ongoing work can resume quickly between fronts.
Autumn wind events and storms create another seasonal delay risk, which is why many local projects are best targeted for the more stable late spring to early fall window. If an autumn start is necessary, build in buffers for blown debris, shifting temperatures, and potential shingle lift from gusty days. Ensure temporary containment around open edges to minimize storm-driven setbacks and protect any newly installed underlayment from sudden rain.
Coastal weather swings and salt-air exposure can accelerate aging of edges and fasteners. Schedule when mechanical freezes are unlikely and when sea-breeze afternoons are mild, reducing the risk of thermal expansion issues during dry-in. Coordinate with crews to align access paths with predicted weather gaps, especially around additions and low-slope areas over porches.