Last updated: Apr 19, 2026
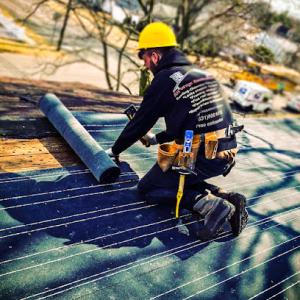
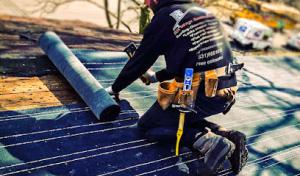
Shirley sits on Long Island's South Shore in Brookhaven, where autumn nor'easters and coastal rain events can expose underlayment and open roof sections to wind-driven moisture during replacement. When you're evaluating tear-off timing, you must map the weather to the roof deck exposure potential. If you pull shingles during a stretch when gusts routinely top 30-40 mph, you're inviting lift, blowing rain under flashing, and accelerating wear on any exposed deck. The practical consequence is a temporary, high-risk window where a leak can start as soon as moisture lands on vulnerable spots. The best approach is to schedule work during calm, dry spells in a stable window, and to plan for rapid tarp and seal readiness in advance of a storm system.
The area's warm humid summers and coastal moisture increase the importance of scheduling tear-offs in stable dry stretches from late spring through fall. In this climate, humidity persists even on warm days, which can slow flashing cure and compromise sealant effectiveness if work sits in a damp environment. You want dry, lower-humidity days with moderate temperatures to keep underlayment and any open sections from absorbing moisture during removal and installation. Avoid peak heat days that can scorch underlayment and flashings, and avoid late-season wet spells when residual coastal moisture can seep behind new layers before they can cure. In practical terms, plan for a multi-day dry window rather than a single perfect day, with contingencies for an early morning start and late afternoon wrap to keep material temperature stable.
Winter freeze-thaw cycles in Shirley can turn minor flashing or shingle defects into active leaks and ice-dam problems before spring. Even a small gap at a vent boot or along a metal edge can become a pathway for meltwater as temperatures swing. If a roof is opened in late fall or left exposed through a thaw, you are courting trouble when temperatures plunge and the water in the attic freezes into expanding ice. The risk multiplies with coastal moisture, which keeps condensation higher and compounds ice-dam formation. The prudent move is to avoid long open exposures once leaves are down and humidity rises, or to secure a robust temporary seal until permanent installation can proceed when the weather is reliably cold-free.
You should monitor local forecasts for sequences of dry days and plan around low-wind forecasts. Before any removal, inspect nearby trees for overhanging branches that could shed debris during a storm and compromise a tarped area. Ensure temporary shields cover exposed roof sections and that flashing-related vulnerabilities are addressed with a temporary seal to minimize moisture intrusion. If a storm is forecast during a replacement window, pause work and secure the site until conditions stabilize. In this coastal climate, timing is not a luxury-it is a first line of defense against costly leaks and recurring repairs.
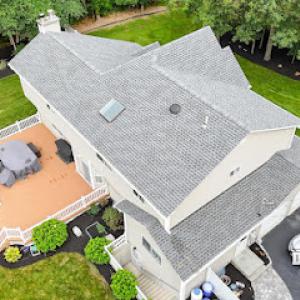
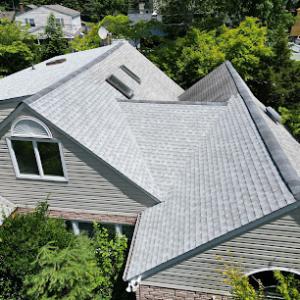
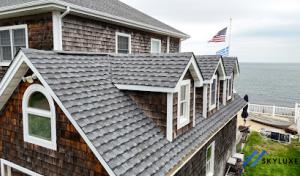
Asphalt shingles dominate Shirley's detached suburban housing stock because they fit the area's common re-roof budgets and are widely used on pitched roofs throughout Brookhaven hamlets. For a homeowner facing coastal humidity and frequent Nor'easter-driven stress, these shingles offer a straightforward path to reliable protection. Look for a 30-year or longer laminate product with good wind resistance and a moisture-resistant underslating. In practice, this means selecting a shingle with a robust warranty and a sealed edge system to minimize wind uplift along the exposed edges of a low- to mid-pitch roof. On a practical schedule, you can time asphalt replacements to lull between seasons with the most predictable temperatures, which helps the adhesive strip seal without heat or cold interfering with the installation. When inspecting, pay attention to flashing around chimneys, vents, and skylights, ensuring the countersinking and sealing materials hold up to salt-air exposure and repeated freeze-thaw cycles.
Metal roofing is relevant in Shirley for homeowners seeking better resistance to wind-driven rain and lower maintenance in a humid coastal environment. If you live on a corner lot or a roof with higher exposure to gusts from the bay-front air, metal can keep gutters and fascia safer during storms. In practice, choose an architectural or heavy-gauge profile with concealed fasteners or corrosion-resistant coatings (galvanized or aluminum) to withstand salt spray. A metal roof benefits from proper attic ventilation and a well-sealed underlayment to manage condensation and ice dam risk in winter. Consider color and surface texture that hide dirt and salt buildup, which helps in a shoreline climate where salt air can accelerate staining. When a decision leans toward metal, plan for a careful installation sequence: confirm roof deck integrity, ensure gutter integration, and verify fastener placement to resist uplift in high-wind events.
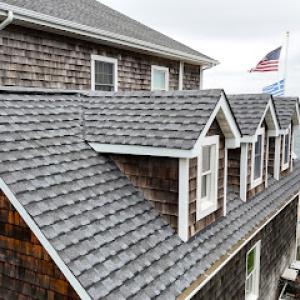
Tile and cedar products appear in the market but require careful structural and moisture planning in a region with snow load, salt air exposure, and repeated wet-dry cycling. Clay and concrete tiles can offer durable, long-lasting aesthetics, but their weight demands a through-check of framing and roof deck strength. In snow-prone periods, ensure the roof can handle the additional load without warping or seam separation, and confirm the underlayment is suitable for freeze-thaw transitions. Salt-laden coastal air can cause faster patina formation on clay and darker surfaces, so consider finishes that resist staining or glaze wearing. Cedar shakes, while attractive, carry higher maintenance needs in humid summers and salty exposure; if you opt for cedar, plan for regular treatment and inspections to prevent rot and insect ingress. If you pursue tile or cedar, work with an installer who explicitly assesses wind uplift, moisture movement, and substrate condition before committing to the switch.
In practice, the decision hinges on the combination of your roof pitch, exposure, and the coastal weather window you expect to encounter. For a typical detached home with a standard pitch, asphalt shingles provide an efficient balance of protection, service life, and ease of replacement during favorable spring or fall windows. If the roof sits on a higher exposure plane or you anticipate extended storm seasons, metal may offer defense against wind-driven rain and easier upkeep. For homes with unshared eyes toward long-term durability and unique aesthetic, tile or cedar can be appropriate, but require a proactive assessment of structure, moisture management, and salt-air effects before proceeding. In all cases, ensure that the roof's edge details, penetrations, and drainage paths are designed to handle Shirley's coastal humidity and freeze-thaw cycles, minimizing the risk of future leaks.
Regardless of material choice, routine inspections after major storms are essential. Coastal humidity can hide subtle leaks that develop into bigger problems during the winter. Pay special attention to flashing around chimneys and dormers, vent penetrations, and the condition of underlayment. Clear debris from gutters and downspouts to prevent water backing up toward the eaves, where salt air can contribute to corrosion or rot. Schedule light-touch maintenance twice a year-one after winter to catch freeze-thaw damage, and another after peak storm season-to catch loose fasteners, sealant degradation, or shingle lifting early. This neighbor-friendly check-in helps keep the roof performing through Shirley's distinctive blend of coastal weather and suburban living.
For asphalt shingles, you're looking at roughly 420 to 800 USD per square. Metal roofs run higher, typically 800 to 1200 per square. Clay tile projects push up to 1400 to 2500 per square, while concrete tile sits around 1200 to 2000 per square. Wood shingles or shakes are commonly 500 to 900 per square, and synthetic or composite shingles sit in the 400 to 800 per square range. These figures reflect the coastal humidity, nor'easters, and freeze-thaw cycles that shape how Shirley homes age and how long a roof lasts.
South Shore weather events drive costs up quickly. After a regional storm, emergency dry-ins and full re-roofs across Brookhaven neighborhoods become in higher demand. That spike shows up in material queues, labor availability, and sometimes expedited disposal needs. If a storm hits, expect bids to shift, and scheduling to compress, which can affect both the price and the window you have to start a project.
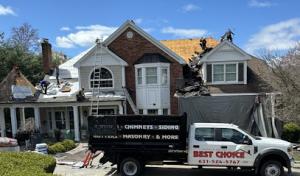
Several local factors apply in Shirley. Tear-off work on older suburban homes tends to be more complex due to existing decking conditions and possible insulation updates. Chimney flashing is a common area needing careful attention, given the proximity to bay breezes and salt exposure. Cleanup and disposal are not just a finish detail; they're a real line item that homeowners in this market consistently value and expect to be included in the contract. The combination of difficult access in some yards, upper-level work over dormers, and the need for detailed flashing around stacks and chimneys all adds to the final price.
The best window for a full replacement often aligns with dry, moderate conditions and sea-salt exposure that can affect installation quality. In practice, that means planning for the late spring to early fall period when frequent nor'easters aren't battering the coast and when crews can move steadily without weather delays. If you're facing an urgent replacement after a storm, expect variation in price based on available crews, which may be tighter than average and reflect the demand in your neighborhood.
Start with a realistic material choice that balances climate resilience and budget. If you want peak durability in this environment, metal or high-grade synthetic options can justify the higher upfront cost with longer service life. For a traditional look and cost control, asphalt remains a solid choice, especially when paired with proper ventilation and a robust underlayment. Always factor in the local expectations for flashing around chimneys and vents, and reserve a line item for cleanup and disposal to avoid surprises when the job wraps.
All Ways construction
(631) 800-1615 allwayconstruction.com
15 Ridge Rd, Shirley, New York
5.0 from 115 reviews
We are a construction company that focuses primarily on roofiing, but we also provide several other services that include framing, restoration, and new construction.
ELED Construction
(631) 552-6884 eledconstruction.com
16 Ridge Rd, Shirley, New York
5.0 from 82 reviews
ELED Construction is a local Family Owned & Operated all over Long Island.This company is inspired & founded by Ledian Halilaj (President) and Elidon Halilaj (Honorary Vice President). We provide the best experience for more than 10 years on Roofing, Siding, Gutter, Chimney,Decks,Doors,Windows,Framing,Flat Roofs, Masonry and is here to take care of all your Roof Repair, Roof Leak Repair, Skylight Repair, Chimney Repair, Chimney Cleaning, Chimney Liner Installation, Gutter Cleaning , Gutter Repair , Deck Repair and Siding Repair needs. We believe in maintaining the highest standards of quality without ever compromising. We are 24 hours / 7 days a full-service, licensed and insured company Serving Long Island, Suffolk County , East Hampton.
Skyluxe Construction
(631) 707-0172 www.skyluxeconstruction.com
26 Merrick Rd, Shirley, New York
5.0 from 56 reviews
SkyLuxe Construction isn’t just a name; it’s a family legacy brought to life in Suffolk County, NY. With decades of exterior renovation experience, our team specializes in roofing, siding, chimney, and gutter solutions – 100% tailored for the everyday homeowner. Each construction project receives personal oversight, combining traditional craftsmanship with modern techniques to meet the high standards our family name stands for.
EM Certified Roofing & Chimney
(631) 633-1381 roofinglongislandny.com
60 Mastic Blvd W, Shirley, New York
4.9 from 98 reviews
Discover superior quality with EM Certified Construction, your trusted Long Island, NY professionals. We offer expert services in roofing, siding, gutter cleaning, skylight installations, and chimney upkeep. Our skilled team carefully executes each service, delivering high-grade solutions to protect and enhance your home. Our dedication to quality craft, exceptional service, and industry best practices sets us apart. From routine maintenance to full-scale renovations, we are your one-stop solution for all your exterior needs. We aim to increase your property's aesthetic appeal and durability, one project at a time. Reach out to us today for a free consultation, and let's work together to bring your home exterior vision to life!
Done Right Roofing & Chimney
(631) 281-3500 www.donerightroofingandchimneyinc.com
574 Montauk Hwy, Shirley, New York
4.8 from 361 reviews
Done Right Roofing and Chimney specializes in residential and commercial Roofing, Chimney, Gutters, Masonry, and Siding installation, replacement, and repairs. Is your Roof Leaking? Don’t delay and call Done Right Roofing and Chimney for expert Roof Leak Repair in Long Island. We stop Roof Leaks, Chimney Leaks, Skylight Leaks, and more. No matter the time of the day you can count on us for any Emergency Roof Repair in Long Island.
LI Prestige Construction
(631) 605-9332 liprestigeroofing.com
1 Kingsland Ave, Shirley, New York
5.0 from 32 reviews
The premiere contractor for all your Roofing, Chimney, Skylight, and Gutter Services.
Quality
(934) 852-0025 www.omegaqualityinc.com
19 Ridge Rd, Shirley, New York
5.0 from 24 reviews
Dreaming of a home exterior that wows? Since 2018, Omega Quality Roofing & Chimney has been transforming Long Island homes and businesses with expert craftsmanship and meticulous attention to detail. More than just a roofing company, they are your partners in creating a beautiful and durable exterior, offering roofing, skylight, siding and gutter services. With over a decade of experience, Omega Quality delivers professional, high-quality results you can depend on. Whether it's a new roof installation, a much-needed repair, or simply a gutter cleaning, trust Omega Quality to elevate your property. Fully licensed and insured for your peace of mind.
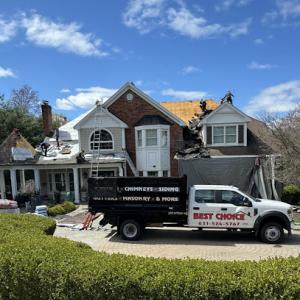
Best Choice Roofing & Chimney
(631) 524-5767 bestchoiceroofingchimneyinc.com
60 Northern Blvd Ste #2, Shirley, New York
4.7 from 97 reviews
We offer all types of Roof, Chimney, Siding, Gutter and Masonry work. We take pride on our workmanship. Our company offers Free in person Estimates and we are happy to help with all of your home projects big or small. We can also help you maintain your property by offering Gutter Cleaning, Chimney Cleaning and Power washing services. Our Services: - Asphalt Shingle Roof Replacement - Cedar Shingle Roof Replacement -Flat Roof Replacement -Metal Roofs -Chimney Leak Repair -Chimney Liner -Chimney Sweep -Chimney Repointing & Waterproofing -Gutter Cleaning, Repair & Replacement -Siding Repair & Replacement -Vinyl Siding - Cedar Siding - Cement Siding , Hardie Board, Hardie Plank - Skylight Repair - Skylight Replacement
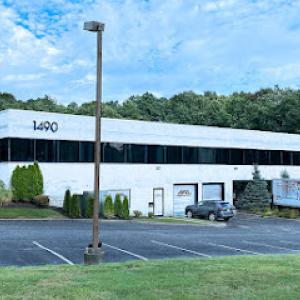
ELI Construction Services
(631) 869-5171 eliconstruction.com
1490 William Floyd Pkwy #109, Shirley, New York
4.7 from 35 reviews
We are a family owned and operated construction company with more than 20 years of experience. We are licensed and insured. And we work in Suffolk and Nassau county.
Payless Roofing & Gutters
(631) 572-7070 www.paylessroofingandgutters.com
Serving
4.9 from 143 reviews
Payless Roofing & Gutters is a Family Owned and Operated Roofing Service Company specializing in Residential and Commercial Roofing, Chimney, Gutters, Skylights, and Siding Services, which includes Roof Repair, Gutter Installation, Skylight Installation, Chimney Repair, and Siding Installation. Payless Roofing & Gutters is available 24/7 for Emergency Roof Repair, which includes Roof Leak Repair, Roof Tarp Installation, and Collapsed Roof Repair.

All Island Pro Roofing & Chimney
(631) 874-6100 www.allislandpro.com
Serving
4.9 from 132 reviews
All Island Pro Roofing and Chimney is a local Family Owned & Operated Long Island Roofing, Siding ,Gutter and Chimney Company, and is here to take care of all your Roof Repair, Roof Leak Repair, Chimney Repair, Chimney Cleaning, Chimney Liner Installation, Gutter Cleaning and Siding Repair needs. We believe in maintaining the highest standards of quality without ever compromising. We are a full-service, licensed and insured company Serving Long Island, Suffolk County NY and Nassau County NY for over 25 years. Let our trained technicians inspect your home to give you the answers.
Supreme Island
(800) 380-6707 supremeislandcorp.com
Serving
4.9 from 80 reviews
Supreme Island is a construction company proudly serving Long Island. We specialize in roofing, chimneys, siding, gutters, and masonry. Visit our website to book a FREE Estimate appointment.
Shirley is governed through the Town of Brookhaven building process rather than a standalone city department, so homeowners should expect town-level permit handling for major roofing work. That means your project will follow the same town rules as nearby homes and schools, and your permit intake, review, and tracking happen through Brookhaven's system rather than a local village office. Expect a clear timeline driven by the town's inspection schedule rather than a private contractor's calendar.
A building permit is required for most full re-roofs in Shirley, and the permit must be posted at the job site during construction. The posted card is not mere formality-it's your daily reminder that crews are under town oversight, and that the work must comply with current codes and approvals. If the posted permit goes missing or is obscured, plans can stall and re-inspection may be demanded, delaying progress during critical weather windows.
Inspections are conducted during the project and again upon completion, making scheduling and contractor coordination important when weather windows are tight. Nor'easter threats and sudden coastal squalls can compress a planned re-roof into a tight series of days, so a well-coordinated crew that aligns with inspection slots matters more than ever. Weather that holds long enough to strip, lay, and seal matters, but it won't excuse missed town inspection checkpoints.
Coordinate upfront with your contractor to align permit filing, inspection appointments, and material deliveries. Have a clear plan for staging, so work areas stay accessible for inspectors without delaying the schedule. If a weather window shifts, promptly communicate with both the contractor and the town inspector to avoid rework or penalties. In Shirley, keeping the permit visible and responsive ensures the project stays on track even when coastal conditions push deadlines.
Storm-driven damage near the bay and the Atlantic hits roofs differently than inland neighborhoods. In this climate, wind-driven shingle lifts, hail bruises, and hidden leaks often emerge only after a few days of humid air and subsequent rain. Adjusters familiar with Long Island weather will look for patterns across the roof, attic, and ceilings, and they may scrutinize whether existing wear lines up with the storm event. The combination of nor'easters and freeze-thaw cycles can complicate how a claim is evaluated, especially on older roofs.
In New York, Shirley homeowners may be asked by carriers for roof age records, photos, and contractor estimates when filing claims tied to wind or hail events. To avoid delays, assemble a straightforward: roof age documentation, clear before-and-after photos, and a simple notes log of where damage appeared first and how it progressed. The more you can show, the less room there is for back-and-forth decisions. If a contractor has already inspected, include their professional assessment and any recommendations for temporary protection or repairs. Coordinating these items promptly helps the claim move through the system faster.
Because coastal storms and nor'easters are closely watched on Long Island, adjusters may require thorough inspections and may apply depreciation or other claim adjustments to older roofs. Do not assume a single rush inspection captures all trouble; humidity can mask leaks that worsen with follow-on rain. Ask for a second look if new water intrusion appears after the initial assessment. Be prepared to document attic conditions, signs of moisture staining, and any mold concerns that could influence the scope of repairs.
Protective measures matter. Cover exposed areas to limit additional water intrusion, and keep a dated record of any temporary tarping or repairs. Contact your insurer promptly to start the claim, but avoid making permanent repairs before the adjuster inspects unless safety requires it. When the adjuster arrives, present the organized file of photos, roof age information, and contractor input to support a clear, thorough evaluation. If depreciation or other adjustments surface, request a detailed explanation and, if needed, an independent estimator to verify the assessment.
Connect with contractors who help homeowners navigate the claims process from damage assessment to final approval.
EM Certified Roofing & Chimney
(631) 633-1381 roofinglongislandny.com
60 Mastic Blvd W, Shirley, New York
4.9 from 98 reviews


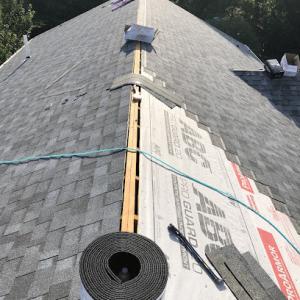
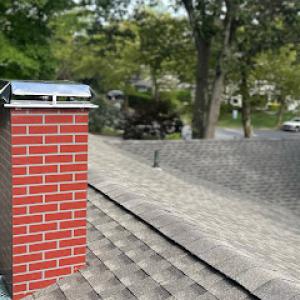
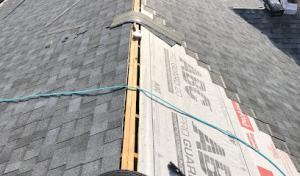
Chimneys are a frequent leak source in this market, mirroring the prevalence of chimney services among local contractors and the older detached-home stock found across Shirley. The most common failure is flashing where the chimney meets the roof, especially after freeze-thaw cycles and wind-driven rains. Look for dark staining along interior ceilings near the chimney line after a heavy rain. On the roof, signs include cracked or lifting flashing, rusted or missing step and counter-flashing, and cement or mortar joints that have spalled. A practical rule is to inspect the chimney chase during dry days and check for hairline cracks in the concrete or brick around the base. Seasonal attention to the flashing seam, booting at vent pipes nearby, and the presence of leafy debris can prevent minor leaks from becoming attic floods.
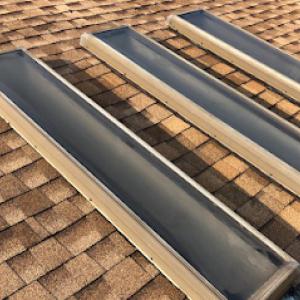
Skylight service is a meaningful local specialty, with recurring leak and flashing issues around penetrations rather than only field-shingle failures. Inspect skylight flashing with the same eye you use for chimneys: look for loose or deteriorated metal, sealant gaps, and failed curb flashing where the skylight sits on the roof. In Shirley's coastal climate, sun exposure accelerates sealant drying, so notice dried or cracked putty and degraded glazing around the frame. If you see condensation between panes, that can signal a seal failure that often accompanies flashing problems at the perimeter. When diagnosing leaks, trace water marks to the skylight perimeter rather than simply following the indoor stain; the path of leakage is frequently lateral before it travels downward.
In freeze-thaw winters and wind-driven rain events, flashing at chimneys, skylights, and roof-wall transitions often becomes the first place homeowners notice interior staining. Schedule targeted inspections ahead of the winter cycle and after major storms to catch minor flashing failures before interior damage develops. Regular maintenance, including resealing joints and replacing deteriorated metal flashing, saves more extensive repairs down the line. For homes with multiple penetrations, create a maintenance map noting the age and material of each flashing system to prioritize replacements during cooperative weather windows.
Find contractors experienced in skylight installation, flashing, and leak repairs to bring natural light into your home.
All Ways construction
(631) 800-1615 allwayconstruction.com
15 Ridge Rd, Shirley, New York
5.0 from 115 reviews
ELED Construction
(631) 552-6884 eledconstruction.com
16 Ridge Rd, Shirley, New York
5.0 from 82 reviews
Skyluxe Construction
(631) 707-0172 www.skyluxeconstruction.com
26 Merrick Rd, Shirley, New York
5.0 from 56 reviews
While pitched roofs dominate the area, a real signal for flat-roof work comes from porches, extensions, garages, and low-slope rear additions common in suburban Long Island housing. In Shirley, these low-slope sections are especially vulnerable when spring storms or autumn nor'easters push water sideways under aging edge details and seams. Understanding how these pieces fit with the main roof helps prevent leaks that can sneak in quietly, even when the visible roof still looks sound.
Mixed-roof homes in this community often require replacement planning that treats the main shingle roof and the low-slope sections as separate systems. The shingle roof typically carries a different lifespan than a flat or low-slope area, and leak risks shift accordingly. A single, uniform replacement plan can overlook vulnerable edge details, roll flashing, or penetrations unique to low-slope surfaces. When assessing a project, map out each area: the primary roof, the low-slope porch or garage roof, and any transitions between the two. Prioritize addressing flashing transitions, seams, and edge details where water tends to collect or migrate.
Flat and low-slope roofs commonly use membranes or modified-bitumen systems, which behave differently from asphalt shingles in weather-facing roles. Pay close attention to edge details along parapets, dormer penetrations, and transitions to the main roof. In Shirley's coastal climate, proper drainage is critical: a flat section needs clean, reliable snowshed and a slight, consistent pitch to promote shedding, with internal drains or scuppers checked for debris. Edge metal, counter-flashing, and seams should be inspected for sealant degradation after winter cycles and storm events. If a low-slope surface shows signs of existing blistering, seam separation, or ponding, treatment should focus on both surface integrity and the underlying substrate.
Spring storms test shoulder-season performance most severely, when winds push moisture toward vulnerable edges and corners. A targeted inspection after major rain events should verify that edge details remained intact over winter, that flashing around parapets is watertight, and that any penetrations through the low-slope plane-the vent stacks, skylights, or heater lines-are properly sealed. Because these areas are more prone to leakage than the main roof, schedule timely checks rather than waiting for a single large issue to emerge. Timely maintenance preserves the overall system health and reduces the likelihood of cascading leaks through the roofline.
Find specialists in TPO, EPDM, and built-up flat roofing systems for residential and commercial properties.
All Ways construction
(631) 800-1615 allwayconstruction.com
15 Ridge Rd, Shirley, New York
5.0 from 115 reviews
ELED Construction
(631) 552-6884 eledconstruction.com
16 Ridge Rd, Shirley, New York
5.0 from 82 reviews
Best Choice Roofing & Chimney
(631) 524-5767 bestchoiceroofingchimneyinc.com
60 Northern Blvd Ste #2, Shirley, New York
4.7 from 97 reviews
The local market strongly favors re-roofing specialists over new-construction roofers, reflecting the mature housing stock and replacement-heavy demand in Shirley. When you start, look for firms that focus on full roof replacements rather than quick patch responses. A contractor with a steady stream of completed overlays and tear-offs signals familiarity with the nuances of coastal humidity, freeze-thaw cycles, and Nor'easter stress. Ask for recent projects in similar housing stock and a clear project timeline.
Quick response and cleanup are standout hiring priorities here, aligning with a market where emergency leak calls and occupied-home tear-offs are common. Your first contact should yield a concrete plan for a same-week assessment after a storm, with a firmed-up arrival window and a written cleanup protocol. Insist on daily debris containment and a tarp plan for any staging area. A reputable crew will cover landscaping, vents, and come down-hard on wind-proofing the temporary setup to avoid shingle loss during high coastal winds.
Long-established, family-owned, licensed, and insured firms have visible traction locally, indicating homeowners here value reliability and site management as much as price. Prefer builders who can demonstrate a clear chain-of-command, a detailed site supervisor on the job, and a staffed cleanup crew at the end of each day. Check references from neighbors with similar homes and review any post-storm reviews that mention punctuality and workmanship quality.
Create a short list of three to five bidders who provide in-person, David-verified assessments, a written scope of work, and a fixed start date. Confirm materials compatibility with coastal humidity and the local climate, and verify the plan for weather windows to avoid repeated exposure of interior spaces. Ensure the contract specifies tarping, debris disposal, and a guaranteed seam and leak-detect phase after installation.