Last updated: Apr 19, 2026
Rhode Island Nor'easters and tropical-storm remnants bring wind-driven rain and heavy snow loads that turn minor roof weaknesses into active leaks in Kent County communities like West Warwick. This place endures rapid shifts from dry sun to driving squalls, and that volatility means every home-especially the older ones with aging decking-needs a plan that treats a small leak as a potential flood path. The goal is to recognize the first warning signs and act fast, before water finds an interior route through rotted sheathing, compromised underlayment, or a tired flashing line around chimneys and vents.
In this town, the storm cycle often starts with gusts that lift loose shingles or flashings, then drops heavy rain that saturates compromised zones. After a Nor'easter, spray from wind-driven rain can blow sideways into roof joints that aren't fully sealed, while snow loads stress rafters and decking beyond their design. Repeated repairs, aging decking, and prior layer-overs common on aging stock create a maze for leak tracing. The result is that a seemingly modest attic drip can become a full-speed leak along a ceiling line, sometimes tracing a path across multiple rooms before a homeowner realizes it's more than a single bad shingle.
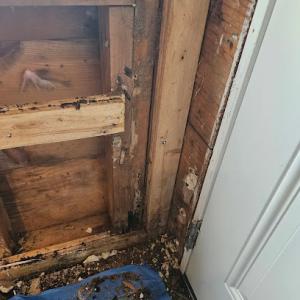
Older homes in this area often carry a history of quick fixes that didn't fully restore the roof's integrity. Repeated repairs can create hidden weak points-barJoins in valleys, marginal roof-to-wall transitions, damaged step flashing, and degraded sealants around penetrations. Prior layer-overs can obscure rot and moisture traps, and decking aging means a leak after a storm can progress faster than expected. This combination makes leak tracing a two-step challenge: identify the immediate active leak and map a path back to the root weakness, which is frequently not obvious from the attic alone.
First, assess quickly for active ingress. Look for new stains, bubbled paint, damp insulation, and ceiling sagging near exterior walls or under dormers. If you identify active water, place a tarp over the affected area to minimize further intrusion while a plan is formed. Safety first: avoid walking on damaged decking and keep children and pets away from flooded zones. If you cannot locate the source, focus on protecting interior valuables with plastic sheeting and plastic drops to limit secondary damage. Time is of the essence; a 24-to-48-hour window can determine whether structural damage remains manageable or escalates.
For rapid response, secure a heavy-duty tarp and anchor it to solid roof sections beyond the problem area. Use roofing nails or screws with a large metal flange to minimize wind uplift, and seal edges with exterior tape designed for tarps. Reinforce corners with boards if wind gusts threaten the tarp, and ensure the tarp extends well past the leak's apparent footprint to block rain from spreading behind failed flashing or soffits. Keep your attention on the most vulnerable zones first: valleys, chimney bases, and dormer connections.
Once the interior leak is under control, begin careful tracing. Start at the interior ceiling and follow the water path toward the exterior, noting all penetrations and spots where roofing material shows signs of wear. Inspect protrusions-vents, chimneys, skylights-and the flashing along the roof-to-wall transition. In older homes, the culprit is frequently a combination of several compromised points rather than a single failed shingle. Document every area with photos and measurements to speed up the next steps.
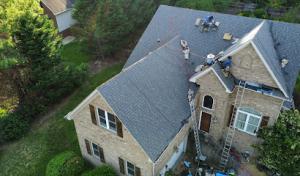
A storm-damaged roof in this market often demands emergency repair and storm-damage response. If water continues to enter after tarping, or if you notice structural compromise, rapid tarping and leak control should be your priority while scheduling a post-storm assessment with a local contractor who specializes in storm-damage work. The aim is to stop the ingress now and set a clear plan for reparation, so interior damage doesn't compound and the roof can be stabilized before another system stress from the next Nor'easter rolls in.
Classic Metal Roofs
(401) 821-0024 classicmetalroofs.com
88 W Warwick Ave, West Warwick, Rhode Island
4.9 from 24 reviews
Classic Metal Roofs is a premier roofing contractor in 88 West Warwick Ave, specializing in standing seam metal roofs, metal shingle roofs, and aluminum metal roofing installations across Rhode Island and New England. With three generations of expertise in construction, we deliver durable, energy-efficient, and aesthetically appealing roofing solutions, including copper roofs. Our metal roof panels and systems, crafted from top-quality materials, withstand harsh weather and reduce energy costs by up to 25%. As your reliable metal roof contractor, we prioritize sustainability, offering cutting-edge designs and personalized service to enhance your property's curb appeal and resilience.
TKO Builders
(401) 300-7360 www.tkobuildersllc.com
Serving
5.0 from 13 reviews
At TKO Builders, LLC, we bring over 20 years of experience to your roofing, remodeling, framing, and home building projects in Warwick, RI, and surrounding areas including Connecticut and Massachusetts. Owned and operated by Justin Turner, we prioritize friendly and honest customer service, ensuring clear communication and a transparent pricing process. We're dedicated to exceeding your expectations by transforming your vision into a reality, using top-quality materials and skilled craftsmanship. Contact TKO Builders today for your free consultation!

Roch Brothers
Serving
5.0 from 19 reviews
Roch Brothers delivers premium roofing backed by a Rhode Island family name trusted since 1954. We bring pride, precision, and honest craftsmanship to every project—whether it’s a full roof replacement, shingle installation, repair, leak diagnostic, or storm-related roof assessment. Homeowners trust our clean workmanship, clear communication, and roofs built to withstand New England weather. Our siding and gutter services add long-term protection and curb appeal. Fully licensed and insured. Free estimates.
RTP Roofing
Serving
5.0 from 196 reviews
Established in 2006, RTP Roofing is a well-established, trusted roofing contractor serving the Rhode Island community. RTP Roofing is committed to delivering top-quality services, specializing in residential and commercial roofing. Whether fixing a leak, installing a new roof, or replacing an existing one, RTP Roofing has the expertise to handle all your roofing needs. Our roofing company also offers comprehensive siding and gutter installation services, ensuring that your property has a sturdy roof and boasts impeccable exterior features. With a focus on precision and customer satisfaction, RTP Roofing is the go-to choice for all your roofing and exterior improvement projects.

United Home Experts of Rhode Island
(401) 593-0101 unitedhomeexperts.com
Serving
5.0 from 44 reviews
We are an exterior home and building improvement company, grounded by great people that love the craft. Our niche is long-term, low-maintenance roofing, siding, windows, doors and painting solutions. We’re changing the face and reputation of the home improvement industry by uniting top quality products, 25+ years of experience on New England homes, innovative technology and some of the most talented and kind people on earth. Based in Ashland, MA, and founded in 1998, we are family owned and professionally operated, servicing Massachusetts, Rhode Island, Northern Connecticut and Southern New Hampshire. Our passion is creating a company people love to work for and customers are proud to refer.
Roofing Concepts
(401) 885-5800 www.roofingconcepts.com
Serving
4.4 from 14 reviews
Since our founding in 1982, Roofing Concepts has been committed to providing high quality roofing and sheet metal installations to a vast array of commercial, industrial, institutional and residential property owners. Our dedicated staff of estimators, superintendents, roofers & sheet metal workers combined with our dedicated ownership team, modern equipment & modern office/warehouse facilities allows us to efficiently estimate, coordinate and execute an array of roofing and sheet metal projects from simple to complex. Serving Rhode Island ( RI ), Massachusetts ( MA ) and Connecticut ( CT ), we offer top quality roofing and sheet metal installations at a competitive price. We invite you to take a moment to browse our site and learn about...
Rhode Island Remodeling
Serving
5.0 from 177 reviews
Rhode Island Remodeling has been a trusted name in home improvement services in Rhode Island since 1988. We are a family-owned and operated business that takes pride in delivering high-quality workmanship and exceptional customer service on every project. We are pleased to serve the entire state of Rhode Island.
Paramount Roofing Solutions
Serving
5.0 from 20 reviews
Paramount Roofing Solutions is the trusted roofing contractor serving Warwick, RI, with a commitment to delivering high-quality roofing services for residential and commercial properties. Whether you're in need of a new roof installation, roof replacement, or expert roof repair, our team has you covered. We specialize in a variety of roofing options, including durable metal roofing, classic asphalt shingle roofing, and energy-efficient commercial TPO roofing. We also offer top-notch services for new construction roofing projects and flat roofing systems. With years of experience and a dedication to customer satisfaction, Paramount Roofing Solutions ensures your roof is built to last, protecting your property from the elements.
Erie Home
Serving
4.7 from 110 reviews
Since 1976, Erie Home has manufactured, supplied, and installed the best-performing roofing on the market. By providing ironclad warranties and convenient financing, we ensure that every homeowner we work with receives top quality service and value for their homes and properties. Erie Home professionals are the roofing company of choice in the greater Providence, RI area. Whether you need roof inspections or roof damage repair services, Erie Home has been the go-to roofing contractor for nearly 50 years because of our attention to detail and dedication to making sure our customers are satisfied with their results. Contact us today for a quote and see why we're the trusted roofing company Providence counts on.
Couto Construction
(401) 420-7248 coutoconstruction.com
Serving
4.9 from 400 reviews
Couto Construction is the most-trusted home exterior renovation serving Warwick, Rhode Island and surrounding areas since 1987. A family-run business they are a one-stop shop for all your home's exterior needs, specializing in roof replacement and repair, siding, windows, doors, gutters, and attic insulation. Their team of certified contractors brings decades of expertise ensuring top-quality results that last. They use only the best materials and back their work with a peace-of-mind 50-year warranty. Get a free inspection and estimate and Couto Construction will work closely with you to understand your needs and budget, ensuring a smooth and stress-free home exterior remodeling experience.
Rinaldi Brothers Roofing
(401) 219-9548 www.rinaldiroofingri.com
Serving
4.9 from 544 reviews
Rinaldi Roofing was founded by twin brothers Matt and Nick Rinaldi. With Nick’s business background and Matt’s construction knowledge, they are a force in the roofing & siding space. They take a family-first approach and are laser-focused on customer experience. Often referred to as "the roofers for the people", Rinaldi Roofing is the #1 roofing expert and fastest growing exterior remodeling company in the state of Rhode Island. They implement an innovative approach and uphold "old school" values.
Winter in the river valley brings cold snaps, heavy snow, and frequent Nor'easter storms that leave roofs damp and shaded for longer spells. Older homes in this area often sit on modest attics with marginal ventilation, which means ice backup and freeze-thaw edge damage can become practical problems even before a full-on roof failure. The combination of prolonged dampness and restricted airflow creates a pattern where ice dams form at the eaves and water migrates under shingles, risking flashing corners and interior leaks when storms hit back-to-back.
When a full re-roof is on the horizon, ventilation performance shifts from a comfort feature to a critical component of proper function. Town inspections for full re-routes specifically verify installation and venting, so it is essential to treat attic ventilation as part of the roof system, not an afterthought. If existing soffit intakes are blocked by insulation or debris, or if the attic lacks a balanced pair of intake and exhaust vents, air can stagnate and heat can contribute to ice dams. Plan for a balanced, continuous venting path that brings in cool air at the soffits and exhausts heat and moisture at the ridge or high vents. This is especially important for homes perched along river corridors where shade slows drying after snow and rain.
Cold winters and dense shade from surrounding trees in the Pawtuxet Valley slow moisture escape. That means dampness lingers on the roof surface longer after a storm, increasing the reliance on a well-sealed underlayment and robust flashing at eaves, valleys, and chimney details. Start with a thorough attic inspection: verify that insulation depth is sufficient to keep deck temperatures steady and prevent rapid surface condensation. Check for gaps around plumbing vents, electrical penetrations, and exhaust ducts that could funnel moisture into the roof decking. If insulation is uneven or compressed near eave lines, the risk of ice backup rises because warm attic air can raise the sheathing temperature, promoting melt-refreeze cycles at the edge.
During a planned replacement or retrofit, insist on a continuous ventilation strategy that pairs intake and exhaust. In practice, this means clear soffit vents, strategically placed baffles to maintain uninterrupted airflow to the ridge, and ridge or high-profile exhaust vents that avoid blockage from snow buildup. Pair this with high-quality underlayment that resists ice damming and provides a reliable moisture barrier, especially along eaves and protrusions. Flashing should be doubled at corners, valleys, chimneys, and any roof-to-wall transitions where freeze-thaw movement is most pronounced. For river-valley homes with shaded, damp facades, consider asphalt or metal options that offer strong underlayment compatibility and durable edge details, ensuring the system dries promptly after storms rather than lingering dampness.
As soon as a leak is suspected, act quickly. Promptly remove any standing moisture, dry the area, and inspect the valley intersections and flashing for damage. In prolonged damp spells, a cautious, lower-profile check after a snowfall can prevent creeping leaks: a small ice dam can extend along roof edges before a larger problem becomes visible inside the attic. For aging homes with marginal ventilation, annual or biannual checks of vent openings, insulation seating, and flashing integrity pay dividends in half-days of repair rather than days of disruption during a major storm. Keeping the roof's edge detail well-sealed and the attic well-ventilated is the best defense against the twin challenges of ice backup and slow drying in this valley-influenced climate.
Asphalt shingles remain the practical baseline for most homes in the area. They align with the common residential re-roof market here and are typically the most straightforward choice when quick response is needed after a storm. In dense, village-style neighborhoods along the Pawtuxet River, many older houses were originally built with or retrofitted to 3-tab or laminated asphalt, so matching profiles and color schemes is often simpler. The familiar installation process, plus broad availability of local crews, helps you secure timely repairs or replacements after Nor'easters bring wind-driven rain and ice. If a rapid, predictable remedy is the priority, asphalt shingles usually present the most reliable balance of performance, availability of skilled local labor, and ease of maintenance.
Metal roofing stands out for snow-shedding performance, a critical factor when Nor'easters dump heavy snow and sleet. In this market, contractor specialization in metal is unusually active, so you can often find crews who handle rapid leak fixes and efficient installations with careful detailing for ridges and flashing. Metal surfaces shed snow more predictably, reducing the risk of ice dam buildup along eaves and in valleys-an important consideration for older homes with variable attic ventilation and deck integrity. If you anticipate harsh winter conditions and want a system that can tolerate repeated freeze-thaw cycles, metal can offer longer service life with fewer mid-winter leak scares. That said, the structural check is essential: ensure the roof framing and decking can support metal panels' weight and the underlayment is suitable for the chosen profile.
Tile and cedar-style options exist in the local market, but their weight and detailing demand closer scrutiny on older structures. Clay and concrete tiles demand substantial roof framing-often incompatible with aging decking without reinforcement-and cedar shakes can complicate leak detection because grain patterns and natural material expansion respond to moisture differently than synthetic alternatives. If choosing tile or cedar in a village context, plan for a thorough structural assessment, including decking condition, attic insulation, and rafter spacing. Repair work tends to be more intricate and can require specialized crews for delicate flashing, ridges, and penetrations around chimneys and skylights. For homes with long-standing roof lines and multiple roof pitches, these choices can deliver distinctive curb appeal, but only when the underlying structure is confirmed to handle the weight and higher maintenance needs.
In homes with decades of history, storm-driven leaks often reveal themselves at flashing points, valleys, and along eaves where ice dams form. Regardless of material, prioritize a proactive approach: keep gutters clear, inspect flashing after heavy storms, and address shingles or panels that show lift or curling promptly. Local crews understand the typical problem spots-where chimneys meet the roof, around dormers, and at valley intersections-and can respond quickly with targeted sealant or patching. For older houses, schedule a periodic, light maintenance cycle in the shoulder seasons to catch small issues before a big Nor'easter arrives. A well-informed homeowner can save time and minimize interior damage by coordinating with a trusted local contractor who can provide rapid temporary fixes and a solid plan for a full re-roof when needed.
Local work tends to run best from late spring through early fall. Winter snow, spring rain, and fall wind events can disrupt tearing-off and dry-in timing, so planning ahead for the shoulder seasons helps you avoid delays and extra cold-weather challenges. When a Nor'easter threatens or a strong wind event hits, crews may shift to urgent repairs, which can push schedules and pricing. If your roof is slated for a full tear-off, aim for a window with mild, dry days to keep the work on track and minimize tarps and rework.
For asphalt shingles, expect West Warwick costs in a broad range from 350 to 750 USD per square. Metal roofing generally sits higher, from 700 to 1300 per square. If clay or concrete tile is in the plan, costs commonly run 1000 to 2600 per square for clay and 900 to 2100 for concrete. Wood shingles or shakes typically land around 600 to 1200 per square, while synthetic or composite shingles fall between 450 and 900 per square. These figures reflect local material markets and labor, which rise when storm demand surges after regional wind events.
Storm-driven demand can tighten scheduling and push prices up, especially after a severe wind event that reveals damaged decking during tear-off. If older roofs show compromised decking, more labor and material coordination are required, which can elevate both timeframes and costs. Additionally, features like skylights, penetrations, or complex flashing add labor and permit-related coordination, nudging prices higher. Plan a contingency in both your budget and your calendar for potential weather-driven delays and extra work.
Start with a mid-spring inspection to identify damaged decking or hidden leaks before peak season. Gather two to three local bids to compare scheduling windows and response times, then pin down a target tear-off date with a firm contingency for weather. If you already see storm threats on the forecast, arrange temporary repairs or a quick leak stop to buy time without sacrificing overall project timing. Keep a running list of upgrades (skylights, new penetrations, improved ventilation) to establish a realistic final price, since these add labor and coordination.
Get a clear picture of your project costs upfront - no commitment required.


You'll find that in this town, a full re-roof isn't just a matter of picking shingles and a good ladder. In West Warwick, full re-roofs generally require a building permit through the town Building Department whether the applicant is the contractor or the homeowner. The permit process exists for a reason: it helps ensure the roof system is designed and installed to handle the area's Nor'easter-driven mix of snow, ice, wind, and rain. Getting this right the first time reduces the risk of leaks that can cascade through an aging interior, especially in dense village-style neighborhoods where neighboring homes share similar vulnerabilities.
Applications are not just a formality; they tie into the structural and ventilation checks that matter on older homes. When you file, expect review of roof deck attachment, soffit and ridge venting, attic ventilation, and drip edge details. The town's focus isn't on paperwork for its own sake, but on proper installation and venting. If the project changes mid-course-say a larger area is removed or a skylight is added-the permit may need adjustment. Planning ahead avoids delays and rework that can stretch into the cold season when storms loom.
Inspections in this area are scheduled during and after installation. The inspector will verify that flashing around chimneys, vent stacks, and skylights is sound, that roof penetrations are properly sealed, and that ventilation paths are not blocked. In homes with multiple roof lines or complex valleys, expect closer scrutiny of how the components meet code and how they perform under simulated moisture loads. The goal is to catch deficiencies before drywall goes back up or trims are sealed, which saves the homeowner from costly rework and the temptation to cut corners.
If the project alters the structure or adds new penetrations, additional permits may be needed. Skylights, roof vents, or changes to chimney flashings can shift the approval sequence. Keep the contractor aware that unexpected additions might trigger new inspections and revised timelines. In this town, scope changes aren't cosmetic paperwork; they influence structural integrity and long-term performance against the next Nor'easter.
Older homes often have aging decking, rusted flashing, and winding eaves where ice damming begins. Start with a clear plan that aligns with the permit path and the inspection schedule. Your local Building Department appreciates proactive communication about any changes and, in turn, helps you avoid delays that leave you exposed to winter leaks while awaiting approvals.
Storm-driven damage in this neighborhood mix often centers on wind and hail, not just aging roofs. Nor'easters and tropical storms leave a wake of shingle lift, missing granules, and dented or torn edges that can masquerade as wear. When a claim is filed, adjusters know the landscape: an older roof may show preexisting wear, but a sudden wind gust or hail strike can be the catalyst for a larger loss. Documented wind events, hail paths, and localization of impact are key to establishing a storm-created condition rather than routine deterioration.
Insurers typically request thorough documentation, so start with a clear, dated inventory of visible damage. Take wide photos of the roof, then close-ups of damaged shingles, flashing, and potential gutter impacts. Save weather reports and any incident notes from the day of the event. For older homes, include photos of decking if accessible and evidence of prior repairs or patchwork. Before any tear-off, a contractor should provide written notes describing the nature of the damage, the suspected cause (storm vs. wear), and a proposed sequence for evaluation. Provide this to the adjuster to support a storm-related claim.
For aging decks, inspectors may request decking information and records of prior repairs, so ensure those files are ready. If tests are done-such as moisture readings behind peeling shingles or around penetrations-document the results and timestamp the provider. Photo documentation and contractor notes gain weight when they clearly connect damage to a recent storm event rather than long-term deterioration. Communicate openly with the adjuster about any gaps in records and offer to provide copies of contractor field notes promptly to keep the claim moving.
Connect with contractors who help homeowners navigate the claims process from damage assessment to final approval.
Flat and low-slope roofing is an active specialty in this contractor scene, reflecting porches, additions, mixed-use buildings, and commercial structures that demand different drainage and membrane detailing than steep-slope homes. When inspecting a property with a low-slope section, focus on edge details where flashing meets parapets, transitions to steep-roof areas, and any membrane seams near vents or condensate lines. Ice, snow melt, and wind can push water laterally across a deck or porch roof, so inspect for fishmouths, punctures, or lifted edges after storms. If you see dark streaks or damp plywood around a low-slope outlet, it's a signal to test for delamination and membrane wear before rain returns.
Skylight penetrations are a notably active local specialty, aligning with permit notes that new skylight penetrations can trigger added approvals and inspection attention. When a skylight sits atop a lower roof or sits where a low-slope section meets a steeper roof, leaks often start at the flashing pan, curb, or surrounding boot. In heavy rain or after snow melt, check the perimeter sealant and sealant bead for cracking, shrinkage, or missing caulk. Replace aged seals promptly and verify that the skylight's drainage path clears debris regularly to prevent water backing up onto the curb.
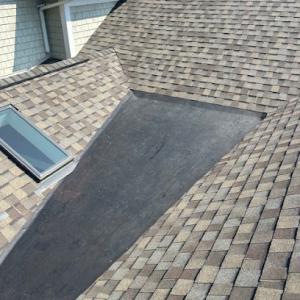
On older roofs, transitions between steep roofs, low-slope sections, chimneys, and skylights are common leak points after heavy rain, snow melt, and wind-driven weather. Examine all transition zones for proper flashing, counterflashing, and step flashing. Chimney bases and boot-flashing should be dry behind the metal. If a section shows recurring staining or peeling around these joints, plan for targeted flashing upgrades rather than broad, full-roof work. Immediate attention to suspicious seams can prevent pattern leaks through multiple seasons.
Find specialists in TPO, EPDM, and built-up flat roofing systems for residential and commercial properties.

Quality Exteriors & Roofing Of RI
(401) 738-8245 www.qualityexteriorsinc.com
Serving
4.7 from 60 reviews