Last updated: Apr 19, 2026
This area sits inland in western Kent County, where cold winters and pronounced freeze-thaw cycles stress roofs more than nearby coastal Rhode Island locations. When ice forms in crevices and moisture works its way into shingles and underlayment, rapid cycles of freezing and thawing push granules loose, warp boards, and open gaps for leaks. A roof that looks fine in July can reveal problems after a harsh January cold snap. In Coventry, the pattern is not a single event but a recurring test, especially on older homes with wood, asphalt, or sometimes a metal roof that's seen better decades. The clock on wear runs faster here because the landscape-lakes, woods, and shaded yards-holds moisture and slows drying in shoulder seasons. The result is a real edge-of-season risk: wind-driven storms in fall can compound preexisting soft spots, while winter storms exploit any vulnerable seam or vent flashing.
The best replacement window is typically late spring through early fall. Temperatures during this stretch stay warm enough to guarantee proper tear-off, underlayment adhesion, and shingle sealing without the extra stress of freezing conditions. In Coventry, that means timing your project from roughly mid-April to mid-October, depending on the year's rain and storm patterns. Don't assume a fall project can be rushed to beat the first freeze; autumn storms in this area often arrive with little warning and backlogs can form quickly as crews get booked by late summer. If a late-summer storm season is forecast, plan to secure a start date immediately after that window passes, not during it.
Late summer into early fall brings storm activity that can disrupt newly scheduled reroofing and repairs. High winds, driving rain, and shingle damage from lightning or hail are common this time of year, and Coventry's wooded neighborhoods magnify debris accumulation and leaf-related drainage issues. Backlogs can occur when roofs sustain damage and homeowners push for expedient repairs before winter, so prompt assessment after a major storm is crucial. When you notice missing shingles, lifted edges, or moisture in the attic after a storm, treat it as an urgent signal to begin coordinating with a trusted local contractor. If a storm arrives late in the season, aim to complete the work within the remaining warm days before the first real cold snap of late fall.
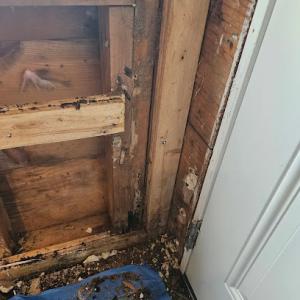
If aging shingles show cupping, cracking, or significant granule loss, or if attic condensation appears after a warm spell followed by a cold night, treat this as an urgent maintenance alert. Coventry's climate amplifies the risk: delayed attention can quickly turn a manageable repair into a leak-widening problem once freeze-thaw cycles resume. Proactive scheduling, especially in the late spring to early fall window, reduces the chance of being caught by a stubborn backlog when the next storm arrives.
Coventry has many wooded residential areas where fall leaf drop commonly clogs gutters and valleys before replacement season ends. In these neighborhoods, gutters and downspouts can fill with leaves long before crews arrive for a scheduled tear-off. That buildup slows water shedding, increases the chance of ice dams later in the season, and forces water to spill over into eaves and flashing zones. When a roof ties into chimneys or attic vents, this debris can wrap around flashing details and linger at vulnerable joints. The practical effect is moisture sits where you don't want it, and underlayment exposure can be uneven once the project begins.
Leaf drop isn't just an upper-story problem; it affects the entire drainage route. Valleys, softer roof-to-wall transitions, and chimney flashings collect sediment as it slides down the slope. In wooded zones, debris-pinched valleys can hold moisture longer, creating a reservoir that continuously wets the underlayment during thaw cycles. If the roof is nearing replacement, expect more careful hand-cleaning of valleys and flashing surfaces, and plan for extra attention to sealing around chimney and vent openings. A small amount of debris can multiply wear on concealed fasteners and edge metal, so the crew will check these areas first.
Spring rains in Rhode Island can complicate tear-off sequencing and underlayment exposure on homes already dealing with debris-heavy drainage paths. If rain arrives while shingles are still in a lift-and-clip phase, water can back up behind piles of leaves, delaying decking inspection and micro-ventilated underlayment installation. This is particularly true for houses with steep pitches or those that drain toward a central gutter line bordered by trees. Scheduling flexibility matters, so you're less likely to have a partially exposed roof during a late-season storm nor to extend the window when rain can saturate exposed plywood.
During a project, prioritize clearing the roof edge and near-peak drainage routes before lift-off, especially around valleys and chimneys. Remove loose leaves from gutters ahead of the first full day on site to reduce the risk of water backing up as shingles are peeled away. If a storm is forecast during tear-off, crews may opt to pause work and re-seal the most exposed edges with temporary protection to prevent moisture intrusion. On completion, verify that all drainage hardware is clear and that downspouts flow freely, since residual debris can migrate into the system once new roofing is in place.
Post-replacement, establish a routine to monitor leaf buildup in the first fall season after the new roof is installed. In wooded zones, a twice-yearly gutter inspection helps catch clogged pockets before they compromise the flashing or roof edge. If drainage paths are consistently congested, consider expanding the gutter system or adding leaf guards that suit a minimally invasive installation to protect against future debris-related wear.
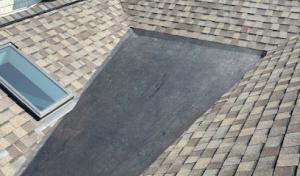
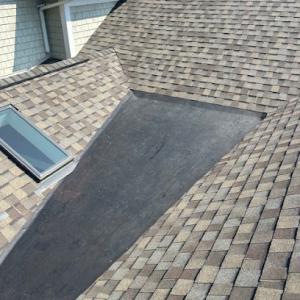
Find contractors experienced in skylight installation, flashing, and leak repairs to bring natural light into your home.
DePietro Roofing
804 Tiogue Ave, Coventry, Rhode Island
4.6 from 63 reviews


Asphalt shingles are the dominant practical choice for homes in this area, and for good reason. The broad mix of modest reroofing projects and cost-conscious replacements found around the inland lakes and wooded neighborhoods lines up well with asbestos-free, straightforward installation and decent longevity. In Coventry, the seasonal rhythm-freezing winters, leaf-heavy falls, and spring thaws-often means shingles that hold up well against freeze-thaw cycles while staying affordable enough to refresh as the storm-driven reroof demand arises. For homeowners facing a limited budget but wanting a reliable, straightforward roof, asphalt shingles deliver predictable performance with a relatively easy residential installation footprint. When choosing this option, look for a shingle line with good granule adhesion and a warranty that covers wind and temperature fluctuations, since stretches of late winter wind and early spring storms can push shingles to lift if edge seals degrade.
Metal roofing stands out as a meaningful local option for those aiming for improved snow shedding and enduring durability through Rhode Island winter cycles. In wooded neighborhoods with lingering moisture from long summers, metal's slick surface helps snow slide off more readily, reducing the risk of ice dams forming along eaves and valleys. Metal also tends to resist impacts from hail and carries strong wind performance, which matters after storm events that drive replacement decisions. The trade-off is that metal can show its seams and fasteners more visibly than some other options, and heat movement under the panels can affect attic temperature control if insulation isn't up to par. If choosing metal, consider a finish and profile designed to blend with the local rooflines-many homes in the area favor standing-seam or lightweight coated profiles that balance curb appeal with long-term weather resistance.
Wood shingles or shakes appear in this market, but they demand close attention in a climate with humid summers and tree-dense surroundings. The longer damp stretches can tempt moss, mildew, and rot if attic ventilation or roof clearance keeps drainage from flushing properly. Also, in wooded settings, leaves and needles accumulate on the roof and in gutters, increasing the potential for moisture retention and decay. If wood is the preferred aesthetic for a particular home, prioritize a treatment plan that includes regular cleaning, proactive moss control, and a robust ventilation strategy to keep the decking dry from behind. Wide-seam shake profiles can add charm, but verify that fasteners and installation methods are rated for consistent moisture exposure and that a durable top-layer underlayment supports the wood's need for a clean, dry surface.
Clay tile and concrete tile offer strong durability and distinct curb appeal, often suited to homes with compatible roof structures and sufficient structural support. They perform well under freeze-thaw cycles when properly installed and maintained, though their heavier weight requires a structural assessment and careful detailing at eaves and penetrations. Synthetic or composite shingles provide a versatile option that can mimic natural materials while delivering improved resistance to moisture and ongoing wear from seasonal storms. For these choices, working with a local roofer who understands how Coventry's rainfall patterns and leaf-loads interact with roof drainage is essential to ensure long-term performance.
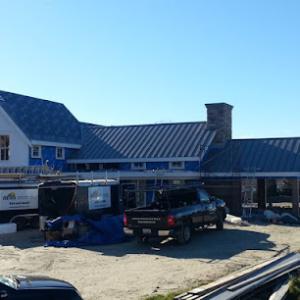
Reroof-heavy local demand shapes prices, especially after late-summer storms that push bookings and tighten schedules. In wooded neighborhoods with ample tree cover, crews often face longer climbs, more debris cleanup, and delicate work around overhanging branches, which can nudge labor time and material waste alongside the sticker shock of surge demand. When a storm hits and roofs are stripped on several nearby homes, you may see a short-term spike in acceptance lead times and visual price bumps on bids land. This is a practical reality in this inland spread-out pattern, where lakefront and village pockets mix with older housing stock that needs more detailed attention.
Material choice drives the majority of project variance. Use these ranges as your budgeting guide: asphalt shingles 350 to 700 USD per square, metal 600 to 1100, clay tile 800 to 1600, concrete tile 700 to 1500, wood shingles or shakes 550 to 1000, and synthetic or composite shingles 400 to 800. In Coventry, a premium finish or a coupled flashing upgrade around chimneys and dormers can push an overall per-square cost higher, even if the basic sheathing and underlayment are standard. Expect the most dramatic swings when storm-driven replacement timing intersects with peak local demand, since crews may adjust schedules and supply chains accordingly.
Tree cover is more than cosmetic in this market: it directly affects debris cleanup, gutter and downspout protection, and the need for careful chimney flashing around older masonry. Debris removal adds a measurable line item on bids, particularly on larger homes with extensive roof decks or multi-level access. Chimney flashing complexity matters because older homes often feature uneven joints or brickwork that requires careful sealing and precise shingle seating. Weather-related schedule gaps, along with staging around branches, can extend installation time and impact waste disposal logistics.
For a typical Coventry roof, you'll see the cost per square reflect both the material and the local labor variables described above. Asphalt remains the most budget-friendly, while metal and tiles trend higher but offer longer life in freeze-thaw cycles. If a storm-damaged roof also needs venting or retrofits for attic insulation, factor those needs into the overall square count and the bid. Align your expectations with the ranges provided, and use them to compare multiple quotes that account for debris, flashing work, and access constraints in this specific market.
DePietro Roofing
804 Tiogue Ave, Coventry, Rhode Island
4.6 from 63 reviews
Residential Roofing Specialist

JFM Construction
39 Idaho St, Coventry, Rhode Island
5.0 from 1 review
JFM Construction is a trusted roofing contractor that has been protecting homes and businesses in New England since 1957. We offer a wide range of roofing and painting services, including new roof installation, roof repairs, roof maintenance, roof coatings interior and exterior painting renovations .Our team of experienced and certified specialists will work with you to find the best solution for your needs. We are committed to providing high-quality workmanship and customer satisfaction. Contact us today for a free estimate! Our company name speaks for itself. Jfm construction- Second to none.
Scituate Roofing & Exteriors
(401) 823-0000 scituateroofingri.com
131 Sandy Bottom Rd, Coventry, Rhode Island
2.4 from 12 reviews
Exterior Remodeling Contractor. We pride ourselves in the work we provide to our clients. From product selection to job completion, we remain transparent with our customers and strive to make their visions come to life!
DM Construction
Serving
5.0 from 5 reviews
We do roofing ,siding,decks, additions,floors,Etc. Anything construction Interior/Exterior we do
Classic Metal Roofs
(401) 821-0024 classicmetalroofs.com
Serving
4.9 from 24 reviews
Classic Metal Roofs is a premier roofing contractor in 88 West Warwick Ave, specializing in standing seam metal roofs, metal shingle roofs, and aluminum metal roofing installations across Rhode Island and New England. With three generations of expertise in construction, we deliver durable, energy-efficient, and aesthetically appealing roofing solutions, including copper roofs. Our metal roof panels and systems, crafted from top-quality materials, withstand harsh weather and reduce energy costs by up to 25%. As your reliable metal roof contractor, we prioritize sustainability, offering cutting-edge designs and personalized service to enhance your property's curb appeal and resilience.

KAC. Construction
Serving
4.5 from 21 reviews
QUALITY ROOF REPLACEMENT DONE RIGHT AT THE BEST PRICE...

Roch Brothers
Serving
5.0 from 19 reviews
Roch Brothers delivers premium roofing backed by a Rhode Island family name trusted since 1954. We bring pride, precision, and honest craftsmanship to every project—whether it’s a full roof replacement, shingle installation, repair, leak diagnostic, or storm-related roof assessment. Homeowners trust our clean workmanship, clear communication, and roofs built to withstand New England weather. Our siding and gutter services add long-term protection and curb appeal. Fully licensed and insured. Free estimates.
RTP Roofing
Serving
5.0 from 196 reviews
Established in 2006, RTP Roofing is a well-established, trusted roofing contractor serving the Rhode Island community. RTP Roofing is committed to delivering top-quality services, specializing in residential and commercial roofing. Whether fixing a leak, installing a new roof, or replacing an existing one, RTP Roofing has the expertise to handle all your roofing needs. Our roofing company also offers comprehensive siding and gutter installation services, ensuring that your property has a sturdy roof and boasts impeccable exterior features. With a focus on precision and customer satisfaction, RTP Roofing is the go-to choice for all your roofing and exterior improvement projects.

The Warwick Roofers
(401) 593-0043 thewarwickroofers.com
Serving
4.9 from 8 reviews
The Warwick Roofers is the best roofing company in Warwick that you can count on! From our expertly performed services to our professional roofing contractors are highly skilled and professional at what they do. We only offer our customers the best quality roof repairs, roof inspections and we're 100% honest when it comes to your roof's evaluation. We offer a wide array of materials you can choose from. From asphalt roofing, slate roofing, cedar shake roofing, metal roofing, rubber roofing, plastic roofing, and more. Our services are also available in Coventry, West Warwick, East Greenwich, West Greenwich, and North Kingston. Call us now and get your free estimate!

Midland Roofing Company
(401) 738-8282 www.midlandroofingri.com
Serving
5.0 from 230 reviews
For nearly 50 years, Midland Roofing Company, Inc. has served the residential roofing needs of homeowners across Rhode Island.
TKO Builders
(401) 300-7360 www.tkobuildersllc.com
Serving
5.0 from 13 reviews
At TKO Builders, LLC, we bring over 20 years of experience to your roofing, remodeling, framing, and home building projects in Warwick, RI, and surrounding areas including Connecticut and Massachusetts. Owned and operated by Justin Turner, we prioritize friendly and honest customer service, ensuring clear communication and a transparent pricing process. We're dedicated to exceeding your expectations by transforming your vision into a reality, using top-quality materials and skilled craftsmanship. Contact TKO Builders today for your free consultation!

Rinaldi Brothers Roofing
(401) 219-9548 www.rinaldiroofingri.com
Serving
4.9 from 544 reviews
Rinaldi Roofing was founded by twin brothers Matt and Nick Rinaldi. With Nick’s business background and Matt’s construction knowledge, they are a force in the roofing & siding space. They take a family-first approach and are laser-focused on customer experience. Often referred to as "the roofers for the people", Rinaldi Roofing is the #1 roofing expert and fastest growing exterior remodeling company in the state of Rhode Island. They implement an innovative approach and uphold "old school" values.
A full reroof in Coventry typically requires a permit submitted with project scope and the contractor's license number. The permit is more than a box to check; it sets expectations for how the new roof will perform against the town's freeze-thaw cycles and leaf-heavy fall drainage. When preparing your submission, make sure the scope clearly calls out underlayment, flashing around chimneys and dormers, attic ventilation plan, and how the roof will be attached to the structure. If the contractor misses the license number or the scope clarity isn't specific, the processing can stall and later demand adjustments that slow the project. A careful, complete packet saves both time and the risk of rework.
Inspections in Coventry are generally scheduled during construction and again at completion to verify underlayment, flashing, ventilation, and roof attachment. The first check helps catch issues that could lead to water intrusion during the wet spring and autumn storms, especially where large trees drop leaves that can clog vent paths. The final inspection confirms that the roof is securely fastened against wind uplift and that attic vents provide adequate airflow to temper heat buildup in the attic space. If deviations are found, talks about corrective steps and re-inspections start, which can add days to the overall timeline. Prepare to keep access clear and provide any requested documentation promptly to avoid unnecessary delays.
Processing times in Coventry can vary with seasonal workload, so storm-season applications may move slower than off-peak submissions. In a town with frequent wind-driven storms and rapid post-storm repairs, that lag is felt across neighborhoods with older housing stock. Plan ahead by lining up a licensed contractor who understands the seasonal rhythm and can coordinate the permit, inspections, and material deliveries. Clear communication with the building department reduces the chance of misfiled forms or missing documentation that could push back your reroof by weeks.
In this town's inland, wooded neighborhoods, late-summer wind and hail events can cluster, making pre-loss and post-loss photos essential for insurers. If you have a credible record of a roof's condition before a storm and a clear set of after-storm images, you reduce confusion during the claims process. Take wide shots that show the entire roof and close-ups of damaged shapes, granules, and sheathing if visible. Keep a dated log of dates and weather notes for context. Storing these images in a simple, labeled folder on a computer or cloud drive helps keep them organized when the adjuster arrives.
Adjusters reviewing Coventry roof claims often ask for detailed estimates and photo documentation showing damage scope and replacement justification. Include photos that illustrate where damage is greatest, such as edges, valleys, and flashing, and separately document any prior issues that may affect roof life. Your contractor's scope should clearly connect each repair item to observed damage, not just a generic replacement. A thorough write-up that aligns photos with line-by-line estimates makes it easier for the adjuster to see why a full reroof is necessary rather than piecemeal fixes.
Coverage decisions in this market are tied closely to installation quality and code-compliant reroofing, so homeowners need complete contractor scopes and inspection records. Ensure the contractor's proposal spells out shingle choices, underlayment, flashing details, ventilation, and attic insulation considerations. Obtain and preserve any inspections or third-party assessments that verify installation quality. When records are complete and transparent, the path from claim initiation to final coverage decision can unfold more predictably, reducing delays and second-guessing after the storm.
Connect with contractors who help homeowners navigate the claims process from damage assessment to final approval.

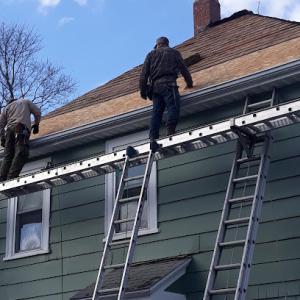
Local contractor signals show homeowners here most often hire for full reroofing rather than niche roof systems. The inland, wooded layout brings frequent leaf buildup, fallen branches, and aging shingles that have endured freeze-thaw cycles. When deterioration reaches the point where leakage or rapid shingle loss is evident after a harsh winter, crews are called in for a complete roof replacement rather than patchwork. In practice, expect seasoned crews to survey the entire roof line, assess underlayment, and plan a replacement timeline that minimizes exposure to late-season storms and the next freeze-thaw cycle.
Cleanup and fast response are especially prominent in this market because Coventry neighborhoods accumulate leaf litter and pine needles that clog gutters and trap moisture. Contractors prioritize strapping on protective windscreens, removing debris, and tidying the yard to prevent storm-driven debris from causing damage during reroofing. When a storm hits or a leak is detected, the most reliable teams offer rapid triage-covering exposed areas, securing the site, and returning promptly to complete work before new weather sets in. Homeowners tend to value clear communication about work windows and post-project cleanup commitments.
Chimney-related roof work stands out as a local hiring concern, reflecting the concentration of contractors who highlight chimney-adjacent expertise. In Coventry, many homes feature brick or stone chimneys that require careful flashing, crown, and step-flashing details to prevent leaks at seams. Expect bids to include dedicated chimney flashing repairs or integrated venting updates as part of the reroofing plan. Contractors with proven chimney experience can reduce call-backs and ensure a durable seal around the chimney chase during heavy storms.