Last updated: Apr 19, 2026
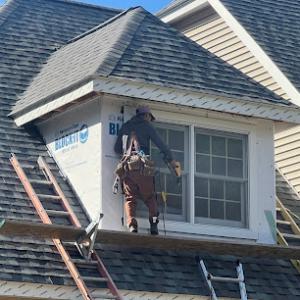
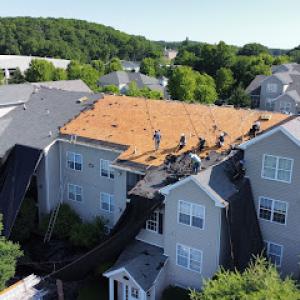
Woonsocket experiences cold winters with repeated freeze-thaw cycles that turn roof edges and gutters into a battleground. When nights stay below freezing and days rise above it, water from melted snow refreezes at eave lines, creating ice dams that back up moisture into the roof deck. In older homes along the Blackstone corridor, those cycles bite harder because roof assemblies and attic spaces were not originally built with tight ventilation or modern drainage in mind. The result is accelerated wear on shingles, flashing, and underlayment, with a real risk of hidden moisture damage that can compromise structural members and insulation. This isn't hypothetical - it's a pattern that shows up year after year on roofs that weren't prepared for perennial freeze-thaw stress.
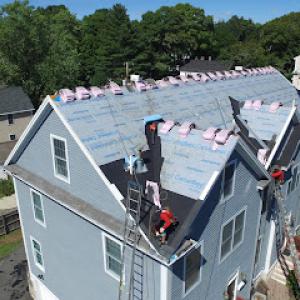
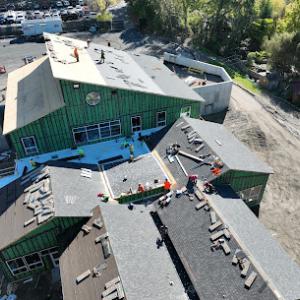
When a roof is replaced, attic ventilation becomes a central check point. The older housing stock in this area often relies on passive venting that isn't enough to prevent moisture buildup under a new roof. Proper intake and exhaust air pathways, plus attention to chimney detailing where warm air can creep into colder eaves, are essential. You want a balanced vent plan that keeps the attic near the outside temperature, reduces condensation, and discourages warm attic air from meeting a cold roof surface. If the attic space was previously under-ventilated, plan for baffles, soffit vents, ridge or high side vents, and any necessary sealing to stop air leaks from living spaces into the attic. A systematic check should verify that insulation is adequate and evenly distributed, with no holes for air to bypass the vent paths. This is not cosmetic; it directly affects how ice dams form and how quickly the roof dries after each melt cycle.
Replacement timing in Woonsocket typically favors late spring through early fall because winter snow, spring rain, and summer humidity all create installation and scheduling complications. Planning with the seasonal constraints in mind minimizes the risk of moisture intrusion during work and ensures that crews have reliable temperatures and dryers. If a roof is already showing signs of ice dam stress or moisture intrusion, delaying replacement can escalate damage in successive freeze-thaw events. On the other hand, rushing a replacement into peak heat or a wet spring can also invite issues with adhesives, fasteners, and sealants not curing properly. The practical takeaway is to target a window when temperatures stay consistently mild, and before the next round of winter conditions threatens vulnerable sheathing or insulation.
Inspect the eaves and gutters for uneven ice buildup or signs of recurring moisture staining along the attic plane. Look at flashing around chimneys, dormers, and roof-to-wall transitions for gaps or peeling sealant. Inside, check attic insulation for compression, gaps, or wet spots near the roof line, and verify that vents are not blocked by insulation or debris. If you notice damp smell, staining, or warped boards in the attic after a melt, take action quickly. A proactive approach now can prevent a small leak from becoming a costly, wide-reaching replacement later, and it reinforces a roof system built to endure Woonsocket's harsh, variable climate.
In Rhode Island's spring, storms roll in with heavy rain and brisk winds that can disrupt roofing schedules and trigger leak investigations or partial damage claims. The combination of thawing ice from winter and sudden downpours means attic moisture and fast-developing issues can appear quickly. Scheduling delays are common as contractors juggle weather windows, but timely documentation helps keep claims moving once the storm season peaks. Storm-related interruptions often lead to revised inspection timelines, so plan for potential delays and keep the process organized.
Rhode Island insurers commonly respond to wind and hail roof claims with documentation requests. Adjusters may ask for photos plus contractor estimates before approving a replacement scope. Since roofs on aging housing stock can show multiple stress points, an adjuster will look for pre-existing conditions in addition to new damage caused by the event. Be prepared to provide a concise narrative of when the issue was observed, how it progressed, and any temporary measures taken to prevent further water intrusion. Having a clear file reduces back-and-forth and helps ensure the claim reflects current storm-related needs rather than a broad rehabilitation.
Because aged roofs and storm-related damage both drive claims activity here, homeowners need condition photos and date-stamped records before temporary repairs are made. Start with wide exterior shots showing attic access, chimneys, valleys, and gutters to establish a baseline. Interior images should capture any signs of leakage, staining, or warped decking near the most exposed areas. Date-stamped receipts for supplies used in temporary fixes-tarps, sandbags, or plywood boards-provide a timeline that can be referenced in the claim. If the attic is ventilated, document any signs of condensation or frost on rafters, as these details support the moisture narrative. Keep a simple log noting storm dates, wind speeds if known, and the exact locations of observed damage.
Temporary repairs are a common step while a claim is being processed, especially as spring weather can reopen leaks after a brief dry spell. Do not delay reporting new damage if rainfall resumes or wind-driven debris appears. Before making or removing temporary fixes, confirm that the chosen action aligns with the insurer's requirements and your contractor's plan. In this market, consistent communication with the adjuster reduces the risk of disputed scope changes later. If a temporary cover is used, secure it in a way that minimizes further damage and documents any installation details.
Select a contractor who understands the neighborhood's typical roof construction and the way moisture travels across valleys and adjoining chimneys. Ask for a written scope that distinguishes emergency measures from permanent repairs, and request a line-by-line estimate that matches the claim's observed damage. When possible, coordinate dates with the insurer to avoid gaps in coverage or questions about the transition from temporary to permanent work. A reputable contractor will help translate the adjuster's expectations into a practical, weather-resilient repair plan.
One frequent issue is documenting after the fact without baseline photos, which can lead to disputes about what was damaged by the storm versus pre-existing conditions. Another trap is accepting a replacement scope that overlooks ventilation concerns or ice-dammed risk, especially around chimneys and attic vents. In Woonsocket, spring weather can reveal previously hidden moisture pathways; ensure the claim address both surface damage and underlying moisture control to prevent a recurrence. Finally, avoid rushing the claim without a thorough review of the entire roof's condition, as fast repairs can create long-term vulnerabilities.
Find local contractors experienced in assessing and restoring roofs after hail, wind, and severe weather events.
Franklin Roofing
(401) 793-1360 franklinroofing.co
52 Upland Rd, Woonsocket, Rhode Island
5.0 from 141 reviews
Franklin Roofing
(401) 793-1360 franklinroofing.co
52 Upland Rd, Woonsocket, Rhode Island
5.0 from 141 reviews
Franklin Roofing provides roofing services in Woonsocket, RI.
GT Restoration
(401) 405-9083 gtrestoration.us
441 Diamond Hill Rd, Woonsocket, Rhode Island
5.0 from 35 reviews
We are your New England experts for roofing and siding projects. All our work is 100% Guaranteed and safety certified with full insurance coverage on the job site. We provide 24/7 Emergency On-Call Service too. At GT Restoration we get the job done safely and effectively, every time. If you need roofing or siding repair or replacement, or you have a build-up of snow, call us for a quick, free estimate. We will get your work done on time and according to your specifications, every time.
Tim's Roofing & Siding
(401) 216-7729 www.facebook.com
592 Manville Rd, Woonsocket, Rhode Island
4.6 from 11 reviews
Tim's Roofing and Siding provides roofing, siding, windows, and more in Rhode Island. We service Woonsocket, Cumberland, North Smithfield, Burrillville, Lincoln, Smithfield, North Providence, Cranston, Warwick and the rest of Rhode Island.
Eagle Exteriors
(401) 298-0449 www.eagleexteriorsri.com
Serving
4.7 from 47 reviews
Eagle Exteriors is a construction company specializing in exterior remodeling. Eagle is located in Cumberland RI and has years of industry experience. We serve all of RI and MA.
C Duva Roofing
(401) 639-2373 cduvaroofingri.com
Serving
4.9 from 46 reviews
Family-owned and operated roofing contractor since 2005, C Duva Roofing is proud to provide quality roof installations and repairs throughout Rhode Island. We are certified CertainTeed Shingle Masters, with a commitment to professionalism and a dedication to quality craftsmanship that few other roofing companies demonstrate. Our reputation for fair pricing, quality workmanship , and dedication to customer service has made us New England's preferred roofing business. We pay close attention to detail, because in our business you have to. If you need a new roof or repair to your existing roof contact us for a free estimate.

INTEGRITY ROOFING & Construction | Industrial | Commercial | Residential
(401) 358-8505 integrityroofingri.com
Serving
5.0 from 21 reviews
Here at integrity roofing we take pride in our work from beginning to end, when seen & when not seen. We hold ourselves strongly to Integrity during all production and customer service. giving you the service you deserve. We are affiliated with the best leading roofing brands, giving you the best roofing materials and warranties in the industry, getting you the most for your buck. We know roofing ain’t cheap. That’s why you should hire us, not only we have the best pricing, you won’t have to pay to do your roof twice. We do all types of roofing Industrial | Commercial | Residential Replacements | Overlays | Repairs. 25 years of experience. Give us a shot, we won’t let you down. Thanks for reading God Bless

Cook's Roofing
(508) 556-2492 www.cooksroofing.com
Serving
4.9 from 79 reviews
Cook's Roofing provides roof installation, roof repairs, attic insulation, gutters, ventilation, and ice dam solutions to the Bellingham, MA area.
RoofMasters
(401) 407-6312 www.roofmastersri.com
Serving
5.0 from 118 reviews
RoofMasters is a top-rated roofing contractor serving Rhode Island, Massachusetts, and Connecticut with over 100 ★★★★★ reviews. We specialize in roof replacement, roof repair, roof rejuvenation, storm damage, and commercial roofing. Based in Smithfield, RI with an additional location in Griswold, CT. We offer free roof inspections, financing, and industry-leading warranties. Call 401-400-7008.
Umbrella Home Solutions – Roofing & Windows
(401) 496-9385 umbrellaroofingcompany.com
Serving
4.7 from 14 reviews
Umbrella Home Solutions, a GAF-certified roofing contractor, is your trusted provider for top-quality roofing, siding, gutter & window services in Woonsocket, RI, and surrounding areas. We specialize in residential and commercial properties, offering everything from minor roof repairs to complete roof replacements, plus window installations. We use premium materials and advanced techniques for durability and superior craftsmanship. In addition to roofing, we provide expert siding and gutter solutions to enhance and protect your property. With competitive pricing, free estimates, and a commitment to excellence, Umbrella Home Solutions company is here to meet your home improvement needs. Contact us today for reliable and professional service!
Cedar Valley Exteriors
(401) 236-8150 www.cedarvalleyexteriors.com
Serving
4.8 from 165 reviews
Cedar Valley Exteriors are roofing and siding experts. We offer free inspections and work with your insurance company to restore your home and business.
Josh's Construction
(401) 373-3994 www.joshsconstruction.com
Serving
4.8 from 106 reviews
For reliable roofing services in Smithfield, RI, Josh's Construction is the roofing company you can trust. We have a solid track record of commitment to quality and customer satisfaction since 1998. Whether it's a new roof installation or a repair, our skilled team ensures your home or business is protected with durable materials and excellent workmanship. At Josh's Construction, we take pride in our work, offering written warranties on labor and materials. Our dedication to serving the Smithfield community has made us a trusted name in the industry. When you need a roofing company Smithfield, choose Josh's Construction for dependable and professional service. Visit our website or contact us for your roofing needs.
LCT Construction & Services
(508) 488-6639 www.lctroofing.com
Serving
4.9 from 137 reviews
LCT Construction & Services is the epitome of quality construction solutions, specializing in roofing, chimney services, siding installation, and gutter maintenance. Our team of highly skilled professionals is dedicated to enhancing the exterior appeal and functionality of residential and commercial properties located in Hopedale, MA, and surrounding areas. With unparalleled craftsmanship, we create impeccable results that last. Discover the exceptional at LCT Construction & Services Roofing services and siding services are available throughout Franklin, Worcester, Suffolk, and all counties in MA. We also service roofing jobs in Northern RI and Northern Connecticut. Call or book service online!
In Woonsocket, typical pricing for asphalt shingles runs about $400 to $800 per square. Metal roofing sits higher, at roughly $750 to $1300 per square. If clay tiles are in the mix, expect $900 to $1800 per square, while concrete tiles run about $850 to $1700 per square. Wood shingles or shakes fall in the $600 to $1100 per square range, and synthetic or composite shingles are typically $500 to $900 per square. These ranges reflect the age of many local homes, where access, deck condition, and the need for careful detailing around chimneys and roof penetrations can push costs higher.
Costs in older homes can rise quickly when a teardown reveals decking repairs, ventilation upgrades, or flashing work around chimneys. In practice, that means shingle costs are only part of the equation-proper attic ventilation and a solid drainage plane around the ridge and eaves are essential to prevent repeat freeze-thaw damage. If you uncover soft spots or warped decking during removal, budgeting for additional decking replacement is wise. Expect a noticeable uptick in labor if existing ventilation is undersized or blocked by insulation, since upgrading soffit vents, ridge vents, or a balanced system can be necessary to control ice dam formation in harsh winters.
Seasonal weather in Woonsocket also affects pricing and scheduling. Winter snow and ice complicate deliveries and heightened safety requirements can slow crews. Spring rain can create delays while keeping materials dry and the attic relatively vented, and summer heat and humidity can push crews to shift working hours. With these weather patterns, it's common for projects to start later in spring or be delayed into early summer, which can influence both material availability and labor rates. When planning, allow a conservative window for veneer and underlayment installation, as temp fluctuations drive more frequent adjustments to the pacing of the job.
To manage a successful replacement, map out a realistic scope that accounts for potential decking repairs, ventilation upgrades, and flashing around chimneys. If you're choosing a material with higher upfront costs, pair that decision with a plan for efficient ventilation and proper insulation to maximize long-term performance in this climate. By prioritizing attic ventilation, you'll reduce ice dam risk and improve energy efficiency across the seasons, which is especially valuable for older homes with historically tight or leaky roofs.
Don't let upfront costs delay a critical repair - these contractors offer payment plans to fit your budget.
Franklin Roofing
(401) 793-1360 franklinroofing.co
52 Upland Rd, Woonsocket, Rhode Island
5.0 from 141 reviews

For most full roof replacements in this area, a building permit is required. The application should be submitted with project details before any work proceeds. That means your contractor or you as the homeowner will gather information about the existing roof, the proposed materials, the scope of removal and replacement, and any attic ventilation or venting changes. In practice, the city expects a clear plan that shows how the new roof will address common local concerns-especially moisture management around chimneys and attic spaces, given the freeze-thaw cycle and winter moisture pressures that are typical here. The permit process serves to confirm that the proposed work aligns with local codes and with Woonsocket's housing stock realities.
Inspections are a routine line of communication between you, the contractor, and the city. In Woonsocket, the typical sequence includes a rough inspection during completion, followed by a final inspection after the roofing work is finished. The rough inspection focuses on how materials were removed, how the underlayment and ice and water shield were installed, and whether the ventilation pathway remains uncompromised. The final inspection verifies that the roof project has been completed to code and that any changes to attic ventilation or venting meet current requirements. If the city needs documentation demonstrating sufficient attic ventilation and venting, that confirmation may be requested during review or inspection. Plan ahead for these checks to avoid scheduling delays and to ensure the project continues smoothly through the late fall and winter transition.
Because Woonsocket winters put a premium on proper ventilation and moisture management, the city can defer permit issuance if documentation is incomplete. In practice, this means paperwork related to attic ventilation, venting details, and any structural notes must be aligned before the permit is granted. If any portion of the project touches or alters the attic space, make sure the plan explicitly describes how ventilation will be preserved or improved. Having a clear, detailed scope of work that addresses these questions up front can reduce the chance of delays when the city reviews the application.
Coordinate with a contractor who understands local code expectations and the specific moisture risks of the Blackstone River valley area. Collect all required drawings or diagrams that show underlayment, ice dam solutions, and ventilation routes. Keep communication lines open with the building inspector, especially if attic venting plans change during the project. By staying ahead of documentation and aligning with Woonsocket's inspection milestones, the permit and inspection steps become a straightforward part of delivering a durable, weather-ready roof.
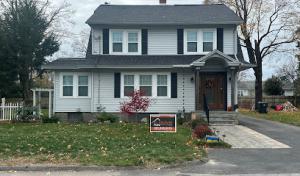
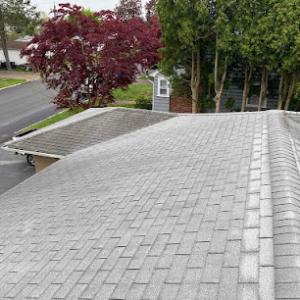
This area has an aging stock of homes along the Blackstone River valley, where freeze-thaw cycles and ice dams are common winter challenges. The right material should manage moisture well, shed snow efficiently, and fit the way older structures were built, including attic ventilation details and chimney interfaces. Asphalt shingles are the most straightforward upgrade for quick, reliable performance, while metal brings durability and better snow shedding. Other options exist, but require careful evaluation of weight, moisture behavior, and detailing on older roofs.
Asphalt shingles remain the practical backbone of many re-roof projects here. They're affordable to install, familiar to local crews, and easy to replace when the next cycle of wear comes around. For older homes, look for self-sealing or laminated shingles that provide good wind resistance and adequate UV aging. A well-ventilated attic helps prevent moisture buildup under asphalt, especially during freeze-thaw events that can stress underlayment and decking. If an older roof is nearing its end, replacing with asphalt can minimize disruption to complex roof lines and chimneys common in this market.
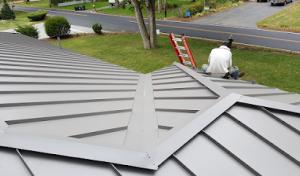
Metal is actively used in the Woonsocket market and is often chosen by homeowners seeking enhanced snow shedding and winter durability. Snow slides off more predictably, which helps with ice dam formation down the line, and metal panels resist repeated freeze-thaw cycles. When selecting metal, consider a profile that minimizes water intrusion at the edges and around valleys, and verify that the roof deck and flashing details can support the mounting method. Older homes benefit from metal systems designed for retrofit to maintain proper ventilation and to avoid creating rain-driven ice dams at eaves and chimneys.
Tile (clay or concrete) and wood shakes exist in the local market, but their suitability hinges on the structure's weight capacity and moisture behavior. Clay and concrete tiles add substantial weight and require a reinforced deck; wood shakes can be susceptible to moisture and rot if ventilation and flashing are not carefully maintained. On older homes, these materials demand a thorough assessment of attic ventilation, vapor barriers, and chimney detailing to prevent problems in winter. If a tile or shake option is pursued, ensure the framing, insulation, and ventilation plan align with the added load and moisture pathways.
When evaluating options, prioritize systems that integrate with existing ventilation routes, ridge and soffit airflow, and chimney clearances. Insulation in the attic should keep humidity in check during freeze-thaw cycles, and flashing around dormers and valleys should be continuous and well-sealed. For many homes, a straightforward asphalt replacement paired with upgrades to attic ventilation and proper snow-bridging considerations offers the most reliable path, while metal can be a superior choice where winter performance is the primary concern.
The most popular roofing material in the US. Find pros who install, repair, and replace asphalt shingles.
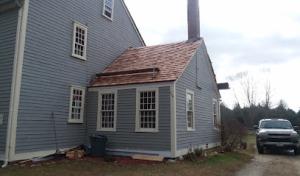
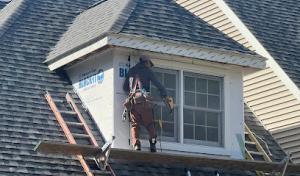
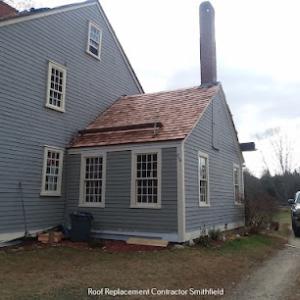
Chimneys are stubborn leak sources on many local homes, especially where aging masonry meets roof planes. During re-roofing, flashing around the chimney and any masonry-adjacent waterproofing must be addressed with care. A common pitfall is undersizing or misplacing step and counter-flashing, which invites ice damming and moisture tracking into the attic. In practice, this means inspectors and roofers should verify that flashing continues up behind bricks, seals gaps at the base, and coordinates with the attic venting system so warm air from soffits can flow without creating drip paths along the chimney chase. Expect the work to involve masonry touch-ups or repointing where the brick or stone has spalled, because weak joints become silent leak pathways once roofing material is reseated.
Skylight service is notably active here, and curb flashing sits at the heart of recurring local leaks. The curb must be flashed to redirect water away from the flashing joints without creating a hard corner where ice can dam up. In practical terms, roofing teams prioritize sealing the curb-to-roof transition with a continuous sealant bead and a properly integrated shingle course that overlaps. If a skylight is installed after the roof is in place, the installer should align the skylight opening with existing shingle rows to avoid creating a stray edge where moisture can stall and refreeze. Pay attention to any misalignment between skylight framing and vented attic space, as that mismatch often betrays hidden air leakage or moisture buildup.
On older roofs, replacement planning often needs to account for multiple penetrations and transitions rather than just field shingle condition. Every vent, attic access, and exhaust stack increases the complexity of a reliable, long-lasting seal. A practical approach is to map all penetrations, confirm continuous ventilation at the eaves, and ensure that each transition-where roof planes meet dormers, chimneys, or skylight curbs-receives careful flashing detail and shingle integration. When a roof is refreshed, the goal is to tame every potential drip line, so be prepared for targeted work around each penetration rather than a single, blanket repair.
Find contractors experienced in skylight installation, flashing, and leak repairs to bring natural light into your home.
Franklin Roofing
(401) 793-1360 franklinroofing.co
52 Upland Rd, Woonsocket, Rhode Island
5.0 from 141 reviews

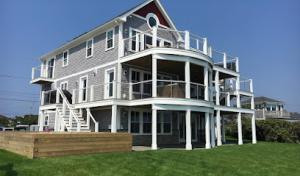
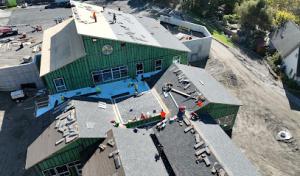
Flat-roof specialization is active in Woonsocket, reflecting the city's mix of residential add-ons, multifamily properties, and commercial buildings that do not fit a simple steep-slope replacement model. These roofs must handle frequent precipitation and winter moisture without sacrificing long-term performance. Understanding how drainage, insulation, and ventilation interact on these systems is key to avoiding costly failures.
Regular precipitation and winter moisture make drainage performance especially important on low-slope roofs. Before choosing materials, evaluate the existing drain layout, scuppers, and downspouts. On a typical Woonsocket roof, a high-quality membrane paired with a properly sloped deck and perimeter edge details reduces standing water and ice build-up. Work with a contractor who can demonstrate a test plan showing notch tests or water-flow paths, especially around parapets and around any dormers or chimneys that interrupt drainage.
Ventilation matters just as much on a flat or low-slope system as on a steep roof. Poor attic ventilation forces moisture into the decking and the membrane, which can accelerate rot and damage during freeze-thaw cycles. In homes with flat additions or converted spaces, verify that the roof assembly includes a balanced attic or roof void ventilation strategy. Ensure openings align with any existing soffit or wall vents and that baffles or intake channels keep airflow unobstructed.
Ice dam risk rises when low-slope roofs lack proper edge insulation or have inadequate insulation levels in the attic space above the roof deck. Ensure the design includes continuous insulation, a vapor barrier appropriate to the climate, and edge detailing that minimizes warm-air leakage to the roof plane. When inspecting, look for proper flashing at baseboards, junctions with siding, and around any penetrations.
Homeowners and property owners in Woonsocket should distinguish between steep-slope shingle replacement and membrane or low-slope work when comparing contractor experience. Ask for portfolios that show flat-roof projects with details on drainage, edge metal, flashing, and membrane integration with existing parapets and chimneys. A local-wisdom contractor will discuss how winter moisture and river valley humidity shape each install.
Find specialists in TPO, EPDM, and built-up flat roofing systems for residential and commercial properties.
Franklin Roofing
(401) 793-1360 franklinroofing.co
52 Upland Rd, Woonsocket, Rhode Island
5.0 from 141 reviews
Rhode Island insurer practices influence roof replacement decisions in Woonsocket, especially after wind or hail events when adjusters often request photos and contractor estimates. That means keeping a steady record of roof health before any damage shows up is a practical hedge. In conversations with local adjusters, the emphasis is on clear evidence of what existed prior to a claim, not just what is revealed after the storm. If a roof has known moisture signs or prior repairs, these details shape the claim narrative and the ultimate resolution.
Because claims are common for both storm damage and aged roofs in this market, Woonsocket homeowners benefit from documenting roof condition before leaks spread or emergency tarping changes the evidence. Start with dated exterior photos from multiple angles, including the ridges and valleys where ice damming tends to begin. Move indoors to capture attic temperature, ventilation gaps, and signs of attic moisture or condensation. Preserve any prior maintenance notes, inspector reports, or contractor recommendations. If a temporary tarping or protective covering is used during a storm, photograph the tarp setup promptly and capture how long it remained in place. This material serves as a baseline and helps prevent disputes about the onset of damage.
The local claims environment makes it important to separate maintenance issues from sudden storm damage when presenting a Woonsocket roof loss. Document long-standing issues such as chronic ice damming, gutter clogging, or flashing wear as background context rather than new damage caused by a storm. In contrast, record specific wind uplift, hail impact marks, or a clearly triggered leak path that coincides with a recent weather event. A well-organized file that differentiates aging wear from fresh storm impacts will support a more accurate assessment and smoother communication with the insurer.
Connect with contractors who help homeowners navigate the claims process from damage assessment to final approval.
Franklin Roofing
(401) 793-1360 franklinroofing.co
52 Upland Rd, Woonsocket, Rhode Island
5.0 from 141 reviews

Tim's Roofing & Siding
(401) 216-7729 www.facebook.com
592 Manville Rd, Woonsocket, Rhode Island
4.6 from 11 reviews
Top of the Line Construction
(401) 617-0935 topofthelineroofingri.com
25 Ethel St, Woonsocket, Rhode Island
4.3 from 11 reviews
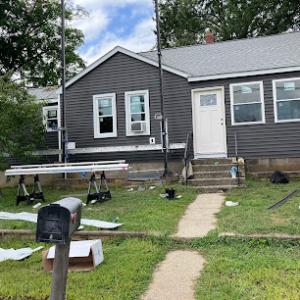
Woonsocket homeowners are navigating a market dominated by re-roofing rather than new construction. Tear-off experience and cleanup practices matter more here than builder-focused sales language. Look for a roofer who talks plainly about removing the old roof, disposing of debris, and protecting your interior during a project that can be interrupted by winter weather or spring melt.
In this climate, quick response is a major local hiring signal. Leaks and icy interruptions create urgency, so you want a contractor who answers calls promptly, provides a clear next-step plan, and follows through with on-site assessments in a reasonable window. Expect timely project scheduling, clear weather contingency messaging, and written updates during any weather-driven delays.
Residential service and a long-established company presence weigh heavily in Woonsocket. Seek out contractors with a demonstrated track record on homes similar to yours: older stock with attic mitigation needs, chimney flashings, and moisture management around vents. A company with a stable local footprint is more likely to offer dependable warranties, repeat service, and predictable cleanup after a job finishes.
Ask for recent references from projects in older neighborhoods with similar roof lines and materials. Confirm tear-off methods, scaffold or ladder setup, and debris containment specific to tight urban lots. Inquire about ventilation improvements tied to ice dam prevention, such as attic baffles, soffit venting, and proper underlayment. Ensure crews are trained for winter temperatures and safe work practices around existing chimneys and skylights.
A solid proposal should include a clear scope: material type, complete tear-off, waste disposal plan, attic and interior protection, and guaranteed cleanup. Request a calendarized start date with expected daily progress, so weather delays don't derail expectations. Trust your instincts: the right roofer speaks plainly, shows legitimacy in their references, and demonstrates a practical, no-nonsense approach tailored to older homes.
Get a clear picture of your project costs upfront - no commitment required.
GT Restoration
(401) 405-9083 gtrestoration.us
441 Diamond Hill Rd, Woonsocket, Rhode Island
5.0 from 35 reviews