Last updated: Apr 19, 2026
Repeated snow accumulation followed by thaw-refreeze cycles commonly creates eave ice buildup on heated homes in this inland eastern Massachusetts pocket. When that ice forms along the eaves, it can back up melting snow into the soffits, fascia, and, eventually, into the attic and ceiling. In Franklin, where older colonials, capes, and split-levels share walls and rooflines with newer subdivisions, those ice bridges can find the most vulnerable paths at roof-to-wall intersections, chimney flashing points, and spots where attic insulation is uneven or compressed. The result is a winter-ready pathway for leaks that arrives quietly and then announces itself with stained ceilings, damp walls, and the telltale smell of moisture behind finished surfaces.
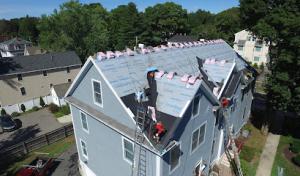
Chimney flashing is a frequent trouble spot because it often sits at a single point where multiple roof planes meet and where heat from the chimney can warm nearby snow. In older homes, this flashing can loosen over time, creating a ready-made channel for meltwater to creep between the chimney and the felt or shingles. Roof-to-wall intersections are another prime vulnerability in Franklin's mix of construction styles; improper flashing or a lack of proper kick-out details can allow water to slip downward behind trim boards or into soffit vents. Uneven attic insulation, common in homes that have been lived in for decades, compounds the issue: warm pockets skate across the attic, freezing at the eaves and re-melting in place to push water inward through any tiny breach. The point is simple: where two building assemblies meet and where insulation gaps exist, winter leaks are most likely to show up first.
Snow retention can be a hidden enemy. Snow that sits on a heated roof longer than it should will melt and refreeze at the eave line, forming a dam that blocks proper drainage. Each thaw-refreeze cycle then increases the pressure behind the dam, which can push against underlayment and shingles. Start by keeping an eye on gutter performance; if gutters clog or form ice backups, the meltwater has nowhere to go but under flashing and into the attic. In homes with multiple roof planes, ensure that the transition points are solidly flashed and that kick-out flashing is installed where the wall meets the roof. Insulation in the attic should be thick and evenly distributed around vulnerable areas; look for compressed or missing insulation near attic hatches, kneewalls, and around chimney penetrations, and address gaps with unfaced fiberglass or mineral wool to reduce heat loss into the attic space.
Addressing the most common failure points before winter starts is the best defense. Prioritize upgrading or repairing chimney flashing and ensuring kick-out flashing is properly integrated with the wall. If the attic has visible gaps or if insulation is badly settled near eave lines, fill those gaps to maintain a more uniform temperature across the roof deck. Check for damaged or missing shingles at valleys and along the eaves, particularly where two roof sections meet or where a chimney interrupts the roofline. If you notice persistent ice build-up along the eaves after a storm, consider installing heat tape in a careful, targeted pattern to help the meltwater reach the gutters, and ensure the gutters themselves are properly sized and securely mounted to handle snow weight.
Leaks often start as a slow drip during a thaw or a damp spot that worsens after a series of freeze-thaw cycles. If you hear dripping or see a darkened section on the ceiling that wasn't there in the fall, investigate the attic first for any signs of moisture around the chimney flashing, roof-to-wall joints, or around penetrations. Do not delay; the longer water sits behind a wall or in an attic, the greater the chance of wood rot, mold, and higher repair costs down the line. In Franklin, acting decisively to seal flashing, improve insulation, and clear gutters during the shoulder seasons can make the difference between a winter with manageable leaks and one where you're dealing with significant interior damage.
Asphalt shingles fit much of Franklin's housing stock because they suit the steep-slope colonial and cape-style roofs seen across established neighborhoods and newer subdivisions alike. They're simple to install over existing underlayment when feasible, and they tolerate freeze-thaw cycles well with proper attic ventilation and a solid water shield at eave and rake edges. For winter protection, choose architectural or thicker three-tab shingles with good wind resistance, and ensure the roof deck is dry before installing to minimize ice-related failures. In snow-prone winters, a well-sealed edge and continuous drip edge help keep meltwater away from fascia, reducing ice dam development on lower sections. If you're weighing replacement timing, asphalt shingles deliver reliable performance with manageable maintenance, and they pair well with upgraded attic ventilation to blunt winter dam risks.
Metal roofing is relevant in Franklin for snow shedding and longevity, but installers must account for sliding snow over entries, walkways, and lower roof sections during New England winters. A metal roof can dramatically reduce the load duration from heavy snow and can shed it more quickly, limiting prolonged moisture contact on the roof deck. The practical challenge is handling the pathways below the roof edge: ensure snow guards, strategically placed overhangs, and secure clearance for doors and walkways. When choosing metal, consider a standing-seam profile with a snow-retarder system for critical egress points, and plan for a strong, continuous underlayment system to prevent ice backing up into eave areas. Proper sealing at dormers, skylights, and chimney penetrations matters as these create potential ice dam sites. If the house has a lot of shade or tree cover, metal's reflective properties can help reduce heat buildup that drives rapid melt and refreeze cycles along eave corners.
Slate and tile appear on some higher-end or older Massachusetts homes, but their weight and repair complexity matter more in a town where many replacements are practical re-roofs rather than custom new builds. Slate remains attractive and durable, yet installation and potential tile breakage during New England winters demand careful handling-especially on older framing. Clay tile and concrete tile bring classic Massachusetts character, but weight and structural requirements restrict their use to properly engineered roof systems. If choosing slate or tile, ensure the attic and rafter system can support the extra load, particularly on older colonials with mixed rooflines. Maintenance becomes more specialized: cracked tiles and slippage at hips or valleys require timely attention to prevent leaks, and flashing around repeated freeze-thaw cycles needs routine inspection. In many Franklin homes, these materials are best reserved for remodels or replacement in conjunction with structural upgrades.
Begin with a clear assessment of the roof's slope, age, and current ventilation. Ice dam risk in this area spikes when insulation and ventilation fall short, so pairing any roof type with robust attic ventilation and an effective ice/water shield at eaves is essential. For most standard colonials and capes, asphalt shingles deliver dependable performance with straightforward maintenance. If the house sits under heavy snowfall or has shaded, lower pitches that see frequent melt-refreeze cycles, metal can offer advantages in longevity and shedding, provided the installation accounts for walkways and entry protection. For the older, higher-end homes with existing masonry accents or unique vectors, slate or clay tile can preserve appearance and curb appeal, but only with a structurally prepared frame and a plan for ongoing maintenance. In all paths, a prudent approach combines proven roof material with vigilant winter-ready installation details to minimize leaks and ice dam risk in Franklin's winter climate.
In Franklin, the most reliable replacement window is late spring through early fall, when crews can avoid frozen decking, persistent snow cover, and the shortest winter daylight hours. That window gives sharper coordination with interior venting work, attic insulation checks, and the ability to finish a job before the next cycle of freeze-thaw stress. If a roof is clearly nearing the end of its life, planning for that stretch reduces the risk of sudden leaks during a mid-winter storm.
Spring scheduling in Franklin can still be disrupted by rain and rapid temperature swings, while late fall jobs face colder mornings that can slow shingle sealing and shorten daily work windows. When warm, dry afternoons align with cooler mornings, crews can seal and complete flashing more consistently. If a replacement spans multiple days, the weather pattern matters as much as the roof condition: a dry stretch with moderate temperatures is best for the new underlayment and for staying on a predictable timeline.
A replacement decision should consider more than visible wear. Look for widespread shingle loss, curling, or cupping, plus signs of trapped ice dam damage or recurring winter leaks that persist beyond temporary fixes. In Franklin, the impact of freeze-thaw cycles makes coordinated ventilation and attic air sealing part of a solid replacement plan. If moisture has penetrated sheathing or rafters, early replacement can prevent cascading interior damage and minimize the risk of future seasonal leaks.
Homeowners often discover replacement needs after winter leak season, which can compress demand into the warmer months and make earlier planning important. A leak that appears after the last snowfall is an early warning sign that a full roof replacement may be safer than repeated patching. In such cases, scheduling a mid-spring inspection gives the roofer enough time to stage materials, confirm decking integrity, and align flashing and ventilation strategies before the next winter.
Choosing the right material for Franklin's climate matters. Heavier weights and robust underlayment systems perform better under repeated freeze-thaw stress, while a material with proven cold-weather sealing properties reduces the risk of wind-driven leaks. The timing of installation should align with a calm period in late spring or early fall to ensure long-term performance and minimize the chance of early-season weather setbacks. A well-planned replacement focuses on proper attic ventilation and effective drainage to prevent ice dams from forming again, even in a future winter.
Get a clear picture of your project costs upfront - no commitment required.


Affordable Roofing
(508) 509-9661 affordableroofingma.com
33 Forge Hill Rd, Franklin, Massachusetts
5.0 from 15 reviews
Family Owned And Operated

Royal Roof Cleaning
(800) 508-9092 www.royalroofcleaning.com
Serving
5.0 from 16 reviews
Roof Cleaning, Moss Removal, House Washing, Gutter Guards, Roof Inspections and Roof Maintenance.

Connell Roofing
(781) 444-7577 connellroofing.com
Serving
4.9 from 268 reviews
Connell Roofing, Inc. is your trusted roofing contractor located at 25 Commercial Dr Unit 204, Wrentham, MA 02093, specializing in top-quality roofing solutions throughout Massachusetts. As local roofers dedicated to excellence, we offer comprehensive services including roof installation, repair, and maintenance. Recognized among leading local roofing companies, we also provide expert siding and gutter installation services tailored to your needs. Whether you're searching for residential roofers near me or reliable roof contractors, our skilled team delivers unmatched results to ensure your home's protection and aesthetic appeal. Choose Connell Roofing, Inc. for top-notch local roofing services and gutter services today.

Northeast Home & Energy
(508) 625-5253 northeast-home.com
Serving
4.9 from 15 reviews
We are a Roofing Contractor in Wrentham, MA serving residential and commercial customers since 1980. Northeast Home & Energy specializes in roof repair, roof replacement, energy-efficient replacement windows, vinyl siding, and attic & wall insulation. We are a top A+ rated BBB member, an elite installer roofing company for roof repair and replacement, and have always prided ourselves on outstanding quality craftsmanship and the personal attention we give to every client. Our business was founded upon responsive, professional home improvements for all of our customers. We treat your home as if it were our own.

Robert Roofing & Gutters
(857) 247-8709 robertroofingandgutters.com
Serving
4.9 from 54 reviews
We are a third generation, full service roofing company with 40 Years experience. Fully licensed and insured. ONE CALL SENDS A ROOFER NOT A SALESMAN.

Leland Siding, Roofing & Windows
(508) 533-8664 www.lelandsiding.com
Serving
5.0 from 42 reviews
Leland Siding Windows & Roofing has been installing quality vinyl siding, roofing and windows in the Metrowest area for over 25 years. Vinyl Siding, roofing and windows beautify and make your home more energy efficient, adding value and comfort. Located in Medway MA, we are the leading vinyl siding, roofing contractor and window installer in the Metrowest area. When you call Leland Siding, Windows and Roofing you deal directly with the owner,. We use only the best materials from Certainteed, Mastic and Harvey Industries so you can be assured of the the best quality result whether you need vinyl siding installation, roofing replacement or vinyl windows installation.

Cook's Roofing
(508) 556-2492 www.cooksroofing.com
Serving
4.9 from 79 reviews
Cook's Roofing provides roof installation, roof repairs, attic insulation, gutters, ventilation, and ice dam solutions to the Bellingham, MA area.

New England Exteriors
(508) 966-2400 newenglandext.com
Serving
5.0 from 15 reviews
New England Exteriors in Bellingham, MA, Norfolk County, specializes in replacement window and door installation. Do you feel a draft, struggle to open or close windows, or want to update your home’s look? We’re here to help! Serving Bellingham and Metrowest MA, we offer window replacement and new construction installation, improving comfort, energy efficiency, and curb appeal. We install Harvey, Andersen, and Pella products with precision and care, ensuring a clean job site and protecting your landscaping. Upgrade your home today—contact us to get started!

HomeXpert Construction
(508) 315-7210 homexpertconstruction.com
Serving
5.0 from 76 reviews
We’re your trusted local roofing company specializing in quality roof replacements, roof repairs, home siding, windows and gutter installations. We provide the best roofing systems throughout the New England area and New Hampshire. The experienced and licensed crew at HomeXpert Construction guarantees your complete satisfaction. We’re a second generation, family-run business known for our commitment to outstanding quality and service so that the customer can be confident that our work meets and exceeds industry standards.

LCT Construction & Services
(508) 488-6639 www.lctroofing.com
Serving
4.9 from 137 reviews
LCT Construction & Services is the epitome of quality construction solutions, specializing in roofing, chimney services, siding installation, and gutter maintenance. Our team of highly skilled professionals is dedicated to enhancing the exterior appeal and functionality of residential and commercial properties located in Hopedale, MA, and surrounding areas. With unparalleled craftsmanship, we create impeccable results that last. Discover the exceptional at LCT Construction & Services Roofing services and siding services are available throughout Franklin, Worcester, Suffolk, and all counties in MA. We also service roofing jobs in Northern RI and Northern Connecticut. Call or book service online!

Robert Kierce Contracting
(508) 698-3806 www.kiercecontracting.com
Serving
4.8 from 32 reviews
Now is the time to plan ahead to re-roof your house, replace your gutters, install replacement windows or schedule your exterior painting project. Give Bob a call today at 508-698-3806 to make an appointment to review your project. Estimates are always free and all work is guaranteed. We use quality products and have confidence in our workmanship, so we stand behind our work. Bob works with his customers from start to finish insuring that your needs are met. According to the old adage, the best advertising is a satisfied customer,” Bob finds that most of his customers are referrals from previous clients. So call Robert Kierce Contracting, Inc. today to experience the professional service his customers have come to expect. #Roofing

NEPS Roofing
(508) 243-4228 nepsroofing.com
Serving
5.0 from 29 reviews
NEPS Roofing is a locally owned roofing company serving homeowners and commercial property managers across Massachusetts and Rhode Island. With more than 20 years of construction experience, NEPS specializes in fast, clean, one-day residential roof replacements and expert commercial roofing solutions for HOAs, multi-unit housing, schools, warehouses, and more. Fully licensed, insured, OSHA-compliant, and NRCIA-certified, NEPS combines skilled craftsmanship with outstanding project management and communication. From start to finish, we deliver roofing done right—with no mess, no stress, and no shortcuts.
Cost planning should start with the Massachusetts-area per-square ranges provided, then adjusted for the specifics of typical Franklin homes. Asphalt shingles run about 350 to 750 USD per square, metal roofs 600 to 1400, clay tile 900 to 1900, concrete tile 850 to 1800, synthetic or composite shingles 450 to 900, and slate 1600 to 3000 per square. Final pricing often climbs when you're dealing with steep colonial rooflines, multiple dormers, and tear-off complexity. In a neighborhood with older colonials and newer subdivisions, those adjustments show up quickly because many roofs aren't flat and include long runs, cross gables, and attic ventilation needs. Use the base ranges as your starting point, then add a line for the extra work that pushes the total toward the upper end.
Steep pitches common on colonial and cape styles demand more safety gear, more time on the roof, and more careful installation, all of which lift labor costs. Dormers add fabric to the job-more flashing, more shingles, and additional edge work-so plan for higher numbers when you have several. Chimney flashing is a frequent source of leaks when the roof is older, and addressing it during replacement is essential to a durable result. Tear-off complexity matters, too; if you're facing multiple layers, old flashing, or compromised deck boards, expect the project to push toward the higher end of the ranges. In Franklin, these factors don't just affect the sticker price; they also influence the sequence of work and the crew's daily pace.
Seasonal demand spikes after long winters and during the late spring-to-fall installation window. In Franklin, winter damage can create urgent needs that tighten schedules and elevate labor costs as crews shuffle prioritize high-damage jobs. If you're aiming for a specific weather-friendly window, book earlier rather than waiting for a late spring rush, because availability tightens quickly and pricing can shift with demand. Planning ahead helps lock in crews and reduces last-minute premium charges.
Cleanup is a major consideration in this market, and many homeowners prioritize full debris removal and property protection. That expectation can add to labor time and disposal costs, especially in neighborhoods with well-landscaped yards and tight driveways. Contractors who include comprehensive protection-tarps, sheathing, and careful haul-away-will present higher initial numbers, but the value is measurable in cleaner surroundings and fewer post-project surprises.
Get a clear picture of your project costs upfront - no commitment required.
In Franklin, a full roof replacement is handled through the local building department rather than informally. The town's code enforcement expects proper permitting to ensure that the project meets structural, fire, and weatherproofing standards that are crucial when dealing with freeze-thaw cycles and snow loads. Contractors commonly pull the permit, but you should confirm who is responsible for the paperwork, posting the permit on site, and arranging the required inspections. Clear assignment up front helps prevent delays, especially in late fall when weather windows narrow.
When a replacement is planned, ask your contractor who will file the permit application and who will be listed as the permit holder. In many Franklin projects, the contractor handles the filing, but the homeowner should verify that the correct property address, scope of work, and timeline are accurately reflected in the permit record. Once issued, the permit must be posted on the job site where it is visible to inspectors. If the permit notices are not readily accessible, this can trigger unnecessary hold-ups, particularly if a snowstorm is approaching and an inspection window is tightening.
Inspection flow in Massachusetts towns like Franklin generally includes an in-progress inspection during key milestones and a final sign-off after completion. An in-progress inspection is typically scheduled to coincide with critical milestones such as roof deck replacement, underlayment installation, and flashing work. This helps catch issues early, especially where ice dam risk, venting, and drainage details are being upgraded to accommodate winter conditions. A final inspection confirms that the work conforms to the approved plans and that every element-from attic ventilation to flashing layers-meets code requirements.
Plan review or additional scrutiny is more likely when structural changes are involved or specialty materials are used. If the project includes trusses alterations, skylight additions, or alternative roofing systems, expect a closer look at load calculations, flashing transitions, and overall drainage design. In Franklin, where winters bring heavy snow and icy conditions, inspectors pay particular attention to structural integrity, proper attic ventilation, and snow-load compatibility. Be prepared to provide shop drawings, product datasheets, or up-to-date insulation and ventilation details if requested.
Coordinate inspection appointments with your contractor well in advance of expected weather events. Keep the site accessible for inspections, especially during winter when snow can obscure critical details. If a plan tweak is needed mid-project, obtain any necessary addenda and ensure the building department approves changes promptly to avoid rework or delays. Maintaining transparent communication with the inspector and ensuring that all required documentation is current can significantly smooth the permit-to-completion path in this climate.
Franklin faces frost-cracked shingles, ice dams, and winter leaks more than flashy coastal surge events. Wind-driven rain and fallen limbs can gouge edges, loosen flashing, and push water into attic vents or soffits even when the roof looks intact from the ground. In storms with heavy snow, the weight plus thaw cycles can reveal slow leaks that started as tiny drips. The practical consequence is that damage may arrive after a stormy stretch rather than during the rush of the event, making thorough follow-up inspections essential.
Massachusetts carriers typically want dated photos, a roof condition report, and a contractor-adjuster scope alignment before decisions are made. For Franklin homeowners, this matters because a few years of wear can blur with sudden storm damage. Take clear photos from multiple angles after a storm, and keep a dated log of any creaks, drips, or attic condensation. When the adjuster arrives, present a concise condition report plus your contractor's scope that differentiates preexisting wear from post-storm damage. Clear, consistent documentation reduces back-and-forth and protects the claim focus in your favor.
Leaks discovered in winter can escalate quickly if not addressed. Do not delay temporary measures that stop active infiltration, but avoid permanent repairs that could blur the damage line for the claim. Notify the insurer promptly with the storm date, location, and affected areas. Coordinate a single, reputable contractor-adjuster meeting to align the scope. If a dispute arises over what is storm-related versus aging wear, request an independent assessment or second opinion to keep the claim on track.
Select a local contractor who has experience navigating Massachusetts settlement expectations and understands Franklin's home stock-from colonial roofs to newer capes. Ask for a written scope that ties each repair to a specific damage cause, and ensure the contractor can explain how the work resolves the leak path without masking existing deterioration. A clear, evidence-based plan helps both homeowner and insurer move toward a fair resolution.
Find local contractors experienced in assessing and restoring roofs after hail, wind, and severe weather events.


Skylights on older Franklin homes often sit over rooms that suffer temperature swings. During winter, aging seals and surrounding flashing are repeatedly stressed by snow cover and thaw cycles, which can push moisture into the roof assembly long after the snow surface has melted. If a skylight sits under a valley or near a displaced ridge line, the risk compounds as ice dams form along the curb. Regular inspection of the curb, flashing joints, and sealant continuity is essential before a heavy snow season. Pay attention to any interior staining or musty odors that hint at hidden leaks, and address small issues sooner rather than later-the cost of a delayed fix grows once cold snaps return.
Chimney-related roof work is especially relevant in this area because many homes were built with masonry chimneys that create recurring flashing maintenance points. The chimney transition to the roof is a common failure spot when brickwork shifts or mortar deteriorates. Ice dam formation can drive water into the sides of the chimney chase where flashing laps meet, especially where shingles abut a tall chimney or where a crown crack channels meltwater inward. Inspect the chimney cricket or flue cap for proper slope and clearance, and verify that step and counterflashing are continuous and watertight. If you notice cracked mortar, loose flashing, or unusual staining at the chimney base, plan for resealing or re-flashing before the next freeze.
Roof penetrations on older Franklin homes often need closer inspection during re-roofing because layered repairs over time can hide flashing defects until winter or heavy rain exposes them. Look for signs where vents, plumbing stacks, or heat vents meet the roof around the chimney and skylight areas. Poorly sealed penetrations can become leak sources once snow accumulates or when temperatures swing above and below freezing. When re-roofing, verify that penetrations are integrated with a continuous, corrosion-resistant base flashing, and that any previous patches do not interrupt the proper drainage and flashing line. A cautious approach now-checking seals, laps, and caulking-helps prevent winter leaks and the cascading damage they cause.
Find contractors experienced in skylight installation, flashing, and leak repairs to bring natural light into your home.

In this market, established re-roofing crews are common, so you should compare responsiveness, cleanup practices, and how they handle winter leaks rather than assuming every company specializes in specialty systems. Look for crews that can show they finish a job neatly, protect landscaping from winter melt and debris, and return promptly if a leak develops after a thaw or a storm. The best choice combines steady communication with solid workmanship, not just the lowest bid.
Because quick-response service is common in this area, you can reasonably ask how emergency calls, temporary tarping, and follow-up scheduling are handled after storms or winter leaks. A reliable contractor will outline a clear sequence: triage by phone or text, on-site assessment within 24-48 hours if possible, tarping to minimize further damage, and a concrete plan for permanent repair or re-roofing. Confirm whether temporary fixes are included or charged separately and how long the temporary solution is expected to hold.
Given the prevalence of chimney work and standard steep-slope residential roofs, homeowners should request recent local examples involving flashing, ventilation, and full tear-offs rather than only generic references. Ask for at least three nearby projects with similar roof lines, especially around chimneys, dormers, and valleys. Inspect whether the contractor used step and counter-flashing appropriate for brick chimneys, and whether attic ventilation was assessed as part of a complete system. A dependable company will discuss ridge, soffit, and intake ventilation as a package, not as separate afterthoughts.
Choose a contractor who provides a detailed, step-by-step plan for your roof's specific issues-ice-dam prevention, snow-load considerations, and winter leak protection. They should offer a clear timeline, a notification process for weather-related delays, and a practical approach to minimization of debris, waste, and disruption to your daily routine. Ask for a representative who will be your point of contact from start to finish and who can explain the sequencing of flashing, decking checks, and final cleanup in plain terms.