Last updated: Apr 19, 2026
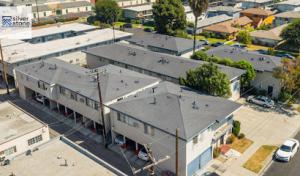
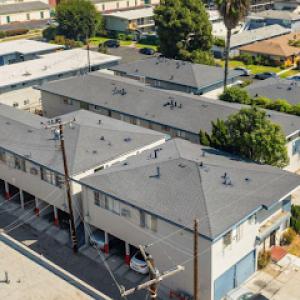
In Calabasas, the Santa Monica Mountains sit at a critical junction where wildland-urban interface realities dominate the roof conversation. This is not about rain protection alone; it's about survivability when embers ride Santa Ana winds and gusts push heat across exposed ridges. Your roof assembly should be chosen with a wildfire-ready mindset from day one: fire-rated materials, tight assembly details, and watertight ridge and edge systems that hold up under ember exposure. If a home's roof isn't designed to resist radiant heat, radiant embers, and wind-driven debris, a single flame can compromise the entire structure. Prioritize roof assemblies that meet modern fire resistance expectations and align with the highest-risk conditions observed on hillside properties.
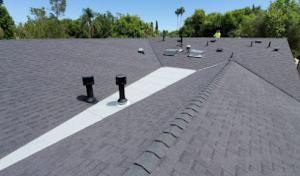
Santa Ana wind events can launch embers across exposed roof planes, so ridge lines, eaves, valleys, and especially tile attachments become focal points. On hillside homes with tile roofs, the attachment system must survive high-velocity debris impact and uplift. Look for fastener schedules that secure tiles with corrosion-resistant, wind-tested hooks or clips and non-rusting substrates. Edge detailing matters: continuous eave closures, sealant compatibility, and heat-activated moisture protection should be integrated into one continuous weather barrier. Valleys need reinforced waterproofing to prevent ember-initiated leaks that can bypass a fire-rated roof. In practice, this means choosing a system with integrated underlayment, fire-treated deck coverings, and reliable, tested interlocks that don't separate under vibration or movement on sloped terrain. When you're comparing options, request a demonstration of how the tile system behaves under simulated wind-driven embers, not just rain.
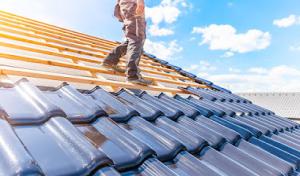
This market favors newer, fire-rated roof systems, especially for older homes where underwriting and renewal decisions hinge on wildfire risk. A practical upgrade path for Calabasas properties is to pair a fire-rated underlayment with a roof covering that has shown resilience to radiant heat and ember exposure. Clay and concrete tiles have natural fire resistance, but their performance hinges on secure attachment, proper in-field fastening, and compatible deck and underlayment choices. Metal roofing offers exceptional wind resistance and ember resistance when installed with appropriate edge detail, fastener length, and seam closure. Synthetic or composite shingles can bridge performance gaps where traditional tiles aren't feasible, provided the system is specifically designed for wildfire resistance and tested for wind uplift on complex hillside geometry. In all cases, insist on explicit detail drawings that map how tiles, underlayment, fasteners, and sealants work together to form a continuous, fire-rated envelope.
On Calabasas hillsides, you'll want a maintenance routine that aligns with wildfire readiness. After heavy winds or wildfire season, inspect for loose tiles at ridges and edges, verify sealant integrity around penetrations, and check that all vents and chimneys have ember collars installed. Keep gutter systems clean and ensure debris does not accumulate where embers could ignite hidden dry matter. A proactive approach means scheduling annual or semiannual inspections with a roofer who understands hillside conditions, wildfire risk, and the unique demands of tile and metal systems in this terrain. If an older roof shows signs of wear or compromised connections, treat it as a potential reactor to the next embers-driven event and pursue upgrade to a fire-rated, wind-secure assembly promptly.
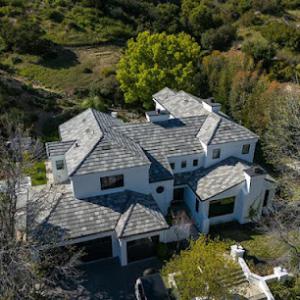
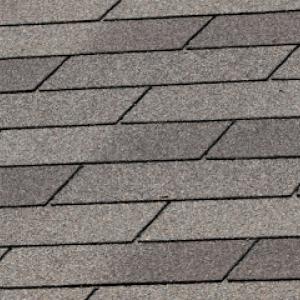
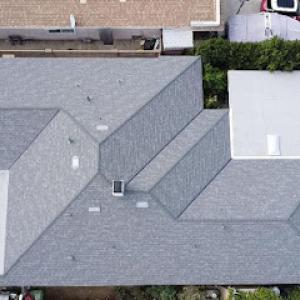
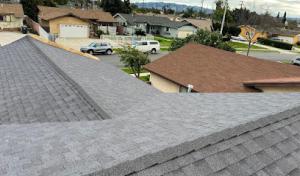
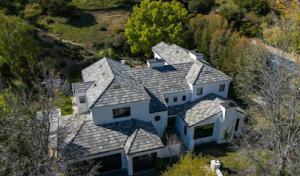
In hillside neighborhoods with Mediterranean and Spanish-style design, clay and concrete tiles are the look and the logic. They handle the Santa Ana blow-tors and the long Santa Monica sun better than many other roof assemblies. The texture and color harmonize with stucco walls and ground-facing tile work that define the views from the hillside streets. If you're choosing a replacement roof, these tiles bring curb appeal, but they require careful attention to fasteners, underlayment, and wind-secure detailing to perform through peak fire season and seasonal humidity.
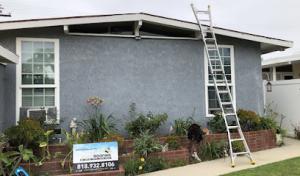
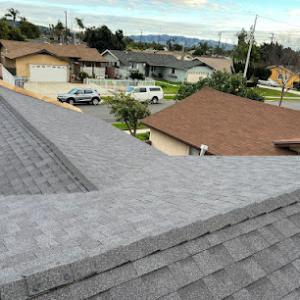
Tile roofs in this area often need close attention after wind events because slipped, cracked, or displaced tiles can expose underlayment long before the roof looks damaged from the street. After a tight Santa Ana wind, walk the roof with a ladder on a calm day and look for gaps or loose fasteners where tiles meet hips and ridges. Pay special attention to the edges of the roof where wind can pry tiles loose from their batten system. If you see gaps, don't wait for a leak to appear-address them with replacement tiles and re-securement before the next wind storm. When you spot cracked or chipped tiles, catalog the locations, because small fractures can propagate under UV exposure and heat cycling. For anchor points, check that ridge caps sit firmly and that valley tiles are seated correctly to shed water efficiently during winter rains.
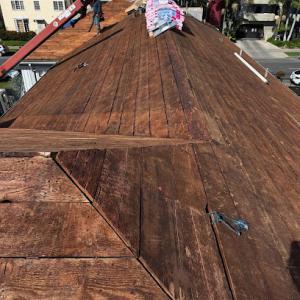
On older Calabasas homes, the limiting factor is often the aged underlayment beneath reusable tile rather than the tile itself, especially after years of hot summer sun and winter moisture cycles. Even if the tiles look intact, the underlayment can degrade, causing hidden leaks and degraded attic ventilation performance. The practical approach is to evaluate underlayment in sections where tiles have been replaced previously or where the roof shows uneven seam patterns from sun exposure over decades. A visual inspection from the attic or from the edge of the overhang can reveal softened or discolored areas, which are red flags for rot or moisture intrusion. If underlayment is compromised, plan a careful replacement of the layer beneath the tile-prefer a breathable, fire-rated membrane compatible with tile systems-and ensure a seamless transition at the eaves and valleys to maintain wind resistance and fire performance.
Fire-rated assemblies matter here because hillside homes sit closer to natural vegetation. Ensure that tile fasteners and battens are corrosion-resistant and that the underlayment includes a fire-rated backer in the upper portions of the roof where embers are most likely to accumulate. When you replace or repair, confirm that the roof deck is clean, dry, and free of debris that could fuel ember penetration. Consider secondary protection measures such as ember-resistant vent baffles and sealed roof penetrations to minimize pathways for flames and embers. A thoughtful tile upgrade that emphasizes wind-secure detailing and a robust underlayment will help your hillside home stand up to the region's unique blend of sun, wind, and fire risk.
Find contractors who specialize in clay and concrete tile roofs, known for their durability and curb appeal.
Global Roofing Specialist
(877) 345-7223 globalroofingspecialist.com
23600 Park Sorrento, Calabasas, California
5.0 from 287 reviews
Morning Light Roof Repair
(818) 699-0488 roofingcalabasas.com
26500 W Agoura Rd #171, Calabasas, California
4.8 from 67 reviews
Silver Stone Roofing
(818) 737-0647 sshomeremodeling.com
27001 Agoura Rd Suite 110, Calabasas, California
4.8 from 70 reviews
Global Roofing Specialist
(877) 345-7223 globalroofingspecialist.com
23600 Park Sorrento, Calabasas, California
5.0 from 287 reviews
WHO WE ARE & WHY WE’RE HERE As a homeowner, Global Roofing Specialist recognized there was a market need for roofers who could not only provide an excellent job with low-cost, long-lasting materials but also live up to their promises. Global Roofing Specialist was created to meet that need, and we have been doing just that since our founding in 2006.
LocalRoofs
27001 Agoura Rd #350, Calabasas, California
4.9 from 118 reviews
LocalRoofs has provided residential and commercial roofing services in Los Angeles, Ventura, and Santa Barbara for more than 50 years. Locally owned and operated, we are a licensed and insured local roofing company dedicated to providing high-quality work and premium service to our customers. We offer free roof checkups and estimates, roof replacement and repair services, solar shingle roofs, roof tune-ups, roof inspections, gutter installation and replacement, and attic venting. CSLB #1095477
Silver Roofing Specialist
(818) 863-3755 silverroofingspecialist.com
27001 Agoura Rd Suite 110, Calabasas, California
5.0 from 76 reviews
Silver Roofing Innovation Company, we pride ourselves on being more than fair a material company – we are your committed accomplice in defending and upgrading your property. Our group of gifted experts brings decades of ability to each venture, guaranteeing predominant comes about. We prioritise high-quality materials, and exact establishments, and provoke repairs to ensure a smooth and fulfilling material encounter for you. Past material, we construct unwavering quality, provide strength, and change spaces into persevering sanctuaries. Select Fabric Administrations to hoist your property, protect your venture, and give you a roof you can depend on for a long time.
Morning Light Roof Repair
(818) 699-0488 roofingcalabasas.com
26500 W Agoura Rd #171, Calabasas, California
4.8 from 67 reviews
Welcome to Morning Light Roof Repair, your reliable partner for all your roof repair needs. Our dedicated team of professionals is committed to providing exceptional results and exceeding customer expectations. With our attention to detail and expertise, we offer reliable and efficient repair services to address any issues with your roof. Whether it's fixing leaks, replacing damaged shingles, or addressing structural concerns, trust Morning Light Roof Repair for reliable and professional solutions. Experience the difference we can make for the longevity and functionality of your roof.
Silver Stone Roofing
(818) 737-0647 sshomeremodeling.com
27001 Agoura Rd Suite 110, Calabasas, California
4.8 from 70 reviews
Silver Stone Roofing is a trusted roofing contractor serving Calabasas, Westlake Village, Camarillo, Ventura, Oxnard, Santa Clarita, Los Angeles, Long Beach, South Pasadena, Arcadia, Altadena, and the San Fernando Valley. We specialize in roof replacement, repair, and maintenance, delivering high-quality craftsmanship with durable materials to ensure long-lasting protection for your home or business. Our expert team is dedicated to precision, reliability, and customer satisfaction, offering a range of roofing solutions, including shingle, tile, metal, and flat roofing systems. Whether you’re dealing with storm damage, leaks, or simply need an upgrade, Silver Stone Roofing provides customized solutions tailored to your needs and budget.
United Home Painting & Roofing
(323) 228-3466 unitedhomeservicesca.com
22432 Dardenne St, Calabasas, California
5.0 from 26 reviews
Honest, skilled and experienced are just a few words that best describe United Home Painting & Roofing. Locally owned and operated, we have extensive design-build experience in making Greater Calabasas, CA homes even more beautiful. We are fully licensed and insured, general contractors serving cities such as Thousand Oaks, Westlake Village, Agoura Hills, Reseda, Van Nuys and Sherman Oaks, CA. United Home Painting & Roofing is committed to providing our customers with the very best products and quality installations by knowledgeable craftsmen. Our owner has 20+ years of experience and supervises all jobs. We specialize in roofing repairs and replacements | interior and exterior painting and home remodeling.
vibe roofing
(855) 999-8666 viberoofing.pro
5830 Las Virgenes Rd, Calabasas, California
5.0 from 15 reviews
Vibe Roofing is a trusted local roofing contractor serving Los Angeles and nearby areas. We specialize in roof replacement, roof repair, new installations, gutter systems, and emergency leak response for both residential and commercial properties. Our team is fully licensed, bonded, and insured, bringing expert craftsmanship and a customer-first approach to every project. Whether you're dealing with a leak or planning a full roof upgrade, Vibe Roofing delivers dependable service at competitive prices. 📍 Serving: Los Angeles, Van Nuys, Studio City, Burbank, Sherman Oaks, and beyond. 📞 Call Vibe Roofing now for a free roof inspection or estimate.
LA Roof Masters Calabasas
(323) 544-3001 laroofmasters.com
24011 Ventura Blvd UNIT 200, Calabasas, California
5.0 from 11 reviews
Discover superior craftsmanship and reliable service with LA Roof Masters Calabasas, your trusted roofing contractor. Established in April 2023, this dedicated team brings expertise to every project, ensuring quality and durability. Located at 24011 Ventura Blvd unit 200 in Calabasas, CA, they specialize in a full range of residential and commercial roofing solutions. From new installations to meticulous repairs and complete replacements, LA Roof Masters Calabasas is committed to protecting your most valuable asset. Experience professional service and peace of mind with a team that puts your needs first.

911 Roofing Builders
(888) 404-0197 911roofingbuilders.com
24007 Ventura Blvd Suite 240, Calabasas, California
4.4 from 43 reviews
Energy Roofing has been offering the finest, most reliable residential and commercial roofing services in the Los Angeles, Inglewood, Chatsworth, Woodland Hills, and surrounding LA County region areas for over 10 years.
AAA Roofing Services
(818) 654-5977 aaaroofingsvc.com
23901 Calabasas Rd # 2063, Calabasas, California
5.0 from 4 reviews
AAA Roofing Services is a family owned full-service roofing company that prides itself in providing the highest level of quality workmanship on all of our commercial and residential services. With over hundreds of satisfied customers; our referrals are our biggest attribute and we are confident you will not want to look else where.

Roof Installation Pros
(818) 864-1350 roofinstallationprosca.com
Serving
5.0 from 59 reviews
Roof Installation Pros proudly serves Woodland Hills, CA, and nearby areas with over 19 years of professional roofing expertise. Our skilled team specializes in roof installation, roof replacement, shingle roofing, tile roofing, flat roof systems, roof leak repair, storm damage restoration, and more. We are dedicated to delivering durable, energy-efficient, and cost-effective roofing solutions that protect and enhance your home or business. With a focus on quality workmanship and customer satisfaction, our roofing contractors ensure every project is completed to the highest standard. Contact Roof Installation Pros Woodland Hills today for a free roofing estimate and dependable service you can trust.
Elite Roofing Solutions
Serving
4.8 from 56 reviews
At Elite Roofing Solutions, we are dedicated to providing top-tier roofing services that meet the highest standards of quality. Our team of skilled professionals brings expertise and craftsmanship to every project. Whether you need installations, repairs, or replacements, we have the knowledge and experience to deliver exceptional results. We work closely with our clients to understand their unique requirements and provide tailored solutions. Using premium materials and advanced techniques, we ensure that your roof not only provides reliable protection but also enhances it.
Calabasas has hot, dry summers that accelerate aging of asphalt products and underlayment, especially on sun-exposed slopes. On hillside homes with southern or western exposure, shingles and the underlayment can reach higher temperatures, leading to accelerated aging, brittleness, and more rapid wear corners and valleys. When planning a tear-off, expect shorter lifespans for any older asphalt components on these sun-facing facets. A practical approach is to align replacement work with a window where new underlayment can cure fully and new sealed edges can resist the daily sun load without being compromised by heat-driven expansion.
The wetter period roughly from November through February raises leak risk on aging roofs and can delay tear-off and dry-in scheduling. In that span, you want to avoid long stretches of unsettled weather that could push work into pockets of rain, which disrupts felt installation, membrane sealing, and tile or shingle seating. If a roof is approaching teardown during late fall, you should plan for a contingency in case a series of storms crops up, especially on exposed slopes where wind-driven rain can intrude under imperfect seals. Proactive temporary weatherproofing-such as secure eave protection and tarp strategies-can prevent moisture intrusion without committing to a full dry-in during uncertain weeks.
Replacement timing in Calabasas often revolves around avoiding both peak rain interruptions and the hottest summer installation windows. The goal is to secure a dry-in during a mild-to-warm shoulder period when days are long, humidity is moderate, and afternoon heat is manageable for crews laying underlayment, fasteners, and sealants. Shoulder seasons also reduce the risk of heat-related material softening during tile or shingle seating. If a project starts in late spring or early fall, crews can complete removal, repair of sheathing as needed, and installation before the most intense heat or winter storms arrive. Coordination of sequencing matters: ensure framing and underlayment are prepped ahead of the warmest stretch, so that heavy roofing work happens when UV exposure is steady but not extreme.
On hillside slopes, wind becomes a factor, especially when installing roofs with wind-rated assemblies. Schedule during days with lower afternoon gusts to minimize debris, reduce worksite hazards, and help sealants cure evenly. When a storm front is predicted, secure loose materials and protect underlayment from oversaturation. On sunny days, plan for proper shade and ventilation for crews to maintain product performance and worker safety. This targeted timing approach helps sustain long-term roof performance against wildfire exposure and Santa Ana wind events while keeping the project on a predictable path.
When you can't wait, these contractors offer fast response times to stop leaks and prevent further damage.
Silver Roofing Specialist
(818) 863-3755 silverroofingspecialist.com
27001 Agoura Rd Suite 110, Calabasas, California
5.0 from 76 reviews
Morning Light Roof Repair
(818) 699-0488 roofingcalabasas.com
26500 W Agoura Rd #171, Calabasas, California
4.8 from 67 reviews
vibe roofing
(855) 999-8666 viberoofing.pro
5830 Las Virgenes Rd, Calabasas, California
5.0 from 15 reviews
A full re-roof in Calabasas typically requires a building permit through the City of Calabasas Building & Safety. The process starts with submittal of roof plans, including details for fire-rated assemblies and wind-secure nailing patterns appropriate for hillside homes exposed to Santa Ana winds and high UV. Plan review tends to be more thorough when tile or metal options are chosen, as these materials interact with underlayment, ventilation, and clearance around vents and chimneys. Expect the city to request clarifications or supplemental drawings if the proposed materials or roof geometry raise questions about fire resistance or wind performance. Gather documentation on existing underlayment type, venting scheme, attic access, and debris management plans to streamline review.
Calabasas inspectors follow the permit path with on-site inspections rather than a simple over-the-counter replacement. Before work begins, a permit tag must be issued and clearly posted. During the project, inspections typically occur at critical milestones: before underlayment installation, after underlayment but before covering, after installation of all roofing materials, and a final inspection upon completion. Inspectors are known to verify underlayment quality and coverage, correct nailing patterns for the chosen roofing product, attic ventilation adequacy, and proper clearance around penetrations and flashings. Debris clearance and site safety measures are also evaluated to avoid windborne debris and hillside runoff concerns. Having a detailed schedule and a ready-to-review set of site photos can help the process move smoothly during plan-check back-and-forth.
Plan-check back-and-forth is common in Calabasas, especially for complex hillside homes with unique rooflines or custom tile configurations. Responses to reviewer comments may require updated drawings, revised fastener schedules, or alternative underlayment specifications. Timely communication with Building & Safety staff can prevent delays; designate a primary contractor contact to receive notices and provide prompt responses. Keeping a complete record of submittals, revisions, and permitted methods helps resist unnecessary clarifications that slow the path to permit issuance.
Permits come with fees that vary by scope and project complexity. While the exact amounts depend on the specifics of the replacement, anticipate a process where plan review, permit issuance, and inspections are bundled into the overall permit cost. Ensure access for inspectors to the roof and attic space, and prepare to address any neighborhood or HOA requirements that may intersect with City approvals. A well-documented submittal and proactive communication with the Building & Safety team reduce the chance of backtracking and keep the project aligned with Calabasas fire and wind-resilience expectations.
When you're budgeting a roof replacement for hillside homes with Santa Monica Mountain views, material choice drives a big portion of the price. Provided local ranges run about $320 to $650 per square for asphalt shingles, $600 to $1100 for metal, $900 to $1800 for clay tile, $800 to $1500 for concrete tile, $600 to $1400 for wood shingles or shakes, and $500 to $900 for synthetic or composite shingles. These figures reflect Calabasas' blend of high-end rooflines, heavy tile usage, and the need for durable, wind-resistant systems.
Costs can climb on steep or complex hillside homes with multiple facets, high access difficulty, and heavier tile systems that are common in local architecture. Labor must contend with tight access, required edge protection, and careful staging to avoid damage to landscaping, driveways, and surrounding structures. If a roof has multiple slopes or a perched parapet, plan for extra hours and specialized materials that maintain fire and wind resistance.
Costs in Calabasas can rise with permit fees, plan review, debris handling expectations, and premium labor for tile removal, underlayment replacement, and careful site cleanup. These factors can materially affect final pricing in this market, and the exact numbers depend on roof height, square footage, and existing framing condition. A detailed back-and-forth with your contractor helps pin these line items down before work begins.
If fire and wind resistance is your goal, discuss fire-rated assemblies and wind-secure detailing with your contractor, and verify that fasteners, underlayment, and tile or shingle selections meet Santa Ana exposure and wildfire risk. The right choices reduce long-term risk but can add upfront cost, especially with heavier tile systems.
In practice, asphalt remains the lowest entry cost, while clay and concrete tiles push total installed costs higher on hillside sites. Synthetic shingles offer a middle ground, with more wildfire resistance than standard asphalt but lighter weight than tile. Consider your slope, access, and long-term performance when comparing options.
Get a clear picture of your project costs upfront - no commitment required.
LocalRoofs
27001 Agoura Rd #350, Calabasas, California
4.9 from 118 reviews
vibe roofing
(855) 999-8666 viberoofing.pro
5830 Las Virgenes Rd, Calabasas, California
5.0 from 15 reviews
911 Roofing Builders
(888) 404-0197 911roofingbuilders.com
24007 Ventura Blvd Suite 240, Calabasas, California
4.4 from 43 reviews
California's insurance environment makes roof age, fire rating, and material type especially important for Calabasas homeowners because wildfire exposure can affect underwriting and coverage availability. A roof that looks pristine but sits atop a hillside home with drought-stricken or wind-prone surroundings can trigger tighter terms or even coverage gaps during renewal. In this market, what you chose for a replacement or retrofit matters as much as the current condition of the roof itself.
Claims in this area may involve wind-driven tile damage, rain intrusion after displaced roofing, or wildfire-related underwriting scrutiny rather than frequent hail-driven losses. That means the most useful files are those that show both the age and the performance history of the roof. Keep dated photos that clearly depict roof surface, flashing, valleys, vents, and any visible wear or damage. Include contractor inspection notes, product data sheets, and installation details that confirm fire rating and wind-secure detailing. When a storm or wildfire event occurs, these records help adjusters and underwriters see the whole story of how the roof has held up and what materials were used.
Store materials lists and mass-certification documents in a dedicated file, with cross-references to inspection dates and tile or shingle type. If a contractor identifies displacement, uplift risks, or compromised underlayment, capture notes and photos promptly from multiple angles. If a claim involves wildfire exposure, emphasize any preexisting fire-rated assemblies and the continuity of wind-resistant detailing. In short, clear, dated, and organized records shorten review cycles and reduce the chance of coverage questions when a claim is filed.
Connect with contractors who help homeowners navigate the claims process from damage assessment to final approval.
Morning Light Roof Repair
(818) 699-0488 roofingcalabasas.com
26500 W Agoura Rd #171, Calabasas, California
4.8 from 67 reviews

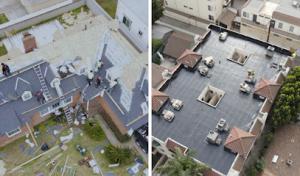
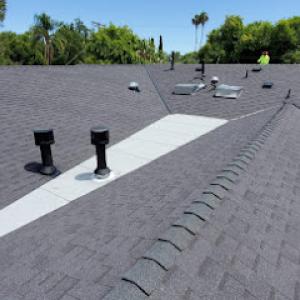
Pitched tile roofs dominate in hillside neighborhoods, but flat or low-slope sections over additions, patios, and modern designs require different drainage and membrane detailing. When planning a reroof or a retrofit, check how these sections tie into the tile field and how the parapets, scuppers, and drip edges are flashed. In Calabasas, heat and Santa Ana winds can bake membranes over low-slope areas, so ensure a high-quality adhesion, adequate slope, and reliable termination at transitions to higher-pitch sections. Consider a single, continuous membrane behind a counterflashed edge to minimize seam vulnerability where slopes change.
Skylights are a meaningful local service category, and leak diagnosis on mixed rooflines often centers on transitions between tile fields, low-slope sections, and skylight flashings. For a skylight retrofit or replacement, verify that the flashing seats squarely against both the tile plane and the membrane, with a dedicated curb or curb-cap flashing. Seal all penetrations at the curb with compatible flashing and ensure the surrounding tile is coordinated to shed water away from the skylight. In addition, confirm that valley or crickets near skylight penetrations are not directing water toward the curb.
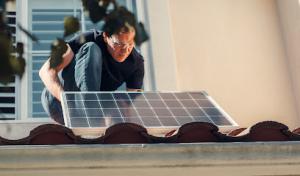
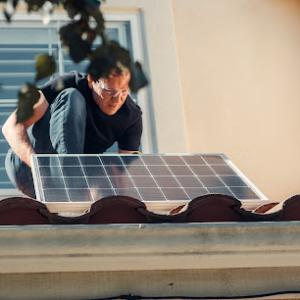
Solar-related roof work matters in sunny Calabasas because reroof timing, flashing integrity, and penetrations become more important when coordinating with existing or planned rooftop solar. If solar arrays are planned, align the panel array layout with roof penetrations, ensuring that penetrations through the roof deck are minimized and, where needed, reinforced with proper sealants and cladding. Schedule reroofing so that flashing around the solar mounts remains intact during installation, and consider pre-sealing all parapet and edge flashing to prevent future uplift failures during Santa Ana winds.
Low-slope sections require precise drainage planning to prevent ponding, especially near transitions to tile fields. Use a properly sloped membrane, integrated with edge drains or scuppers, and install a reliable termination at wall flashings to avoid water tracking under tile. For mixed rooflines, standardize flashing details at all transitions so that water flow remains clear and predictable, even during heavy sun and heat exposure. Regular inspection after installation helps catch micro-movements that could loosen patches, especially where skylight frames meet membranes.
Find specialists in TPO, EPDM, and built-up flat roofing systems for residential and commercial properties.
Global Roofing Specialist
(877) 345-7223 globalroofingspecialist.com
23600 Park Sorrento, Calabasas, California
5.0 from 287 reviews
Silver Stone Roofing
(818) 737-0647 sshomeremodeling.com
27001 Agoura Rd Suite 110, Calabasas, California
4.8 from 70 reviews
Wood shingles and shakes appear in the local material mix but are a more sensitive choice in a wildfire-conscious California market. When you're perched on a hillside, the tendency to reach for a wood look must be weighed against ignition risk, ember exposure, and the surrounding landscape. Even well-vented soffits and careful clearance won't fully shield you from wildfire dynamics that can overwhelm a roof with a rapid flame surge or wind-driven embers.
For Calabasas homeowners who want a traditional wood look, synthetic or composite products may enter the conversation because insurers and fire-rating concerns can influence material selection. These products mimic the texture and color of wood while offering enhanced fire resistance and lower maintenance in sun-scorched summers and with persistent Santa Ana winds. The trade-off is often a more uniform appearance and a slightly different shadow line that can impact the roof's character from the street.
Material choice in Calabasas is often a balance between architectural appearance, wildfire-related underwriting pressure, and the performance demands of hot sun and seasonal winds. If you opt for wood-like composites, you'll want to verify UV stability, color retention, and the ability to resist wind-blown debris without warping. If you lean toward real wood, expect more frequent inspections and proactive maintenance to manage drying, checking, and potential ember resistance within the fire regimes of dry summers.
Consider how roof lines, vents, and chimneys interact with wind corridors and eucalyptus or native groves nearby. The right choice aligns curb appeal with a defensible roof edge, a fire-resilient underlayment, and a fastening system designed to resist lifting in gusts. In practice, the decision hinges on how much traditional wood you value versus the long-term reliability offered by fire-friendly composites.
Connect with specialists in the installation and restoration of natural cedar shake and shingle roofs.