Last updated: Apr 19, 2026
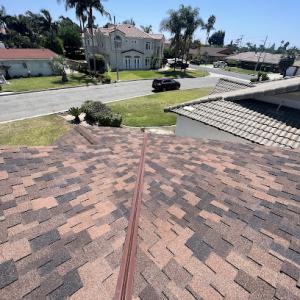
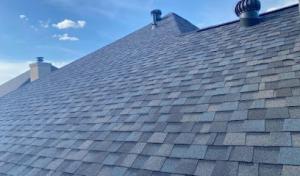
The Mediterranean-style climate in this area brings long dry summers and mild, wetter winters. Replacement timing tends to be driven more by UV exposure and seasonal rain than by freeze-thaw cycles. Asphalt shingles, metal, and tile all wear from sun exposure over time, and the daily sun load compounds the aging of any roof surface. In practice, that means you're watching for gradual loss of granules, color fading, and increased flexibility or brittleness in shingles rather than sudden freeze-thaw cracking.
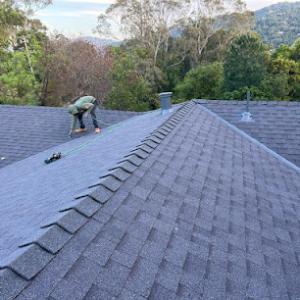
Fall Santa Ana winds in the Los Angeles Basin can lift aging shingles and disturb ridge lines or tile components. In Lakewood, late-summer and fall inspections gain priority because wind events can expose underlying decking, loosen fasteners, or dislodge cresting. If an inspection after the hottest weeks shows lifted edges or loose ridge caps, plan repairs promptly to prevent water intrusion or accelerated deterioration during the rainy season. The goal is to catch wind-related damage before it becomes a larger roof failure.
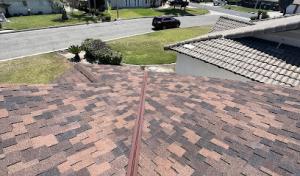
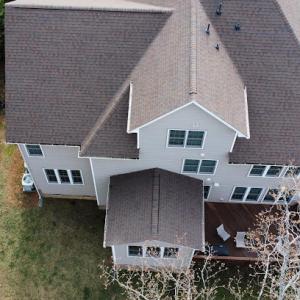
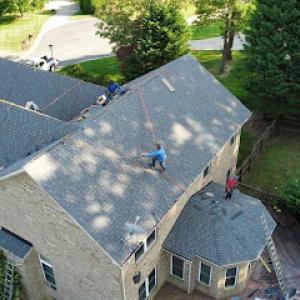
This area is characterized by older tract homes with uniform roof types and shared construction practices. Many reroofs involve aging roof systems rather than first-time installations. That means the decision point often centers on when the substrate and underlayment have reached a point where replacement delivers durable protection rather than chasing cosmetic improvements. Look for common signs in practical terms: curling or cupping shingles, bald spots where granules are missing, sagging or lifting at hips and ridges, and visible daylight from the attic.
A practical plan is to schedule formal checks twice a year with a mid-summer follow-up after the peak heat. Start with a visual from the ground after the dry season and again after the wet season's beginning, paying attention to areas around chimneys, vents, and transitions to walls. For homes with clay or concrete tiles, inspect ridge lines for cracked or dislodged pieces and check the fasteners securing hip-and- ridge components. For asphalt or metal roofs, look for granule loss, corrosion (in metal), and any misaligned panels or shingles. If you spot loose pieces or granules in gutters, address them before western winds intensify.
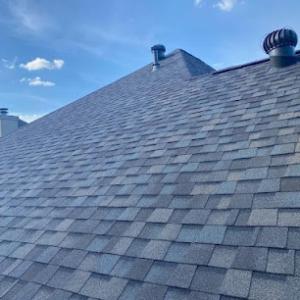
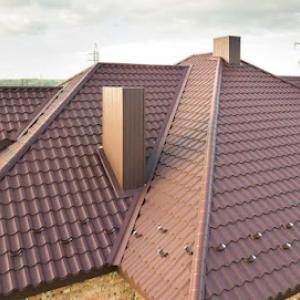
Sun exposure accelerates wear on all roof types, but tile roofs (clay or concrete) are particularly vulnerable to micro-cracking and lifting at edges under heat cycling and wind pressure. Metal roofs can develop panel seam leaks if fasteners loosen or flashing degrades, while asphalt shingles commonly show granule loss and curling at the edges. Decks under older roofs may show signs of moisture intrusion first at penetrations, transitions, and along eaves where water can pool and soak in during heavier winter rain.
If the roof is approaching two to three decades in moderate sun exposure or shows noticeable UV-based aging, factor replacement into a window that avoids peak summer heat and the wettest months. Schedule the major work after the end of the dry season but before the heavy fall rains and wind. When planning, align a capable crew with a scope that includes inspecting and potentially upgrading underlayment, venting, and ridge components to withstand Santa Ana wind cycles. A well-timed reroof minimizes the risk from UV-driven aging and fall wind events, ensures a solid seal against winter rain, and aligns with the built-out tract-home realities that define the local housing stock.
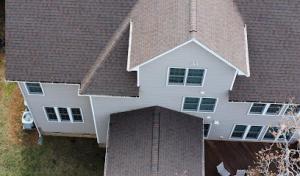
In this city's postwar tract-home neighborhoods, the sun punishes roofs with long exposure to heat and UV. Asphalt shingle systems in particular endure brittle edges and accelerated aging under that constant glow, which can shorten reroof cycles if the shingles start cupping or curling sooner than expected. On the other hand, tile options-clay and concrete-face different challenges tied to California's mixed climate: weight, underlayment aging, and wind-driven displacement after Santa Ana events. When planning a reroof, the local pattern is clear: asphalt installations tend to respond quickly to summer heat, while tile systems demand attention to the roof deck, fastener integrity, and the underlayment's ability to handle aging and moisture infiltration.
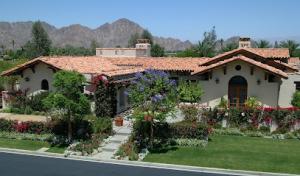
The area's established stock features a mix of asphalt shingles, clay tile, concrete tile, metal, wood shakes, and synthetic shingles. Asphalt and tile stand out as the most relevant choices for the typical home-especially given the long-lived neighborhoods with varied roof pitches. Asphalt remains common due to its lighter weight, straightforward installation, and broad availability of styles that mimic traditional shingle textures. Tile-both clay and concrete-appears frequently on grander street-front homes and on projects where homeowners want a classic Southern California look. Metal and wood shakes appear in pockets, but their performance hinges on roof geometry and maintenance history. Synthetic shingles provide a middle ground in aesthetics and durability, yet they must still battle sun exposure and wind in this climate. Understanding these materials' distinct behaviors helps you pair the right product with the house's structure and the local weather cycles.
With clay and concrete tile, the underlayment often carries more long-term importance than with asphalt. Its age and condition influence how the roof handles winter moisture and the seasonal winds that can strip loose tiles after strong Santa Ana events. If the underlayment has seen its share of sun-exposed summers, it may need more frequent inspection or earlier replacement when reroofing with tile. Asphalt systems, while simpler in this regard, still rely on a sound underlayment to prevent heat-driven adhesive failures and to extend the shingle life under high UV exposure. After a Santa Ana wind surge, you should expect to inspect for lifted or cracked shingles or displaced tiles, and trigger a closer look at wind-driven damage that can compromise attic ventilation and roof decking over time. In short, tile systems demand a proactive assessment of underlayment age and tile fastening integrity, while asphalt boards benefit from ensuring sealant and flashing remain watertight against radiant heat.
Concrete and clay tile carry substantial weight compared to asphalt. On older Southern California homes, particularly those with aging framing or limited structural upgrades, a change in material type during reroofing can introduce stresses that require reinforcement. If a homeowner contemplates moving from asphalt to tile-or from one tile type to another-it's essential to verify that the existing roof structure can handle the added load. Conversely, moving from heavy tile to lighter asphalt may relieve some structural demands but could demand additional ventilation and moisture management because of the different roof plane characteristics. In this region, careful assessment of purlins, rafters, and sheathing clarity helps prevent unexpected sagging or fastener failure once the new roof is installed.
The sun-driven wear pattern on asphalt often translates to earlier replacement decisions in the tract-home stock, especially where roof lines are perpetually bathed in afternoon heat. Tile roofs, while resilient to heat, require attention to fastener corrosion, mortar setting between tiles, and underlayment age after heavy winter rains and Santa Ana winds. The reroof timing in this climate tends to be governed by the balance between UV-induced shingle wear and tile deck durability. Regular inspection during and after the hottest months can catch early signs-curling edges on asphalt or displaced tiles after a wind event-so you can plan the replacement before a small problem becomes a costly one.
The winter rain episodes in this tract-home corridor arrive with more urgency than people expect. Short, sharp downpours can expose a roof that has deferred maintenance, especially where flashing, valleys, penetrations, or aged underlayment have already been weakened by sun exposure. When those weak points give way, you get leaks that show up fast-sometimes during the first serious cold front or the first measurable rain after weeks of sun. If your roof already sounds a little thin or brittle at the valleys, you are not imagining it-you are watching a risk window open.
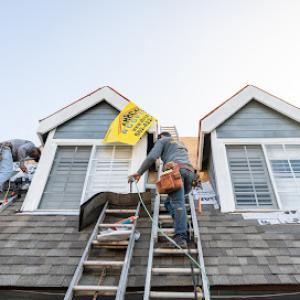
Fall wind events from Santa Ana conditions are particularly disruptive to reroof work and emergency repairs. Debris management and material staging become more difficult as gusts pick up and dust devils swirl through streets. Neighbors may find shingles or torn underlayment shifting mid-project, and crews must contend with sudden gusts that threaten ladder stability and safety lines. That means timing becomes critical: trying to complete work during a windy spell can extend repair windows, raise risk, and leave vulnerable areas exposed longer than necessary.
During Santa Ana conditions, debris blows into gutters, valleys, and around fasteners, clogging drainage paths and masking problem areas. If a project lands in a windy stretch, the usual clean-as-you-go approach can stall because every gust demands re-staging of materials and temporary containment. Expect routine setbacks: tarps slipping, nails rolling under bushes, and tools rattling loose from racks. Proactive debris containment and careful staging are not optional-they determine whether a quick fix or a longer follow-up is required. Your roof can go from a simple repair job to a full replacement timeline if debris and sun-damaged underlayment have accelerated deterioration.
Spot-check flashings around chimneys, skylights, and vent pipes; if you notice loose flashing or lifted shingles, address it before the next rain window. Inspect valleys for bird nests, debris buildup, or fascia gaps that could channel water into the roof deck. If a wind event is forecast, clear gutters and downspouts, secure loose materials on the roof, and arrange for temporary weather-tight coverings over vulnerable penetrations. When a leak is detected after a wind or rain event, photograph the affected areas, map the path of water intrusion, and communicate promptly with a roofing professional who can stage a targeted emergency repair before additional storms arrive.
Rushing a repair in active Santa Ana conditions often leads to incomplete sealing or misaligned shingles, which can fail when the next gust hits. A measured, staged approach during calmer windows reduces repeated trips and guarantees that flashing, underlayment, and penetrations are correctly sealed. If multiple homes on a block require attention, coordinate with neighbors to create a controlled work zone that minimizes wind exposure and keeps debris contained. A focused plan during favorable weather keeps minor leaks from spiraling into significant interior damage.
Find local contractors experienced in assessing and restoring roofs after hail, wind, and severe weather events.
A-1 Roofing
(562) 249-1725 lakewoodroofingsolution.com
500 Lakewood Ctr Mall #22, Lakewood, California
4.9 from 17 reviews
Reroof planning in this tract-home corridor hinges on understanding that replacement work dominates the market. In practice, that means budgeting around reroof scenarios rather than new construction since many homes already have established loads, ventilation, and underlayment needs that drive pricing more than a fresh build would. When you measure cost, think in terms of replacing what's there with choices that fit the same footprint and slope, and anticipate that a typical Lakewood project is motivated by aging shingles, prior deck exposure, or weather-driven wear rather than flashy upgrades.
Asphalt shingles remain the baseline for many Lakewood homes, and the price range reflects frequent, straightforward installations. Expect costs near the lower to mid end of the spectrum, with visible savings if the roof deck is sound and existing sheathing remains in good condition after a tear-off. Moving to heavier systems like tile can up the numbers quickly, especially if the existing structure isn't reinforced for heavier weights or if deck repairs are uncovered during tear-off. In practice, many homeowners find asphalt a practical balance for sun exposure and wind, while tile systems demand closer attention to structural compatibility and long-term maintenance.
If a homeowner pushes from asphalt to clay or concrete tile, prepare for a sizable step up in cost. Tile systems offer durability against Lakewood's strong sun and Santa Ana winds, but they require more robust framing, improved ventilation, and upgraded underlayment. When tear-off reveals compromised decking or insufficient ventilation, the project expands beyond a straightforward shingle swap. Those adjustments are common enough to affect the bottom line, and they often come with longer project timelines and a tighter window for scheduling in peak demand periods.
Synthetic or composite shingles can bridge the gap between affordability and durability, providing better resistance to heat and wind without the weight of traditional tile. This option can reduce some installation complexities versus full clay or concrete tile, yet it still carries a premium over basic asphalt. If your home's roof is near the end of its service life and the existing underlayment is older, upgrading to a higher-performing synthetic layer can deliver value even as you upgrade aesthetics.
Project timing influences price in Lakewood for several reasons. Winter rain can delay a start or push crews into tighter winter windows, fall wind precautions may require additional temporary bracing or protective measures, and regional demand spikes after storm events can tighten scheduling and labor availability. Planning around shoulder seasons can help stabilize both cost and scheduling, especially if a tear-off reveals more extensive repairs.
A-1 Roofing
(562) 249-1725 lakewoodroofingsolution.com
500 Lakewood Ctr Mall #22, Lakewood, California
4.9 from 17 reviews
Welcome to A-1 Roofing, where excellence meets expertise in roofing solutions! Elevate your property's protection with our top-notch services. Our skilled team specializes in seamless Roof Installation, ensuring durability and style for your home or business. Experience a transformative upgrade with our Roof Replacement services, providing innovative options for every need. Trust us for swift and effective Roof Repair, restoring your peace of mind. Explore the modern charm and resilience of Metal Roofing or opt for the classic appeal of Asphalt Shingle Roofing. For commercial spaces, our expertise extends to Commercial TPO Roofing. Whether it's New Construction Roofing or efficient Flat Roofing solutions, A-1 Roofing is your premier choice.
Shingle Guard Roofs
(562) 545-4906 shingleguardroofs.com
Serving
5.0 from 25 reviews
Shingle Guard Roofs is a trusted roofing company dedicated to protecting homes and businesses with durable, quality roofing solutions built to last. Specializing in roof repairs, replacements, new installations, and preventative maintenance, our team delivers expert craftsmanship and reliable service at fair prices. We work with all major roofing materials asphalt shingles, tile, metal, and flat roofing systems to provide customized solutions that enhance curb appeal while keeping properties safe from the elements. At Shingle Guard Roofs, we stand by our name by offering long lasting protection, honest estimates, and a commitment to excellence that has made us a go to roofing contractor for homeowners and businesses.
Elevate Roofing
(562) 469-2089 elevateroofingservices.com
Serving
5.0 from 96 reviews
At Elevate Roofing, we're more than just a roofing company we're a close-knit, family-owned business with over 30 years of combined experience in the industry. Picture us as your friendly neighborhood roof experts, committed to treating your home like our own. Here's the deal: we take the time to get things just right, from hand-picking the best materials for your roof to making sure every detail, like ventilation and flashing, is spot on. Our team? They're not just skilled workers; they're like part of the family, dedicated to crafting roofs that not only look great but also stand strong against whatever Mother Nature throws their way. So, if you're ready to give your home the top-notch treatment it deserves, let's chat.
AHR Company
Serving
5.0 from 49 reviews
We provide commercial and residential roofing services in LA County, Orange County, and the surrounding areas. Call today for your free estimate.
Roofing H Rancho Palos Verdes
Serving
5.0 from 44 reviews
As a premier roofing service, Roofing H Rancho Palos Verdes offers exceptional craftsmanship for all your roofing needs. We specialize in installations, repairs, and maintenance, ensuring the durability and longevity of your home's protection. Our dedicated team uses high-quality materials and proven techniques to deliver results that stand up to the elements and elevate your property's curb appeal. Trust us to provide reliable, professional service that keeps your home safe and secure for years to come.
California Coast Construction
(562) 850-1722 californiacoast.construction
Serving
5.0 from 23 reviews
California Coast Construction is a trusted roofing company proudly serving Long Beach, CA, with reliable residential and commercial roofing services. Known for quality craftsmanship and attention to detail, the team provides expert roof installations, maintenance, and repairs designed to protect homes and businesses year-round. As a dependable roofing contractor in Long Beach, we specialize in durable materials, energy-efficient solutions, and professional service that clients can count on. California Coast Construction is dedicated to customer satisfaction, offering honest communication, fair pricing, and dependable results. Homeowners and businesses in Long Beach, CA choose us for roofing solutions that deliver long-lasting protection.

Atlas Roofing of Long Beach
(562) 376-2244 www.atlasroofinglongbeach.com
Serving
5.0 from 18 reviews
Atlas Roofing is Long Beach and the surrounding area’s premiere roofing company providing a variety of roofing, siding, and gutter services. We offer residential roofing and commercial roofing, roof repair and roof replacement, including asphalt shingles roofing, wood roofing options, metal roofing, tile roofing, and low slope roofing. We are experts at helping you navigate through insurance issues.
Advanced Roofing Systems
(855) 218-2694 www.advancedroofingsystems.com
Serving
4.7 from 43 reviews
Advanced Roofing Systems provides roof inspections, installations, repairs, maintenance, waterproofing, and more in Los Angeles and Orange counties.
Allied Roofing
(562) 525-5839 norwalkroofingcontractor.com
Serving
4.9 from 23 reviews
Welcome to Allied Roofing, your trusted partner in elevating rooftops to new heights! Experience excellence in every layer with our expert Roof Installation – a seamless blend of precision and aesthetics. Transform your property with confidence through our dedicated Roof Replacement service, ensuring durability and curb appeal. Count on us for meticulous Roof Repair, restoring your peace of mind. Embrace innovation with our cutting-edge Metal Roofing solutions or the timeless charm of Asphalt Shingle Roofing. For commercial spaces, choose the reliability of Commercial TPO Roofing. From New Construction Roofing to the sleek lines of Flat Roofing, Allied Roofing delivers quality, durability, and a new zenith for your property.

Swell Roofing
(562) 751-2090 swellroofing.com
Serving
5.0 from 23 reviews
Swell Roofing, located at 6801 E 11th Street, is your top choice for expert roofing solutions. As a leading roofing contractor, we specialize in roof repair, roof replacement, and comprehensive roof inspection services. Our skilled team is dedicated to providing exceptional craftsmanship and swift emergency roof repair for your peace of mind. As your trusted local roofer, we pride ourselves on serving our community with reliable and affordable services. When searching for "roofer near me" or reputable "roofing companies," Swell Roofing is committed to ranking at the top of Google Maps, delivering quality results, and ensuring complete customer satisfaction.
Lifetime Roofing & Renovation
(408) 685-2177 lifetimeroofingrenovation.com
Serving
4.8 from 17 reviews
Lifetime Roofing & Renovation, Inc is a full-service roofing and renovation company based in Los Angeles, CA. We specialize in residential and commercial roofing services, including new installations, repairs, and replacements. Our team of experienced professionals is dedicated to providing high-quality workmanship and excellent customer service. In addition to roofing services, we also offer a wide range of renovation services, including kitchen and bathroom remodels, additions, and exterior renovations. We are fully licensed, insured, and bonded, and we use only the highest-quality materials to ensure that our work is built to last. Trust us to protect your home or business with a sturdy, long-lasting roof and beautiful renovations.
GreenCal Construction
(714) 790-1750 greencalinc.com
Serving
4.5 from 76 reviews
GreenCal Construction provides high-quality, energy-efficient home improvement solutions: residential and commercial roofing & solar, roof repair, windows, insulation, exterior paint, and patio covers. Focusing on sustainability and durability, their expert team enhances homes with innovative, eco-friendly upgrades. Whether you're looking to improve curb appeal, reduce energy costs, or create a low-maintenance outdoor space, GreenCal offers customized solutions tailored to your needs. Their services combine expert craftsmanship, top-notch customer service, premium materials, and long-lasting performance to ensure customer satisfaction. GreenCal Construction has you covered...and surrounded!
In Lakewood, reroof projects generally require a building permit from the City of Lakewood Building and Safety Department. Before lifting the old shingles, you'll want to confirm that a permit is opened and active, because surveillance and code compliance are part of the work timeline. The process isn't something to rush through; a missing or incomplete permit can halt a project mid-progress and create rework that's costly in both time and materials. Start by identifying the scope of work early, so the permit reviewer sees a clear plan from day one.
Permit applications typically include project scope, roofing materials, and ventilation details, and plan review may require energy code compliance and underlayment specifications. In practice, you should assemble a package that spells out the roof's layout, deck condition notes, attic ventilation strategies, and a description of the underlayment type and thickness you intend to install. Energy efficiency requirements are common in this area, so be prepared to show how the new roof contributes to insulation and ventilation performance. If the contractor uses any specialty products or nonstandard details, include manufacturer literature and installation guides to support the plan review.
Inspections are typically scheduled at key milestones, with pre-deck or underlayment inspections followed by a final inspection once the work is complete. The weather patterns in this region-hot, dry summers with occasional winter rain and Santa Ana wind events-can affect when inspections are feasible and how long it takes to secure a clearance. Plan for a window between permit approval and the first inspection, and coordinate with the crew to avoid delaying critical steps like securing the roof deck and installing the underlayment. Keeping the project on a steady schedule helps minimize the risk of weather-related holdups, which can cascade into permit prolongation.
A frequent stumbling block is submitting incomplete information or missing a required detail in the plan review, which can trigger delays or a need for addenda. Double-check that ventilation calculations align with local code expectations and that the chosen underlayment specifications meet the inspector's criteria. Another pitfall is applying temporary measures that aren't up to code, then discovering during final inspection that they must be upgraded. To prevent this, verify all documentation with the Building and Safety Department before starting any removal work, and maintain a clear line of communication with the permit reviewer throughout the project.
Lakewood homeowners are affected by California's tighter insurance market, where carrier pullbacks in parts of Los Angeles County have made roof condition and documentation more important. Being prepared with clear records can influence whether a claim is accepted or how a policy may respond after a wind-driven rain event or a maintenance issue that becomes a leak. The timing of reroof projects in this climate is often tied to how well the roof has been photographed, measured, and detailed for insurers.
For claims and underwriting, homeowners may need thorough pre- and post-project photos, material records, and documentation of wind-related repairs or mitigation details. Return to those photos after a storm if a leak appears, and organize them by date, area, and the suspected cause. Keep receipts and product specs, plus notes on any temporary measures you used to limit rain intrusion. Insurance adjusters in this region will compare recent conditions to the prior state, especially when wind-worn or sun-bleached sections show accelerated wear.
Because losses are more often tied to wind-driven rain, leaks, and maintenance-related failures than hail, documentation quality can matter when distinguishing sudden damage from wear. Take wide-angle shots that show the roof slope, edge details, and any surrounding trees or debris that might contribute to wind-driven impacts. Close-ups of fasteners, flashing, and any existing repairs help demonstrate whether a loss happened suddenly or evolved from gradual deterioration. In contested cases, well-organized evidence can streamline the review and reduce back-and-forth with a carrier.
Develop a simple filing routine: label photos with dates and locations on the roof, store digital copies in a cloud folder, and keep printed copies in a weatherproof binder. Create a brief roof-health summary that notes visible sagging, missing shingles, or granule loss, and attach it to your claim file. If a mitigation step is taken-temporary tarps, quick-repair patches, or wind straps-document the setup with dates and the installers' names. Clear, consistent documentation helps protect against misinterpretation when insurers assess wind-related risk and maintenance history.
Connect with contractors who help homeowners navigate the claims process from damage assessment to final approval.

Atlas Roofing of Long Beach
(562) 376-2244 www.atlasroofinglongbeach.com
Serving
5.0 from 18 reviews
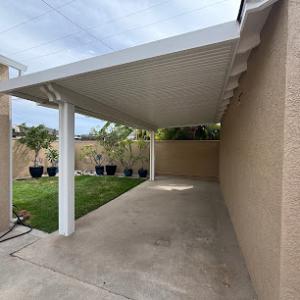
In this area, the contractor market shows meaningful flat-roof specialization, reflecting demand for low-slope sections on additions, patios, garages, and some commercial properties. That focus means you can often find a skilled crew for leaks, flashing, and membrane repairs without stepping outside familiar Lakewood neighborhoods. Expect crews to bring experience with single-ply membranes and built-up roofing, not just shingles.
Although pitched residential roofs are common, a low-slope section can look fine while drainage is already failing. In Lakewood's dry climate, a neglected drain path, clogged scuppers, or worn seams invites hidden ponding that worsens on winter rain days. Seams and laps are the high-risk spots; if you see fasteners lifting or flashing pulling away at the transitions, address it before the next rain. A simple, proactive check can stop a small leak from turning into interior damage.
Mixed-roof homes in older Southern California neighborhoods often need different repair strategies where low-slope sections meet shingle or tile areas. Pay close attention to how the edge of the low-slope part meets the higher-slope roof, and ensure flashing continuity across materials. Inconsistent flashing or mismatched coatings here is a common failure point after wind events or seasonal temperature swings.
Keep an annual plan: inspect for membrane blistering, confirm edge metal is secure, and clear debris from any drainage outlets. After Santa Ana winds or a heavy storm, re-check fasteners and sealants on all low-slope transitions. If small issues are found, act quickly before travel paths and roof edges widen the problem.
When summer sun seasons align with a dry spell, that's a good window to seal or retrofit low-slope areas, since winter rain will test any neglected joints. If a reroof on a low-slope addition or garage is planned, schedule inspection of the entire transition zones first, because the combination with existing shingles or tile changes the approach. Keep a simple visual log for temperature swings seasonally.
Find specialists in TPO, EPDM, and built-up flat roofing systems for residential and commercial properties.
A-1 Roofing
(562) 249-1725 lakewoodroofingsolution.com
500 Lakewood Ctr Mall #22, Lakewood, California
4.9 from 17 reviews
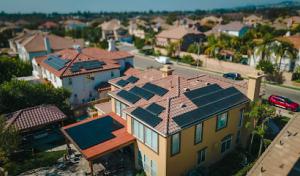
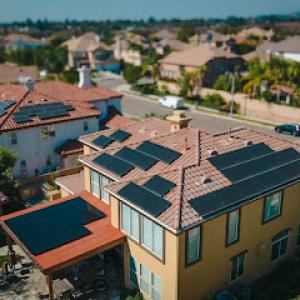
In tract-home roofs common to this area, the south-facing sun trains heat on shingles and flashing all summer, driving expansion and contraction that can loosen seams. When a reroof is planned close to solar installation, timing becomes practical: align panel mounting with a roof that still has years of life left, so panels don't have to be moved later. Clear, realistic schedules help avoid a mid-project rerun.
Roof penetrations from solar mounts, vents, and skylights deserve extra scrutiny before the first winter storms. Southern California leak calls often trace back to flashing details rather than field shingles alone. Check sealant wear, flashing step-laps, and the transition from roof to edging. If a panel system is involved, ensure mounts won't compromise ridge or drip edge during a heavy rain event.
Santa Ana winds can lift and loosen components if fasteners or flashings are marginal. In Lakewood, high sun and dry air accelerate aging of sealants, so inspect every penetration after a heat cycle and again after any wind event. A reroof in good weather with fresh sealants and properly seated flashing reduces the chance of a rushed repair during a storm.
When reroof work and solar installation are scheduled near the same window, build in overlap for panel removal and reinstallation. This prevents multiple climbs onto the same slope and minimizes the risk of accidental damage to a newly shingled roof. Document the exact locations of all penetrations to guide the crew during rework.
Find contractors who integrate solar panels or solar shingles into your roof for long-term energy savings.
Lifetime Roofing & Renovation
(408) 685-2177 lifetimeroofingrenovation.com
Serving
4.8 from 17 reviews