Last updated: Apr 19, 2026
Spring hail and wind are the dominant roof-loss events driving replacement timing and claim volume in this area. The Front Range's unique mix of rapid temperature swings and dry air means hail can batter a roof after a fast-moving storm, with damage sometimes hidden beneath the surface. In this neighborhood, roofs age quickly under repeated freeze-thaw cycles, making early assessment after a significant hail event critical. You'll want to understand that the frequency and severity of hail in this region are higher than in many other Colorado markets, and that your roof's age and material type can dramatically affect claim outcomes and repair timelines. Recognize that a seemingly minor bruise can become a larger leak once the next round of storms arrives, so prompt action can prevent cascading damage.
Local insurers commonly verify hail history, roof age, and exact material type because hail frequency in the Front Range is high compared with many other Colorado markets. This means you should be prepared with precise records: dates of past storms that impacted your property, the current roof's approximate age, the exact shingles or panels installed, and any previous repairs. If the claim relies on a hail history trail, gaps in documentation can slow the process or lead to partial approvals. Having organized documentation helps insurers move from initial inspection to full replacement more smoothly, reducing the risk of weathering delays when the next storm cycle approaches. Expect adjusters to compare your roof's current state to the installed materials and to verify whether pre-existing conditions could affect eligibility for coverage.
After major spring storms, contractor schedules tighten quickly in Littleton and nearby south-metro communities, which can delay inspections, temporary dry-in, and full replacement starts. The surge means you may face longer wait times for an inspection, especially if the storm produced widespread damage across neighborhoods. If a claim is approved, the coordination between insurer, contractor, and supplier availability becomes a bottleneck that can push timelines into the peak of the next storm cycle. Plan for a compressed window of opportunity after approval, but also build in contingencies for weather-related delays. Knowing this pattern helps you set expectations with your family and your contractor so you're not scrambling at the last minute when a window opens.
Prepare a simple, organized file before spring storms hit: photos of the roof from multiple angles, notes on material type, and any prior repairs or replacements. When a hail event occurs, take immediate but careful photos, timestamped if possible, and document any new signs of damage (soft spots, curling shingles, granule loss). Contact a trusted local contractor promptly after the storm to arrange a quick professional assessment; the sooner a knowledgeable eye can confirm damage, the stronger your position when coordinating with the insurer. If you receive an insurance statement indicating coverage for a full or partial replacement, schedule your next steps with the contractor as soon as possible, keeping in mind the tight post-storm calendar. This proactive stance reduces the risk of weathering delays and helps ensure that the first available dry-in and full replacement slots align with insurance approvals and material availability.

Trek Contracting
(720) 640-6646 trekcontracting.com
8500 W Bowles Ave Suite 301, Littleton, Colorado
5.0 from 127 reviews
Trek Contracting is a trusted roofing company in Littleton, CO, specializing in professional roof replacement and repair services for homes and businesses. With Colorado’s unpredictable weather, from heavy snow to intense summer hail, our team focuses on durable, high quality roofing solutions that protect your property year-round. We handle everything from full roof replacements to storm damage inspections with precision and care. Known for reliability and craftsmanship, Trek Contracting stands out among Littleton roofers as your local, licensed, and experienced roofing contractor dedicated to lasting results and superior service.
Keystone Roofing
(303) 349-9792 www.keystoneroofinginc.com
Littleton, Colorado
5.0 from 112 reviews
Keystone Roofing is a top-rated roofing contractor serving Littleton, Colorado since 2008, renowned for high-quality commercial and residential roofing services. Specializing in "commercial roof hail damage," "roof repair Littleton," and "Littleton roofing companies," our team offers expert maintenance, inspections, and emergency repairs tailored to combat Colorado's harsh weather. Trusted by the community, we use state-of-the-art drone technology for detailed inspections and handle insurance claims efficiently. Whether you're dealing with storm damage or need routine maintenance, Keystone Roofing is the leading "roofing contractor in Littleton" dedicated to excellence and customer satisfaction.
Blue Peaks Roofing
(303) 808-0687 bluepeaksroofing.com
8000 S Lincoln St Ste #201, Littleton, Colorado
4.9 from 150 reviews
Blue Peaks Roofing specializes in insurance roof repair and replacement. All our roofers are licensed insurance adjustors who will handle everything for you. The next time you experience hail roof damage and need fast, efficient repairs that your insurance will cover, call Blue Peaks Roofing. We also install siding and gutters, too! Blue Peaks Roofing began with a purpose: to provide homeowners with the most trusted and seamless resource for their roof replacement and repair needs. It is our passion and privilege to guide homeowners through a flawless insurance claims process while ensuring their properties are restored to their original charm in a timely and professional manner.
Advanced Construction Roofing
(720) 216-0704 www.advancedconstructionroofing.com
10872 Mill Hollow Rd, Littleton, Colorado
5.0 from 48 reviews
Advanced Construction Roofing (ACR) provides an unparalleled level of customer service in residential home repair. ACR is a locally owned and family-run company that specializes in exterior home renovations with an emphasis in roofing in the greater Denver Metro Area.

ARCM Roofing
(303) 306-8334 www.arcmroofing.com
5306 S Bannock St Suite 218 Suite 218, Littleton, Colorado
4.9 from 132 reviews
ARCM Roofing is a top roofing company offering expert residential roofing and commercial roofing contractor services. We specialize in roof repairs, installations, and storm damage restoration. Our certified contractors use high-quality materials, including hail resistant asphalt shingles, concrete tiles, metal roofs, and TPO/EPDM commercial flat roofing systems, ensuring long-lasting results. We also provide roof drone roof inspections and maintenance to extend your roof's life and prevent costly issues. As storm damage specialists, we repair hail and wind damage, offering quick service and insurance claims support for a stress-free process. Enjoy affordable pricing and excellent communication with ARCM Roofing
Great Roofing & Restoration
(720) 571-8796 greatroofing.com
709 W Littleton Blvd #200, Littleton, Colorado
4.9 from 188 reviews
We specialize in residential, commercial, and multi-family roofing services. Our team of experienced contractors are dedicated to providing high quality workmanship and customer service to all our clients. We understand the importance of a secure roof for your home or business, and take pride in working with our customers to develop a plan that works for their home in their budget. From repairs to full roof replacement, Great Roofing and Restoration has you covered. Contact us today for more information!

Modern Roofing Group
(720) 613-9927 modroofgroup.com
8200 Shaffer Pkwy #271047, Littleton, Colorado
4.8 from 105 reviews
Modern Roofing Group is a trusted roofing contractor based in Littleton, CO, proudly serving Denver and the surrounding areas. We specialize in residential roofing and gutter solutions, including roof repair, replacement, and new installations. Our team is committed to delivering quality workmanship and a seamless customer experience, which has helped us earn an A+ BBB accreditation and a reputation built on referrals. As a local Denver roofing company, we take pride in supporting our community and treating every home as if it were our own. Whether you need storm damage repair, a new roof, or gutter installation, count on Modern Roofing Group for reliable service and free estimates.
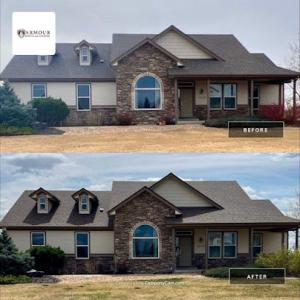
Armour Roofing & Exteriors
(303) 798-7663 www.armourexteriors.com
5255 Rio Grande St Suite B, Littleton, Colorado
4.8 from 116 reviews
Armour Roofing and Exteriors is a Colorado-based roofing company. We are a licensed, bonded, and insured roofing contractor that provides new roof installation, re-roofing, roof repair, assessment and repair of storm damage, gutter installation and repair, roof maintenance, and roof inspection. We stand out from other Denver roofing companies by offering a 15-point roof inspection system to ensure thorough analysis and recommendations for all residential and commercial roofing needs. Armour Roofing and Exteriors also sells seamless gutter systems, provides gutter maintenance, and serves the entire Front Range of Colorado. We can help with any of your roofing needs!
GCCS Roofing
(720) 551-7663 gccsroofing.com
8122 Southpark Ln STE 112, Littleton, Colorado
4.8 from 91 reviews
GCCS Roofing, LLC is your trusted roofing company in Littleton, CO, proudly serving Aurora, Centennial, Lakewood, Highlands Ranch, Castle Rock, Elizabeth, and surrounding areas. We specialize in residential and commercial roofing, including roof repair, roof replacement, inspections, metal roofing, shingle roofing, tile roofing, storm damage restoration, and roofing insurance claims. Our expert roofing contractors provide the best roofing services for homes and businesses alike. We use top-quality materials and expert craftsmanship to ensure durable, weather-resistant roofing solutions that stand the test of time. Contact us today for top-tier roofing services, including emergency repairs, backed by our motto: "Quality Through the Roof!"
Platte River Roofing
(720) 254-1462 platteriverroofing.com
6181 S Aberdeen St, Littleton, Colorado
4.8 from 73 reviews
Platte River Roofing is Colorado owned and operated and has been proudly serving the front range, Colorado Springs and the mountain areas since 2009. We are fully licensed and insured and we never ask for money until the project is complete. We serve both residential and light commercial customers, so whether you need a roofing repair or full roof replacement, we can handle your needs.
Beacon Restoration
(303) 862-4625 www.beaconrestore.com
11786 Shaffer Pl Suite S-205, Littleton, Colorado
4.9 from 42 reviews
Beacon Roofing is a licensed general roofing contractor proudly serving the Denver Metro area, Front Range and Summit County for the last 20 years. Whether your project is commercial or residential, big or small, Beacon Roofing is experienced and well-equipped to get the job done.

PCS Residential
(720) 595-0000 www.pcsrenew.com
2270 W Chenango Ave #200, Littleton, Colorado
4.6 from 146 reviews
PCS strives to build experiences that renew and inspire as we interact with our homeowners and industry partners on a daily basis. Beyond being named Pella Platinum Elite, GAF Master Elite, and A+ Rated through the Better Business Bureau, PCS is built on providing superior service through policy and claim knowledge, industry awareness, integrity, and quality craftsmanship.
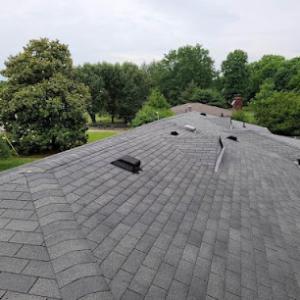
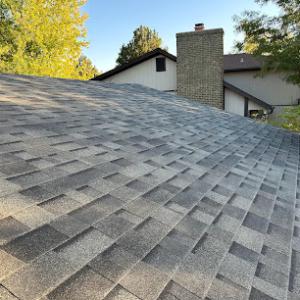
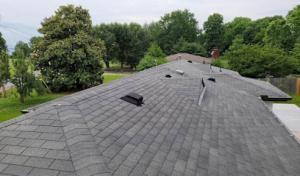
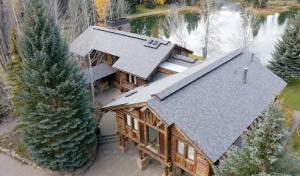
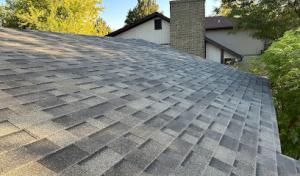
Asphalt shingles are common in Littleton, and the Front Range's mix of spring hail and bright sun can wear them down faster than expected. After a hailstorm, you may notice darker dimples, granule loss in gutters, or uneven wear on ridge caps. Granule loss accelerates when hail is combined with high sun exposure over the following weeks. If a roof has already endured several hail events, the appearance life can drop even if the underlying deck remains sound. When inspecting or planning a repair, focus on the two weak spots: granule retention and edge curling. Crews experienced with local weather patterns know how to spot pressure cracks that can let moisture creep in under shingles, particularly along valleys and around flashings. If shingles show obvious hail bruising but the underlying plywood is dry and solid, a roof replacement may still be the practical choice when backed by insurance documentation. The practical path is to stage work so crews can address both surface damage and any deck-related issues discovered during inspection, ensuring a long-term return to weather resistance.
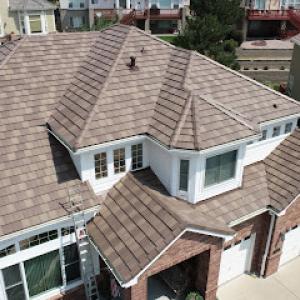
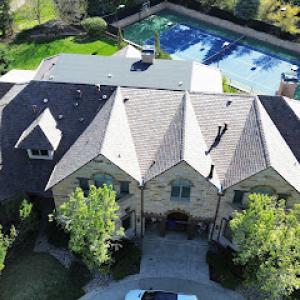
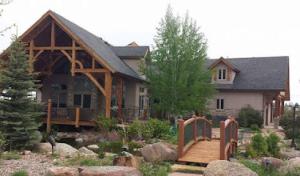
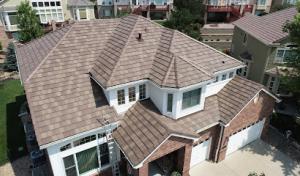
Tile roofs are a meaningful part of the local market, and Littleton homeowners need to account for impact damage, brittle aging, and the need for crews experienced with concrete and clay tile replacement matching. Concrete tiles, common on ranch-style homes and newer builds, can crack or spall after hail, with brittle aging making some tiles more susceptible to future damage. Clay tiles, valued for their appearance and longevity, can crack or break when subjected to hail strikes; however, replacements require matching profiles and color so the roof's aesthetic remains cohesive. When a tile fails, the surrounding tiles must be checked for microfractures that aren't immediately visible. The risk is water intrusion through the tile bed, which can undermine the underlayment and deck if left unaddressed. A trained crew will carry exact-match tiles or alternative profiles from the same manufacturer to preserve the roof's look and performance. In Littleton's climate, it helps to anticipate a broader inspection of hips, ridges, and parapet coping where wind-driven hail can expose underlying materials. Scheduling inspections after major storms, and before the next cycle of precipitation, reduces the chance of extended exposure to weather that could worsen damage.
Metal roofing is increasingly relevant in this market because homeowners compare hail resistance, snow shedding, and long-term durability against traditional shingle systems. In the Front Range, metal panels can offer superior hail resistance due to their uniform surface and resilience to impact, though installation quality matters for long-term performance. Snow shedding is a practical benefit in winter, reducing ice dam risk when paired with proper underlayment and venting. For Littleton homes, choosing a metal roof with corrosion-resistant coatings and robust seams helps combat the daily sun exposure that can dull finishes over time. If hail has damaged a metal roof, the assessment focuses on panel integrity, fastener security, and the state of the sealant around flashings and intersections. Replacement or repair should consider matching color and profile to preserve curb appeal, especially on homes with brick accents or stone veneer that query a seamless transition between roof materials and the dwelling's exterior. A seasoned crew will verify that the substructure and underlayment are compatible with metal, ensuring a watertight, wind-tolerant result that stands up to the Front Range's spring cycles.
Asphalt Shingles: 350-700 USD per square. Metal Roofing: 700-1400 USD per square. Clay Tile: 1000-2400 USD per square. Concrete Tile: 900-1700 USD per square. Wood Shingles/Shakes: 650-1100 USD per square. Synthetic/Composite Shingles: 650-1200 USD per square. These ranges reflect typical Littleton pricing, which can shift with storm-driven demand and scheduling pressure after Front Range hail events.
In Littleton, spring hail storms drive sudden spikes in labor availability and project timelines. When demand surges, crew availability tightens and crews may set higher day rates or push jobs toward the upper end of the local ranges. If your roof is scheduled right after a major hail event, expect estimates to land toward the top end of the spectrum, especially for fuller tear-offs and re-stages. Steeper residential rooflines are common in established neighborhoods and can substantially raise costs. Tear-off work, safety rigging, and extra staging require more time and labor, which translates to higher per-square figures compared with simpler low-slope layouts.
Tile and specialty materials face additional pressure. If the project requires matching an existing profile or color on a partial repair in a mixed-architecture block, the cost can climb beyond the base tile ranges. Matching a curved or textured tile, or sourcing a close color match for synthetic or clay options, adds procurement and labor complexity. In practice, a small patch that must blend with neighboring homes may drive a tile job into the higher portion of its range, even when the overall square count is modest.
Asphalt shingles remain the most budget-friendly in many Littleton projects, and they typically weather hail more predictably without color-matching complexities. However, if you're protecting higher-value facades or emphasizing curb appeal, metal or synthetic options can offer longer life in the Front Range climate, with weight and wind-resistance considerations still at the forefront. Tile choices (clay or concrete) bring exceptional durability and aesthetic options for specialty homes, but the initial cost and the need for compatible underlayment and deck structure can push total project figures higher, particularly when inspection teams require exact restoration of existing profiles.
If timing is flexible, align re-roofing with the calmer part of the season prior to the next storm cycle. Early-season projects often secure better scheduling, lower contingency needs, and fewer weather-driven delays. When spring hail season looms, budgeting for a potential premium is prudent, especially for steep pitches or high-profile homes. In any case, a detailed itemized estimate that separates tear-off, disposal, underlayment, and roof-layer costs helps you compare bids more accurately and spot where premium charges are coming from-labor intensity, material specialty, or color-matching requirements.
Get a clear picture of your project costs upfront - no commitment required.

Modern Roofing Group
(720) 613-9927 modroofgroup.com
8200 Shaffer Pkwy #271047, Littleton, Colorado
4.8 from 105 reviews

In Littleton, a full re-roof typically requires a permit issued by the City of Littleton Building Department. That permit is not optional-the city uses it to ensure the roof is installed to current code, which helps with long-term performance against hail and freeze-thaw cycles. Starting work without this permit can trigger a halt to the project and fines before any further progress is allowed. If you are navigating an insurance-driven re-roof after a spring storm, the permit process still applies and is essential to keeping the claim moving forward without delays.
Littleton commonly performs an inspection at the staging phase, covering decking and underlayment before concealment. This means the inspector will need to see the roof structure, the condition of the decking, and the type and installation of underlayment while the roof is still open. If decking or underlayment doesn't meet code or manufacturer recommendations, the city may require corrections before you can proceed. Planning for this inspection early helps avoid rework that can stall the project later and potentially complicate insurance documentation tied to the rebuild.
A final inspection occurs after installation is complete. This verifies that all components-underlayment, flashing, venting, fasteners, and the finished roof coverings-were installed correctly and meet code requirements. Failure to pass the final inspection can block final approvals, which in turn can hinder warranty validation and insurance settlement. Timing the final inspection to align with the completion of detailing work (venting, fixtures, and sealing) reduces the risk of delays.
Contact the City of Littleton Building Department early to confirm the permit scope for your project and to schedule both inspections. Keep a clear record of permit numbers, inspection dates, and any required corrections. If an insurer is involved, coordinate inspection documentation with the staged and final inspections to ensure a smooth claim process and minimize the chance of work stoppage due to permit or code issues.
This area sits in Colorado's high-claim Front Range hail corridor, where roof age and material choice directly affect premiums, renewals, and coverage terms. The neighborhood patterns you see after a typical spring storm-dented shingles, bruised edges, and granule loss-line up with what insurers expect to document, inspect, and adjudicate. When a hail event hits, a claim isn't just about what happened on the surface; it's about proving the roof's condition before the storm, the exact damage observed, and how the replacement aligns with the policy's coverage terms. Understanding that framework ahead of time helps you avoid surprises down the line.
Insurers serving this market commonly require thorough photo documentation, date-stamped storm evidence, and condition records before approving full-scope roof work. A strong file isn't assembled after the fact; it's built with careful photography that captures both widespread and localized damage, clearly labeled by date and location on the roof. Before any claim starts, assemble a baseline set of images showing intact components, ventilation, flashing, and edge details. Document visible hail impact marks on shingles or metal, and keep weather reports or radar screenshots that tie the damage to a specific storm window. If a contractor signs off on damage before an adjuster visits, the file should still retain unaltered original photos and dates. This isn't about polyfilling a narrative; it's about presenting verifiable evidence that stands up to adjuster scrutiny.
Adjusters in this market commonly inspect for hail-consistent damage patterns and confirm material specifications rather than relying only on homeowner descriptions. Scratches, bruising on asphalt, pitting on metal, or missing granules are weighed against the roof's slope, age, and the product's known performance. If the roof uses a newer or less common material, expect questions about warranty terms and installation details. The inspector may also compare neighboring roofs with similar exposure to determine whether observed issues exceed normal wear or stem from the storm event. Preparation means focusing on both the visible damage and the underlying system-underlayment, ventilation, and flashing-that could influence long-term performance.
In a spring-focused climate, insurers expect prompt notification after a storm and a clear plan for how to document and move toward repair or replacement. Delays can complicate coverage terms or limit the scope of reconstruction the adjuster authorizes. Consider how the timing of your claim aligns with the anticipated storm cycle, and maintain steady communication with both your insurer and a trusted local contractor who understands the area's exposure patterns. A measured, well-documented approach reduces the chance of coverage disputes and supports a smoother path to restoring a roof that can stand up to the next round of Front Range weather.
Connect with contractors who help homeowners navigate the claims process from damage assessment to final approval.

Trek Contracting
(720) 640-6646 trekcontracting.com
8500 W Bowles Ave Suite 301, Littleton, Colorado
5.0 from 127 reviews
Blue Peaks Roofing
(303) 808-0687 bluepeaksroofing.com
8000 S Lincoln St Ste #201, Littleton, Colorado
4.9 from 150 reviews
Spring brings the highest storm interruption risk, so many projects begin with inspections and temporary protection before full replacement can be scheduled. After spring hail or heavy rain, a careful roof check helps identify bruised shingles, lifted edges, and potential attic leaks before they compound. You should plan for temporary tarping, debris containment, and rapid-detect leak control in the event a storm arrives while work is mid-process. Prioritize safety with fall protection and open venting to avoid wind-driven damage during short-term delays. Scheduling a thorough after-storm assessment keeps the timeline realistic and helps you coordinate with your insurer and the contractor for a smooth transition to a full replacement when conditions stabilize.
Summer heat and thunderstorms along the Front Range can create afternoon work stoppages and affect handling of temperature-sensitive materials. In practical terms, expect longer days to plan around cool-down periods and shaded staging areas. Metal and synthetic products respond differently to heat, so crews typically adjust application times and fastener choices to prevent warping or premature curing. Lightning awareness and sudden gusts can pause work, so clear a safe space around equipment and vehicles, and communicate contingency dates for roof-access windows. Keeping plastic coverings and underlayment dry during monsoon storms reduces the risk of moisture entrapment behind new coverings.
Winter snow and freeze-thaw conditions in Littleton can limit access, expose underlayment longer if schedules slip, and make emergency leak control more important than full replacement timing. Snow loads and icy stairs slow material transport and setup, so crews often prioritize rapid leak mitigation over staging a complete re-covering when storms persist. If an active leak persists, temporary patches and controlled drainage can prevent interior damage while a longer window for full replacement is arranged. Coordination with drainage strategies and interior protection becomes essential when cold snaps tighten schedules.
When you can't wait, these contractors offer fast response times to stop leaks and prevent further damage.

ARCM Roofing
(303) 306-8334 www.arcmroofing.com
5306 S Bannock St Suite 218 Suite 218, Littleton, Colorado
4.9 from 132 reviews
GCCS Roofing
(720) 551-7663 gccsroofing.com
8122 Southpark Ln STE 112, Littleton, Colorado
4.8 from 91 reviews
In the Front Range climate that defines this market, solar and skylight work must ride alongside aging roof replacements after spring hail events. The combination of sun exposure, rapid freeze-thaw cycles, and wind-driven storms means any penetration or integration needs careful detailing so posts, flashings, and sealants hold up under a hail-due risk cycle that hits hardest after a roof is aged.
Skylight flashing details matter in this area because snow, ice, and wind-driven spring rain can expose weak curb and flashing work quickly. When you replace an aging roof, inspect the curb condition, flashing height, and surrounding shingle laps. Match flashing material to the roof surface, ensure a tight seal around the base, and verify continuous coverage from flashings up to the skylight frame. If a skylight is being replaced or upgraded, consider a broader flashing kit and a slightly larger curb to reduce the chance of future ice dam-related leaks.
For solar installations, plan for clean mounting points and predictable drainage paths. Use flush or raised mounting rails that won't trap snow and ice at the edges. Seal penetrations carefully where racking penetrates the roof deck and ensure sealants remain compatible with asphalt, metal, or tile surfaces common in Littleton homes. Keep edge distances aligned with shingle or tile underlay lines to prevent shadowing that reduces panel efficiency and to maintain wind uplift resilience in spring storms.
Low-slope sections on additions, porches, and mixed-roof homes require different drainage and membrane detailing than the steeper primary roofs. Install a high-quality, bonded membrane with properly engineered terminations at terminations and transitions into steeper sections. Pay special attention to drainage slopes and scupper or gutter integration to avoid ponding that can worsen snow melt and ice buildup near skylights or roof penetrations.
Find contractors experienced in skylight installation, flashing, and leak repairs to bring natural light into your home.
Advanced Construction Roofing
(720) 216-0704 www.advancedconstructionroofing.com
10872 Mill Hollow Rd, Littleton, Colorado
5.0 from 48 reviews
ARCM Roofing
(303) 306-8334 www.arcmroofing.com
5306 S Bannock St Suite 218 Suite 218, Littleton, Colorado
4.9 from 132 reviews