Roofing in Colorado
Last updated: Feb 28, 2026
Colorado roofs live in a climate that seems to flip from sun-soaked summers to snow-packed winters in a heartbeat. At altitude, the sun's rays burn hotter, and the freeze-thaw cycles that follow each spring shower can push even sturdy shingles to their limit. Then add hail season, often dramatic along the Front Range, and you've got a roof that needs durable materials, smart ventilation, and timely maintenance. In our mountain towns and wide-open plains, what works in Denver can look very different from what a rural ranch or a ski town home requires—especially when it comes to snow loads, wind, and how gutters handle heavy runoff.
On this Colorado page, you'll find practical, trustworthy guidance designed for homeowners who want real results. You'll get a clear sense of how Colorado weather shapes material choices, budgeting, and upkeep; how local codes and permits affect projects; and the common problems you'll want to prevent or fix before they become bigger issues. While the goal is straightforward, the advice is grounded in Colorado realities—so it's not just generic tips but guidance you can act on, whether you're planning a small repair, a mid-range upgrade, or a full replacement. This resource is built to feel like a helpful neighbor who's also a roofing pro: friendly, honest, and ready to help you make smart choices.
What makes this guidance fit Colorado? It's tailored to the conditions we see across the state and supported by local resources. You'll find references to current Colorado codes and permit practices, input from local suppliers, and insights from Colorado-based roofing pros and associations. That means the tips you read here are aligned with what actually applies in your town—whether you're in Boulder, Colorado Springs, Fort Collins, Grand Junction, or a mountain community.
Let's start with the climate that shapes every roof project here in Colorado.
Local Climate & Its Impact on Roofs
Snow, ice, and freeze-thaw cycles
Colorado winters bring heavy snowfall, mixed with rapid temperature swings. Snow loads, plus freezing and thawing, put repetitive stress on roofing systems. Ice dams can form when heat in the attic melts snow at the roof edge, refreezing along the eaves and backing water up under shingles.
What this means for your roof
- Increased risk of shingle damage, fascia, and flashing from ice buildup.
- Greater need for robust attic ventilation and insulation to slow melting.
- More frequent gutter and downspout clogs from ice and debris.
Practical steps
- Insulate well (targeted attic insulation to reduce heat transfer; balanced ventilation helps prevent ice dams).
- Install an ice-and-water shield along eaves and around penetrations to limit water intrusion.
- Keep gutters clean and free of debris so water can shed properly.
Snow load and local codes
Snow loads vary by county and altitude in Colorado. Your roof must be designed to handle local snow pressures, which can spike dramatically in the mountains and on the Front Range.
What to do
- Check your home's snow-load rating and compare it to your area's requirements through your local building department.
- If you're unsure, hire a licensed roofer or a structural professional to assess whether your roof can safely carry typical regional loads.
- Plan inspections after major storms or season changes to catch hidden damage early.
Sun exposure and UV impact
Altitude means stronger sun and more UV exposure. UV rays degrade roofing materials faster, especially asphalt shingles, and can accelerate color fading and granule loss.
Tips to combat sun damage
- Consider UV-resistant underlayment and reflective or lighter color options to reduce heat absorption.
- Schedule periodic inspections for granule loss, dried-out seals, and flashing deterioration.
Wind and hail risk
Colorado's winds can be volatile, and hail is a common hazard during spring storms, especially on the plains and Front Range. Wind uplift can loosen fasteners and flashing if the roof isn't properly anchored.
What this means for material choice
- Use wind-rated shingles and ensure proper nailing patterns and flashing around vents, chimneys, and skylights.
- In hail-prone areas, consider impact-resistant roofing (Class 3–4 shingles or metal roofs) and regularly inspect after hail events for dents, punctures, or lifted edges.
Temperature swings and material stress
Wide day-night temperature swings cause expansion and contraction in roofing materials. Over time, this can loosen fasteners and seams and lead to leaks or wind damage.
How to manage
- Use compatible flashing and sealants designed for variable temps.
- Ensure proper nail length and spacing per manufacturer specs to resist uplift during rapid changes.
Maintenance checklist for Colorado roofs
1. Inspect twice a year and after major storms (look for damaged shingles, flashing, and signs of water intrusion).
2. Clear gutters and downspouts to prevent ice dam formation and ensure proper drainage.
3. Check attic ventilation and insulation; correct any imbalances.
4. Trim overhanging branches that could damage the roof in wind or hail.
5. Address moss, algae, or granule loss promptly to prevent moisture intrusion.
Warnings and official resources
- Roof work can be dangerous in snow, ice, or high winds—avoid risky areas and use proper fall protection or hire a licensed pro.
- After a major hail or wind event, inspect promptly but safely; document damage for insurance purposes.
Official resources
- National Weather Service – Denver/Boulder:
- NOAA/NWS general climate and safety information:
- Colorado Climate Center (Colorado State University):
- Colorado State University Extension – home maintenance and roof-related guidance:
Recommended Roofing Materials for Colorado

For many Colorado homes, asphalt shingles are still a practical baseline choice. When hail is a concern, opt for architectural (laminate) shingles and look for UL 2218 Class 4 impact resistance. A heavier, better-sealed shingle and a robust underlayment improve performance in wind, sun, and snow. Lighter colors help reflect heat in summer, while darker colors may absorb more heat in winter.
- Pros:
- Budget-friendly, easy to install, widely available.
- Many Class 4 options improve hail resistance.
- Wide color and style selection to fit most homes.
- Cons:
- Lifespan generally shorter than metal or tile (often 20–40 years, depending on quality).
- Severe hail can still cause damage if the shingles aren't rated for impact.

Metal roofs are a strong Colorado option, especially in hail-prone areas and windy sites. Standing-seam or concealed-fastener profiles with durable coatings (galvalume or PVDF paints) resist hail, sun, and wind for decades. They shed snow well, which helps with ice dam risk and reducing maintenance.
- Pros:
- Excellent hail resistance and long lifespan (40–70+ years).
- Lightweight, energy-efficient, and good for snow shedding.
- Cons:
- Higher upfront cost.
- Some profiles show visible fasteners; choose seam systems for a cleaner look.
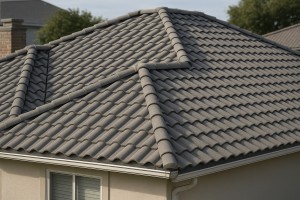
Concrete tiles handle Colorado's temperature swings and mitigate hail damage better than clay in many cases. They're heavy, so a solid deck and possible structural reinforcement are necessary. With proper installation, concrete tiles can last 50+ years and offer good color retention and fire resistance.
- Pros:
- Very durable, strong hail resistance, broad style options.
- Good insulation and fire resistance.
- Cons:
- Heavy—requires structural analysis and potentially more framing.
- Higher installed cost; more complex installation.

Clay tiles deliver a distinctive look but are more sensitive to hail and freeze-thaw cycles. They're heavy and can crack if hit hard by hail unless properly secured with weather-rated clips and a reinforced structure. In Colorado, clay is best chosen for specific architectural styles and with robust support.
- Pros:
- Long lifespan under ideal conditions; classic aesthetic.
- Cons:
- Very heavy and brittle in hail; higher cost and installation complexity.
Synthetic Roofing Materials
Engineered options (rubber, polymer, composite shingles, or faux slate/shake) mimic traditional looks with enhanced durability. They're often lighter, more hail-resistant, and simpler to install than natural materials. Warranty terms vary—choose a reputable brand with Colorado experience.
- Pros:
- Hail resistance, lighter weight, flexible aesthetics.
- Easy installation and maintenance.
- Cons:
- Quality varies by manufacturer; verify warranty and climate performance.

Wood can look stunning, but it requires careful consideration in Colorado. Fire codes in many areas restrict wood in heavy-wire zones, and hail can dent or puncture shakes. If you pursue wood, select fire-treated, properly installed options and be prepared for higher maintenance and inspection.
- Pros:
- Natural beauty and good insulation.
- Cons:
- Higher maintenance, fire risk in many zones, potential hail damage.
Underlayment, Ventilation, and Additional Considerations
- Ice-and-water shield at eaves is worth it in higher snow zones.
- Synthetic underlayment provides better durability and water protection.
- Adequate attic ventilation reduces heat buildup and ice dam risk, extending roof life.
Quick decision guide for Colorado homeowners
1) Assess local climate and hail exposure, wind, and snow load.
2) Check local codes and any HOA restrictions.
3) Match roof material weight to structural capacity.
4) Compare warranties and look for insurance discounts (Class 4 impact ratings where available).
5) Work with a local contractor who has Colorado experience and references.
Popular Roof Styles & Architectural Trends in Colorado
Colorado's mix of high altitude, intense sun, heavy winter snow, and strong winds means roofs must be built to shed snow, resist uplift, and withstand hail. When choosing a style or material, prioritize pitch, simple geometry, and proven underlayment for cold temps. A well-ventilated attic and durable fasteners also matter in our climate.
- Pitch matters: 4:12 to 6:12 pitches are common for effective snow shed and drainage.
- Wind-wise shapes: hip or simpler gable combinations reduce uplift compared with highly complex roofs.
- Underlayment and protection: synthetic or rubberized underlayment plus ice/water shield at eaves improves longevity.
- Hail-ready choices: impact-resistant shingles (Class 1-4) or metal can dramatically extend life in hail-prone areas.
Popular Roof Styles in Colorado
Different styles suit our terrain, aesthetics, and maintenance realities.
- Gable roofs: Classic, efficient, and excellent at shedding snow. Suitable for varied elevations; pairing with dormers boosts living space and light.
- Hip roofs: Very wind-friendly and stable in open, exposed locations; typically more complex and pricier but great for storms.
- Cross-gabled and mountain lodge blends: Add architectural interest for larger homes or mountain lots; performance depends on detailing and drainage.
- Contemporary and mix-geometry: Common in urban Colorado towns; flat or low-slope elements appear with strong insulation, proper water management, and metal or membrane systems.
- Cedar shakes and timber accents: Rustic, natural appeal; require maintenance and careful fire considerations in some wildland-urban interfaces.
- Tile and slate accents (where structurally feasible): Clay/concrete tile and synthetic slate offer longevity and a distinct look but add weight and cost; best with appropriate structural support.
Materials Popular in Colorado
Material choice balances hail resistance, weight, cost, and curb appeal.
- Asphalt architectural shingles: The workhorse choice—great value, wide color range, and improved dimensional look for Colorado homes.
- Metal roofs (standing seam or modular panels): Highly durable, excellent hail resistance, superb for shedding snow, and energy-efficient with reflective coatings.
- Cedar shakes/shingles: Natural, warm appearance; higher maintenance and fire risk considerations; ideal for mountain or rustic styles.
- Slate and synthetic slate: Extremely durable and fireproof; heavy and costly but long-lasting; synthetic options offer lighter install and similar aesthetics.
- Clay/Concrete tile: Durable and stylish for appropriate structures; heavier and best on homes with solid framing; less common in extreme snowfall unless designed for it.
- Composite or engineered shakes: Lightweight alternatives to natural shakes with good durability and style flexibility.
Architectural Trends by Region
Colorado's diversity shows up in regional styles and trends.
- Front Range cities (Denver, Boulder, Colorado Springs): Modern and mountain-modern blends, solar-ready roofs, and energy-efficient systems; larger overhangs and dramatic window lines are common.
- Mountain towns: Rustic lodge-inspired designs with heavy timber, stone accents, steep pitches, and durable, weather-tested materials.
- Color and finish trends: Earthy tones, charcoal blends, and cool grays; roof color paired with stone or wood trim to enhance the natural landscape.
Roof Components and Features for Colorado
Smart add-ons can improve safety and performance.
- Snow guards and retention systems: Help manage heavy snow loads and protect walkways below.
- Ice dam prevention: Eave protection, proper ventilation, and insulation strategies reduce ice dam risk.
- Ventilation and insulation: Balanced attic venting prevents ice dams and keeps interior temperatures stable.
Solar and Energy-Efficiency Trends
Colorado homes increasingly pair roofs with energy solutions.
- Solar-ready designs: Roof orientations, framing, and wiring layouts that simplify add-on solar.
- Reflective and cool roof options: Light-colored shingles or reflective coatings lower cooling loads in warm months.
- Integrated solar options: Some homeowners consider roof-integrated solar tiles or in-roof mounting systems for cleaner aesthetics.
Maintenance and Inspection Tips
Keep Colorado roofs performing well through regular checks.
- Post-storm inspections: Check for hail damage, missing granules, or lifted shingles after hail events.
- Gutter and drainage: Clear debris to prevent ice and water buildup; ensure downspouts direct water away from the foundation.
- Seasonal maintenance: Biannual roof inspection helps catch minor issues before they become costly.
- Professional assessment: Have a local roofer assess structural integrity, underlayment, and venting in line with local climate demands.
Average Roofing Costs in Colorado
Typical cost ranges by material
- Asphalt shingles: $4.50–$7.50 per sq ft installed (about $450–$750 per square). Common, cost-effective, and adaptable to Colorado's climate.
- Metal roofing: $9–$14 per sq ft installed (about $900–$1,400 per square). Durable in hail-prone areas; lighter options may reduce framing needs.
- Cedar/shake: $6–$11 per sq ft installed (about $600–$1,100 per square). Strong curb appeal; requires proper ventilation and maintenance.
- Clay/concrete tile: $12–$22 per sq ft installed (about $1,200–$2,200 per square). Heavier; great for some Pueblo-style homes but may need structural upgrades.
- Slate: $15–$40 per sq ft installed (about $1,500–$4,000 per square). Premium, long-lasting, and weight-intensive; not common on all Colorado homes.
Additional cost factors
- Permits and inspections: typically $100–$500, depending on city and county.
- Roof removal and debris disposal: roughly $1–$2.50 per sq ft; some crews bundle disposal into the per-square rate.
- Underlayment and ice/water shield: essential in Colorado's freeze–thaw cycles; adds $0.50–$1.50 per sq ft.
- Ventilation and insulation upgrades: boost energy efficiency and attic health; $1,000–$3,000 depending on scope.
- Structural upgrades for heavy materials: clay tile, slate, and some metals may require added framing or reinforcement.
Regional variations within Colorado
- Denver metro: higher demand and hail risk can push prices up; expect premium for Class 4 hail-resistant shingles and wind mitigation features.
- Front Range (Colorado Springs, Boulder, Fort Collins): costs are broadly similar to Denver but vary with local labor markets and HOA requirements.
- Mountain towns and high-altitude areas: steeper pitches, access challenges, and snow-load considerations can raise labor time and safety costs by 10–30%.
Local considerations affecting price
- Climate and weather risks: frequent hail, strong winds, and heavy snow influence material choice and installation details.
- Roof pitch and complexity: steeper roofs require more labor, equipment, and time; complex architectural features add to the bill.
- HOA rules and building codes: some neighborhoods mandate specific materials or wind/hail protections, affecting cost.
- Insurance requirements: in hail-prone areas, insurers may favor higher wind-hindering materials, which can influence long-term savings versus upfront cost.
Add-ons and upgrades common in Colorado
- Ice and water shield on eaves and in valleys, plus synthetic underlayment for durability.
- Ridge vents and upgraded soffit ventilation to manage attic temperatures.
- Snow guards and reinforced drip edges for steep roofs in snowy zones.
- Gutter upgrades and fascia treatments to handle snow load and water diversion.
- Roof penetrations for skylights or solar panels; plan for proper flashing and compatibility with existing systems.
Quick planning steps
1. Determine roof size in squares (1 square = 100 sq ft); a typical 1,800–2,000 sq ft roof is about 18–20 squares.
2. Choose material and any required structural upgrades based on climate, HOA rules, and architectural style.
3. Add expected costs for removal, disposal, permits, and possible contingencies (10–15%).
4. Factor in local conditions (hail-prone zones, mountain access) to set a realistic budget and timeline.
Permits & Local Regulations
Do you need a permit in Colorado?
- In most Colorado cities and counties, a building permit is required for roof replacement and related work (underlayment, flashing, decking, vents). Some very small repairs may be exempt in certain jurisdictions, but you should assume a permit is needed and verify with your local office.
- Before you hire a contractor, check with the local building department or permit portal to confirm requirements, fees, and timelines. Rules vary by city, county, and even neighborhood.
- Licensing needs vary too. Some municipalities require roofers to hold a local license to pull permits. Always verify your contractor's license and insurance with the city or county.
What a permit covers
- The permit establishes the project scope and ensures compliance with current building codes, wind standards, and safety rules.
- It codifies the work: full roof replacement, decking or structural changes, flashing, vents, and any attached components like gutters.
- It triggers required inspections at key milestones to confirm proper installation and weatherproofing.
- It ties the work to the property and the contractor's credentials, helping protect you if issues arise later.
How to apply (step-by-step)
1) Identify the right jurisdiction. Call or check the online portal for your city, county, or special district.
2) Gather essentials. You'll typically need: a project description, roof type and materials, contractor name and license number, proof of liability insurance, and any structural notes if you're replacing decking or rafters.
3) Submit the permit package. Many Colorado offices accept online submissions; some require in-person filing. Include drawings or product specs if requested.
4) Plan review and fees. The department may review the plan for wind resistance, eave overhangs, and drainage. Pay permit fees and wait for approval.
5) Permit issuance and posting. Once approved, you'll receive a permit card to display on-site; keep all permit documents and numbers handy for inspections.
Inspections to expect
- Pre-install or underlayment inspection: checks of roof deck, flashing, ice/valve protection, and correct nailing patterns.
- Rough/installation inspection: verifies shingles or other roofing materials are installed per code, including fasteners, ventilation, and flashing details.
- Final inspection: confirms the entire roof project is complete and meets code, with all components in place and any venting or insulation work properly finished.
- If issues are found, a re-inspection will be scheduled after corrections are made. Delays often come from missed inspections or incomplete work.
HOA, historic districts, and other approvals
- HOA approvals: Many associations require a pre-approval or architectural review before exterior changes. Get written consent and keep a copy on site.
- Historic districts or landmarks: If your home sits in a designated historic area, you may need approval from a local historic preservation board in addition to the building permit.
- Environmental or zoning considerations: Some areas have special rules around drainage, neighbor setbacks, or stormwater management that can impact roof work.
Energy, ventilation, and other regulatory notes
- Energy codes: Colorado adopts IECC-based codes that can apply to major remodels. Reroofing alone often doesn't trigger a full energy upgrade, but if you're upgrading insulation, attic ventilation, or adding skylights, check with the building department about compliance requirements.
- Weather and wind considerations: Colorado's climate and wind zones can influence valve protection and shingle selection. Verify that chosen materials meet local wind resistance standards where applicable.
- Older homes and hazards: If the house predates 1980, consider potential lead paint or asbestos concerns. While rare on roofing material itself, it's prudent to evaluate any demolition or debris handling with your contractor.
Practical tips to stay compliant
- Hire a licensed, insured local roofer who is comfortable pulling permits where you live.
- Ask for the permit number and keep it on-site and in your project files.
- Schedule inspections proactively; coordinate with the contractor to ensure access for inspectors.
- Don't proceed with unpermitted work. If work has begun without a permit, stop and contact the building department to determine the best path forward.
Quick checklist for Colorado permits
- [ ] Confirm permit necessity with city/county
- [ ] Verify contractor licensing and insurance
- [ ] Gather project scope, material specs, and plans
- [ ] Submit permit package and pay fees
- [ ] Post permit on-site
- [ ] Schedule and pass all inspections
- [ ] Obtain final approval and keep records for sale or insurance needs
Common Roofing Problems in Colorado & Solutions
Hail damage and impact from Colorado storms
- What to look for: dents or dimples in shingles, exposed granules in gutters or on the lawn, bent or dented metal roofing, damaged siding or trim near the roof line.
- Practical steps:
1) After a storm, document damage with clear photos from multiple angles.
2) Call your insurer and request an inspection if you suspect hail damage.
3) Schedule a licensed roofing professional for a thorough inspection.
4) If damage is confirmed, replace damaged shingles and flashing. Consider upgrading to Class 4 impact-resistant shingles for Colorado's hail-prone climate.
5) Keep records of repairs, receipts, and any claims for future maintenance or resale.
Snow, ice dams, and freeze-thaw wear
- What to look for: ice buildup along eaves, interior leaks around exterior walls or ceilings, warped or cracked shingles, icicles that indicate heat loss.
- Practical steps:
1) Improve attic insulation to at least R-38 and ensure proper air sealing.
2) Verify soffit-to-ridge ventilation so warm attic air doesn't melt roof snow.
3) Install ice-and-water shield along eaves and low-slope areas to prevent water intrusion.
4) Use a roof rake from ground level to remove fresh snow, reducing dam risk.
5) Consider heat cables for severe icing and ensure gutters are clean and functional.
6) Schedule a professional inspection after heavy snow seasons.
Wind damage and uplift
- What to look for: loose or curling shingles, lifted edges, damaged flashing around vents and chimneys, creased or torn underlayment.
- Practical steps:
1) Inspect after strong wind events for missing or shifted shingles.
2) Re-secure loose shingles with proper nails at manufacturer-recommended patterns.
3) Replace or reseal damaged flashing; ensure step and counter-flashing are intact around chimneys and penetrations.
4) Consider wind-rated shingles or a more secure roof assembly if you live in high-wind zones.
5) Schedule periodic post-storm inspections to catch early issues.
UV exposure and heat aging
- What to look for: curling, cupping or cracking shingles; accelerated granule loss; faded color.
- Practical steps:
1) Choose durable, UV-resistant shingles or metal roofing for long life.
2) If replacing, opt for higher-quality asphalt shingles with strong granule adhesion and UV protection.
3) Keep roof surface clean of debris to maximize reflective performance.
4) Regularly inspect for exposed or damaged granules and replace as needed.
Attic ventilation, insulation, and moisture control
- What to look for: unusually warm attic in summer, condensation on roof deck in winter, higher energy bills.
- Practical steps:
1) Confirm a balanced intake (soffit) and exhaust (ridge or gable vents) ventilation plan.
2) Add or upgrade insulation to meet climate recommendations; seal attic air leaks.
3) Use baffles to maintain airflow above insulation.
4) Consider a professional assessment to prevent moisture-related rot and ice dam formation.
Flashing, vents, and chimney seals
- What to look for: water stains around chimney or vents, rusted or loose flashing, excessive caulking or gaps.
- Practical steps:
1) Have flashing replaced or properly resealed by a licensed roofer.
2) Replace corroded metal and cracked vent boots.
3) Ensure proper flashing integration with roof membranes and shingles.
4) Check for algae or mold growth near penetrations and treat as needed.
Gutter and drainage issues
- What to look for: sagging gutters, ice buildup, water overflow at downspouts.
- Practical steps:
1) Clean and inspect gutters twice a year; fix loose hangers.
2) Verify gutters slope toward downspouts (minimum 1/16 inch per foot).
3) Remove leaves and debris; ensure downspouts discharge away from the foundation.
4) Consider heated or insulated gutters in areas with persistent icing.
5) If gutter guards are used, choose designs that don't trap debris and clog drainage.
Aging roof and material selection for Colorado
- What to look for: widespread curling, missing granules, persistent leaks.
- Practical steps:
1) Plan for replacement on grade with climate-appropriate materials.
2) Favor materials rated for impact resistance and Colorado extremes (Class 4 shingles, metal, or tile).
3) Schedule regular maintenance inspections every 3–5 years to extend life.
Flat roof considerations
- What to look for: ponding water, membrane blisters, seam failures.
- Practical steps:
1) Add tapered insulation to promote drainage.
2) Inspect membranes for punctures and seam damage.
3) Restore with a compatible, weather-rated membrane solution.
4) Maintain a clear drainage path and inspect after heavy snowfall.
Maintenance & Repair Tips for Colorado
Understand Colorado's climate and how it affects roofs
Colorado's altitude brings big temperature swings, intense sun, heavy snowfall, and hail. These conditions stress roofing materials differently than milder climates. A proactive plan reduces leaks and extends life.
- Snow load and freeze-thaw cycles can loosen seals and lift shingles.
- Hail impacts are common here, causing dents and granule loss that shorten life.
- UV exposure speeds aging of asphalt shingles; color fading can indicate aging.
- Strong winds can tear shingles and damage flashing.
Regular inspections you can do safely
Create a simple seasonal routine to catch problems early.
1. From the ground, use binoculars to spot curling, missing granules, or lifted edges.
2. Check flashing around chimneys, vents, skylights, and along ridges for gaps or rust.
3. After storms, look for new leaks or obvious denting; if unsure, call a pro.
- If you must access the roof, use a sturdy ladder, proper fall protection, and avoid wet or icy surfaces.
After a hailstorm: evaluate and repair
Hail damage isn't always obvious from ground level.
- Inspect for bruises, cracks, and granule loss on shingles; check gutters for granules.
- Look for dented metal panels or loose flashing where water could penetrate.
- For significant damage, schedule a professional assessment before making patches.
Prevent ice dams and attic moisture
Ice dams form when warm attic air melts snow at the eaves.
1. Improve attic insulation and seal air leaks around hatches, ducts, and lights.
2. Ensure a proper ventilation balance with soffit intake and ridge or exhaust vents.
3. In deep snow, use a roof rake from the ground to remove snow near eaves; never strike the roof with metal tools.
Gutter and drainage care
Clear gutters and downspouts so meltwater sheds away from the house.
- Remove leaves and debris after fall and after major storms.
- Check for sagging sections or loose hangers and repair.
- Direct downspouts away from the foundation; extend with splash blocks or flexible extensions on slopes.
Materials tips for Colorado roofs
Different materials react to Colorado weather.
- Asphalt shingles: watch for curling or missing granules; replace damaged shingles; consider impact-resistant options in hail-prone areas.
- Metal roofs: inspect seams and fasteners; dents are common, but check for loose hardware and coating wear.
- Tile or composite: look for cracked or loose pieces; ensure underlayment and ventilation are intact.
When to call a pro
- After a severe storm or hail event with visible or suspected damage.
- If there are leaks, signs of structural movement, or unsafe conditions for DIY inspection.
- If your roof is older and you notice ongoing wear beyond routine maintenance.
Seasonal maintenance calendar (Colorado focus)
1. Pre-winter: insulate attic, seal leaks, and clear gutters.
2. Winter: monitor snow depth; remove dangerous snow from eaves with a roof rake.
3. Spring: inspect after thaw; clear gutters; check flashing for damage.
4. Fall: clean gutters; trim overhanging branches; verify attic ventilation.
When to Repair vs. Replace
Colorado's climate—heavy snow, freeze-thaw cycles, and hail storms—puts roofs to the test. Small issues can become big problems fast. Here's how to decide whether to repair now or replace for long-term reliability.
Key factors to consider
- Roof age and material lifespan ( asphalt 15–30 years; metal 40–70; clay/concrete 50–100; wood/shake 25–40).
- Extent and location of damage (localized leaks or patchable spots vs. widespread curling, cracking, or missing shingles).
- Leaks and moisture (active leaks, attic staining, rot in structural decking).
- Future weather exposure (new hail events, heavy snow, wind uplift).
- Budget and value (upfront repair cost vs. long-term replacement payoff).
When a repair is a good bet
- Damage is localized to a small area (e.g., one flashing, a few shingles) and the rest of the roof is in solid shape.
- The roof is relatively young or has several good years left in its current life after a patch.
- Repair costs are significantly lower than replacement and a proper repair will stop leaks and restore function.
- The underlying deck and underlayment are sound, and you're not seeing widespread curling or granule loss.
- You want a temporary fix while planning for a longer-term upgrade (e.g., wind or hail season followed by a later replacement).
When replacing makes more sense
- Widespread damage across multiple shingles, extensive curling, cracking, missing sections, or sagging structure.
- The roof is past the middle-to-late portion of its expected lifespan and repairs would be frequent or short-lived.
- Multiple leaks appear in different areas, or damage includes underlayment, decking, or ventilation issues.
- You're aiming for long-term value, improved energy efficiency, or installer warranties that come with a new roof.
- Local weather risks (hail-prone areas) make a more durable option (impact-resistant shingles, metal, or upgraded underlayment) a wise investment.
Colorado-specific considerations
- Hail season can leave unseen damage to decking and underlayment; hire a roofer who will perform a thorough inspection, including attic checks.
- Snow and freeze-thaw cycles stress seals and flashing; ensure proper ice barriers and ventilation to prevent ice damming.
- Insurance impact: hail damage claims are common in Colorado. Document damage with photos, understand your deductible, and get a detailed estimate for repair and replacement.
- Warranties matter: look for material warranties and workmanship warranties, and ensure the contractor is licensed and insured for Colorado hail exposure.
Practical decision steps
1. Assess visible damage and note any leaks, curling, missing shingles, or staining in the attic.
2. Schedule a licensed roof inspection; request both a repair estimate and a replacement estimate.
3. Compare costs against the roof's remaining life and potential future repair cycles.
4. Factor in upgrades (better underlayment, ventilation, ice/water shield) that come with replacement.
5. Check insurance coverage and potential premium impacts; get the insurer's guidance when applicable.
6. Choose a contractor with Colorado hail experience, proper licensing, and clear warranty coverage.
When to Hire a Professional
When damage warrants professional help
- You notice missing or severely curled shingles after a hailstorm or strong wind.
- There are granules in gutters, dark streaks on asphalt shingles, or dented flashing around chimneys and vents.
- You see leaks, staining, or moisture in the attic or ceiling, especially after rain or a thaw cycle.
- Your roof is steep, tall, or features multiple valleys, skylights, or a chimney—areas that make DIY safer-risky.
Colorado-specific indicators to watch for
- Hail frequency and size along the Front Range: frequent hail can cause widespread granule loss and hidden roof damage that isn't obvious from ground level.
- Ice damming and freeze-thaw cycles: in mountains and higher elevations, repeated freeze-thaw can loosen shingles and underlayment, increasing leak risk.
- Snow load and wind exposure: heavy snow plus gusts can stress rafters, flashings, and vents; addressing issues early helps prevent structural problems.
- Ice and water shield decisions: if your home sits in a snow-heavy zone, you may benefit from upgraded ice/water shield and proper eave detailing—an area where a pro can design to local weather patterns.
DIY vs. professional: what to know in Colorado
- Roof work on steep pitches, near chimneys, or around skylights is risky; fall protection, harnesses, and proper equipment are essential.
- If you're unsure about where leaks originate or if interior staining suggests widespread damage, a pro's inspection saves time and reduces misdiagnosis.
- DIY repairs that don't address flashing, underlayment, or hail-damaged decking risk short-term fixes that fail in Colorado's climate.
How to evaluate a Colorado roofing contractor
- Licensing and permits
- Check local city or county requirements; many municipalities require a building permit for re-roof projects.
- Confirm the contractor pulls the permit and coordinates inspections; avoid handymen or unpermitted work.
- Insurance and financial safety
- Request Certificates of Insurance: general liability (at least $1–2 million) and workers' compensation.
- Verify coverage with the insurance carrier; ask for policy numbers and effective dates.
- Local reputation and stability
- Favor locally based contractors with Colorado references; beware storm-chasers from out of state.
- Check with the Better Business Bureau, Angi, or Nextdoor for recent customer feedback.
- Credentials and warranties
- Manufacturer certifications (GAF, Owens Corning, CertainTeed) can affect warranty validity.
- Require a written labor warranty in addition to manufacturer warranties; specify duration and coverage.
- Documentation and process
- Get written estimates that detail scope, materials, colors, timeline, cleanup, disposal, and permits.
- Ensure contract includes change-order procedures, payment schedule, and lien releases.
Questions to ask during contractor selection
- Will you obtain the building permit and coordinate inspections with the city?
- Do you assist with insurance claims and communications with the adjuster?
- What is your exact warranty for labor and materials, and how is it serviced or transferred?
- Do you offer Class 3 or Class 4 hail-resistant shingles or impact-resistant underlayment?
- How will you protect landscaping and outdoor spaces during the project, and what's your cleanup plan?
Steps to hire a pro (clear, practical)
1) Document damage with photos from ground and attic views.
2) Gather at least 3 written, detailed proposals; compare scopes and inclusions, not just price.
3) Verify license (where required) and insurance; obtain and confirm COIs.
4) Check references and local projects similar to yours; confirm on-time completion and cleanups.
5) Review contract thoroughly; ensure permit handling, exact materials, warranties, and payment terms are clear.
6) Confirm a final lien release is provided upon full payment.
Timing considerations in Colorado
- If leaks or structural concerns exist, hire promptly to reduce interior damage and framing exposure.
- Winter work can be slower due to weather, but some contractors can winterize and perform critical repairs; plan for a spring roof replacement if possible for best scheduling and material selection.
Putting A Lid On It: Roof Maintenance, Repair, and Replacement in Colorado
Colorado's climate swings from hot sun to hail and heavy snow, putting real stress on roofs. Regular maintenance isn't vanity; it's protection against leaks, ice damming, and surprising energy bills. A practical, proactive approach—tuned to our altitude and storms—helps your roof stand up to the elements and perform at its best for years to come.
Start with a simple annual inspection and after severe weather, then follow a season-by-season routine. If you're ever unsure, hire a qualified roofer to evaluate conditions safely. Consistent upkeep preserves warranties, extends life, and reduces the likelihood of large, costly repairs.
Seasonal Checklist
- After winter storms: look for damaged shingles, loose flashing, or dented gutters; clear debris; check the attic for signs of moisture or unusual warmth.
- Spring: watch for hail impact, granule loss in gutters, and moss or algae in shaded areas; clean gutters and inspect seals around vents.
- Summer: ensure proper attic ventilation and insulation; inspect flashing around chimneys and vent pipes; tighten any loose fasteners in high-wind areas.
- Fall: prep for snow by clearing branches over the roof, verifying gutters are clear, and confirming drainage paths work well; plan ahead for snow management and de-icing needs.
Repair vs Replacement
Most repairs stay affordable when caught early—replacing a handful of shingles or resealing flashing can prevent bigger leaks. If damage is widespread or the roof is nearing the end of its expected life, replacement often makes long‑term sense. A professional can help you weigh current condition, climate exposure, and future costs.
Colorado-ready Materials
- Class 4 impact-resistant asphalt shingles for stronger hail resistance without a big price jump.
- Metal roofs, which handle hail and temperature swings well and often shed snow cleanly.
- Clay or concrete tiles, strong in heat and sun but requiring a solid roof deck and careful installation in snowy areas.
What to Look for in a Contractor
- Local licensing and adequate insurance.
- Solid references and a clear written estimate.
- Transparent warranty terms for both materials and labor.
- A defined scope of work and reasonable timeline.
A warm, practical note
Your roof is part of a caring, connected community. By staying observant, keeping up with seasonal tasks, and consulting pros when needed, you'll enjoy a sturdy, beautiful roof that protects your home and your neighbors' peace of mind. Here's to a Colorado roof that stands tall through storms and sunny days alike.