Last updated: Apr 19, 2026
Glen Cove sits on Long Island's North Shore, so roofs endure coastal wind-driven rain and humid marine air rather than inland-only weather. That combination means salt corrosion, faster grit wear, and accelerated degradation of fasteners and sealants. In practical terms, a roof here faces sudden downpours from storms and steady, creeping moisture during humid summers. The result is a higher tendency for leaks to form at penetrations, seams, and edge details than in milder interior climates. Understanding this coastal reality helps you read the signs sooner and act before a small drip becomes a flood during the next nor'easter.
Winter storm stress hits hard, with freeze-thaw cycles that push and pull shingles, flashing, and underlayment. The same roof that sheds rain cleanly in late spring can develop microcracks by late winter, opening tiny pathways for water. In the warm season, humidity and salt-laden air aggress lightly corroding nails, metal flashings, and fastener heads. Leaks in Glen Cove often start as slow seepage at flashing corners or along rake edges, then escalate after a season-change storm. The pattern is gradual deterioration that cycles year to year, making timely detection and proactive repairs essential to avoid emergency calls after the next wind-driven rain event.
Storm-driven winds drive rain under shingles where edge laps and valley linings are compromised. In older steep-slope homes, missing granules or curling edges allow wind-driven rain to penetrate beneath the surface. In low-slope sections, poor transitions around dormers, chimneys, and skylights become a magnet for standing water. Salt air increases the chance of corrosion at nail heads and flashing fasteners, which degrades sealants and creates stubborn leaks that mimic other roof problems. Because local contractor activity skews toward emergency repair and storm damage work, the best defense is preemptive attention to these hotspots: edge details, penetrations, and flashing integrity.
If you own a mixed-roof home in this city, start with a careful walk-around after every heavy rain or wind event. Look for damp spots on ceilings that track along a line from roof penetrations, and inspect attic insulation for moisture staining after storms. Pay close attention to flashing around chimneys, skylights, and dormers; even small gaps can ribbon-water into living spaces. In the attic, check for loose nails, rust on metal components, and deterioration of underlayment near eaves and valleys. For shingle roofs, watch for lifted edges or missing granules at the eaves, where winter meltwater can pool and refreeze, widening the problem. If a leak is suspected, do not delay-water travels quickly through seams and could damage ceilings, walls, or insulation before a storm hits again.
Begin with a quick, targeted containment: place a tray or bucket under the drip, protect valuables, and reduce interior moisture by turning off HVAC on the leaking zone to prevent further intrusion into ductwork or ceilings. Then document the leak with photos and note the exact location on the roof if accessible. Call a local contractor experienced with Glen Cove's coastal conditions to perform a rapid inspection, prioritizing exterior flashing and edge seals, valley integrity, and penetrations. If winter thaw follows a storm, inspect for ice dam related leaks as well, since trapped meltwater can back up under shingles and infiltrate at the eaves. Acting quickly minimizes interior damage and reduces the chance of a larger leak during the next storm cycle.
Treat coastal exposure as a lifestyle factor for your roof. Schedule semi-annual checks that align with seasonal transitions: spring after salt-air exposure from winter storms, and fall before the next heating season begins. Emphasize flashing, sealant integrity, and edge protection in your maintenance routine, especially around chimneys, skylights, and dormers. For historically crafted or mixed-material roofs, prioritize coordinated replacement of failing components rather than piecemeal fixes to avoid mismatched seals that fail in damp, windy conditions. Staying ahead of deterioration keeps you out of urgent post-storm repairs and preserves your home's defense against Glen Cove's unique blend of winter rigidity and summer humidity.
Glen Cove's housing stock features many older homes with additions, dormers, porches, and intersecting rooflines. Those setups create more flashing transitions than simple suburban tract roofs. When shingles or metal meet a dormer, a bay window, or a polygonal porch, misalignment or age-related wear at the flashing becomes a common failure point. The key is to expect multiple transitions per roof and treat each one as a potential leak source. Walk the roof edges after storms to spot lifted tabs, hairline splits, or loose sealant at vent pipes, valley intersections, and step flashing along dormer walls.
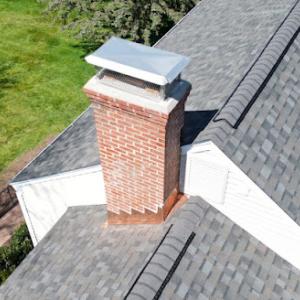
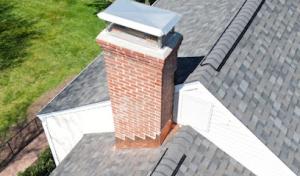
The local contractor market shows meaningful demand for chimney and skylight-related roof work, which fits the area's older homes and complex penetrations. Chimneys that have seen freeze-thaw cycles tend to develop cracked mortar or deteriorated flashing where the chimney meets the roof. Skylights and roof-access hatches introduce additional seals that can degrade over time, especially when adjacent roof planes vary in slope. Plan for targeted inspections around those features after winters with heavy precipitation or wind-driven rain, and address any signs of moisture tracking near interior ceilings promptly.
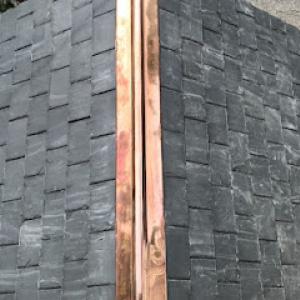
Mixed roof systems are common in this region, with steep main roofs and low-slope porch, garage, or rear addition sections requiring different materials and maintenance plans. A steep main roof may shed water efficiently, but a low-slope section can trap moisture, leading to edge- or valley-based leaks if a membrane or flashing is compromised. When the roof palette changes from shingles to metal, tile, or fiber cement in a single footprint, transitions between materials become crucial weekly checks. Keep an eye on edge metal seams where older corrosion can start, and on sealant lines where two materials meet and expand at different rates.
Cold winters with freeze-thaw cycles encourage small cracks to widen at joints and fasteners. Salt spray from coastal exposures can accelerate corrosion on metal flashings and fasteners in exposed areas. After significant weather events, inspect valleys, apron flashings, and drip edges near eaves, and look for lifted shingles or tile that can catch wind. For homes with dormers and porches, give extra attention to the sill plates and step flashing where the roof plane intersects the vertical supports. Document and prioritize repairs around penetrations first, because those weak points typically lead to the most consequential leaks if neglected.
Begin at the highest point of the roof and work toward the eaves, tracing each transition where different shapes or materials meet. Use binoculars from ground level to identify obvious gaps, lifted edges, or dark streaks that hint at moisture intrusion. When a repair is needed at a chimney, skylight, or dormer, address the surrounding flashing first and verify that the adjacent shingles or panels remain properly seated. Maintain a routine cadence of inspections in late fall and after heavy coastal storms to catch issues before they travel into attic spaces.
Find contractors experienced in skylight installation, flashing, and leak repairs to bring natural light into your home.

L.i.n.y. Roofing
(516) 629-6494 www.linyroofing.com
72 School St Ste.2n, Glen Cove, New York
4.9 from 58 reviews
Shamrock Contracting - NY Roofing Experts
(516) 376-8338 shamrockcontractingny.com
Serving
5.0 from 63 reviews

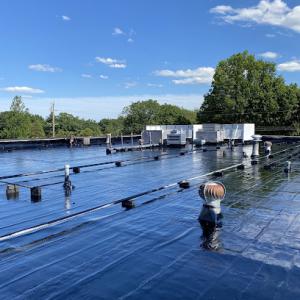
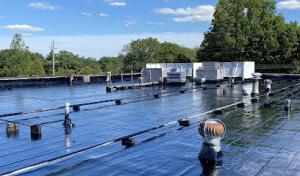
Flat-roof specialization is highly active locally, suggesting many Glen Cove properties have low-slope sections even when the main house uses shingles, slate, or tile. Those low-slope areas-porches, extensions, and garages-often escape close inspection until trouble shows up in spring rains or after winter ponding. Because coastal exposure brings salt air, high humidity, and occasional strong winds, a careful, whole-roof mindset is essential. A contractor who can assess flashing integrity, drainage transitions, and the connection points between steep and low-slope sections will prevent leaks before they start.
In this area, leaks rarely stay confined to a single surface. Begin by mapping all flat or near-flat sections, including any parapets, skylight flashings, edge details, and transitions where a low-slope roof meets a steeper main roof. Check for ponding areas that sit long enough to promote membrane wear or seam failure. Inspect drip edges, counterflashing, and terminations around walls and chimneys with a steady eye toward salt-spray corrosion. An evaluation should extend beyond visible front elevations; a thorough survey covers the back porch roof, garage canopy, and any extension roofs that may have had unfamiliar patchwork over the years.
Flat and low-slope sections often rely on single-ply membranes, built-up roofs, or modified bitumen. In this climate, choosing a system with robust seam integrity and UV resistance matters. Emphasize durable flashing at all corners, penetrations, and transitions as these are common leak points after winter cycles. Cold snaps can cause contraction that widens gaps at fasteners or sealants, so look for sealant compatibility with salt-logged air and ensure that any rooftop penetrations are sealed with compatible, long-lasting materials. When a low-slope roof ties into a steeper section, ensure step flashing and base flashing are continuous and properly sealed to prevent wicking.
Develop a routine for after-storm checks of flat sections, especially following heavy spring rains. Clear debris from any scuppers or internal drains to prevent backup and ice-formation during thaw. If ponding is observed, plan a targeted inspection with a flat-roof specialist to verify insulation beneath is still performing and that the membrane is not compromised. Document any signs of blistering, edge lift, or unusual staining, and schedule a timely assessment before minor issues become major leaks.
Homeowners often need contractors who can evaluate the whole roof system rather than only the visible steep-slope front elevation. A Glen Cove project typically benefits from a single crew that coordinates repairs across both high- and low-slope surfaces, ensuring flashing, drainage, and insulation details align. This integrated approach reduces the risk of new leaks appearing after patchwork on a nearby section and supports longer-term performance through the coastal season.
Find specialists in TPO, EPDM, and built-up flat roofing systems for residential and commercial properties.
Elite Waterproofing & Roofing
(516) 774-4477 www.eliteroofingny.com
143 Glen St, Glen Cove, New York
5.0 from 74 reviews
Elite Waterproofing & Roofing
(516) 774-4477 www.eliteroofingny.com
143 Glen St, Glen Cove, New York
5.0 from 74 reviews
Elite Roofing NY is a family-owned roofing company based in Glen Cove, NY, with over 15 years of experience serving NYC, Nassau County, and Suffolk County. We specialize in a variety of roofing systems including asphalt shingles, SBS, TPO, EPDM, metal, slate, and cedar shake. Whether you need a small repair or a full roof replacement, we’re fully licensed and insured, prioritizing safety, reliability, and high-quality craftsmanship.
L.i.n.y. Roofing
(516) 629-6494 www.linyroofing.com
72 School St Ste.2n, Glen Cove, New York
4.9 from 58 reviews
FULLY LICENSED & INSURED. We specialize in roofing siding and gutters. We take pride in providing excellent craftsmanship in every single job we do. Keeping customers happy for over 20 years in the long island area.
Shamrock Contracting - NY Roofing Experts
(516) 376-8338 shamrockcontractingny.com
Serving
5.0 from 63 reviews
New roofs and roof leaks specialist. Chimney and skylight leak specialist. Guarantee on all work done. Owner on all jobs. Free estimates.
Clearview Roofing & Construction - Port Washington
(516) 767-2000 clearviewroofs.com
Serving
4.9 from 135 reviews
Clearview Roofing and Construction has been a trusted roofing contractor in Port Washington, NY, since 1961, delivering expert roof repairs, installations, and inspections backed by years of experience. Known for superior craftsmanship, timely project completion, and exceptional customer service, Clearview serves residential and commercial clients with a commitment to quality and care. Whether you're dealing with roof damage or planning a renovation, call (516) 767-2000 today or schedule a free estimate online to work with Port Washington’s most reliable roofing professionals.

Foley & Sons Roofing
(332) 895-1121 foleyroofnewyork.com
Serving
5.0 from 52 reviews
Foley & Sons Roofing has built a reputation for dependable work and genuine care for every home and business we serve. Our family-run team understands how important a solid roof is to your peace of mind, which is why we pay close attention to every detail, from the first inspection to the final cleanup. We handle everything from small repairs to full replacements, always explaining your options and making sure you feel comfortable with each decision. When you choose Foley & Sons Roofing, you get friendly service, skilled workmanship, and a team that treats your property like their own.
Westbury Roofing
(516) 637-1335 westburyroofcorp.com
Serving
5.0 from 108 reviews
Our team of experts are here to give you the best experience . we specialize in roof installations / repairs in any type of roof including architectural roof shingles , cedar shingles , slate and so much more. Over 30 years of experience father & son company founded in 2015 call now for free estimate.

All Weather Guard
(516) 876-1999 allweatherguard.com
Serving
5.0 from 162 reviews
Residential & Commercial Roofing

Nassau Roofers
(516) 785-7663 www.nassauroofers.com
Serving
4.9 from 97 reviews
For comprehensive roofing services that meet every residential and commercial need, choose Nassau Roofers, Inc. Based in East Meadow, New York, our roofing contractors provide a wide variety of services, including replacement and repair of both shingle and flat roofs. Established in 1978, we have developed a proven track record as experienced professionals who create the roof you want at a price you can afford. We are a local, family-owned business that is fully dedicated to your complete satisfaction.
TMT Roofing
Serving
5.0 from 69 reviews
Established in 1963, TMT Roofing is your top choice for all commercial and residential roofing needs in Long Island, NY. We specialize in commercial roofing, gutter services, and siding, ensuring our dedicated team provides unparalleled expertise and exceptional customer service. We offer comprehensive roofing solutions, including silicone coatings, EPDM, shingles, and metal roofing. Whether you require a new roof installation or urgent repairs for leaks or damage, we have you covered. Trust TMT Roofing for high-quality materials, expert craftsmanship, and affordable rates—your satisfaction is our top priority.
Guardian Roofing
(516) 475-3228 www.guardianroofingny.com
Serving
5.0 from 18 reviews
The highest quality materials and workmanship should be used on your roofing project at an affordable price. We believe that our customers deserve exceptional value for their investment in a new roof. Providing exceptional service and installing only high-quality materials is what creates that value at Guardian Roofing NY. We work with some of the top manufacturers in the roofing industry to provide the region's best roofing systems. We install products that we would use on our own homes, so we use the best shingles, underlayment, and accessories available. Your home's appearance and protection are enhanced by a properly installed roofing system. Call us now at (516) 475-3228 for a Free Roof Inspection and a Free Quote!
6D Roofing & Construction
(914) 688-2332 6dconstructiongroup.com
Serving
5.0 from 192 reviews
We are a reliable and experienced local roofing company that takes pride in delivering exceptional residential and commercial roofing and chimney services in Westchester County, NY. We have a team of highly skilled professionals who specialize in providing a wide range of services, including roof repair, new roof installation, chimney repair, skylight installation, gutter installation, and much more. We use only the highest quality materials and state-of-the-art equipment to ensure that our work is of the highest standard. In addition to our roofing and chimney services, we also offer professional construction services such as deck installation, masonry work, and siding installation.
Preferred Exterior
(516) 354-7252 www.preferredexterior.com
Serving
5.0 from 50 reviews
We are a family owned and operated establishment specializing in commercial, industrial and residential roofing and siding. We are certified installers of all major manufacturers. We are fully licensed and insured. Our reputation is built on knowledge, craftsmanship and integrity.
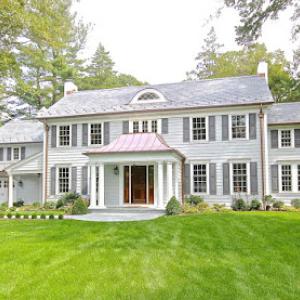
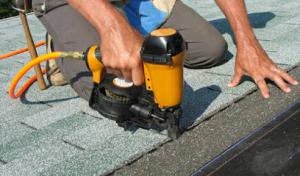
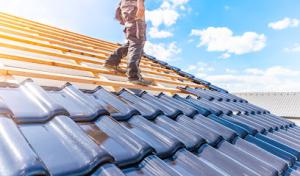
Asphalt shingles dominate practical choice locally due to easy replacement and compatibility with a wide range of house styles on the North Shore. They provide straightforward maintenance and can be matched to older steep-slope homes as well as mid-century roof lines common in Glen Cove. For premium looks that align with historic architecture, slate and clay tile stand out, delivering a distinct coastal character that echoes traditional North Shore styling. If the goal is a lighter yet durable option, synthetic or composite shingles mimic the appearance of slate or tile with easier handling and installation. Metal roofing also presents a clean, modern aesthetic with longevity that suits newer additions or updates to older structures.
Coastal storm exposure shapes material choices differently than inland settings. In Glen Cove, the emphasis is on wind resistance, edge curbing, and how each roof type interacts with salt air. Premixed underlayment systems or high-quality self-sealing underlayment are important across materials, but the surface selection often hinges on weight and roof geometry. Slate and clay tile bring a historic look but require careful structural assessment because they are heavy; some older homes may need upgrades to support the load. Metal, synthetic shingles, and fiber cement shingles offer lighter options with strong wind performance, which can be advantageous when retrofitting existing roofs.
With freeze-thaw cycles and humid summers, underlayment quality matters as much as surface material. A robust, water-tight underlayment paired with corrosion-resistant flashing reduces leak risk at valleys, dormers, and chimney connections. Ventilation becomes a critical line of defense against moisture buildup and ice dam formation on mixed roof types. In Glen Cove, ensuring proper attic ventilation and unobstructed soffits helps manage condensation that can otherwise lead to rot at the eaves and fascia. A contractor should verify that attic space is well insulated and vented to maintain roof longevity across different seasons.
A homeowner considering multiple roof types should plan for targeted maintenance. Asphalt remains forgiving for mid-size repairs, while slate and clay tile demand careful, professional replacement to avoid cracking neighboring pieces. Metal roofing demands attention to seam integrity and flashing where roof meets walls. Synthetic and fiber cement shingles generally provide easier maintenance than natural slate or tile, but still benefit from periodic inspection after coastal storm events. Regular inspections after heavy winds or nor'easters can prevent small issues from becoming large leaks.
When replacing a roof on an older North Shore house, match the installation method to the existing roof deck and eave details. Retrofit fasteners and hidden clips can preserve the architectural look while improving wind performance. For any material, prioritize high-quality flashing around penetrations and along valleys, and ensure ventilation paths remain clear after work is completed. The right combination of board, underlayment, and fastener choices keeps a Glen Cove roof resilient through salt air, winter freeze-thaw cycles, and humid summers.
In Glen Cove, late spring through early fall is the preferred replacement window because winter snow and freeze-thaw cycles complicate tear-offs and sealing. The months from May to October typically give you the best conditions to keep plywood and vents dry during removal and to ensure sealants cure properly. If a roof is near the end of its life and a major storm season is looming, plan the project to start after the lingering spring rains ease, and before autumn winds tighten schedules.
Spring rains and humidity can disrupt schedules and material handling, while summer heat affects crew productivity and shingle handling on exposed roofs. If a heat wave hits mid-season, expect slower progress and more careful staging of bundles to prevent distortion. On older steep-slope sections with mixed materials, aggressive sun can speed up stress on underlayment, so aim for early mornings and finish-lines that avoid peak heat. Fall sessions bring cooler mornings but brisk afternoons, so factor daylight length and wind shifts into the plan to avoid shingle misalignment or tarping challenges.
Autumn wind events on the North Shore can tighten contractor calendars as homeowners try to finish work before winter weather returns. High gusts can complicate tearing off and securing edge debris, so add a buffer for weather-induced delays and potential rescheduling. If a storm warning appears, protect vulnerable valleys and dormers early, then reassess the schedule rather than pushing ahead in unsettled air. A dry, steady forecast minimizes the chance of loose fasteners or exposed underlayment in exposed ridge lines.
Glen Cove features a mix of older steep-slope homes and low-slope sections, so replacements must account for differing drainage and flashing needs. Start with a thorough inspection of ridges, valleys, and parapets to identify sections that will need copper or metal flashing upgrades, and plan sequencing that secures the most vulnerable zones first. For homes with clay tile or slate in the mix, coordinate tear-off and reinstallation windows to suit material-specific cure times and helical fastener considerations. A well-timed project reduces the risk of weather-driven leaks during the transition and supports a longer life for the new roof.
Typical price ranges per square (100 square feet) are as follows: asphalt shingles 350 to 650, metal 700 to 1200, clay tile 1000 to 1800, synthetic/composite 450 to 800, slate 1500 to 3000, and fiber cement 550 to 900. These figures reflect local materials and labor realities, not nationwide averages. In practice, you'll see the broadest spread where old, steep-pitched roofs meet newer, low-slope sections, especially on architecturally mature homes in town.
Older North Shore homes with steep pitches, multiple dormers, chimneys, skylights, and mixed roof sections have higher flashing and labor complexity. That means even the same material can push costs upward if the roof line requires extra penetrations, custom flashing, or more scaffolding time. In Glen Cove, expect these projects to eat into the mid to high end of the ranges when the roof changes slope often or when history-driven detailing is preserved.
Storm-driven demand spikes the calendar and the price. After a major coastal storm, materials can surge and crews get booked quickly. Premium-material choices on historically sensitive or architecturally significant homes add to the bill, particularly when a roof must blend with existing textures or preserve character while upgrading performance.
When planning, think in steps: confirm the current roof type in each section, estimate flashing and patchwork needs, and budget for potential local delays. If you're weighing material options, start with asphalt or synthetic for cost efficiency on straightforward sections, then reserve heavier options like slate or clay tile for corridors or principal massing where weather exposure and aesthetic require it.
Get a clear picture of your project costs upfront - no commitment required.
Shamrock Contracting - NY Roofing Experts
(516) 376-8338 shamrockcontractingny.com
Serving
5.0 from 63 reviews
Clearview Roofing & Construction - Port Washington
(516) 767-2000 clearviewroofs.com
Serving
4.9 from 135 reviews
A full reroof in Glen Cove typically requires a building permit through the City of Glen Cove Building Department. The process exists to verify that the project meets local standards for wind resistance, fire safety, and drainage. If plans show mixed roof types or coastal exposure considerations, those details should be clearly documented to avoid questions later. Submittals should include roof layout, materials, and any structural work. In Glen Cove, a permit is not something to treat as optional; it's the framework that keeps a roof within code and helps protect your home against a storm-driven leak scenario.
The city conducts inspections at key milestones and finishes with a final inspection after the roofing work is completed. Expect a review when framing or deck modifications precede sheathing, another when underlayment and fasteners are installed, and a final pass after the roofing material is installed. Inspections focus on proper flashing around penetrations, eave and rake details, and coastal wind considerations. If any feature seems nonstandard for your home's slope or mix of roof types, be prepared for questions and potential rework.
Processing can take anywhere from a few days to a few weeks depending on workload and how complete the submitted plans and scope details are. In Glen Cove, accurate, thorough plans streamline review. Incomplete submittals or missing specifications can extend timelines and trigger requests for additional documentation. Plan for an orderly sequence: permit review first, then scheduling inspections, then the final sign-off.
Coordinate with the roofing crew to align material selections with local exposure risks and flashing details favored in this climate. Have your contractor document storm-related considerations, such as coastal corrosion resistance and leak prevention measures, within the permit package to minimize back-and-forth. If a delay arises, use the extra time to confirm warranty coverage and ensure a proper seal against winter freeze-thaw cycles.
Completing the permit and passing inspections is not just bureaucratic formality; it's a safeguard against costly leaks and warranty disputes after a major storm. When the final stamp arrives, it confirms the roof meets Glen Cove's standards and your home's specific coastal exposure challenges.
Coastal exposure means wind and storm-related claim activity in this region can ripple through underwriting and deductible expectations for homeowners. A single nor'easter can test both steep-slope and low-slope sections alike, so prepare for a broader range of claim outcomes than you might expect inland.
Insurers in this market expect clear documentation of roof age and replacement scope, making pre-loss records and contractor photo sets especially important. Gather dated photos of the entire roof, interior signs of leakage, attic insulation, and any prior repairs so your file tells an honest, complete story to the adjuster.
Local claims practice relies on detailed photos, written estimates, and timely communication with adjusters during storm-related roof losses. Photo sets should cover eaves, flashing, valleys, chimneys, and any penetrations. Written estimates should reference exact roofing material, square counts, and known vulnerabilities from the coastal environment.
Glen Cove's mix of older steep-slope homes and low-slope sections means a single storm can reveal multiple failure points. Elevations, exposure to spray, salt-laden air, and freeze-thaw cycles all influence whether a leak is isolated or systemic. Be prepared for divergent repair scopes within the same property.
Contact a trusted local contractor who understands coastal conditions early after a storm. Prompt, coordinated communication with the adjuster helps prevent gaps in coverage and reduces the chance of protracted disputes over what constitutes necessary repairs versus cosmetic fixes.
Connect with contractors who help homeowners navigate the claims process from damage assessment to final approval.
A sturdy roof in this coastal environment hinges on more than the shingles. Local homes feature chimneys, skylights, and varied transitions, so the craftsperson's ability to seal and dress those details matters as much as the look of the field. Expect crews to document the exact flashing measures used around penetrations and transitions, verify ice-and-water shield where appropriate, and tailor layering to the specific slope and exposure of each section.
In this market, homeowners value cleanup-included service that leaves no nails, shingle scraps, or fasteners behind. A reputable contractor will perform a thorough post-project sweep, with a final walk-through to confirm all debris is removed and gutters are clear. Quick response for storm-related calls is a practical signal of reliability here, not simply low price. If storm damage is suspected, ensure the crew commits to a timely triage visit and a written plan for repairs that addresses both the roof and any affected flashing.
Because many roofs feature chimneys, skylights, and multiple roof transitions, scope quality should focus on flashing details first. Look for corrosion-resistant metal flashing and properly sealed joints at chimney cricketes, skylight bucks, and valley intersections. The best installations use continuous counter-flashing where feasible and careful sealant choices that resist salt air and freeze-thaw cycles. A detailed scope should describe how each penetration is treated, not just the overall shingle layout.
Warranty depth and manufacturer-certified installation matter on higher-end systems common on the North Shore. Expect options that include material warranties plus workmanship guarantees, with clear coverage for flashings and critical penetrations. Reputable installers provide transferable warranties and documentation that aligns with the chosen system, so future buyers and insurers can verify coverage from day one.