Last updated: Apr 19, 2026
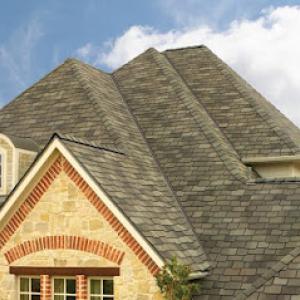
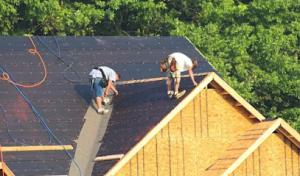
Your roof endures a distinct hammer-and-treeze pattern that can turn into expensive problems if ignored. In Eastpointe, winter brings heavy snow, ice buildup, and freeze-thaw cycles that slowly bruise shingles, lift tabs, and stress flashing. Then the warm-season wind and hail events arrive with little warning, sometimes tearing at already-worked edges and revealing leaks. This cycle means what looks like ordinary wear after a harsh winter may actually be storm-related damage that accelerates failure. Look for bruising on shaded surfaces, loose or lifted tabs, granule loss, and dark streaks consistent with water intrusion. If any of these appear after a thaw, don't wait for a drip to tell you something's wrong.
Because Eastpointe roofs sit on older stock, the line between aging wear and storm damage can blur. A quick hail strike or a sudden gust can push marginal repairs into urgent replacements, especially if flashing around chimneys, vents, or skylights shows signs of rust or separation. The key signal is timing: damage that coincides with a storm event or rapid temperature swings should be treated as possible storm impact, not merely aging. If you notice new wet spots, unusual coloration on shingles, or water marks that align with wind-driven rain patterns, set an inspection appointment promptly. The goal is to separate older wear from recent damage so you don't misallocate repair efforts.
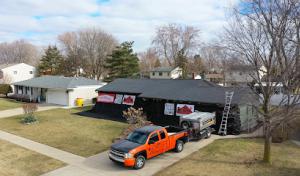
Replacement timing in this area leans toward late spring to early summer. Thaw conditions expose winter damage and allow for more reliable surface work, while avoiding the harshest cold-weather installation challenges. If you're weighing a full replacement, align planning and material selection with that window to minimize disruption from unpredictable spring storms. Delays beyond early summer can push you into hotter, more strenuous work conditions and increase the risk of weather-related setbacks. Plan ahead for inspection, material delivery, and crew scheduling before the thaw ends and before the next round of storms arrives.
Insurance outcomes hinge on proving whether issues stem from a recent storm or older wear. Start documenting as soon as you notice potential damage: timestamped photos of bruising, lifted tabs, flashing rust or degradation, and any interior signs of leaks. Keep a simple calendar of storm events and the dates you observed changes on the roof. If a claim is filed, you'll want to show the insurer a clear lineage from storm impact to current condition. Collect prior maintenance records and any contractor assessments to establish baseline wear versus new damage. Photos should capture close-ups of shingle edges, along with wider shots showing the affected roof surface in relation to the home's geometry. If you're unsure whether a finding is storm-related, schedule a rapid roof inspection after a significant storm and before it's exposed to the next freeze-thaw cycle.
First, arrange a professional roof inspection after the next notable storm and after the first substantial thaw. Ask the inspector to differentiate between winter bruise and spring weather damage, paying special attention to flashing seals around protrusions and the integrity of the underlayment where leaks tend to start. If damage is confirmed as storm-related, begin the documentation bundle immediately for insurance purposes, focusing on dates, storm type, and observable structural changes. For preventative resilience, look at areas with repeated wind exposure or hail impact and consider reinforcement measures to extend the roof's life through the next cycle of seasons. In Eastpointe, a timely assessment that distinguishes storm damage from aging wear can save you from premature replacement and align repairs with the most effective installation conditions.
When you're sizing a roof replacement or a substantial repair, you'll notice Eastpointe material ranges align with the metro Detroit pattern: asphalt shingles run about $350-$700 per square, metal roofing $700-$1100, wood shingles or shakes $500-$1100, slate $1200-$2500, fiber cement shingles $480-$780, and synthetic slate $700-$1200 per square. Those figures reflect the local labor pool and the mix of older homes with full-tear-off needs that show up after harsh winters and heavy summer storms. If you're planning a full tear-off, expect the higher end to cover the extra decking checks and potential replacements that show up once the old layers are stripped.
Costs in Eastpointe can rise after regional storm activity when demand spikes for tear-offs, emergency dry-in, and insurance-related replacement work across the Detroit-area labor pool. That means a shingles-only refresh in a calm year can be notably cheaper than a fall-after-storm or spring-after-winter scenario where crews are stretched. If you've had a severe winter or a summer hail event, you'll likely see bids that incorporate expedited timelines and temporary weather protection, which can raise material and labor charges to keep the project moving.
Pricing is often affected by full tear-off needs, decking repairs uncovered after winter moisture exposure, and ventilation or flashing corrections required to pass city inspection. If the decking has soft spots or moisture damage, you're looking at extra days of labor and new boards, plus additional fasteners, underlayment, and sometimes upgraded ventilation to prevent attic condensation. Flashing around chimneys, vents, and skylights can also demand premium materials and careful detailing, especially in a climate with freeze-thaw cycles that stress joints.
Asphalt shingles remain the most economical and easy-to-replace option for many Eastpointe homes, especially when the roof is otherwise sound and the attic is well ventilated. Metal roofs, while pricier, survive heavy snow better and shed hail more cleanly, which can pay off if you've had repeated winter storms. Wood shingles or shakes add curb appeal but require more maintenance in Michigan's wet springs. Slate and fiber cement offer long life, but slate is a bigger upfront investment and fiber cement provides a robust middle ground. Synthetic slate blends the look with more forgiving installation costs.
Start with a rough scope: confirm square count, ductwork and attic ventilation status, and whether you'll need a full tear-off or a re-roof with some existing deck remaining. Get two or three local bids that itemize underlayment, flashing, and ventilation separately. Ask for a staged plan if storm season is approaching so you can time the dry-in and insulation checks around weather windows. Keep an eye on regional storm forecasts; a slight window before a storm surge can save both material costs and emergency labor fees.
Don't let upfront costs delay a critical repair - these contractors offer payment plans to fit your budget.

Shelby Construction Services Roofing Siding Windows
(833) 674-3529 www.shelbyconstructionservices.com
Serving
4.8 from 167 reviews

BCD Roofing
(313) 707-4747 www.bcdroofing.com
Serving
4.9 from 113 reviews
Roofing, Siding, Gutters Installation Experts; Licensed and Insured; Serving Macomb, Oakland, and Wayne counties
Oak Roofing
Serving
5.0 from 134 reviews
We only do complete replacements, Sorry we do not do repairs.
Pankow n Sons Roofing & repair
(586) 216-6141 www.pankowandsonsroofing.com
Serving
4.9 from 38 reviews
We specialize in repairing your roof. Don't let the union tell you it has to be completely tore off and replaced. Let us come give you a free estimate today!!
Leach Construction
(586) 822-1981 leachconstruction-mi.com
Serving
5.0 from 73 reviews
Welcome to Leach Construction, LLC Your Trusted Partner for Quality Roofing Solutions Serving Wayne, Oakland, Macomb, St. Clair, and Washtenaw counties, Leach Construction, LLC is a family-owned company with roots dating back to the 1960s. Based in St. Clair Shores, we specialize in residential and commercial roofing systems, as well as siding, gutters, and deck installations and renovations. Whether you need a new roof for your home or a reliable commercial system for your business in Metro Detroit, our experienced team is committed to delivering durable, efficient solutions tailored to your needs. At Leach Construction, we take pride in craftsmanship, precision, and customer satisfaction—building with care, every step of the way.
L&S Home Improvements
(586) 879-7006 www.lnshomeimprovements.com
Serving
4.9 from 305 reviews
L&S Home Improvements, located in Warren, MI, is your premier roofing company serving Southeast Michigan, including Macomb, Oakland, and Wayne counties. With a specialization in roofing installation, siding, and gutters, our experienced team of roofers is dedicated to delivering top-quality craftsmanship and exceptional service. Having completed over 1,600 roofs in the area, we take pride in our reputation for reliability and excellence. Whether you need a new roof, roof repairs, or a complete roofing system overhaul, trust L&S Home Improvements to protect and enhance your home. Contact us today for a free inspection and no-obligation quote. L&S Home Improvements will take care of all your roofing, siding, and gutter needs!
Michigan Home Restoration
Serving
4.9 from 71 reviews
Michigan Home Restoration is the leading Roofing Company in the Tri-County area. We’re a team of fully-certified professionals who tackle everything from large, complex projects to smaller scale jobs. Fueled by our commitment to excellence, we go the extra mile to make sure clients are completely satisfied with our work. Call us today to schedule a FREE Inspection.
Monarch Roofing Company
(248) 238-8322 www.monarchroofco.com
Serving
5.0 from 15 reviews
Roof Repairs and Replacements
Bach Roofing Company
(586) 244-2086 www.bachroofingcompany.com
Serving
5.0 from 105 reviews
Your local family-owned, quality St. Clair Shores roofing company. Bach Roofing Company can handle all your residential & commercial roofing needs. From minor repairs to full roof replacement. While we're based out of St. Clair Shores, we service homes and businesses in cities all over Metro Detroit, including Grosse Pointe, Grosse Pointe Farms, Grosse Pointe Park, Harrison Township, Chesterfield, New Baltimore, Macomb, Clinton Township, and Shelby Township.
5 Star
Serving
4.8 from 38 reviews
We are well aware most people don't want to think about replacing their roof or windows. Maybe you have storm damage or maybe your roof is old and needs to be replaced either way we all have to do it eventually. At 5 Star we want to make your next home improvement a pleasant memory, we will get your project finished and cleaned up in a timely manor. We know the key to impressing you is simple, fix the problem quickly for a good price. I will be the first to tell you that we can definitely make that happen! Give 5 Star the chance to shine and I am certain we can leave you satisfied.
3G Home Exteriors
(586) 533-8343 3ghomeexteriors.com
Serving
4.4 from 209 reviews
3G Home Exteriors in Fraser, Michigan delivers expert siding, roofing, gutter, and window services for homeowners across Southeast Michigan. Whether you're looking for a siding contractor near you, need a roofing company for a full roof replacement or repair, or want new gutters or energy-efficient window replacements, our experienced team is here to help. We install premium vinyl siding and fiber cement siding from brands like CertainTeed and James Hardie, offering durable, attractive solutions built to last. Our roofing contractors handle everything from asphalt shingle replacements to leak repairs. We also provide seamless gutter installation with optional gutter guards to protect your home from water damage, along with window replacem
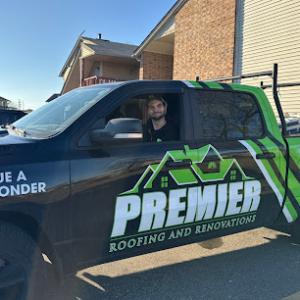
Premier Roofing & Renovations
(888) 770-4245 premierenovations.com
Serving
4.6 from 180 reviews
Established in 2015, Premier Roofing & Renovations serves Southeast Michigan with residential and commercial roof replacement, repair, siding, and gutters. We are an Owens Corning Platinum Preferred installer, storm-damage experts, and provide detailed inspections for aging or damaged roofs. Our Fraser office is staffed Monday–Friday, 9 AM–5 PM, and visits are available by appointment. After hours our call center schedules next-day service. Manufacturer-backed warranties, licensed and insured, and trusted by Michigan homeowners for dependable craftsmanship and honest service.

Select Renovations
(586) 541-8821 selectrenovations.build
Serving
4.9 from 60 reviews
With over 30 years of combined experience, Select Renovations provides top-notch roofing services in Fraser, Michigan. We specialize in Residential Roofing Installation, Residential Roofing Repair, Roof Leak Repair, Commercial Roofing Installation, Metal Roofing, Commercial Roofing Repair, Roofing Inspections, and Emergency Roofing Repair. As certified Duro-Last contractors with Elite Contractor status, we ensure quality, professionalism, and integrity in every project. Contact us today to experience the Select Renovations difference! Fully Licensed & Insured SELECT THE BEST, WE'LL DO THE REST!
Full roof replacements in Eastpointe typically require a permit through the City of Eastpointe Building Department, whether the application is handled by the contractor or the homeowner. The permit process is not optional; it is a standard step that aligns with the city's oversight of full-surface replacements. Before any work begins, confirm that the permit is secured in your name or tied to the contractor's license, and ensure the project scope matches the permit being pulled. Missing or mismatched paperwork can stall approvals and complicate later inspections.
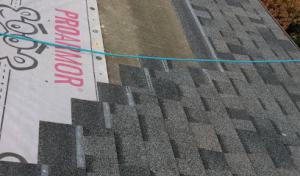
Eastpointe inspection flow commonly includes a tear-off stage and a final inspection, with attention to underlayment, ventilation, flashing, and overall code compliance. During the tear-off inspection, expect the inspector to verify that the old roof has been removed to a solid deck and that the deck is clean, dry, and ready for new materials. Underlayment quality and alignment matter, especially in Michigan's freeze-thaw cycle. Ventilation checks may include attic baffles, intake and exhaust balance, and an overall assessment of how the attic space will manage moisture. In the final inspection, the focus shifts to flashing details around copings, chimneys, skylights, vent stacks, and roof-to-wall intersections, ensuring that all penetrations are correctly sealed and that the new roof meets current code requirements.
Because inspection is tied to visible installation stages, homeowners in Eastpointe should confirm scheduling before work starts so tear-off and closeout are not delayed. Coordinate with the contractor and the Building Department to lock in a sequence: tear-off, reinstall, and then the final inspection. Weather windows matter, particularly after snow loads cycle through winter and during spring thaw. If a tear-off unfolds during a period of rapid freeze-thaw transitions, plan for protected work areas and temporary coverings that keep the deck dry without delaying the final inspection. Stay proactive about post-tear-off moisture checks and document deck conditions, as inspectors will want to see a dry, solid surface beneath new materials.
Ask the contractor for a written inspection plan that outlines each stage, required clearances, and anticipated inspection dates. Keep copies of all permit-related documents on site and readily available for the inspector. If any element like underlayment or ventilation deviates from standard practice, communicate this early and obtain written approval from the Building Department. Finally, verify that flashing and penetrations are completed per code before the final inspection to prevent rework. Having a clear, city-aligned schedule helps minimize downtime and ensures a compliant, weather-resistant roof once the job is complete.
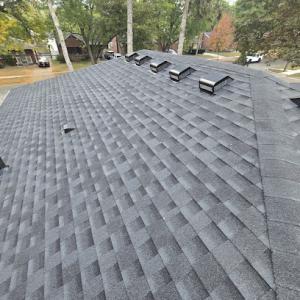
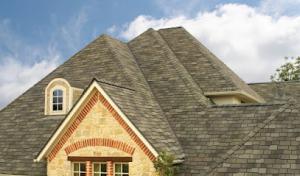
Asphalt shingles are the dominant fit for Eastpointe because they match the city's price-sensitive re-roof market and are widely used on local residential homes. The profile you see on a typical Detroit-influenced lot often relies on a straightforward asphalt system that handles the seasonal swings, from heavy snows to warm summer days. If you're counting on solid, predictable performance with sensible replacement cycles, this option remains the practical anchor for most neighborhoods here. Pay attention to the fabric and granule loss after freeze-thaw cycles, and choose a shingle with good granule adhesion and a reliable warranty to weather the annual freeze-thaw stress.
Metal roofing is present but more specialized in Eastpointe, making it a targeted upgrade choice for homeowners focused on snow shedding, durability, and longer-term performance. If you live on a corner lot with heavier wind exposure or you want a roof that sheds snow more readily and reduces buildup, metal can pay dividends over time. Consider a profile with strong fastener patterns and quality sealants to keep flashing secure through recurring freeze-thaw cycles. Ventilation remains critical with metal, since you want to maintain a balanced attic temperature to minimize condensation and ice dam pressure at eaves.
Slate, synthetic slate, fiber cement, and wood products appear in the market but require careful evaluation because the local freeze-thaw conditions and inspection scrutiny make flashing, fastening, and ventilation details especially important. Slate and synthetic slate deliver a distinct look and long life, yet they demand precise installation to prevent movement and water penetration during thaw periods. Fiber cement offers durability and a mid-range profile, but flashing and nailing patterns matter for weather-tight seams in colder months. Wood shakes can provide character, but expect higher maintenance to protect against moisture and cracking during the Michigan freeze-thaw cycle. If choosing any of these, work with a contractor who prioritizes integrated ventilation, correct underlayment choices, and meticulous flashing around chimneys, vents, and skylights to withstand the Eastpointe climate.
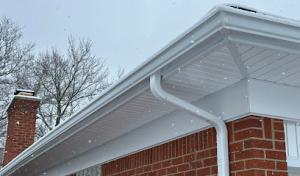
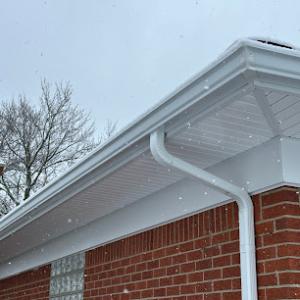
In this climate, the eaves take the first hit. Once attic heat leaks up and melts a fresh layer of roof snow, the meltwater runs toward the colder edge and refreezes. The resulting ice dam can back up water under shingles, leak into the attic, and damage insulation and ceilings. Eastpointe's cold winters make this a recurring risk that cannot be ignored.
Heavy snow accumulation in this corner of southeast Michigan adds temporary roof load that can stress older roofing systems. If snow sits long and the drainage paths freeze, water can back up and find ways through the underlayment and into the attic or ceiling lines. Regular rooftop clearing is tempting but dangerous; the safer path is to maintain drainage and ensure proper roof flashings and valley liners are sound, so meltwater can move off the roof promptly when temperatures rise.
City inspections that review ventilation matter here because poor airflow and moisture control directly worsen winter condensation and ice-dam formation on Eastpointe homes. A well-ventilated attic keeps the cavity cooler, reduces condensation on cold nights, and minimizes the amount of heat that leaks up to melt snow. Check that soffit vents, rafter vents, and attic vents are clear, and that insulation sits properly against the attic floor without blocking airflow. Moisture in the attic travels back down as humidity toward the roof deck; a balanced vapor barrier on the ceiling side helps.
During prolonged cold snaps, watch for interior frost near exterior walls, dampness around ceiling spots, and ceiling stains after a thaw. If drips appear or ice forms along the eaves, address the issue without delay. A cautious approach-staying off the roof, recording dates of heavy snow, and noting any attic temperature irregularities-can prevent escalating damage. If concerns persist, consult a local roofer who understands how snow and ice behave on older Metro Detroit stock and can help you design a plan that limits ice dam formation while preserving ventilation integrity.
In Eastpointe, Michigan carriers active in this market commonly ask for roof age, photos, and a clear damage timeline when wind or hail claims are filed. Failing to provide a coherent sequence can slow a claim or invite disputes over what constitutes new damage versus preexisting wear. Keep a simple, repeatable record: the date of each storm, the weather conditions, and any visible changes to the roof and flashing. Avoid implying certainty about causes you can't prove; stick to what you can document with dates and observable facts.
Adjusters in storm claims may closely separate fresh storm-created creasing, puncture, or flashing displacement from long-term granule loss and prior patchwork. This is not a hobbyist exercise; it affects how the claim is evaluated and paid. Take wide-angle shots of the entire roof and attic soffits, then close-ups of any curled edges, lifted shingles, punctures, or disturbed flashing. Record any interior signs of leaks, including stains on ceilings and the approximate time they appeared. Build a straightforward timeline: prior conditions, the storm event, and the first post-storm observation. Missing or vague evidence can invite deductions or denial of coverage for contested areas.
Homeowners here benefit from documenting damage immediately after storms and before temporary repairs, especially when emergency tarping or partial leak control is needed. Do not overstate the condition to a contractor or insurer, but preserve authenticity: note what you can see, when you saw it, and what you did to stop leaks temporarily. If temporary fixes are necessary, photograph them again after they're in place and keep receipts. Clear, accurate records help protect your claim from later questions about causation or prior conditions.
Connect with contractors who help homeowners navigate the claims process from damage assessment to final approval.
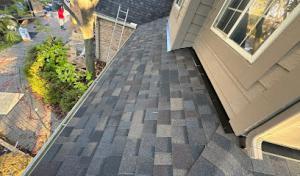
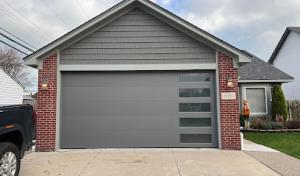
In Eastpointe, the repair-heavy market means leak points around penetrations are watched closely. Winter movement and summer storms repeatedly expose flashing weaknesses before field shingles fail. When inspecting a roof, start at skylights, vents, and chimney openings to catch hairline gaps that can become drips after a thaw or a windstorm. Repaint or reseal flashing as soon as micro-leaks are detected, and verify that surrounding shingles are solidly fastened to prevent water tracking along the deck.
Skylights stay on the front line for leaking because their flashing sits on top of multiple material transitions. Check the flange for any loose screws, cracks in the curb, or degraded sealant. Ensure the curb flash is properly integrated with adjacent field shingles and does not create a trough for meltwater. When replacing a skylight, insist on properly folded shingle edging and a continuous bead of sealant that bridges the transition to the curb. A small gap here can become a big stain after heavy snow or a summer downpour.
Chimney-related roof intersections matter locally because many contractors advertise chimney-adjacent work, signaling that these transitions are common homeowner concerns. Inspect step flashing where the chimney meets the roof, plus counter-flashing that overlaps with siding or brick. Look for rusted or torn bits, and replace any cracked mortar paths that wick moisture toward the deck. Ensure there is adequate clearance for a water-tight seal around the chase with compatible flashing and weatherproofing materials.
City final inspections review flashing details closely, making meticulous work around skylights, walls, and chimneys especially important on replacement jobs. Record flashing conditions, sealant age, and any mold or staining near penetrations. After work is done, confirm a continuous, seamless pathway from the roofing surface into the flashing system, with no gaps where ice, snow, or wind-driven rain could penetrate.
Find contractors experienced in skylight installation, flashing, and leak repairs to bring natural light into your home.
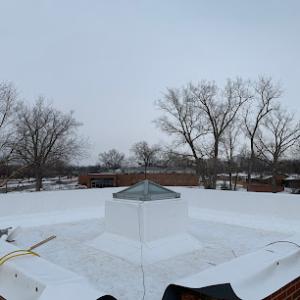
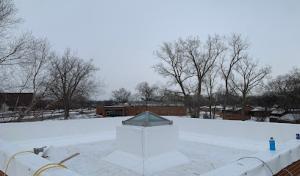
Flat-roof specialization is active in Eastpointe, reflecting a meaningful share of low-slope porch, addition, garage, or commercial roof work even in a mostly residential neighborhood. The shallow profiles can be practical, but they demand disciplined maintenance and timely attention after storms and freezes. This section focuses on how to keep these roofs reliable through Eastpointe's typical weather pattern.
Eastpointe's freeze-thaw cycle makes drainage reliability on low-slope sections critical. Standing water, followed by freezing, can stress membranes and flashing faster than you expect. Inspect for pooling after each storm and especially after winter thaws. If water sits longer than a couple of days after a rain, plan for a closer look at the slope, the edge details, and the primary drainage paths. When you see any edge metal that seems loose or seams that show the first signs of movement, treat it as a red flag to act before the next freeze cycles.
Spring rain after winter weather is a key failure point on low-slope roofs when seams, edge metal, or transitions were already weakened by cold-season movement. Prioritize inspection around the perimeter and where the roof meets penetrations or vent flashing. Look for hairline cracks, rust at edge trim, or gaps where sealant has shrunk. If you notice compromised sealant or corrosion, address it promptly with a thorough cleaning, resealing, and, if needed, reinforcing edge details to handle the heavy spring rainfall.
Document visible damage with photos after big storms, then re-check edges and seams after the first warm, rainy spell of spring. Keep a simple maintenance cadence: inspect twice a year, and after any storm that brings strong winds or heavy rain. When performing work, ensure the fabric membrane is clean, joints are flush, and flashings are anchored solidly. In Eastpointe, trust a local roofer who understands how these systems age under freeze-thaw cycles and spring deluges, and who can tailor repairs to the specific low-slope configurations found on porches, additions, and garages.
Find specialists in TPO, EPDM, and built-up flat roofing systems for residential and commercial properties.
Pankow n Sons Roofing & repair
(586) 216-6141 www.pankowandsonsroofing.com
Serving
4.9 from 38 reviews

Late spring to early summer is the preferred replacement window because winter weather leaves noticeable damage, the weather pattern tends to be more stable, and crews can work before peak storm-season backlogs build. If you've just inspected for hail hits, missing shingles, or ice damming, plan ahead so the crew can complete the job during this stretch when temperatures stay above freezing for the majority of a day. Dry, mild days reduce the chance of shingle warping and help protect ventilation and attic space during removal and installation. In Eastpointe, lining up material delivery and on-site staging during this window minimizes exposure to late-spring rain and sudden heat spikes.
Autumn in Eastpointe can be risky for waiting too long because wind can loosen edges and flashing just before snow and ice arrive. If a weathered valley, loose shingles, or rising attic temperatures are visible, schedule with certainty rather than uncertainty. Early autumn starts give you room to address underlayment, flashing, and venting before winter storms test the roofline. Delaying until after a few windy days can turn a manageable refresh into a leak-prone patch job that complicates re-seaming and flashing resealing.
Emergency leak work remains common in winter, but full replacements are harder to stage cleanly when snow, frozen materials, and inspection timing complicate the job. If a leak forces a winter fix, the priority is temporary containment and a clear plan for a full replacement when conditions permit. In colder stretches, interior warmth and daytime thaw cycles still help, but expect potential delays in material handling and roof access. For Eastpointe homeowners, aligning a plan with your insurer early to document damage can streamline the process once temperatures rise.
Get a clear picture of your project costs upfront - no commitment required.
Pankow n Sons Roofing & repair
(586) 216-6141 www.pankowandsonsroofing.com
Serving
4.9 from 38 reviews
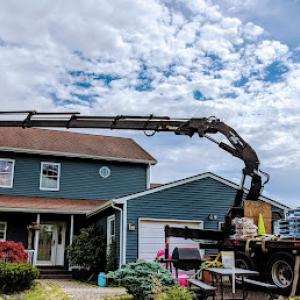
In this market, you may find crews that specialize in different parts of the job. When interviewing contractors, ask who will perform the tear-off, who handles the cleanup, and who coordinates the post-tear-off inspection. Do not assume the same crew does every step. A contractor should be able to clearly explain which team handles debris haul-away, how waste is disposed of, and who documents the condition of your roof before any work begins. This matters after a storm when rapid repairs are common and paperwork trails matter for claims.
The local contractor mix means affordability and response time often compete with long-standing and insured firms. Look for options that have a verifiable history, and verify licensing and insurance coverage. In practice, prefer companies with a local presence, clear references, and a track record of handling storm-related projects. A family-owned business can offer responsive service, but must still meet standard protections and provide written warranties. Request proof of insurance and a current W-9 or equivalent, and check any online reviews or city references to confirm reliability.
Because storm claims and city sign-offs are common here, choose a contractor who can document conditions before tear-off and explain the process for obtaining inspections and approvals after work. Ask for a written plan on how they will present pre- and post-work condition photos, what inspection steps they will coordinate, and how delays or deficiencies would be handled. Ensure they can articulate a realistic timeline and who communicates findings to the insurer and the building department. This clarity helps prevent miscommunication when a claim is involved.