Last updated: Apr 19, 2026
Flushing sits in the Flint-area climate zone where cold snowy winters and repeated freeze-thaw cycles are a primary driver of roof aging and leak development. Each winter, snow builds up along eaves and transitions into ice that can back up into the attic if the roof isn't properly protected. When the temperature swings above and below freezing, that ice melts and refreezes, compromising shingles, flashing, and sealant. By late winter or early spring, interior leaks often show up after thaw periods, sometimes behind a newly revealed layer of snow where the roof looked solid from the ground. This isn't just an aesthetic problem-delayed damage can sneak through under layers that appear intact, turning small gaps into costly interior repairs.
Local permit inspections commonly check for ice and water shield at the eaves, reflecting how important ice-dam protection is in this market. An ice dam forms when heat in the attic escapes and melts snow on the roof, which then refreezes at the colder eave edge. Without a proper ice and water shield, that melted water can creep under shingles and saturate underlayment, seeking any seam or nail line to penetrate. In Flushing, where winter storms concentrate heat losses from attics and second stories, neglecting a robust eave barrier is asking for a cascade of leaks that can travel along the attic planes and down interior walls. Protecting eaves with a continuous, rated shield helps contain water before it breaches fasteners, joints, and roof-to-wall transitions. If the roof's edge flashing is older or less than ideal, the risk of ice damming multiplies, because water will exploit any seam between the shield and the drip edge.
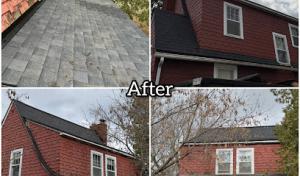
Heavy winter snow can hide older flashing and shingle defects until thaw periods trigger interior leaks in late winter or early spring. Snow acts as a blanket, concealing trouble spots along valleys, around chimneys, and where roof lines intersect walls. When the sun returns and temperatures rise, those concealed flaws trigger a surge of leaking once the melting water finds its way past compromised layers. In practice, that means a roof that looked fine after last season can surprise you with new water stains mid-Mebr or April when the melt accelerates. The danger isn't only on a dramatic storm day; it's the slow drip that adds up over days of thaw when low attic temperatures don't keep up with rapid snowmelt. The smarter homeowner understands that the absence of visible leaks through winter does not guarantee long-term protection.
Begin with the attic and eaves: look for warmth-driven ice dams when the outside temperature is fluctuating. If you notice icicles forming along the roof edge during a thaw, or see moisture staining along the ceiling near exterior walls in late winter, treat these as urgent indicators. Roof shingle granules in gutters after the winter season can be a sign that aging, cracked, or lifted shingles are failing to shed water properly. Inside the house, keep an eye on drywall seams, paint blistering, or staining near exterior walls that align with the attic's eaves. The moment these symptoms appear, plan a targeted inspection focused on the eaves, valleys, and flashing details. Timely reinforcement of ice barriers, flashing replacement, and shingle resealing can halt the progression of leaks before interior damage compounds the problem.
As temperatures rise and snow turns to melt, a proactive, site-specific inspection becomes crucial. A knowledgeable roofer will examine attic insulation performance, roof venting balance, and the integrity of coping details around chimneys and skylights. In Flushing, where climate-driven damage patterns repeat year after year, building a maintenance habit around melt and thaw cycles can save big in repair costs and home comfort. Prioritize upgrades to flashing joints where valley and wall intersections occur, ensure a continuous ice and water shield along eaves, and verify that roofing materials and fasteners are appropriate for the expected freeze-thaw cycling. The goal is a resilient roof system that remains watertight through the cycle of winter weather, spring thaw, and the next season's freeze.
Autumn wind events and severe warm-season storms can turn minor shingle edge wear into claim-worthy damage, especially on older asphalt roofs. In this part of Michigan, hail and wind claims are a meaningful part of the roofing market, and local contractors frequently market storm-damage and insurance-claim help. The combination of freeze-thaw cycles, heavy snow, and sudden wind gusts means a small worry today can become a full-blown leak tomorrow. A storm's aftermath can expose hidden underlayment damage, lifted edges, and micro-cracks that compromise the roof's integrity when the first freeze sets in.
Michigan insurers commonly want photo documentation, before-and-after comparisons, and proof the roof was installed to code and manufacturer requirements. After a storm, photograph every aspect of the roof from multiple angles: edge wear, lifted shingles, granule loss, isolated dents, and any gutter or vent damage. Capture attic photos if there are signs of water intrusion or condensation. Save dated images from a few angles to show the condition prior to and after the event. When speaking with the adjuster, emphasis should be on observed damage, not speculation. Keep a simple, time-stamped record of when the storm occurred and when repairs began. This creates a solid narrative that aligns with what the insurer expects to see.
You do not want to be caught mid-winter with a leaky roof. Before the call, clear obvious debris along the roof edge and in gutters so an inspector can see the true extent of edge wear or punctures. When you hire a contractor, insist on a detailed assessment that notes shingle condition, flashing integrity, vent boot status, and any signs of underlying deck rot. Demand a written scope that includes temporary protection measures to prevent further water entry during the claim process. Ensure the contractor understands manufacturer requirements for any proposed repairs or replacements and can demonstrate that claims work will meet or exceed those standards.
Flushing homeowners benefit from choosing a local contractor who regularly handles storm and insurance work. Local experience means knowing how this town's roofs age under our freeze-thaw cycles and how wind-driven debris commonly impacts visible edges. A trusted contractor will coordinate with you and the insurer, provide clear before-and-after comparisons, and return for any necessary follow-up after the claim is settled. If a claim is approved, the right contractor will document workmanship and materials to satisfy both the insurer and the roof's long-term performance in Michigan winters.
Find local contractors experienced in assessing and restoring roofs after hail, wind, and severe weather events.
Guns N Hoses Roofing & Siding
(810) 226-0400 gunsnhosesllc.com
5442 Pierson Rd, Flushing, Michigan
4.9 from 566 reviews
Cimple Home Construction
405 Elm St, Flushing, Michigan
5.0 from 41 reviews
Platinum Quality Roofing & Siding
(810) 316-8977 www.platinumqualityroofs.com
Serving
4.9 from 120 reviews
Guns N Hoses Roofing & Siding
(810) 226-0400 gunsnhosesllc.com
5442 Pierson Rd, Flushing, Michigan
4.9 from 566 reviews
Guns N Hoses Roofing & Siding is a full-service roofing company serving the greater Flint, Michigan area. Our mission is to provide quality roofing, siding, & gutter services at a great price. With decades of experience in the roofing & siding industry, our team of professionals has the knowledge & expertise to handle all your roofing needs. Our services include residential & commercial roof installation & repair, siding installation & repair, gutter cleaning & installation, and other home exterior services. Our team is experienced in all types of roofing materials & systems, including flat roofing & metal roofing, separating us from the competition. We offer FREE roofing & siding estimates, so contact today to protect your home!
Cimple Home Construction
405 Elm St, Flushing, Michigan
5.0 from 41 reviews
Your Trusted General Contractor for Exterior Transformations. Cimple Home is the leading General Contractor company dedicated to making your home improvement dreams a reality. We specialize in Roofing, Siding, Gutters, & Concrete. With years of industry experience, our team ensures every project is completed on time and within budget. At Cimple Home we prioritize customer satisfaction, clear communication, and excellence in every detail. Contact us today with your next project.

Tri-County Roofing Company
(810) 732-7740 www.tricountyroofingofmidmichigan.com
6393 W Carpenter Rd, Flushing, Michigan
4.5 from 22 reviews
Tri-County Roofing Company started doing business in 1971, with the goal of installing reliable roofs on businesses in the Flushing, Flint & Lapeer, MI area. With our years of experience and dedication to our trade, we not only install commercial roofs that will stand the test of time, but also build lasting relationships with our customers. In addition to our commercial roofing services, we offer fall & spring services to clean your gutters and keep your roof maintained and ready for the winter and summer.
Platinum Quality Roofing & Siding
(810) 316-8977 www.platinumqualityroofs.com
Serving
4.9 from 120 reviews
Platinum Quality Roofing & Siding is your trusted roofing contractor serving Michigan and surrounding areas. We specialize in roof replacements, deck building, siding installations, and comprehensive building restorations. Our skilled professionals can handle insurance claims, perform detailed roof inspections, and promptly install new roofs. Whether you need a complete replacement or minor repairs, we are equipped to tackle any roofing or exterior project. Contact us today and experience unparalleled quality, craftsmanship, and customer care.
Advanced Exterior Solutions & Repairs
(810) 498-7004 www.advancedexteriorsolutionsandrepairs.com
Serving
4.8 from 35 reviews
At Advanced Exterior Solutions & Repairs, we've combined our passion for craftsmanship with 35 years of trade experience to create a family-owned business dedicated to providing unparalleled service. As Mid-Michigan's premier roofing and water management provider, we offer by-appointment services tailored to your needs, ensuring prompt and efficient solutions for your roofing and water shed concerns. Trust in our expertise and personalized approach for satisfaction guaranteed results, because we believe your home's protection is our priority.
Sherriff Goslin Roofing Flint
(800) 933-1906 www.sherriffgoslin.com
Serving
4.8 from 103 reviews
With more than 100 years of experience, Sherriff-Goslin is one of the most respected and trusted roofing contractors in the region. As an Atlas Pro® Diamond Level Contractor, they prioritize quality and professionalism, providing unparalleled services for residential homes, farm buildings, barns, and churches. Sherriff-Goslin provides free roof inspections, roof repairs, and high-quality roofing systems coupled with an industry-leading 10-year free service guarantee. From start to finish, Sherriff-Goslin ensures the quality of your finished roof, the preservation of your property, and your satisfaction with the roofing experience.
Reliant Roofing
(810) 692-6913 reliantroofingllc.com
Serving
4.8 from 20 reviews
Reliant Roofing is here to serve all of your Roofing & Siding needs- especially when storms hit. Our experienced team can guide you through the insurance claim process. We are a team of certified professionals who tackle everything from complex large projects to smaller-scale jobs. We are fueled by our commitment to excellence, we go the extra mile to make sure our clients are completely satisfied. Reliant Roofing is your one-stop-shop for Roofing, Siding, and Gutters.
Ideal Roofing
(810) 258-0500 idealroofingco.com
Serving
4.9 from 55 reviews
Ideal Roofing is Flint's trusted roofing company serving all of Genesee County. We provide FREE roofing estimates, expert repairs, and complete roof replacements. With 30+ years of Michigan experience, we offer 24/7 emergency leak response, storm damage repair, and flexible financing. Locally owned, fully licensed & insured. Call for your free estimate today!
TruEco Construction - Roofing
(810) 880-7663 truecoconstruction.com
Serving
4.9 from 80 reviews
TruEco Construction - Roofing is based in Swartz Creek MI, is a trusted and reliable roofing, siding and gutter company. With a focus on eco-friendly practices, we are committed to providing exceptional roofing services, gutter installation, and vinyl siding solutions. As Michigan's choice, we pride ourselves on delivering top-notch craftsmanship and superior customer service. Experience peace of mind knowing that our skilled team will transform your home with quality materials and precision workmanship. Trust TruEco Construction - Roofing for all your roofing, siding, and gutter needs.
Lockhart Roofing
(877) 766-3033 www.lockhartroofing.com
Serving
4.8 from 310 reviews
Lockhart Roofing is a family owned and operated residential and commercial roofing company that has been servicing Flint and the Mid Michigan areas since 1982. We also offer seamless aluminum gutters and commercial gutters.
Dave Murphy Builders
Serving
4.7 from 31 reviews
For over two decades, Dave Murphy Builders has been building and restoring homes and businesses with quality and care. As a full-service construction company, they handle everything from roofing and siding to remodels and additions. Specializing in residential and commercial projects, their expertise includes roof repair, replacement, and cleaning, as well as metal and vinyl siding installation. Storm damage restoration is also a specialty, covering roofing, siding, gutters, and other exterior fixtures. Dave Murphy Builders also offers complete home inspection services. Trust their experienced team to answer your call and bring your vision to life.
Cardinal Roofing
(810) 397-9393 www.cardinalroofing.net
Serving
4.9 from 32 reviews
Cardinal Roofing: safeguarding homes and businesses across lower Michigan since 2021. Located in Genesee County, we bring over three decades of expertise to every roofing and siding project, both commercial and residential. We install top-quality roofing systems and siding, and are certified in Certainteed, Atlas, Versico roofing, and Hardy Board Siding products, and Pella Windows. Our dedicated local crews, supported by experienced estimators and project managers, ensure excellence from project start to finish. Trust Cardinal Roofing for unparalleled quality and lasting protection.
In Flushing, replacement pricing is most clear when quoted per square (one 10-by-10 foot area). Asphalt shingles typically run 350 to 700 USD per square, metal roofing 700 to 1400, clay tile 1000 to 2000, concrete tile 900 to 1700, synthetic or composite 500 to 900, and slate 1500 to 3000. Those ranges reflect not only material choices but the realities of Michigan winters, where the mix of freeze-thaw cycles and heavy snow can influence labor and access. When you're planning, your initial estimate should break out material cost per square and include scaffold or company-provided snow removal as needed during the project window.
Costs in Flushing can rise after winter damage and storm events when demand spikes for fast re-roofing and emergency leak work. A hail or wind event can compress the lead time you have to decide, and crews may charge a premium for after-hours or expedited service. If your roof is already aged, a contractor might steer you toward a quick patch solution to stop leaks, but winter constraints can push you toward a full-feel re-roof when the weather loosens. Expect longer project windows if temperatures hover near freezing, since cold-weather installs require extra safety measures, material handling precautions, and sometimes additional underlayment or heat sources to set shingles properly.
Asphalt shingles remain a common choice for value, with their per-square pricing aligning with the 350-700 USD range. In roofs with strong eave protection demands or more complex layouts, slate and clay tile offer durability but at higher per-square costs (slate 1500-3000, clay tile 1000-2000). Concrete tile and metal provide a balance of performance and price: concrete tile at 900-1700 and metal at 700-1400 per square. Synthetic or composite shingles provide a middle ground (500-900 per square) if you're balancing weight concerns with winter resilience. In speaking with Flushing neighbors, the decision often comes down to how well the chosen system tolerates attic ice dam formation, wind-driven leaks, and the load of snow on steeper pitches.
Cold-weather scheduling adds labor complexity beyond a mild-weather install. Ice-dam protection details matter: proper underlayment, ice-and-water shield in vulnerable eaves and penetrations, and careful attic ventilation reduce future leaks. If a contractor offers a "winter-ready" package, ask what extra steps are included-heated elements or timed heat tape where permitted, additional flashing approaches, and amplified insulation measures. Ensure the contract specifies winter-specific precautions and any potential delays caused by snow removal requirements or municipal weather windows.
Start with a per-square cost estimate and add a contingency for weather-driven delays or expedited material deliveries after a storm. If repairs are needed mid-season, the price may be affected more by emergency demand than by the material choice alone. For a typical Flushing home, align your budget with the material's range, but also reserve funds for potential ice-dam mitigation and extra labor to keep shingles properly seated in freezing temperatures. Clear communication with the contractor about snow removal responsibilities, access in winter, and the sequence of installing underlayment, flashing, and final shingles will help keep the project on track and reduce the risk of repeat winter leaks.
Don't let upfront costs delay a critical repair - these contractors offer payment plans to fit your budget.

Before any shingle granules fly, you will likely need a building permit for a full roof replacement through the local building department. In Flushing, the permit process is designed to document the scope of work and ensure the replacement aligns with county and local codes, especially given Genesee County's freeze-thaw cycles and snow loads. The application commonly includes the project scope and basic plans before work begins, so having a clear description of materials, roof access, and venting helps speed review. It's wise to start this dialogue early with the permit office and your contractor, so the timeline doesn't collide with winter weather hazards or inspection windows.
A rough-in inspection is typically performed during installation. This is your chance to confirm that the underlayment and ice and water shield details are being addressed properly, particularly along eaves where ice dam risk is highest during Michigan winters. Expect the inspector to verify that eave protection is continuous and that any valleys or penetrations are prepared to resist moisture intrusion as temperatures swing between freezing and thaw cycles. While the crew works, the attic ventilation should be checked as well, since proper airflow helps mitigate condensation and prolongs roof life after a harsh season of snow and freeze-thaw.
The final inspection occurs upon completion and is your last line of defense against hidden issues. The inspector will look at flashing around chimneys, vents, and skylights, ensuring sealants and memory-fit flashing hold up to fluctuating temperatures and wind-driven rain. Attic ventilation should be re-verified to confirm that the intake and exhaust balance remains effective with the new roof. In Flushing, where winter storms and rapid temperature changes can stress sealants, having the contractor present to address any minor adjustments during the final walkthrough can prevent callbacks and rework after the snow melts. Keep a clean site and ensure all debris is removed, as accumulated vent blockages or misplaced nails can quietly compromise a newly installed system in the months following a replacement.
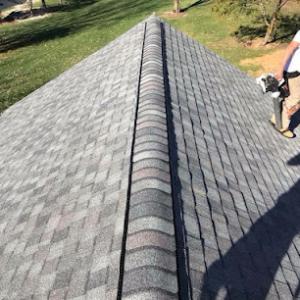
Asphalt shingles are a dominant local choice because they fit the area's re-roofing-heavy market and lower entry cost range. For homes in the Flint-area freeze-thaw cycle, asphalt provides a practical balance of install speed, repairability, and local contractor availability. In Flushing, you'll find crews who are comfortable handling hail and wind damage on asphalt surfaces, and replacement timelines align with the town's pattern of frequent mid-winter leaks and spring storm repairs. When evaluating this option, prioritize architectural shingles for added weather resistance and longer service life, which helps against ice dam formation and rapid snowmelt stresses that stress underlayment and flashing. A focused attention to attic ventilation and proper drip edge still matters, since ventilation plays a big role in preventing ice dams during the Michigan cold snaps.
Metal roofing is also a meaningful specialty in Flushing, making it a realistic upgrade option for homeowners prioritizing snow shedding and long-term durability. Metal panels shed snow more predictably than asphalt, which reduces the weight burden on eaves and helps keep icicles from backing up into valleys. If your home has a shallow overhang or historical curb appeal that accommodates metal's look, this choice can pay off during a sequence of heavy snows and freeze-thaw cycles. Installation requires qualified metal-roof crews who understand how to flash transitions around chimneys, skylights, and rooftop vents so that wind-driven rain and meltwater don't find paths underneath. In snowy winters, metal's rigidity and seam protection help limit movement and leftover moisture that can lead to leaks, provided the underlying deck and venting are in solid condition.
Tile and slate are present in the material mix but carry much higher per-square costs, so structural suitability and installer availability matter more here than for standard shingle jobs. In Flushing, these options demand careful assessment of roof framing, attic clearance, and drainage planning to accommodate weight and expansion/contraction through freeze-thaw cycles. Tile and slate give durable performance in milder periods, but when abrupt temperature swings occur, proper substrate and underlayment choices become critical to prevent cracking and water intrusion at hips and ridges. If choosing these materials, secure local experienced crews who can tailor installation to your roof's pitch, ventilation, and snow-load expectations.
Explore specialists in steel, aluminum, and standing seam metal roofs built to last 50 years or more.
Guns N Hoses Roofing & Siding
(810) 226-0400 gunsnhosesllc.com
5442 Pierson Rd, Flushing, Michigan
4.9 from 566 reviews
When the snow melts, the hidden routes through your roof suddenly show up. In the Flint-area climate, a freeze-thaw cycle can push moisture into spots that seemed dry while the roof sat under snow and ice. In practice, that means small leaks can appear only after a thaw, even if shingles looked fine during the deep freeze. Pay attention to any damp spots along interior ceilings or walls that first show up after spring rain showers start to arrive.
Flushing inspections commonly include attic ventilation review, and for good reason. Local homes often rely on a balance of soffit intake and ridge or vented exhaust to move cold air across the underside of the roof deck. If that flow is hindered, warm, moist air from living spaces can rise and condense in the attic, planning a path to leak-prone areas. Check for clear intake vents, unobstructed baffles, and properly functioning exhaust vents. A well-ventilated attic reduces the chances of condensation-related leaks on eaves and near flashing transitions.
Moisture problems after thaw are often tied to eaves, flashing transitions, and ventilation-related condensation rather than shingles alone. Ice dams can form if warm attic air melts snow at the eave and refreezes at the overhanging edge, pushing water inward. Inspect eave drip edges, gutter lines, and the horizontal flashing where walls meet the roof. Look for telltale staining, mildew, or soft wood near these joints. If you notice persistent dampness after a thaw, the culprit is more likely a ventilation or flashing issue than a single shingle defect. Addressing those systems promptly can help protect the roof's integrity through fluctuating Michigan weather.
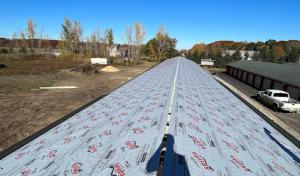
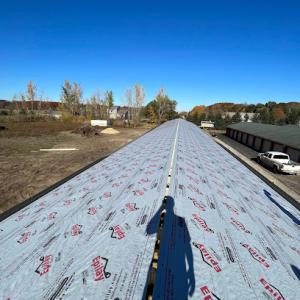
Flat-roof service is active in the Flushing market, reflecting the sizable low-slope sections found on many homes and mixed-use buildings. In this climate, snow tends to linger on flat or near-flat surfaces, and spring thaw can push water toward weak seams and penetrations. If gutters and scuppers clog or sag, meltwater backs up, and ice damming can form at transitions to steeper sections. Pay particular attention to seam tapes, flashing at parapets, and any area where a vent stack or skylight meets the deck. A careful post-winter inspection focusing on fasteners, caulking, and uphill flashing can catch failures early before leaks escalate.
Snow retention devices are not optional on many low-slope roofs here, because a heavy melt can overwhelm a shallow slope in a single warm day. Improperly set snow guards or missing drip edge details create sudden weight shifts and potential panel deformation. In spring, ice and standing water may creep toward skylights and edge details, learning the hard way where the deck is weakest. Have a trusted local sheet-metal or roofing contractor verify that snow guards, edge metal, and internal drainage routes align with the roof's shape and the typical thaw pattern in Genesee County winters.
Skylights are a smaller specialty locally, but flashing failures often show up during thaw and wind-driven rain. Inspect the curb flashing, sealants, and any surrounding toothing or cover flashing after a heavy storm cycle. If a leak appears around a skylight, prioritize resealing and re flashing rather than waiting for a full roof replacement. Address any shifting framing or degraded sealants promptly, because waiting can turn a minor seep into significant interior damage and expedited repairs.
Find specialists in TPO, EPDM, and built-up flat roofing systems for residential and commercial properties.
Guns N Hoses Roofing & Siding
(810) 226-0400 gunsnhosesllc.com
5442 Pierson Rd, Flushing, Michigan
4.9 from 566 reviews
Platinum Quality Roofing & Siding
(810) 316-8977 www.platinumqualityroofs.com
Serving
4.9 from 120 reviews
Weather Shield Roofing Systems | Flint, MI
(616) 243-4040 weathershieldusa.com
Serving
4.9 from 14 reviews
Late winter and spring often reveal the true condition of your roof, as snow load, ice, and thaw cycles expose hidden weaknesses. In Flushing, ice dams can back up along eave lines, forcing water into fascia and attic spaces. If you notice icicles that hang aggressively, or shingles curled at the edges after a melt, that's a sign to inspect the overall roof deck for soft spots. A professional should evaluate whether warped boards or protruding fasteners indicate moisture intrusion beneath the surface. Short list of checks: ensure attic ventilation is adequate, confirm insulation has not settled, and look for ceiling stains that follow roof lines after a thaw. These indicators help decide if a full re-roof is prudent or if targeted repairs suffice.
Spring rain can delay tear-offs and increase moisture-management concerns during installation. When weather shifts to wet, crews need proper staging and containment to prevent runoff from dumping into basements or crawl spaces. If you're scheduling a re-roof after a long winter, set expectations for staggered work and temporary membrane or tarping to minimize leaks during lapses in dry days. In Flushing, a spring evaluation should focus on the roof edge, gutter health, and downspout drainage to avoid trapped moisture on newly installed underlayment. Have clear access to the attic to verify that deck dryness is preserved through the process.
Summer heat affects installation conditions and material handling, with heat-softened shingles and sun exposure influencing nail driving and alignment. Plan for shorter workdays in peak heat and ensure crews protect sensitive finishes on exterior siding nearby. Autumn storms can accelerate wear before winter returns, so aim to complete major work before late fall to reduce freeze-thaw risk. If shingles appear brittle or granules are washing away after a storm, prepare for a more rapid assessment to determine whether patching or full replacement is indicated. In all cases, choose a timing window that minimizes prolonged exposure to harsh winters and keeps moisture out during critical phases.
In Flushing, quick response after storms is a decisive market signal. When hail or high wind hits, you want a crew that can tarp within hours, schedule an inspection promptly, and set a clear path to a re-roof if needed. Ask for a verified timeline from storm to tarp, to inspection, and to project kickoff. A contractor with a plan for fast tarping helps minimize interior damage and ice-dam risk during freeze-thaw cycles.
Cleanup is not an afterthought here. Local projects emphasize debris control, ground cleanup, and protecting nearby vehicles and landscaping from nails and shingle fragments. Inquire about the methods used to contain waste, how dumpsters or mobile cleanup commands are managed, and whether daily project wrap-ups include debris removal. A strong cleanup commitment is a real differentiator on a neighborhood re-roof and reduces post-storm complaints.
The market mixes long-established firms with more affordable crews. Homeowners in this area often weigh how long a contractor has been operating, how reliably they respond during ice dam season, and how their communication holds up from storm to punch list. Check references from recent Flushing projects, verify warranty terms, and confirm who will be the point of contact during weather-related delays and scheduling.
Expect a contractor to perform a thorough on-site assessment that accounts for winter conditions, snow load considerations, and potential ice-dam vectors. They should outline a practical plan: tarp specifics, inspection milestones, temporary repairs if needed, and a staged approach to a full re-roof if warranted. Ensure the written plan includes weather contingency language and a realistic, pump-priority sequence for winter-friendly execution.
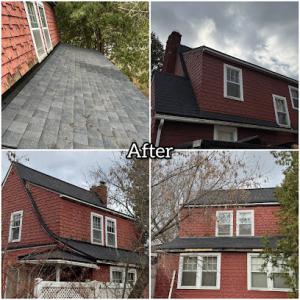
In this market, clear photo sets make a real difference. Start with wide shots of the entire roof and surroundings to show extent, then close-ups of damaged areas. Date-stamp every image, and include a timestamp on selfies or exterior shots with identifiable landmarks. Capture the season's weather context-snow banks, ice buildup, and any hail or wind marks on siding or gutters-to corroborate the claim timeline. A simple, organized gallery helps adjusters see the pattern of damage from the initial event to its current state.
Insurance reviewers in Genesee County look closely at changes over time. If you're pursuing a replacement, keep a dated record of a known pre-loss condition and compare it to post-event results. Include interior surfaces where leaks show up, and document any interior staining or attic condensation. The clearer the before-and-after narrative, the smoother the evaluation, especially when winter freeze-thaw cycles or wind-driven events are involved.
Adjusters may scrutinize whether the roof met applicable code and installation requirements. Having permit and inspection records handy can be a strong support, even if the claim process focuses on damage rather than upgrades. Gather installation details such as shingle type, underlayment, and ventilation configurations that were in place at the time of the loss. If your roof replacement involved upgrades or retrofits, documentation that those steps align with manufacturer guidelines can be particularly helpful.
After a hail or wind event, preserve evidence of flashing, underlayment, and ventilation details because those items are checked during local inspections. Take close, well-lit photos of flashing at joints, boot seals, attic ventilation intakes and exhausts, and any ice dam barriers. A concise archive of these components reduces back-and-forth with adjusters and supports a focused inspection in the field.
Create a simple binder or digital folder with labeled images, event dates, and a written incident chronology. When communicating with the insurer, reference the storm date, observed leak points, and the condition of critical details like flashing and underlayment. Clear, localized evidence aligns with how inspections are conducted locally and helps move the claim toward a timely resolution.