Last updated: Apr 19, 2026
In Howell, heavy snowfall and winter ice dams are a seasonal reality that can halt active roofing work and drive sudden emergency leak calls. The combination of cold, wet roofs and extended cold snaps means water can back up behind dammed ice and push beneath shingles and flashing. When that happens, a small leak inside the attic or ceiling can become a rapid, escalating problem, especially after a warm day when the melt refreezes overnight. Homeowners should treat ice dam formation as a foremost risk signal: if you see ice along the eaves or notice water staining near the ceiling during a thaw, treat it as an urgent leak risk and respond immediately with temporary containment while scheduling a proper repair. In this climate, timely shingle and flashing repairs are not luxury services; they are essential to keeping interior warmth and structural integrity intact through a brutal winter.
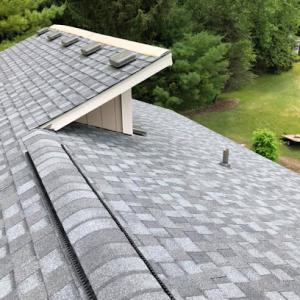
Repeated freeze-thaw cycles stress the roof system in Howell by expanding and contracting shingles, sealants, and metal connections. Asphalt shingles can develop micro-cracks; metal flashing around chimneys, vents, and attic hatch penetrations can loosen or bend; and sealant joints may separate where water migrates beyond the edge of a roof plane. Over days and weeks, that wear compounds, increasing the odds of leaks after a heavy snowfall melts and refreezes. The warning signs are subtle at first: curled shingles at the eaves, hairline cracks along ridge lines, or loose shingle tabs that move with a tug. The moment those signs appear, plan proactive repairs rather than waiting for a full failure. In Howell, where warmth from living spaces is often vented into attics, careful attention to sealant integrity and flashing condition is essential for resilience against winter moisture intrusion.
Winter conditions in Howell can stop roofing crews mid-project when piling snow or ice dam formation blocks access, increases safety risk, or makes roof surfaces dangerously slick. This is not a cosmetic issue; ongoing ice dam activity signals active water intrusion risk. When a storm surge creates ice buildup along the eaves, crews must prioritize safety and leak mitigation to protect living spaces. Keep a plan for rapid temporary protections, such as tarps or debris shields, and ensure interior spaces are prepared for possible moisture if a leak is detected during a thaw. Understanding that weather windows are short helps you coordinate with your contractor to seal leaks quickly and then complete the reroof under safer, drier conditions.
Warm interior air loss into attic spaces is especially relevant because local permit inspections specifically check ventilation details during reroofing. Inadequate attic venting can intensify ice dam pressure by keeping roof decking warm and encouraging meltwater to flow toward the eaves rather than shed off. For Howell homes, verify that soffit, ridge, and mechanical ventilation are properly balanced and that attic insulation is continuous and well-sealed at penetrations. During a reroof, insist on an explicit ventilation plan, including intake and exhaust paths, baffles where necessary, and careful sealing around any new penetrations. This focus helps minimize winter moisture, reduces freeze-thaw stress, and supports a longer roof life through Livingston County's cold season.
In Howell, spring thaw and rainy periods create moisture-management problems and scheduling delays right when hidden winter damage often becomes visible. After a late-season wind or hail event, the first 48 hours matter: leaks may emerge as the sun returns and roof surfaces warm. If a homeowner waits, wind-driven shingles can lift further, ice dam damage can worsen, and hidden roof decking can soak through, complicating both repairs and claim outcomes. The practical move is to inspect for signs of trouble the moment conditions permit, document what you find, and act fast to protect interior space from further damage.
Fall wind events are a listed local seasonal risk, making lifted shingles, flashing movement, and late-season repair urgency a practical concern for Howell homeowners. If you notice loose granules, lifted tabs, creased flashing, or water streaks on ceilings inside, treat it as urgent. Do not delay. Move furniture away from affected areas, place tarps or plastic sheeting to keep rain out, and contact a reputable, local roofing contractor who can provide a rapid temporary patch and a weather-tight seal. Keep a visible record of the exterior storm impact-photos of shingles, flashing, vents, and any hardware displacement-since this will be central to the claim later on. The goal is to minimize water intrusion and prevent further freeze-thaw cycling from expanding the damage.
Michigan roof claims in Howell are typically decided through standard adjuster review, with coverage often turning on whether damage came from wind or hail and on the roof's age. You want an adjuster to see the full picture: a dated storm report, on-roof photos capturing wind-stripped edges or hail impact marks, and clear records of interior moisture. If the roof is older, be prepared for discussions about wear versus storm-caused damage. Acknowledge that some damage may look minor but can drive larger leaks during thaw cycles. To strengthen the file, secure statements from any nearby witnesses about the storm's severity and the timing of interior leaks. Your contractor can provide a brief, itemized assessment that aligns with insurance language-focusing on areas most exposed to wind-driven impacts and typical trouble spots in Howell homes, such as ridges, valleys, and penetration points around chimneys and vent boots.
Given Howell's climate pattern, the window between a storm and the next thaw or rain event is critical. If a claim is filed, responders often work faster when there is an identifiable trigger: a visible leak, a sharp uptick in interior moisture, or a documented wind or hail event date. Do not wait for perfect conditions to begin repairs or to file. Coordinate a temporary, weather-tight fix promptly, then schedule a more durable restoration as soon as the claim process is moving and the weather allows proper work. In the meantime, keep a running log of all communications with the insurer and the contractor, including dates, times, and the names of representatives spoken with, so nothing slips through the cracks during the crucial claim review period.
Find local contractors experienced in assessing and restoring roofs after hail, wind, and severe weather events.

On Top Roofing
(248) 845-1884 ontoproofingmi.com
5896 Sterling Dr, Howell, Michigan
4.9 from 235 reviews

R&R 360 Construction Services
4337 E Grand River Ave ste 117, Howell, Michigan
5.0 from 73 reviews

ABC Roofing & Remodeling
(810) 991-1128 abcroofingllc.com
10067 Bergin Rd, Howell, Michigan
5.0 from 72 reviews
On Top Roofing
(248) 845-1884 ontoproofingmi.com
5896 Sterling Dr, Howell, Michigan
4.9 from 235 reviews
We are the premier roofing contractor and our team specializes in storm damage and insurance claims. We serve all of Southeastern and Central Michigan and with over 20 years of experience, we are equipped to handle all of your roofing needs. Put our trusted and dedicated team to work for you, give us a call today!
R&R 360 Construction Services
4337 E Grand River Ave ste 117, Howell, Michigan
5.0 from 73 reviews
R&R 360 Construction Services is a trusted Owens Corning Preferred Contractor delivering expert roofing and property restoration solutions in Howell, MI, and surrounding areas. As a full-service, licensed contractor, we serve Livingston, Oakland, and Wayne Counties with advanced roofing systems, CertainTeed vinyl siding options including shakes and board-and-batten, and durable Trex decking. Our team uses drone aerial inspections and 3D home design renderings to provide accurate evaluations and informed project planning. From emergency storm response to planned upgrades, we work with all insurance carriers, offer flexible financing options, and deliver fast, reliable service focused on protecting and enhancing your property.

ABC Roofing & Remodeling
(810) 991-1128 abcroofingllc.com
10067 Bergin Rd, Howell, Michigan
5.0 from 72 reviews
ABC Roofing and Remodeling, located in Howell, Michigan, specializes in delivering outstanding roofing and remodeling services. With a blend of expertise and craftsmanship, ABC Roofing and Remodeling provide unparalleled solutions for homeowners and business owners throughout Oakland and Livingston counties. Their services range from minor repairs to insurance projects and complete replacements for your roofing, windows, siding, and gutters. Experience exceptional service and quality at ABC Roofing and Remodeling.

Ethical Exteriors
(517) 404-7606 ethicalexteriors.com
10107 Bergin Rd Building D, Howell, Michigan
4.9 from 117 reviews
Ethical Exteriors is a reputable roofing contractor offering high-quality services to residential and commercial clients. With a strong commitment to excellence, the team ensures each project is conducted with professionalism and precision, achieving an A+ reputation. They provide a wide range of shingles and energy-saving options, along with attic insulation services for enhanced energy efficiency. The company emphasizes skilled training and meticulous standards at competitive prices. Contact them to deliver the right roofing solution for your home.

Eastbrook Roofing & Construction
(248) 877-9247 www.eastbrookroofing.com
1280 Thorn Ridge Dr, Howell, Michigan
4.5 from 12 reviews
Eastbrook Roofing & Construction, serving Oakland, Livingston and North Wayne County Michigan for over 25 years, offers residential roof repair and new roof replacement! Our experienced team can help you determine the best course of action for your roof, whether its a minor repair or a complete overhaul. Visit our website for more information on our process. From a thorough inspection we make recommendation on roof repairs or replacement if your are not sure. At the same time you will get an accurate cost saving quote. Most of our business is done by referrals and we are proud of that. In Howell, Brighton, Fenton, Commerce, Milford, Wixom, Novi and even Ann Arbor you'll find our work. Call Tim today to schedule your free roof inspection.
Lockhart Roofing
(517) 546-6690 www.lockhartroofing.com
Howell, Michigan
4.3 from 4 reviews
Lockhart Roofing is a family owned and operated home and commercial roofing company that has been servicing Howell and the Mid Michigan areas since 1982.

Roofing PD
(517) 798-8583 www.roofingpd.com
Serving
4.9 from 264 reviews
Roofing PD is a family owned roofing business from Howell, Michigan servicing Livingston and surrounding counties.
Ion Construction
(248) 939-1193 ionconstructionco.com
Serving
4.7 from 38 reviews
Based around the unshakeable values of honesty, transparency, and just being good people, Ion Construction isn’t like other construction companies. We strive to treat every customer with the respect and consideration they deserve. Our main goal with every construction project is the happiness and satisfaction of every customer. To achieve this, we strive to treat all of our customers like family because that’s how we’d want to be treated. We treat our customers with the respect they deserve by being fully transparent throughout our process, keeping the lines of communication open, and always listening. Give Ion Construction a call today!

Pure Energy Roofing Company
(810) 626-5606 pureenergyroofing.com
Serving
5.0 from 38 reviews
Pure Energy Roofing is a family-owned and operated roofing company based in Brighton, MI, serving all of Southeast Michigan, including Ann Arbor. Owned by Adrian Beavers and Matt Masters, we specialize in roof replacement, roof repair, hail and storm damage repair, gutter replacement, and attic insulation. As an Owens Corning Certified Contractor, we are committed to using high-quality materials and providing personalized, reliable service. We pride ourselves on our integrity, transparency, and dedication to the community. Trust Pure Energy Roofing for all your roofing needs and experience top-notch service from a local business that cares.

Jim's Roofing & Construction
(888) 301-6335 jimsroofingandconstruction.com
Serving
5.0 from 42 reviews
Contact our professionals today to discuss your next project. Our licensed and insured contractors have more than 20 years of experience. We're dedicated to meeting and exceeding the expectations of our clients. We welcome insurance work.
Spirit Roofing
(810) 225-6500 www.spirit-roofing.com
Serving
5.0 from 24 reviews
Commercial Flat and Metal Roofing out of Brighton Michigan.

Ferguson Roofing
(517) 545-3362 www.fergusonroofinginc.com
Serving
4.6 from 69 reviews
Ferguson Roofing is a full-scale roof maintenance and installation contractor located in Howell, MI. We specialize in a wide variety of services including roof repairs, ventilation installation, roof cleaning, and gutter cleaning. Give us a call today to see how we can help you with your roofing needs!
In Howell, replacement projects go best when the weather is dry and moderate. Dry windows between late spring and early fall reduce installation delays tied to moisture and help seal-downs cure properly. That means planning ahead for a stretch with predictable sun and lower humidity, so shingles and underlayment can be laid without repeated weather interruptions. A practical approach is to target a window of several consecutive dry days, with some buffer for unexpected heat spikes or late spring storms. Scheduling during this period also minimizes the risk of ice dams forming after the crew finishes, which keeps the project on track and reduces temporary leakage exposure.
Summer heat and humidity in the area can affect material handling and curing times, which matters for scheduling seal-down performance and crew productivity. In hot spells, sealants and synthetic underlayment cure faster or slower than expected, depending on material type. To keep installation steady, coordinate work for early mornings or cooler afternoons, and allow for mid-project checks on attic ventilation and ridge vent performance. If a roof replacement includes skylights or vented panels, ensure those penetrations are managed with temporary weather barriers during peak heat to avoid warping or premature material set.
Winter heavy snowfall can halt work entirely, so timing around snow patterns is critical. If a winter window slips, a homeowner may face longer lead times and only temporary protection rather than immediate replacement. Snow holds moisture against decking and flashing, increasing the chance of hidden damage behind ice or snow piles. A practical plan is to install a tarp or wind- and snow-blocking barrier over exposed areas when snow is anticipated, and to confirm that the crew can pause safely and resume quickly when a melt window opens. Proactive protection helps prevent interior leaks while awaiting the next available workday, and reduces the risk of cold-weather delays compromising flashing integrity.
The choice of roofing material interacts with replacement windows in meaningful ways. For example, certain shingles or metal systems pair better with rapid installation and robust flashing to resist ice dam pressure. Ask for a detailed installation sequence that includes attic insulation checks, vapor barrier compatibility, and proper drip edge placement to divert meltwater away from soffits. Pay special attention to attic ventilation and sealing around skylights or dormer windows; improved ventilation reduces condensation under the roof deck, which is a common contributor to winter leaks during and after a replacement. A clear, stage-by-stage plan helps ensure that winter, spring, summer, and fall constraints are all accounted for in the final result.
Asphalt shingles are the dominant practical choice for reroofs in this market, balancing familiar installation methods with a sweet spot of durability under winter conditions. They pair well with the typical housing stock and the local contractor ecosystem, which makes service calls for leaks or ice-dam related issues more straightforward. For homeowners, the practical advantage is predictable performance through freeze-thaw cycles, with recognizable shingles that installers can frequently source and replace quickly after winter storms. When paired with solid flashing and a well-sealed ridge line, asphalt shingles help maintain a steady defense against meltwater backing up along eaves.
Metal roofing appears in this climate as a higher-cost option, but it offers notable snow-shedding benefits and longevity potential. In discussions with local crews, metal often gets weighed against asphalt for its ability to shed snow more efficiently, which can reduce ice-dam pressure on overhangs and gutters. The upfront budget impact is a common hurdle, yet homeowners consider metal for longer-term performance and reduced maintenance in heavy snowfall years. If choosing metal, priority should be given to precision manufacturing and professional installation that ensures watertight joints, robust underlayment, and correctly flashed transitions at chimneys and vent outlets.
Premium materials such as clay tile and slate do appear in the local material mix, typically chosen for distinctive aesthetics or specialized rooflines. However, Howell's freeze-thaw climate makes underlayment, flashing, and structural suitability more consequential than appearance alone. These materials demand a careful assessment of roof deck strength, attic insulation, and proper support to avoid cracking or long-term movement under winter load. When considering these options, ensure the system is designed for cold-weather cycles, with high-quality underlayment and rigorously installed flashing to mitigate water intrusion during rapid temperature shifts.
Across all materials, the behavior of ice and water during winter hinges on more than shingles or panels. A robust underlayment layer, strategically placed drip-edge flashing, and well-sealed penetrations are essential. In homes with steep pitches or complex rooflines, attention to corner joints, skylight seals, and vent bootings becomes even more critical. Local crews emphasize continuous attic ventilation and insulation as keys to reducing the risk of ice dams and frost-related wear. When winter reliability is the goal, prioritize a roof system that coordinates strong primary materials with proven, cold-weather detailing to maintain a dry, durable roof throughout typical Livingston County winters.
Costs in Howell span a broad band, starting with asphalt shingles around 350 to 650 USD per square and climbing to slate at about 1000 to 1900 USD per square. Metal, wood shingles or shakes, synthetic or composite shingles, and clay tile fall in between these bookends, with prices driven by the weight, installation complexity, and long-term performance each material promises. That means the decision isn't only about the color and curb appeal, but how the roof responds to winter conditions and the roof deck's underlying needs. In practice, a homeowner will see the sticker price reflect not just the top layer, but flashing, ventilation, underlayment, and any required deck repairs. A typical Howell project leans toward the middle of the spectrum for many homes, but snow loads and freeze-thaw cycles can shift the total beyond the visible covering.
Winter damage creates surge demand for quick-response reroofing and temporary dry-in work after storms or ice-related leaks. When a cold snap hits, you'll notice urgency among nearby roofers, which can push up removal, disposal, and re-cover costs for a short window. If ice dams are present, crews may need to add ice barriers, enhanced ventilation fixes, or upgraded flashing, all of which add to the bottom line. In Howell, those costs can be enough to nudge an otherwise standard replacement into a higher tier, particularly when the roof deck has sustained moisture damage or requires further rehabilitation to prevent repeat leaks.
Material selection matters more here because freeze-thaw exposure, snow load concerns, and ventilation or flashing corrections during replacement can add scope beyond the visible roof covering. For example, lighter systems like asphalt may keep initial costs down but could demand more frequent maintenance after a harsh winter, while heavier systems or those with complex flashing details may require extra framing or deck work. Clay tile and slate bring exceptional longevity but require careful handling and additional structure considerations in snow-prone conditions. Wood shakes can need more careful attic ventilation and moisture management to resist warping in damp winters. Synthetic or composite options often balance price with good performance in freeze-thaw cycles, but still require proper installation to maximize venting and flashing efficiency.
1) Assess the roof's current condition and identify any deck or flashing weaknesses before choosing a material. 2) Consider the expected winter performance of each option, including how well it sheds snow and resists ice dam formation. 3) Budget for potential surge costs in winter, including dry-in work and expedited material delivery after storms. 4) Talk through ventilation upgrades and flashing details with the contractor to ensure the replacement accounts for Howell's climate. 5) Get multiple written estimates that specify scope, not just per-square price, so you can compare whether winter preparations are included or require extra work.
Howell cost expectations span from about 350 to 650 USD per square for asphalt shingles up to about 1000 to 1900 USD per square for slate, with metal, wood, synthetic, and clay tile in between.
Don't let upfront costs delay a critical repair - these contractors offer payment plans to fit your budget.
R&R 360 Construction Services
4337 E Grand River Ave ste 117, Howell, Michigan
5.0 from 73 reviews


In Howell, a full roof replacement typically requires a building permit issued by the local building department before work begins. That permit process is not something to guess at or file late; missing it can halt work and lead to penalties or required removal of unpermitted work. Before submitting, verify that your chosen contractor is licensed and ask for any material-specific approvals that could affect permitting, such as reinforced underlayment or ice-dam barriers. A smooth start hinges on a clear plan that aligns with local code expectations and any recent amendments.
Reroof projects are commonly inspected at the rough or underlayment stage and again at final inspection, rather than only after completion. This staggered approach gives the inspector a chance to verify that ventilation, flashing details, and drainage paths are correct before the roof is closed up. Expect guidance on attic vent placement, soffit intake, and ridge vent continuity, especially where cold winters and freeze-thaw cycles pressure the roof structure. If the project includes skylights or chimney flashing, these areas draw careful scrutiny during rough-in and final checks.
Homeowners should confirm contractor licensing and any material-specific approvals before permit submission, since these factors influence code compliance and the inspection plan. Documented adherence to ventilation recommendations, ice barrier placement, and proper flashing details reduces the risk of leaks once snow returns. Keep a file of product specs and installation notes to show inspectors that the chosen materials meet local standards. A proactive review with the contractor on these points helps prevent delays and ensures the project proceeds with the visible, verifiable steps that Howell relies on for a reliable, long-lasting roof.
When a winter storm hits and ice dam issues arise, Howell homeowners should document roof damage with clear photos, dates, and notes because Michigan insurers commonly require visual evidence and qualified contractor estimates. Photos should show the extent of damage from multiple angles, including attic views if feasible, and timestamps that align with your storm events. Keep before-and-after shots if you've noticed changes over time after a freeze-thaw cycle. Written notes should record how and when leaks were first noticed, where they appear on ceilings or walls, and any indoor signs of water intrusion.
Take photos after each significant weather event that could affect your roof, and as soon as you detect a leak or frost-related issue. In Howell, winter conditions can create hidden damage under shingles or flashing, so include close-ups of missing granules, lifted shingles, or compromised flashing along the chimney and vents. A simple, dated photo log helps when an adjuster arrives. If possible, have a neighbor or family member assist to capture angles you may miss from ground level. Document the state of any ice dams on gutters and soffits, since insurers often weigh the presence of wind or hail as covered causes rather than pure wear.
In this market, claim outcomes often depend on whether the loss is tied to covered causes such as wind or hail rather than age-related wear from winter conditions. Attach a written summary that correlates photos to specific damage sources, like wind-driven shingles or damaged underlayment from freeze-thaw cycles. Obtain a qualified contractor estimate that itemizes the extent of damage, recommended repairs, and the expected timeline. Having these ready helps speed review during adjuster visits and reduces back-and-forth.
Prior policy details may be requested during claim processing in Michigan, so Howell homeowners should gather policy records before adjuster review to avoid delays. Collect your declarations page, coverage questions, and any endorsements relevant to wind, hail, or roof damage. When presenting the claim, reference your policy's applicable coverages and any stated exclusions with the adjuster to avoid confusion and ensure a smoother process.
Skylights are a common leak point on older and newer homes alike in this market, and the local contractor scene reflects that by offering focused skylight repair and flashing replacement. In winter, freeze-thaw cycles push flashing joints and curb boots apart, so leaks often appear after a heavy snow melt or rapid thaw. If you notice moisture along the skylight flange or stained ceiling panels near a skylight, approach the area from inside, then inspect the flashing from the roof edge when safe to do so. Clean any debris around the skylight opening, ensure the curb is level, and verify that the sealant around the flange remains intact. Schedule flashing and sealant checks before peak melt periods to catch problems before they progress.
Chimney-related roofing work shows up regularly in the Howell market, underscoring how critical flashing intersections are on older homes. Chimney heads, sidewalls, and the transition to the roof deck can develop gaps that let water travel inward. Inspect the chimney flashing for gaps, corrosion, or loose nails after heavy storms or the first big melt in spring. If you see dark streaks on siding or shingles directly beneath the flashing, it's a sign to re-seal or reflash. When scheduling repairs, request a full seal and flashing refresh at the chimney-to-roof intersection, not just patching the top seam. This approach helps prevent recurring leaks during freeze-thaw cycles.
Any roof penetration-vent pipes, attic hatches, or exhaust lines-becomes more failure-prone as temperatures swing. In Howell, use a two-layer approach: first, reseal the interior side with appropriate sealant around the penetration; second, replace or upgrade the flashing boot or the step-flashing arrangement where it meets the roof. Pay attention to a lattice of ice dam pressure along penetrations, which can force water inward even when the main field looks intact. Keep those penetrations checked after storms and after a heavy snowfall, and plan proactive flashing refreshes before the coldest weeks arrive.
Find contractors experienced in skylight installation, flashing, and leak repairs to bring natural light into your home.

Ethical Exteriors
(517) 404-7606 ethicalexteriors.com
10107 Bergin Rd Building D, Howell, Michigan
4.9 from 117 reviews

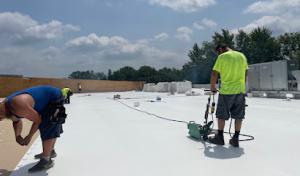
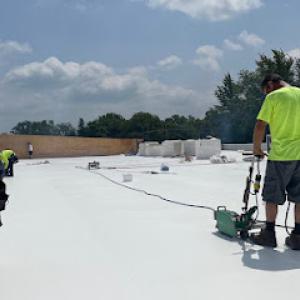
Low-slope roofing remains a practical specialty in Howell, even though most homes are pitched-roofed. Additions, screened porches, and commercial properties routinely feature flat or gently sloped sections that must perform reliably without the same water-shedding speed as a steep shingle roof. When planning these areas, treat the low-slope portion as a distinct system that interacts with the main roof but has its own set of potential failure modes.
Spring rain and snowmelt bring a sharp emphasis to drainage on low-slope sections. Water sits longer on the membrane or sheathing, so a small misalignment or marginal slope can become a significant leak channel over time. Pay particular attention to drainage paths around attic vents, skylights, and transitions from the main roof to the low-slope area. In Howell, you'll want a deliberate approach to roof deck ventilation and to ensure the perimeter of the low-slope plane drains toward designed scuppers or internal drains with cleanout access. Periodic inspections after heavy rains help verify that gutters and downspouts are not backing up moisture toward the edge where the low-slope roof meets the wall.
Homeowners should treat low-slope tie-ins separately from the main roof because underlayment, flashing, and ponding risk differ from standard steep-slope shingle work. Use a compatible underlayment system that resists prolonged moisture exposure, and install flashing at all transitions with attention to drip edges and sealant compatibility. The roof-to-wall intersection requires precise flashing to prevent ice damming and water tracking into soffits, especially when wind-driven rain is a factor during late-winter thaws. For porches and additions, ensure that the membrane fully covers the edge transitions and extends onto the main roof with sufficient overlap to maintain a continuous barrier.
Develop a routine that checks low-slope surfaces after thaw cycles and heavy rainfall. Look for signs of edge ponding, seam gaps, or compromised flashing around penetrations. Clear any debris that can impede drainage to avoid creating microponds that accelerate wear. In Howell, keep an eye on the interface between the addition and the main roof, since years of temperature cycling can loosen fasteners and degrade sealant at those junctions. Regular vent checks and prompt resealing when aging components are spotted can extend the service life of these integral sections.
Find specialists in TPO, EPDM, and built-up flat roofing systems for residential and commercial properties.

Eastbrook Roofing & Construction
(248) 877-9247 www.eastbrookroofing.com
1280 Thorn Ridge Dr, Howell, Michigan
4.5 from 12 reviews