Last updated: Apr 19, 2026
Edgewater sits in southern Anne Arundel County along the South River corridor, where open-water exposure and creekside neighborhoods can see wind-driven rain that turns minor flashing defects into interior leaks. This isn't the season to wait and see. A small lapse in flashing, a loose chimney seal, or a missing edge cap can cascade into soggy ceilings, warped drywall, and soaked insulation-even when the storm doesn't seem catastrophic at first glance. The next shower or gust can push that leakage from a nuisance into a costly repair, so act with urgency when you notice signs of moisture on ceilings or walls after a storm.
The local contractor signal mix is heavily weighted toward emergency repair, storm damage, and insurance claims, indicating that post-storm response is a primary real-world roofing need in this market. That means you'll find crews who specialize in quick temporary fixes to stop the bleeding and crews who handle the more extensive, insurance-driven repair work. If a contractor shows up promising a same-day "patch," use caution and document what gets done. A legitimate patch should stop active leaks, be clearly tied to the area near the origin of water intrusion, and come with a plan for a permanent, long-term repair once the weather calms. In a storm-prone creekside neighborhood, the difference between a band-aid and a durable fix often comes down to how well flashing details and roof-to-wall transitions are addressed.
Maryland roof claims commonly hinge on documenting date of loss, roof age, and photo evidence, which matters in Edgewater when spring storms and fall wind events trigger concentrated claim activity. Keep a dated record every time moisture is observed after a wind event: ceiling staining, damp under attic insulation, or new moldy odors. Take photos that show the progression from the initial damage to any temporary patch, then document the surrounding roof area-the ridge line, flashing around chimneys and skylights, dormers, and attic access hatches. If you have attic access, capture daylight peeking through soffits or decking; this is a straightforward indicator for adjusters of the severity and scope of intrusion. Note the weather conditions, wind direction, and any hail or microburst activity you remember from the storm.
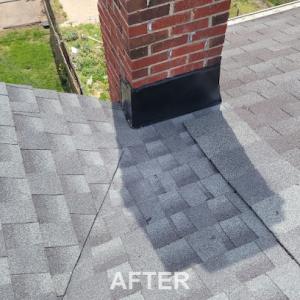
When a leak is suspected, don't test with a bucket and hope it dries out. Trace the leak path carefully from the interior to the likely exterior source. Common culprits include flashing laps at roof-to-wall transitions, vent pipe seals, and counterflashing around brick or siding intersections. In creekside neighborhoods, edge flashings and package joints near dormers can be overlooked until a pressure-driven rain proves their weakness. Prepare to address the immediate need with temporary tarps or roof cement only as a stopgap while you gather documentation and call in a storm-focused contractor. The goal is to move from reactive to documented, insured repair, so you can present a clear, organized loss package that shows date of loss, photos, and a credible timeline for permanent restoration. Stay proactive-your home's envelope depends on it after the next gusty storm.
Thunder Bay Roofing
(410) 956-7663 thunderbayroof.com
153 Mayo Rd Suite 203B, Edgewater, Maryland
4.9 from 143 reviews
Thunder Bay Roofing is located in Edgewater, and offers roofing services and siding replacement for commercial and residential buildings. Nick and Steven understand that a roof is not one size fits all, and considerations need to be made for style as well as substance. With over 30 years of industry experience and having worked for some of the biggest names in the area – we understand how important these decisions are for our customers, and how stressful this process can be. At Thunder Bay it’s our job to deliver the experience our customers deserve, and we’d greatly appreciate that opportunity. Give us a call or fill out the form on our website to schedule your complimentary first consultation with our roofing and siding contractor.
Recinos Siding Contractor
(410) 533-5079 www.recinossidingcontractor.com
806 Shore Dr, Edgewater, Maryland
4.9 from 61 reviews
Professionals and responsible roofing and general contractor

Shingle King
(301) 908-7432 shingleking.net
3757 Beach Dr Blvd, Edgewater, Maryland
5.0 from 10 reviews
Locally owned roofing business with over 30 years of experience
Roof Right
Serving
4.9 from 103 reviews
Welcome to Roof Right, A Family-Owned Roofing Company with offices in Hampstead, Rockville, and Annapolis, Maryland. We service Anne Arundel County, Baltimore City, Baltimore County, Carroll County, Harford County, Howard County, and Montgomery County. We provide service for all types of residential roofing repairs. Roof Right also offers insulation, gutters, windows, doors, siding, and decks. In addition to our excellent roof repairs, we also provide commercial roofing services.

Black Anchor Roofing
(410) 205-9562 blackanchorroofing.com
Serving
5.0 from 206 reviews
When it comes to roofing, no one compares to Black Anchor! With years of combined experience, Black Anchor Roofing has worked hard to build the trust of our clients in Annapolis and surrounding areas. Visit our website to learn more or better yet, call us today!
Odyssey Remodeling
(667) 646-0220 www.odyssey-remodeling.com
Serving
4.8 from 53 reviews
Odyssey Remodeling, located in Annapolis, Maryland, is the go-to exterior home remodeling company for the entire state. With a range of services including roofing, siding, insulation, and window installation, they offer unparalleled expertise and emergency services 24/7. Known for their commitment to excellence and dedication to customer satisfaction, Odyssey Remodeling has established itself as the premier choice for homeowners seeking top-of-the-line exterior remodeling solutions.

Piney Orchard Roofing
(443) 569-7022 www.pineyorchardroofing.com
Serving
5.0 from 41 reviews
Having a roof that you and your family can rely upon is a must – and having one that beautifully complements your home’s appearance is important as well. When you choose the team at Piney Orchard Roofing, you can be certain that you will have both! Their team of Odenton roofers utilize cutting-edge technology to provide precise, detailed reports with which they determine the best type of shingle for your needs, as well as an extremely accurate estimate. Specializing in roof replacements, they also offer gutter installation and skylight replacement when paired with replacement services. Call their team today to find out how they can help you during your free estimate!
Superior Restorations & Construction
(443) 223-7197 www.superiorrestorations.com
Serving
5.0 from 64 reviews
Since 2010, Superior Restorations & Construction has been the Annapolis area's trusted expert in comprehensive exterior home solutions. We specialize in superior roofing, siding, and gutter services, from expert installations to meticulous repairs. Our commitment to excellence is evident in every project, ensuring your home or business not only looks its best but is also protected with top-tier craftsmanship and unwavering reliability. Choose Superior Restorations for all your exterior construction needs.
Benchmark Roofers
(443) 454-1293 www.benchmarkroofers.com
Serving
5.0 from 111 reviews
Benchmark Roofers is the leading Roofing Company in Annapolis, MD & the surrounding areas. We proudly offer Roof Repair & Installation in Annapolis and throughout all of Maryland! We are commercial and residential Asphalt Shingles, Metal Roof, and Flat Roof Roofing Contractor. Hardie and vinyl siding certified contractors. At Benchmark Roofers, our core values drive the essence of who we are as a roofing company. Our commitment to professional roofing and excellent customer service sets us apart. Contact us if you are looking for a "Roofer near me". For a free estimate please reach out to us. We offer the best in service, Lifetime warranties, GAF certified, and offer cost effective solutions. We offer financing and payment options as well
Exterior Renovations
(301) 956-7303 www.exteriorreno.com
Serving
5.0 from 16 reviews
Our team of professionals has years of experience when it comes to customer service, roofing, siding, and window installations in Annapolis, Maryland. Exterior Renovations is a licensed and insured company, and all of our installers have been trained and certified to offer you a team of experienced exterior home renovators to get the job done right the first time. Our professional contractors use only quality materials and are experienced installing asphalt shingles, cedar wood shingle, metal and flat roof systems. We expertly install James Hardie, vinyl siding, cedar siding, and seamless gutter systems. We’ll come out to do a comprehensive inspection of your roof and provide you with a free estimate.
Valor Home Roofing
Serving
4.5 from 127 reviews
For over three decades, Valor Home has been transforming the exterior of homes in the greater Annapolis, MD area. Born from humble, veteran and family-owned beginnings, we've grown into a trusted leader in exterior remodeling. From complete roof replacements to beautiful window installations and energy-efficient siding solutions, Valor Home provides comprehensive services to enhance your home's beauty and value. We believe in delivering quality products and expert craftsmanship, ensuring your vision becomes a reality.

Blue Horizon Renovations
(410) 897-7601 www.bluehorizonreno.com
Serving
4.7 from 30 reviews
Are you looking for a roof installation company in Annapolis? If yes, Blue Horizon Renovations is the company you have been looking for. Our company offers roof installation services for different roofs ranging from asphalt shingles to metal roofs. Additionally, we offer roof replacement, repair, and maintenance services. We also offer home remodeling services. Our roofing company has highly trained and experienced technicians and builders ready to handle any roofing, renovation or repair work you throw at us. Most importantly, we have invested heavily in the right roofing tools and equipment to ensure the team is more efficient and safe at work. We also use the highest quality roofing and construction materials.
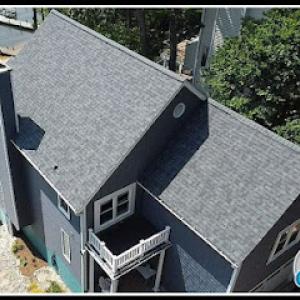
Edgewater roofs face hot, humid summers paired with winter freeze-thaw cycles, a combination that accelerates granule loss, sealant fatigue, and flashing movement. The recurring heat expands and contracts materials, while humidity keeps components damp long after rain, encouraging slow degradation around seams and penetrations. In practice, this means shingle life is not only about sun exposure but also about how often moisture sits on surface and in the attic. A roof that looks fine after a mild winter can still be aging quickly if the attic is moist and ventilation is inadequate. Pay attention to granule loss on asphalt shingles after heavy summer storms, especially along the eave line and valleys, where moisture exposure is greatest.
Regular rainfall in this area tests drainage performance relentlessly. Water should shed promptly off the surface and away from penetration points. Look closely at valleys, hips, skylights, chimney transitions, and exhaust vents-the places where moisture tends to linger if flashing shifts or sealant dries out. If you notice dark staining, moss growth, or algae around flashings, this is a sign moisture is lingering after rain and penetrating under surface materials. Ensure gutters and downspouts are clear and that extensions direct water at least three to five feet away from the foundation. Where downspouts terminate near eaves or into damp landscape beds, anticipate quicker wear on nearby flashing and underlayment. In a climate with frequent wet periods, proper slope and robust drainage paths matter more than a single layer of protection.
Replacement timing is driven more by performance through repeated wet seasons and cold snaps than by age alone. A roof that repeatedly holds moisture in the attic, experiences repeated ice dam formation at eaves, or shows exposed fasteners corroded by salt spray and humidity should be flagged for sooner attention. Inspect after major storms for loose or lifted shingles, torn seals, and displaced flashings. In particular, check around roof-to-wall transitions and vent installations after heavy rains or wind events; those are the most likely failure points to propagate leaks during a season of freeze-thaw cycling. If you observe soft patches on the roof deck or suspect moisture intrusion into the attic insulation, address it promptly to prevent mold growth and wood rot.
Start with a seasonal inspection focusing on sealant integrity, flashing movement, and fastener tightness. Gently probe around the edges of flashing with a non-destructive tool to detect any looseness. Clean gutters in late summer and again after heavy fall rains to keep drainage predictable. If a wind-driven leak event occurs, identify the exact penetration points and have a professional re-seal or replace affected flashing rather than applying temporary patches. Finally, choose replacement materials that perform well in humid, damp environments and have proven coastal resilience, especially for transitions and penetrations where moisture tends to linger.
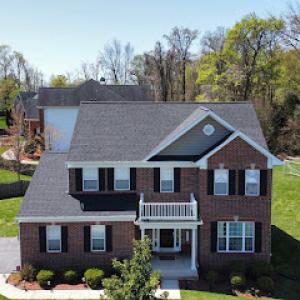
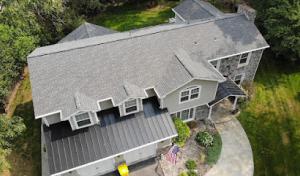
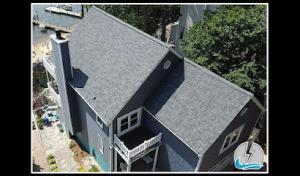
Asphalt shingles remain the dominant practical choice for reroofing projects in this market, aligning with the local contractor base and the area's common reroofing demand. In Edgewater's coastal climate, shingles with good granule retention and algae resistance perform well on steep and moderately pitched roofs found on many neighborhood homes. Look for warranties that cover impact resistance and wind uplift, since storm-driven leaks are a frequent concern after heavy rain and windy passages off the Chesapeake. When selecting asphalt, higher wind-rated shingles and impact-resistant variants can help mitigate the combination of humidity, salt spray, and sudden gusts that are typical around the bay. A locally experienced installer can tailor underlayment choices and fastener patterns to your roof's pitch and exposure, ensuring a solid seal against Edgewater's moisture swings.
Metal roofing is present but more specialized in this market, making contractor selection and installation experience more important than in cities where metal is mainstream. If you consider metal, prioritize crews with documented Edgewater or similar bay-front experience, since coastal environments demand exacting attention to flashing, sealant compatibility, and panel seam integrity. Steel and aluminum panels with corrosion-resistant coatings perform well under humidity and wind, and some profiles shed snow and rain efficiently in mixed seasonal conditions. Expect a steeper learning curve for retrofit projects and repairs; metal requires precise attic ventilation planning and תמ appropriate fastening to the deck. When installed by practitioners familiar with edge exposure, metal can offer durability and a distinct curb appeal that holds up under storm-driven weather.
Tile, wood shake, and synthetic products exist in the Edgewater material mix but are clearly less common locally, so homeowners using them may face a smaller pool of qualified installers and repair crews. Clay and concrete tiles bring a robust, long-lasting feel but can be heavier and less forgiving on older roof structures. They also demand careful nailing patterns and sometimes additional roof reinforcement to handle wind loads. Wood shakes provide a rustic look and excellent insulation but require proactive maintenance to prevent rot and insect damage in humid summers. Synthetic shingles offer versatility in appearance and enhanced hail resistance, yet installation expertise remains crucial to ensure proper alignment and wind performance. If choosing these options, verify the contractor's local track record with similar roof assemblies and confirm that they can source compatible underlayments and flashing details for coastal conditions.
When planning, prioritize materials that balance local roof exposure with ease of maintenance and repairability. Edgewater homes often present varied roof lines and pitches, so a material's installability on nonstandard geometries matters as much as its weather resilience. For storm readiness, emphasize wind-rated products and installers who can demonstrate lab-tested performance under Edgewater's humidity and creekside exposure. If opting for non-traditional materials, ensure the design harmonizes with surrounding homes and that the chosen product line has a track record of availability from local suppliers and repair crews. A well-matched combination of material and installer reduces downstream headaches after the next wind event and helps maintain the home's protective barrier for years to come.
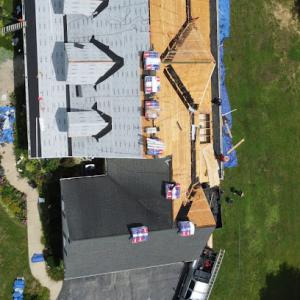
A full reroof requires a building permit through Anne Arundel County's Department of Inspections and Permits rather than a separate city roofing office. This means the project paperwork, plan review, and final closeout all flow through county channels, with county markings guiding what must be on the plan and what forms accompany the permit. Before any shingles come off, confirm your permit application is complete, including any required accompanying drawings if venting or roof shape changes are proposed. The county system can take longer than a quick teardown-and-replace, so factor scheduling accordingly.
Edgewater reroof projects are inspected during and after the work, and the permit is not fully closed until the county final inspection is completed. Expect an inspector on site at key milestones: once the deck is prepped and underlayment is installed, and again after completion to verify that flashing, ventilation, and drainage meet code. The final inspection is the signal that all permit requirements have been satisfied and the file can be closed. If any discrepancies are found during the mid-project or final checks, a corrective action order may be issued, extending timeline and requiring field adjustments.
Complex roof designs or venting changes in Edgewater may require plan submittals, which can affect scheduling compared with straightforward tear-off-and-replace jobs. When a venting relocation, dormer modification, or unusual hip-and-valley configuration is in play, the county may request detailed drawings showing roof framing, flashing transitions, and attic ventilation strategy. Submittal materials should be ready to accompany the permit package, and the review period can add days or weeks to the project timeline. Coordinate with the roofer and a local designer or engineer if needed to keep the submittal on track.
Keep a well-organized set of documents ready for the permit process: the contract, roof plan or drawing, product data for underlayment and ventilation, and any prior inspection notes for the house. After work begins, maintain a concise record of changes from the approved plan, including vent updates or flashing details, so inspectors can verify compliance without delays. Having this ready helps Edgewater residents navigate storm-related repairs efficiently and minimizes the risk of stuck permits during wind-driven weather recovery.
In this coastal Chesapeake Bay neighborhood, costs align with the per-square ranges you see in the area, with asphalt shingles sitting at the lower end and tile systems at the upper end. For reference, asphalt shingles land around the 350-700 USD per square band, while clay and concrete tiles push toward 900-1600 and 800-1400 USD per square, respectively. Synthetic and metal options land in between, with metal typically ranging from 600-1200 USD per square. When you're budgeting, use these local frame references: your decision between basic protection and premium tile can swing the total project quickly, even before labor and disposal fees. Edgewater pricing remedies a tight correlation between shingle type and long-term performance given humidity and wind exposure along the creek.
After significant regional storms, prices can rise as emergency demand spikes and scheduling tightens across Anne Arundel County. In Edgewater, that means you may see longer timelines from the initial assessment to site prep and material delivery, along with occasional premium surcharges for expedited crews or prioritized orders. If a wind event triggers urgent reroofing, the combination of scarce crews and backordered materials can push costs upward beyond the standard ranges, especially for tile systems where large-format or specialty components are less readily stocked.
Soft costs matter more here when venting systems or unusual roof geometry are involved. Complex rooflines, multiple hips, or intricate venting layouts can require additional planning, staging, and slower scheduling, all of which translate into higher per-square totals even before material costs are counted. Edgewater projects with steep pitches or limited access lanes face added labor in debris removal and material handling, subtly elevating the overall price. These factors contribute to longer timelines and a more iterative coordination process with crews, especially after a storm when logistics are stressed.
Get a clear picture of your project costs upfront - no commitment required.

In Edgewater, insurer treatment of roofs is strongly influenced by roof age and material type, and those factors can tilt renewal terms or claim outcomes. Asphalt shingles aged beyond a typical decade, or metal roofs with dulling fasteners, often trigger stricter inspection standards or premium adjustments after a wind event. The stewarded approach you take now matters later when the policy is up for renewal or when a surprise storm hits the Chesapeake humidity cycle. Understanding how age and material intersect with underwriting helps you plan for the long view rather than reacting after damage shows up.
Residents benefit from keeping dated storm photos, prior repair records, and installation age details because adjusters commonly ask for that documentation after wind and rain events. A well-organized binder or cloud folder with date-stamped images of loose shingles, attic insulation condition after a leak, and receipts for reputable repairs can streamline the claim process. After a gusty stretch or a heavy rain, those records translate to faster assessments and reduce the chance that a legitimate wind-damaged claim is questioned for lack of proof.
State insurance conditions and carrier underwriting changes can affect coverage eligibility and claim timelines for homeowners even when damage is legitimate. Changes at the carrier level may influence whether certain weather-caused problems are covered as dwelling damage versus maintenance issues. If a complaint or delay arises, persistence in documenting damage scope and correlating it to storm events becomes a practical hedge. In this climate, proactive record-keeping and timely contact with the carrier help keep legitimate claims moving toward resolution without getting tangled in administrative ambiguity.
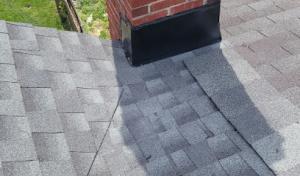
Skylight work is a meaningful specialty in this market, with homeowners frequently chasing leaks that seem to originate at the flashing and curb details rather than the glass itself. In practice, a leak can show up months after a wind event if the curb is not properly flashed or if the curb itself has settled over time. Focus on the intersection where the skylight sits and the roof plane-any hairline gaps, deteriorated sealant, or mismatched flashing can become a chronic drip in a wet season. When choosing a crew, ask specifically about curb detailing, step flashing, and how they test the flashing under simulated rain to catch hidden failures before they become visible.
Flat and low-slope roofing appears in the local contractor mix but is not dominant, which means Edgewater homeowners with these sections should verify that crews handle membrane and drainage details routinely. The membrane needs clean edges at transitions, with proper edge termination and a reliable drip edge that won't trap moisture. Corners, vents, and penetrations deserve extra scrutiny because a small lapse here can escalate into a larger water problem, especially when the rain comes with Chesapeake humidity. If a low-slope area backs a porch or ties into a steep-slope roof, the connection becomes a high-risk seam where water can back up if not properly detailed and pitched.
In the wet climate, transitions between steep-slope roofing and low-slope additions or porch sections are especially important because water management failures often show up there first. Look for continuous water barriers that extend across the interface, plus properly integrated drainage paths that prevent ponding at seams. Ask about how contractors plan for seasonal shifts, such as how flashing and membranes accommodate movement from temperature changes and wind-driven rain. A careful hand at these transition zones usually correlates with fewer surprise leaks after the next storm.
Find contractors experienced in skylight installation, flashing, and leak repairs to bring natural light into your home.
Thunder Bay Roofing
(410) 956-7663 thunderbayroof.com
153 Mayo Rd Suite 203B, Edgewater, Maryland
4.9 from 143 reviews
When selecting a roofer, look for crews that emphasize cleanup included, quick response, and proven reroofing experience. In this market you want a crew that can handle storm aftermath without leaving a mess or leaving neighbors in the lurch for days. Affordability helps, but it should come with a solid plan for debris removal, tarp placement during weather windows, and clear communication about progress. Watch for contractors who describe their process end to end-from attic inspection and hail or wind assessment to post-job cleanup and final gator-mat or magnet sweep for nails.
Long-established and family-owned firms maintain the strongest visible footprint in this area. Those firms tend to uphold a steady, local reputation and easier scheduling, which matters after a wind event when you need a crew that can start promptly. When evaluating bids, ask how long the company has operated locally and request references from nearby Edgewater neighbors who had similar roofs. A consistent local presence often correlates with reliable follow-through on warranty claims and on-site care.
Manufacturer-certified and warranty-offering contractors exist but are not the majority. Do not assume coverage or credentials; verify exactly what the warranty covers, who handles warranty work, and the process for submitting claims after a storm. Confirm installer credentials-look for current manufacturer certifications, proper licensing where applicable, and proof that the crew is trained for the specific product you're choosing. Inquire about the roofer's storm-response routine-how quickly they can address leaks, perform inspections after wind events, and who coordinates with insurance when damage is found.
Ask for a written scope that details cleanup, tarping, and a clear timeline. Request a breakdown of the reroofing sequence and a schedule for site protection measures during weather windows. Visit ongoing job sites if possible and ask about how crews handle attic ventilation inspections and shingle alignment-precision matters when exposure to Chesapeake Bay humidity and creek breezes is high. Finally, check recent Edgewater references and confirm that the contractor's documentation aligns with local expectations for post-storm reliability and long-term performance.