Last updated: Apr 19, 2026
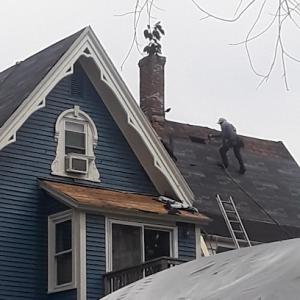
Roslindale homeowners face cold, snowy winters and Nor'easters that mix wind-driven rain, freeze-thaw cycles, and heavy snow on sloped roofs. When a storm dumps new snow or pushes warm air into the attic, ice dams can form at the eaves, backing up water under shingles and flashing. Leaks often appear first around roof-to-chimney joints, dormer flashings, and where valley intersections meet the roof plane. In a typical Roslindale attic, poor insulation and limited attic venting accelerate the problem, creating a pressurized push that drives meltwater under the roofing layers. The danger is not just a wet ceiling; repeated cycles weaken framing and create long-term rot and mold risk in older Boston-area homes.
Older homes in this area commonly rely on roof-to-chimney, dormer, and valley flashing details that become leak points during ice dam events. Pay close attention to any staining or damp spots along the chimney base, along dormer walls where flashing meets shingles, and along valley intersections where two roof planes meet. If you notice warped or corroded metal, gaps at seams, or loose shingles, treat these as urgent fixes. Inconsistent ice buildup along eaves can indicate that water is seeking an entry point further up the slope. Do not assume a visible drip means the problem stops there-the water can travel along boards and fascia before it shows, especially once the wind shifts or temperatures rise and fall.
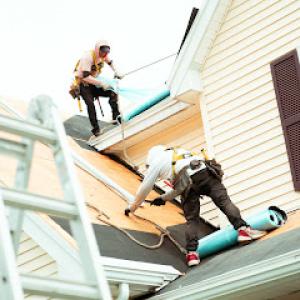
Winter access limits in Roslindale often delay full replacement work, making emergency tarping and temporary leak control a common first step. If you spot active leaks, place a sturdy tarp over the failing area, securing corners against strong winds. Use waterproof plastic sheeting to cover any skylight or dormer openings that could channel water inward. Clear snow off the roof directly above the leak area if safe to do so, reducing additional meltwater pressure. Keep interior spaces dry by directing water to a bucket or container and protecting insulation with plastic sheeting if feasible. It's essential to coordinate with a local roofer who can provide rapid tarp setup and temporary leak stops, especially before a forecasted storm intensifies.
Because winter work delays full replacement, the focus shifts to controlling damage now and scheduling a more thorough repair when weather improves. Prioritize sealing flashing joints around chimneys, dormers, and valleys to minimize further water intrusion. Reassess attic insulation and venting to reduce heat buildup that fuels ice dam formation, and map out a plan with a trusted contractor for a winter-to-spring repair window. When a Nor'easter is on the horizon, couple temporary measures with a concrete plan for re-flashing and shingle restoration, targeting the most vulnerable points first to protect the home's interior from ongoing freeze-thaw cycles.
Otukan Roofing Company Boston
(781) 798-9009 otukanroofing.com
Serving
5.0 from 21 reviews
Otukan Roofing is the top roofing company in Boston, MA, offering a wide range of expert services to protect and enhance your home. Our skilled professionals specialize in any flat roof repair, replacement, and inspection, as well as gutter cleaning, repair, and replacement. We also provide expert skylight installation and repair services. Whether you need routine maintenance, emergency repairs, or a complete roof overhaul, our team is dedicated to providing exceptional customer service and top-quality workmanship. Count on us for prompt, reliable, and affordable solutions to all your roofing needs. Contact Otukan Roofing today to schedule your appointment!
Duffy Roofing
(617) 296-0300 duffyroofing.com
Serving
4.8 from 84 reviews
Duffy Roofing, Inc provides residential roofing services in the Dorchester, MA area.

Certified Roofing Systems
(617) 958-8659 certifiedroofinginc.com
Serving
4.9 from 123 reviews
Serving businesses since 2006, Certified Roofing specializes in roof coatings, full roof restorations, and commercial roof replacements for Metal, TPO, Flat, PVC, Single-Ply roofs across Massachusetts, including Newton, Boston, Medford, Malden, Cambridge, Brookline, Somerville, Waltham, Quincy and nearby. 🏗️ We work with metal, PVC, TPO, EPDM rubber, and flat roofs, using top-quality Gaco Products for lasting protection. 🏢 We provide excellent roof replacement and installation solutions for all types of commercial and industrial buildings. ✅ Get a Free Thermal Drone Inspection and Free Commercial Roof Estimate today! 📞 Call 617-958-8659 or book online. Quality, reliability, and energy-efficient solutions for your business! 🌟

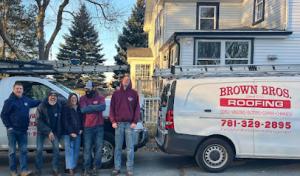
Brown Bros. Roofing
(781) 329-2895 www.brownbrosroofing.net
Serving
4.9 from 71 reviews
Your home is your castle and needs to be protected from the elements. Since 1932, homeowners have been turning to Brown Bros to keep their families safe and warm. You can trust our experienced contractors to do the job right on all roofing, gutters, siding, windows, and deck work. Give us a call or shoot us an email.
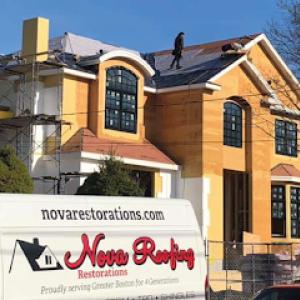
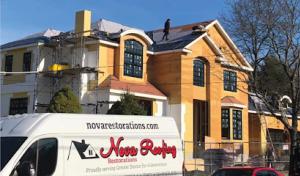
Nova Roofing & Restorations
(781) 407-9112 www.novarestorations.com
Serving
5.0 from 12 reviews
For 4 generations, Nova Roofing and Restorations have been trusted by homeowners, developers, commercial property managers and historical renovators throughout Massachusetts. From the old school, tar and gravel experience to the newest technology used today in all materials related to roofing, Nova has you covered. Certified, insured, licensed and trusted for quality and service.

Daniel Fox Roofing
(617) 965-1294 foxroofinginc.com
Serving
5.0 from 48 reviews
Daniel Fox Roofing is a full-service roofing contractor in Newton, serving the Metro West & Greater Boston areas. When you need a roof repair or roof replacement, there is no better company to call than Daniel Fox Roofing! We've been fixing and replacing roofs in Newton for more than 40 years. Danny works with all types of roofs, from common asphalt shingle roofs to exotic materials like slate, copper, or clay tiles. Plus gutters, flashings, and other aspects of your roof. Your job will be handled professionally, on time, and within budget. Call me today for a free quote.
Loyalty Exterior Roofing Solutions
(508) 719-7205 loyaltyroofingsolutions.com
Serving
5.0 from 226 reviews
Recognizing the distinctive essence of every residence, our comprehensive exterior remodeling expertise extends to a wide spectrum of services, including solar solutions, residential roofing, shingle roofing, emergency roofing services, roof repair, and roof replacement. With a profound respect for the individuality of each property, we meticulously tailor our remodeling solutions to amplify both its inherent allure and practicality. We pride ourselves on offering the best roofing solutions in Needham, MA! We offer peace of mind when it comes to all of our roofing services. We guarantee you'll be pleased with your roof repair, roof installation or roof maintenance! Contact our team of roofing experts today to learn from a pro.

Mighty Dog Roofing of MetroWest Boston
(781) 206-2864 www.mightydogroofing.com
Serving
5.0 from 168 reviews
Handling a roofing project without the right expertise or guidance by your side is hard, but worry no more because Mighty Dog Roofing MetroWest Boston is at your service. We have numerous years of experience handling unique roofing needs and delivering excellence in every project we undertake. Additionally, we use the highest quality materials and equipment, which further enables the delivery of a service that meets customer satisfaction. Also, we offer a free roof inspection, which guides us in providing you with a durable roofing structure. Contact us today for a reliable roofing service that meets all your needs and gives you a stress-free experience.
Admiral Roofing & Home Improvement
(781) 706-2132 admiralroofingma.com
Serving
4.9 from 17 reviews
Admiral Roofing and Home Improvement is a trusted roofing and remodeling company serving Braintree, MA and surrounding areas. We provide quality service for all roofing and remodeling needs, including repairs, installation, maintenance and inspections. Our experienced team of roofers use the latest techniques to ensure your roof is in top condition. You can trust us to make sure your home is safe from the elements.
GF Sprague Exteriors
Serving
4.8 from 842 reviews
GF Sprague has been part of Boston’s architectural fabric since 1969, starting with slate roofs and hand-formed copper details on the city’s most historic sites. Those projects taught us precision, pride, and craftsmanship that can’t be rushed—values that remain our foundation today. We’ve expanded to all roofing types, as well as windows, gutters, siding, and chimneys, bringing the same commitment to detail, durability, and integrity to every project. What sets us apart isn’t just our skill—it’s treating every customer like family. Every roof is a promise to protect a home and uphold Boston’s tradition. Many clients have trusted us for generations, passing down their loyalty as we’ve passed down our craft.
CAN Roof Construction
(857) 415-7727 canroofconstruction.com
Serving
5.0 from 119 reviews
CAN Roof Construction is one of the best Roofing Contractor and Deck Builder in Boston Massachusetts providing Asphalt Roof repair and replacement, Rubber Roof Repair and replacement, Flat Roof Roof repair, Gutter installation, Deck and Porch building and serving Metro West, the Greater Boston area and all surrounding cities. We are the top Roofing Contractor in Boston MA, committed the highest customer service and workmanship quality. We are proper licensed and Insured. If you have roof leak, missing shingle or damage on your roof, get in touch with us, we would love to help you with your roof repair or replacement project. We CAN Roof it!

ID Flat Roof
Serving
4.7 from 40 reviews
Repair, replacement, and installation of flat roofs, low-pitched roofs, regular roofs, and decks.Residential and Commercial roofs.Rubber roof, asphalt shingles roofs, metal roofs, PVC roofs.Experience More Than 21 Years.Lifetime Warranty.We accept credit cards.We have all insurances and licenses.If you want to make your next roof your last roof, call us today and let us provide you with the final solution to your roof or deck problems.
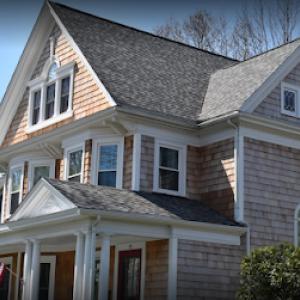
Roslindale's housing stock features many older detached and two-family homes with intersecting roof planes, masonry chimneys, and dormers that complicate replacement scope. Those complex roof geometries create tight valleys and multiple flashing transitions where ice dams tend to form first during Nor'easters. This means your replacement plan should anticipate not only the main roof but also the chimney chase, dormer sides, and any brick or stone veneer that interfaces with roofing. Expect more scheduling coordination if a chimney or dormer is masonry-backed, since those surfaces carry their own drainage and flashing demands.
The local contractor market shows strong chimney-related demand, reflecting how chimney flashing and masonry transitions are recurring roof trouble spots in this part of Boston. When planning a tear-off or repair, verify that the contractor includes a thorough flashing refresh around the chimney base, the crown, and any lintel or masonry joints. Fireplaces and heating flues often share attic space with dormers, so ensure that sub-flashings and counter-flashings are properly integrated with the roof system. If brickwork shows spalling or mortar erosion, address those issues first or in tandem with the roof to prevent future leaks from expanding gaps around the flashing.
Dormers add vertical exposure and multiple planes that can complicate drainage. Pay particular attention to the intersection where dormers meet the main roof, as this is a common leak path during snow load and thaw cycles. A careful replacement plan should include precise shingle layout around dormer sides, proper nailing patterns for the stepped flashings, and inspection of any existing ice guards extended onto the dormer cheeks. Intersections between intersecting roof planes should have continuous ice dam protection where feasible, and the trim work around dormers should be sealed to resist wind-driven moisture.
Tight residential lots and mature tree cover in established neighborhoods can affect staging, debris protection, and cleanup during tear-offs. Plan for protective barriers, such as temporary weatherproof enclosures and careful material handling to avoid damage to nearby landscaping, driveways, and neighboring homes. Cleaning during tear-off may require frequent trips to compact neighborhood disposal points, so coordinate with the contractor to minimize disruption and protect adjacent masonry features from falling debris. In practice, set up staggered work hours and establish clear routes for debris removal to keep sidewalks and gutters clear for winter storms.
Start with a thorough inspection of all flashing around chimneys, valleys, and dormers. Next, confirm the integrity of masonry transitions and replace deteriorated mortar or brickwork where observed. Then, install continuous edge metals and properly sealed counter-flashings at all chimney and dormer interfaces. Finally, finish with a roof covering chosen to suit Roslindale's climate, ensuring that the last layer ties smoothly into dormer and chimney lines for a coherent, leak-resistant envelope.
Find contractors experienced in skylight installation, flashing, and leak repairs to bring natural light into your home.
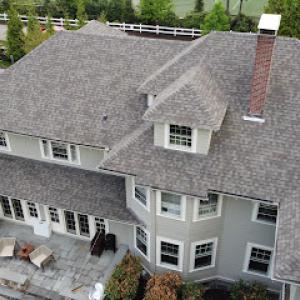
Asphalt shingles are the dominant practical choice for Roslindale because they fit the area's older pitched homes and the local contractor base has the deepest experience with them. They handle the region's freeze-thaw cycles reasonably well when installed with proper underlayment and attic ventilation. For homes with steep, snow-prone roofs, asphalt shingles paired with an integrated attic venting strategy and a well-sealed ridge line help curb ice dam formation. In neighborhoods where homes were built before modern roof geometry, a trusted roofer can tailor shingle profiles to maintain water shedding and minimize wind uplift on overhangs. Regular maintenance-clearing debris, inspecting for lifted tabs after Nor'easters, and addressing minor flashing issues promptly-goes a long way toward preserving a shingle roof through repeated winter storms.
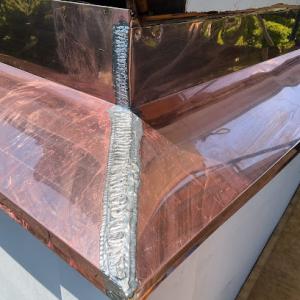
Metal roofing is relevant in Roslindale for snow shedding and durability, but detailing around older chimneys, dormers, and penetrations is critical in Boston's freeze-thaw climate. Metal panels can outperform asphalt in shedding heavy snow, reducing the risk of ice dam buildup along eaves and gutters. However, if a house features brick chimneys, flue collars, or decades-old dormers, the transition areas require precise flashing and sealant strategies to prevent leaks where metal meets masonry or wood. In retrofit projects, consider a standing-seam system with continuous perimeters and sond-like snow guards only where warranted by slope and snowfall. A well-executed metal install can complement an older roofline without compromising the home's historical character, provided penetrations are thoughtfully integrated and backed by solid drainage planning.
Tile, wood, and synthetic products appear in the market but must be evaluated against structural load, winter weather exposure, and compatibility with older Roslindale homes. Clay tile offers superb longevity and a distinctive profile, yet its weight and brittleness under freeze-thaw cycles demand a reinforced roof structure and careful seismic- or wind-performance considerations. Concrete tiles are heavier still but can provide robust performance in cold snaps if the roof framing is rated for the extra load. In both cases, the spacing of roof supports, local wind zones, and the potential for ice dam formation around eaves must be assessed before proceeding. Tile and heavy-shaft options often require specialized flashing around chimneys and dormers to maintain a continuous waterproof barrier through winter storms.
Wood shingles and shakes bring a classic look that many Roslindale homes carry, yet their performance hinges on proper installation and ongoing maintenance. In freeze-prone climates, untreated wood can absorb moisture and be subject to splitting or warping after several Nor'easters. Some synthetic or composite shingles mimic the traditional appearance while offering improved resistance to moisture and a lighter footprint on older structures. When evaluating these options, assess compatibility with existing underlayment, venting, and attic insulation, as well as the ability to resist the seasonal freeze-thaw cycle. For older homes with steep pitches, ensure that the profile and edge detailing support reliable snow shedding and minimize the chances of moisture intrusion at lap joints and penetrations.
Across all material types, the Roslindale climate emphasizes robust attic ventilation, well-sealed eaves, and carefully managed flashing around chimneys, dormers, and roof penetrations. The goal is a system that can withstand Nor'easter-driven leaks while preserving the architectural character of dated rooves. In practice, this means selecting materials that align with the home's structural reality, ensuring proper underlayment, and prioritizing meticulous flashing transitions. Regular inspections after major winter storms help catch problems early, especially at joints, ridges, and penetrations where ice dams are most likely to form.
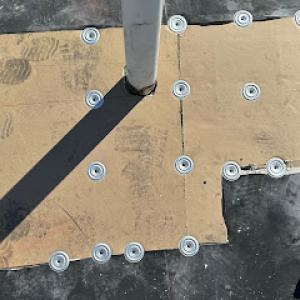
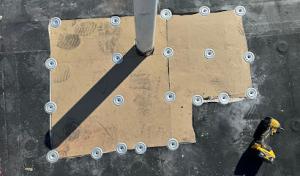
While many main roofs in Roslindale are pitched, low-slope sections commonly appear on porches, rear additions, and small multifamily extensions. These flat or near-flat planes collect snow and water more readily than steeper roofs, and the Boston climate compounds the risk. Snow retention and ponding can create prolonged moisture exposure, inviting leaks at the joints and along fasteners. The plain fact is that these areas are built for function, not long-term weather resilience, so careful detailing matters from the start.
Snow in winter tends to sit on flat sections longer, melting unevenly and refreezing at the edges. Ice dams can form at transitions where the flat roof ties into older sloped roofs, driving water under shingles or into flashing. Come spring, thaw cycles and heavier rains test these same joints. In Roslindale, where Nor'easters are a recurring pattern, the problem is not merely a leak-it's repeated exposure that degrades seals and invites rot around edges and penetrations. These roof areas require vigilant monitoring after storms and during rapid temperature swings.
Transitions where flat sections tie into older sloped roofs are common leak locations on Roslindale homes. The converge point between different roof planes is where flashing, membranes, and sealants bear the brunt of movement, temperature shifts, and moisture intrusion. Pay close attention to chimney crickets, skylight flashings, vent penetrations, and drips at the eaves. If a transition feels soft, wet, or creaky, treat it as a warning sign rather than a cosmetic issue. Improperly integrated transitions often masquerade as surface leaks but originate at the junctions.
Addressing flat-roof vulnerabilities requires a proactive plan. Regularly clear debris from gutters and scuppers to prevent backing and ponding. Inspect flashing around penetrations and transitions at least twice a year, and after heavy storms test for damp spots inside attic spaces that align with these areas. Consider upgrading edge detailing and using a compatible, weather-appropriate membrane at transitions where older sloped roofs meet new flat sections. If signs of moisture persist, it is wise to consult a local roofer who understands how Roslindale's snow loads and melt patterns stress these specific details.
During winter, watch for ice buildup at eave edges and along seams; any active ice daming or water ingress should trigger a quick assessment. In spring, keep an eye on ponding that lingers after rainstorms, especially near transitions. Delays in addressing even small leaks can lead to fascia rot, insulation damage, and interior staining. A disciplined inspection routine tailored to porches, additions, and small extensions will reduce the risk of hidden damage creeping into the structure.
Find specialists in TPO, EPDM, and built-up flat roofing systems for residential and commercial properties.
Costs in this neighborhood are shaped by Boston-area labor pricing, disposal logistics, and the added complexity of older homes with chimneys, dormers, and multiple roof facets. When a roof replacement involves a dormer or chimney chase, measurements and material waste vary, pushing the final square footage tally higher than simple surface area. Seasonal storm demand after winter damage and spring Nor'easters can tighten scheduling and push pricing upward for urgent work. If a storm comes through and you need quick turnaround to stop leaks, you'll likely see higher labor ramp rates and possible expedited delivery fees for materials and dumpsters.
Steeper pitches are common on older Roslindale houses, plus limited driveway or yard staging on city lots, can increase labor time and cleanup effort. They also raise safety considerations and required equipment, which get reflected in the per-square pricing. When crews must maneuver through tight alley access or contend with neighboring property lines, expect a modest rise in handling and staging costs. For safer, neater finishes, crews often use edge protection and careful ladder systems, further impacting overall hours billed.
Asphalt shingles remain the most common, with typical replacement costs from 400 to 800 USD per square. Metal roofing, clay tile, concrete tile, wood shingles/shakes, and synthetic/composite shingles each carry their own ranges and install complexities. In Roslindale, material choice is frequently influenced by the existing roof structure and the desire to balance durability with weather resistance. For steeper roofs, upgraded underlayment or flashing materials may be selected to address Nor'easter-driven ice dam risk, adding to the total.
When obtaining quotes, specify chimney and dormer details, pitch, and access constraints to ensure apples-to-apples bids. Consider timing your project to avoided peak storm windows if possible, and build in a contingency for rapid scheduling if an early spring Nor'easter hits. Finally, confirm waste disposal arrangements, as city logistics can affect both timing and cost.
Get a clear picture of your project costs upfront - no commitment required.


Before any full roof replacement begins, securing the appropriate permit is essential in this city's busy neighborhoods. In Roslindale, a full roof replacement typically requires a building permit through the City of Boston's Inspectional Services Department. The permit process helps ensure that the replacement follows current code requirements for ventilation, insulation, and drainage, which are especially important for steep, snow-prone roofs common on older houses. Have the contractor submit a clear scope of work, including roof type, underlayment, and fastening methods, so the review can move smoothly. Once the permit is issued, inspections are typically scheduled at key milestones to verify materials and construction details align with approved plans.
Boston reviews the replacement scope and roofing materials as part of the permit process. For Roslindale homes with historic or distinctive features, the city may request documentation on venting arrangements, skylights, dormers, or chimney flashing to confirm continued protection against ice damming and leaks. It is wise to keep a detailed, itemized plan available for the inspector, showing each roof section, material thickness, and fastening pattern. If the project includes a reshaped or expanded roof deck, changes to structural members, or alterations to venting, this documentation helps avoid delays. If metal, clay tile, or concrete tile are proposed, ensure the plan includes compatibility details with existing flashing and ridge vent systems to maintain continuous water runoff, especially during Nor'easter-driven storms.
If the project changes structural elements or alters vents or skylights, additional review or inspection steps may apply in Boston. Structural modifications can trigger engineering reviews or revised framing plans, so coordinate with the building commissioner early. Skylight or vent relocation often requires updated flashing details and may necessitate a separate inspection or a change order to the permit. Communicate any planned changes promptly to the contractor and inspector to prevent later rework. In Roslindale, where older homes often feature limited attic access and uneven framing, ensuring that any structural updates account for snow load and drainage paths is especially critical.
A final inspection is generally required after completion to confirm that the roof installation matches the approved plans and satisfies safety and weatherproofing standards. The inspector will check fasteners, underlayment, flashing transitions around chimneys and dormers, and proper installation of vents, as well as overall integrity against anticipated storm conditions. Prepare for a potential follow-up if small adjustments are needed. Having photos and documentation on hand can help streamline the process if the final inspection reveals minor refinements. If everything aligns with the permit, the final sign-off closes the project and helps ensure long-term performance against ice damming and leakage.
Massachusetts insurers commonly want photos, a detailed replacement estimate, and documentation of the completed roof work for Roslindale properties. When a claim is filed after a Nor'easter or a snow-driven event, take clear pictures from multiple angles, show any ice damning or flashing failures, and timestamp them. Gather a line-by-line replacement estimate that aligns with the roof's actual square footage, material type, and any necessary repairs to gutters, soffits, and interior ceilings. Keep copies of all correspondence with the insurer and the contractor, and store them in a single accessible folder that you can share quickly if the adjuster asks for more detail.
After wind or hail events, adjusters may inspect to verify that damage is storm-related rather than age-related wear. Expect questions about prior leaks, the roof's age, and previous repairs. If an interior leak exists, document the leak's origin with photos of attic framing and any insulation moisture. For pine- or oak-shaded sections prone to ice dam buildup, show how ice dams formed and whether interior staining corresponds with storm timing. Having a mapped roof plan and a simple chronology of events helps the adjuster separate new damage from preexisting wear.
Coverage terms in Massachusetts are generally stable, but underwriting can shift as carriers respond to broader climate risk. Insurers may reserve funds for extensive weather seasons or adjust eligibility criteria after major Nor'easters. Stay proactive by maintaining a current inventory of roof components, including shingles or panels, flashing, and underlayment, so renewal conversations stay grounded in documented condition rather than sentiment about recent winters.
Connect with contractors who help homeowners navigate the claims process from damage assessment to final approval.

Storm Works Roofing & Restoration
(844) 786-7696 www.stormworksroofing.com
Serving
4.8 from 143 reviews
Clancy Roof & Leak Repairs
(617) 467-2455 clancyroofrepaircharlestown.com
Serving
5.0 from 53 reviews
Winter snow loads and ice make access and tear-off conditions difficult in Roslindale, so emergency stabilization is often more realistic than full replacement during active storms. If you suspect active ice dams, prioritize sealing attic air leaks and installing temporary barriers to slow leaks while weather clears. Scheduling a full-on replacement after a storm should be reserved for calmer stretches, with daylight, safe access, and clear paths to gutters and corner details. In cold snaps, metal or bituminous underlayment can buy time, but the crew will work slower and with extra safety checks for slip hazards and buried power lines.
Spring Nor'easters can disrupt schedules with high winds and heavy rain across Boston neighborhoods. Plan for potential back-to-back delays, and keep a buffer window between weather blocks and concrete milestones like underlayment replacement or flashing resealing. Early spring is often when old flashing fails most, so expect a shift from diagnostic leaks to repair-only tasks before any major roof tear-off occurs. If a storm rolls in during a planned startup, secure temporary patches that divert water away from critical intersections while awaiting calmer conditions.
Summer humidity and fall leaf debris both affect work planning and post-install maintenance on tree-lined Roslindale properties. Hot days slow shingle installation and can affect adhesive-backed components. Mowing and raking around the work zone improves ventilation and reduces staining on new materials. In fall, debris management-leaf cleanups and gutter guards-becomes a routine aftercare task to protect the new roof and maintain performance through leaf season storms. Plan final inspections after leaf drop, when conditions are dry and visibility is best for flashing and ridge vent checks.
The local market strongly signals demand for quick response and cleanup, so you should expect both to be part of normal service standards. Winter storms and Nor'easters mean leaks can spread fast after a final rain, and a contractor must not treat cleanup as an afterthought. Ask how soon a crew can arrive after a notice of leak, what their plan is for protecting your interior, and how they handle debris and waste on a busy street. In Roslindale, a reputable team coordinates access to alleyways and driveways without adding risk to neighboring homes.
Re-roofing experience matters here because many jobs involve older homes with steep snow-prone roofs and complex penetrations. A contractor with a track record of working on vintage Boston-area houses will better anticipate ice dam risks and flashing failures. Look for portfolios showing multiple iterations of ridge and valley details, vented soffits, and old chimney interfaces. Ask for references from projects similar in age and roofline, and confirm that crews understand how snow load and ice dam patterns influence material choice and underlayment strategy.
Long-established residential contractors are common in this market, reflecting homeowner preference for crews familiar with Boston permitting and older roof details. When evaluating bids, prioritize firms with local staff who know Roslindale's typical attic layouts, skylight placements, and chimney stacks. Stability matters: workers who have been with the same company through several winters are more likely to return for follow-up issues without leaving you in limbo. Communication should feel direct and consistent, not outsourced to a distant team with uncertain arrival windows.
Solar roofing appears in the Roslindale market but is a smaller specialty than emergency repair, asphalt, flat roof, or skylight work. The neighborhood's older housing stock, steeply pitched roofs, and history of Nor'easters shape how solar fits in. You'll often find panels on homes with solid southern exposure, but the decision should consider snow shedding, potential ice dam risk, and the overall condition of the roof deck and flashing. In practice, solar projects are most successful when they align with existing roofing goals rather than as a standalone upgrade.
On older homes, solar planning needs to account for roof age and penetrations before panel or integrated-roof work proceeds. A roof that's nearing the end of its lifespan or has multiple penetrations from outdated ventilation, skylights, or satellite dishes is a red flag for delaying installations until the roof is addressed. Before you commit to panels, have a qualified roof pro inspect the sheathing, ice dam history, and flashing around chimneys and work areas. Addressing weak spots now helps prevent leaks once solar equipment is in place.
Projects that alter roof penetrations or related components may trigger added review considerations through Boston's inspection process. If choosing an integrated roof or mounting system that changes shingle exposure, ridge lines, or drainage paths, prepare for the possibility of additional assessments. In Roslindale, where storms and heavy snows test roofs, prioritize solutions that preserve drainage, maintain effective ice dam management, and keep access to attic vents and attic insulation intact.
Coordinate with a roofer experienced in older construction to plan timing around storm season, ensure flashing upgrades are compatible with any solar hardware, and choose a mounting method that minimizes new penetrations. Consider staged approaches: repair or replace compromised sections first, then install solar once the roof is solid, watertight, and capable of handling the added load and maintenance access.
Find contractors who integrate solar panels or solar shingles into your roof for long-term energy savings.
Storm Works Roofing & Restoration
(844) 786-7696 www.stormworksroofing.com
Serving
4.8 from 143 reviews