Last updated: Apr 19, 2026
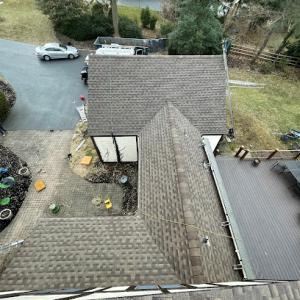
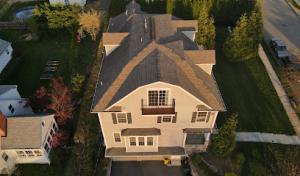
Little Falls winters bring repeated snow, melting, and refreezing cycles that make ice damming and shingle edge damage a primary local roof concern. As snow piles up against eaves and低-slope sections, meltwater can back up behind icy dams, forcing water under shingles and flashing. The Passaic River valley moisture and the exposure from the First Watchung ridge mean more sustained cold snaps and fluctuating temperatures, so every winter day tailors a fragile roof edge condition. Homes with older steep-slope roofs or mixed low-slope multifamily structures face heightened vulnerability because nail heads, sealant lines, and edge metal wear faster from day-after-day freeze-thaw stress.
The transition from winter snow to spring rain in North Jersey commonly turns minor flashing or underlayment weaknesses into active interior leaks. In a town where moisture lingers after a heavy storm, small failures become large problems once the ground thaw begins and rain intensifies. Look for soft spots around eaves, sagging gutters, or damp spots on interior ceilings near exterior walls. If the attic has inadequate insulation or venting, warm indoor air can condense higher up, freezing at night and refreezing during rain events, creating a second wave of damage even after the worst snow settles.
After the snow recedes, examine the roof edges and eaves with a careful, daylight pass. Look for damaged or missing shingle tabs, lifted or curled edges, and any rusting of metal drip edges or gutters. Pay close attention to flashing around chimneys, vent pipes, and skylights; even small gaps become pathways for water if wind-driven rain arrives with a cold snap. In the attic, check for any signs of moisture buildup, staining, or musty odors, especially near gable ends and roof intersections. If insulation feels damp or compressed, air leaks may be carrying humid air into the roof assembly, where it condenses and freezes, accelerating edge damage. The local moisture regime means those weak spots can become leaks in days rather than weeks after the first warm rain.
Begin by cleaning gutters and downspouts to ensure unobstructed flow, since clogged systems back up meltwater and push it under shingles during thaw cycles. Seal exposed gaps around vents and pipes with a durable, roof-appropriate sealant, focusing on areas where ice dams commonly form. Consider temporarily reinforcing vulnerable flashing with corrosion-resistant materials until a more permanent repair can be scheduled. If there are signs of structural movement-shingle cupping, edge buckling, or visible sag at eaves-treat it as an urgent warning, and arrange a professional roof inspection soon after the snow clears. In spaces with attic access, install or upgrade baffles to maintain consistent intake ventilation, which slows warm roof temperatures that drive rapid refreezing at the deck edge.
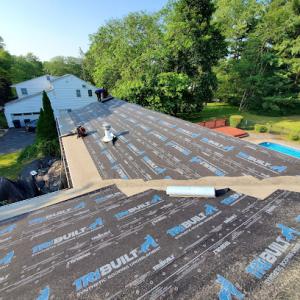
For homes near the Passaic corridor, ensuring continuous edge protection is essential. Install high-quality drip edges and corrosion-resistant flashing along all roof penetrations, with extra attention to joints where different roof planes meet. Roofing materials should be matched to the local freeze-thaw dynamics; select products that resist edge uplift and water intrusion under repeated cycles. Regular seasonal checks-post-winter and pre-spring-are not optional but necessary, given the combination of moisture exposure, cold nights, and spring deluge. When faults are identified, prioritize timely repairs before the next freeze rounds out the cycle, because tiny defects become interior leaks with the first significant warm-rain event.
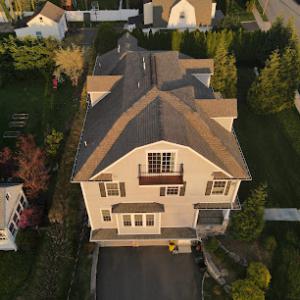
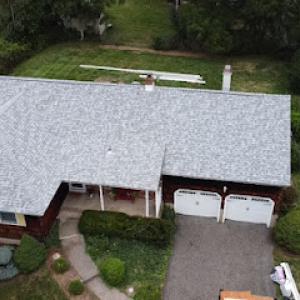
Asphalt shingles are the dominant practical choice in Little Falls because they fit the area's common steep-slope residential roof forms and broad contractor availability. They handle the mix of freeze-thaw cycles and spring rain without demanding heavy structural reinforcement, and you'll find skilled installers across the Passaic Valley corridor. When you're evaluating replacement or upgrades, asphalt shingles offer reliable performance with predictable maintenance needs, especially for homes that have stood up to older weather patterns around the First Watchung ridge. For many homeowners, this material provides a straightforward, long-lived option that keeps repairs manageable after a tough winter.
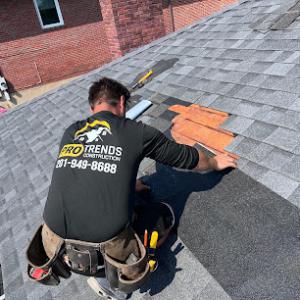
In this market, you'll commonly see architectural or fiberglass shingles with good wind resistance and ease of flashing around chimneys and vents. For a typical Little Falls roof, ensure the shingles are rated for freeze-thaw resilience and that the roof deck is clean and solid before installation. Seams and valleys deserve attention, since- after a winter with snowpack and spring rainfall - those areas are most prone to leaks. A reputable local contractor will confirm attic ventilation and infrared checks to catch hidden moisture that can compromise shingle life in moisture-heavy seasons.
Metal roofing is relevant locally for homeowners trying to improve snow shedding and durability through North Jersey winter and humid summer cycles. In this climate, metal panels can reduce ice dam risk along eaves and improve longevity on steeper slopes. Look for panels with proper underlayment and a corrosion-resistant finish, and verify that flashing detail around penetrations is adapted to older homes that may have irregular roof lines. If a roof hosts heavy snow loads or frequent freeze-thaw alternation, metal can offer quick shedding, but it requires precise installation to prevent leaks at joints and fasteners.
Clay tile, concrete tile, slate, and fiber cement appear in the local material mix but require attention to structural load, flashing detail, and repair expertise on older regional housing stock. Clay and concrete tiles are attractive and durable, yet they add significant weight and demand attic structure review to avoid sag or racking. Slate offers exceptional longevity but carries a high load and delicate handling under the overhangs common on many era homes. Fiber cement shingles provide a balance of weight, cost, and workability, but still need careful flashing and movement consideration in freeze-thaw cycles. For each option, ensure the retrofit accounts for existing rafters, insulation, and the capacity of the original roof assembly to accommodate the new material's weight and span. Local crews who understand historic or mixed-age homes can guide proper fastening, edge detailing, and maintenance routines that keep these systems performing through spring rains and summer humidity.
In this region, skylights and chimneys act like stubborn fault lines during storm season. The local contractor market shows unusually strong demand for both skylight and chimney-related roof work, signaling that these penetrations are frequent leak points in many homes. When a winter thaw rolls into a windy spring, rain driven by North Jersey's shifting storms can exploit weak flashing and curb joints, letting water work its way into attic spaces and ceilings. The problem isn't isolated to one roof type; it spans steeper pitches and flatter low-slope roofs alike, especially where the roof has seen years of patchwork repairs.
Wind-driven rain tends to target the most exposed seams first. Look for telltale signs around chimney bases: damp spots on interior ceilings that drift from a crown or step flashing, staining along the masonry, and any efflorescence where moisture has pressed through bricks. Around skylights, pay attention to condensation trails on glazing edges after a rain, soft or cracked curb membranes, and any seepage along the flashing legs where the curb meets the roof deck. On older homes, the flashing and joints may have settled unevenly, creating small gaps that become big leaks after repeated wetting and freeze-thaw cycles.
Start with a careful inspection after the snow melts and before the next heavy rain event. A ladder-accessible visual check can reveal loose or lifted flashing, deteriorated sealant, or broken mortar joints around the chimney. If the skylight is vinyl or metal-framed, survey the gasket around the sash and the curb's sealing bead; aging gaskets and degraded curb sealant are common trouble spots. When you notice loose flashing, cracked caulk, or corrosion forming on flashings, address it promptly with appropriate materials-not cheap patchwork that traps moisture behind it. For chimneys, ensure step flashing along the roofline is continuous and properly lapped, and verify that the counter-flashing is firmly embedded into the masonry and overlaps the step flashing. Skylight curbs should have a clean, uninterrupted membrane over the curb with a durable sealant that remains flexible under temperature swings.
If the attic shows even small signs of moisture after a storm, or if you can hear rain pattering inside during light winds, it's time to bring in a local roofer who understands freeze-thaw movement in masonry and the stress points of skylight curbs and chimney flashings. Homeowners should prioritize contractors who provide a thorough diagnostic that includes checking the entire flashing system, not just the visible leak area. A professional assessment can identify subtle movement in the masonry or deck that a homeowner might miss, reducing the chance of recurring leaks after the next round of seasonal weather.
Consider upgrading to flashing systems designed for higher wind-driven rain exposure, especially on chimneys that have undergone layered repairs in the past. A coordinated approach that ties the flashing around the chimney to a continuous membrane over the roof deck, and a properly sealed skylight curb, creates a more resilient barrier against moisture intrusion. For multi-family or commercial roofs in the area, ensure that the flashing transitions are reviewed in the context of complex roof planes, as these areas often suffer from accelerated wear due to multiple penetrations and heavier seasonal rainfall. Building a habit of annual, targeted inspections around these penetrations helps prevent costly water intrusion before damage spreads.
Find contractors experienced in skylight installation, flashing, and leak repairs to bring natural light into your home.

A1 Garden State Construction
(201) 655-3980 a-1gardenstateconstruction.com
Serving
5.0 from 106 reviews
Northkit Roofing & Siding
(973) 319-8043 northkitroofing.com
Serving
4.8 from 307 reviews
NorthKit Roofing is a trusted exterior remodeling contractor that provides high-quality services to homeowners. Our team of experts is highly skilled and trained to handle any exterior remodeling project, from simple repairs to complete replacements. We use only the highest-quality materials and precision engineering to ensure that our roofs are built to last. Our services include metal roofing, shingle roofing, siding and window installations, and more. At NorthKit Roofing, we pride ourselves on providing exceptional customer service and delivering results that exceed our clients' expectations. Choose NorthKit Roofing for all your homes exterior remolding needs and enjoy a lifetime of protection and peace of mind.
Chase Commercial Roofing Flat Roof Specialist
Serving
5.0 from 113 reviews
Chase Commercial Roofing Flat Roof Specialist, based in Woodland Park, NJ, brings over 20 years of expertise to commercial, industrial, and residential roofing. We specialize in: - Flat roof installation, re-roofing, and repairs - EPDM, TPO, PVC, metal, and hot tar & gravel roofing materials - Preventive maintenance and roof inspections - Emergency roofing services - Drone-assisted inspections with free estimates Our customized solutions, including after-hours service, ensure minimal disruption to your schedule. Backed by a 10-year warranty on materials and craftsmanship, Chase Roofing provides durable and reliable roofing tailored to your needs. Call today for trusted roofing solutions!

A1 Garden State Construction
(201) 655-3980 a-1gardenstateconstruction.com
Serving
5.0 from 106 reviews
With 20+ years of experience, A-1 Garden State Construction serves its customers with pride, integrity, and attention to the details that matter most. This is one of the many things that sets us apart from other companies. We are locally owned and operated. Just give us a call today!
American Supreme Construction Roofing & Chimney Experts
(833) 607-9803 americansupremeconstruction.com
Serving
4.9 from 124 reviews
American Supreme Construction is a General Contractor plus a trusted Roofing and Chimney Experts. With years of experience, A.S.C offers comprehensive services to keep your home protected from the elements. We also specialize in bathroom, kitchen and basement remodeling. Whether you need a minor repair or a complete overhaul, they are the experts you can rely on for quality workmanship and customer satisfaction.
Pro Trends Construction
(201) 949-8688 protrendsroofing.com
Serving
5.0 from 225 reviews
Pro Trends Construction offers professional residential and commercial construction services, including roofing, chimney siding, masonry, and more. We are among the top Roofing Contractors in Clifton, NJ, and provide expert advice and excellent service to help make your next project a success! Our expert roofing team will evaluate your home's condition and provide you with the best options that meet your needs and budget. Our mission is to ensure that your roof is ready to withstand the rain, hail, wind, and snow. We are well known for professionalism, efficiency, affordable price ranges, commitment to customer satisfaction, and quality Gutter Installation in Clifton, NJ. If you want to know more about our services, contact us.

Matute Roofing
(973) 618-6489 matuteroofing.com
Serving
5.0 from 452 reviews
Matute Roofing is a trusted, family-owned company based in Wayne, NJ, proudly serving Northern New Jersey and Rockland/Westchester Counties for over 20 years. As a GAF Master Elite® Certified contractor, we are a roofing contractor specializing in residential and commercial roofing, including full roof replacements, repairs, inspections, and flat roofing systems such as TPO, PVC, EPDM, and modified bitumen. In addition to roofing, we offer a comprehensive range of exterior services, including siding, windows, doors, gutters, and gutter guards, providing homeowners and property managers with reliable solutions.
Simple Roofing
(201) 429-9607 simple-roofing.com
Serving
4.9 from 75 reviews
Simple Roofing is a roofing contractor in New Jersey that services Passaic County, Paterson, Newark, and nearby areas. We offer free roofing inspections and estimates. If your home has suffered weather-related damage, missing shingles, or it's just time to replace. Contact your New Jersey premier roofing repair contractor today for a free estimate.
Done Rite Exteriors
Serving
5.0 from 290 reviews
At Done Rite, we take pride in delivering roofing and gutter solutions that protect your home, enhance its appearance, and add value to your property. Whether you require repairs, replacements, or maintenance, our dedicated team is ready to exceed your expectations. Contact us today to schedule a consultation and discover how we can elevate your roofing and gutter systems to new heights. Your home deserves nothing but the best!

Unlimited Pro Roofing Construction
(973) 666-2267 unlimitedpronj.com
Serving
5.0 from 194 reviews
For more than 15 years, Unlimited Pro has been creating quality and outstanding projects for Chimney, Roofing, Masonry, Siding, Gutters and more. We have renovated, remodeling, and completing home improvements for the residents of New Jersey. We make sure to stay on top of our projects to be completed as per customer request. We take pride in our projects and we believe that by creating an outstanding project for you we would do a better job for us. Call us for any Roof Repair, Roof Leak, Roof Replacement, Chimney Repairs, Chimney Repointing, Chimney Services, Masonry Services on Steps, Pavers, Driveways, Sidewalks, Walkways; Siding Repair and Replacements and more. Give us a call to see why we are Clifton, NJ's best Roofing company!
Everest Construction Group
Serving
5.0 from 104 reviews
We are a locally owned and operated company that values honesty and integrity and treats your home as if it were our own. We have many years of experience to give you confidence that we are your number one choice for your next home project. You will find us to be competitively priced with close attention to the details. We look forward to building a lasting relationship and guaranteeing your satisfaction!
United Pro Construction
(973) 409-1010 unitedproconstructionllc.com
Serving
4.9 from 179 reviews
United Pro Construction is your local expert in residential and commercial roofing, siding, chimney, masonry, and gutter repair, replacement, and new installation services. We provide free estimates and offer 24/7 roof repair services, which include roof leak repair and roof tarp installation. We are available now and look forward to helping you with your service needs.

Seci Construction
Serving
4.9 from 73 reviews
Seci Construction, Inc. is a trusted leader in roofing and exterior contracting, proudly serving New Jersey, New York, Connecticut, and Pennsylvania for over 50 years. Based in Clifton, NJ, we’re recognized as one of the region’s premier roofing and siding companies. Our team consists of highly-trained and certified professionals dedicated to delivering top-tier service and superior craftsmanship. As an Owens Corning Platinum Preferred Contractor and a member of the GAF President’s Club, we uphold the highest standards in the industry. Our consistent recognition—including being named Best of HomeAdvisor for over 12 years-reflects our unwavering commitment to customer satisfaction. Proudly to be accredited by the Better Business Bureau.
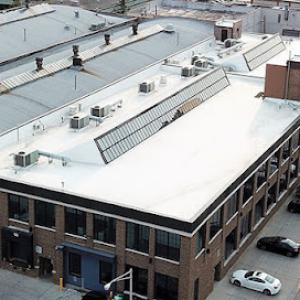
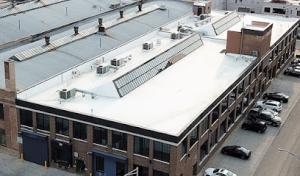
Flat and low-slope roofing matters in this area because a substantial portion of the local market includes commercial and multifamily roofs alongside single-family homes. The Passaic Valley moisture, spring rain, and cold snaps mean these roofs often experience longer wet periods than pitched systems. Snow retention and slow drainage can leave water standing on membranes and coatings well into the thaw, amplifying the risk of ice dams, seam failures, and edge leaks. Understanding how these forces interact with aging materials helps owners set realistic expectations for performance through late winter and early spring.
In this climate, freeze-thaw cycles stress membranes, sealant courses, and edge details first. Look for blisters orALLigatoring on coatings, lifted seams, fastener corrosion, and surface staining that signals water infiltration. Standing water near the low-slope perimeter or around roof penetrations is a red flag. Since commercial and multifamily roofs dominate the local scene, rooftop equipment and parapet-wall details frequently become leak sources after heavy rains, especially when drainage paths are blocked by debris or snow remnants.
Begin with a fall and spring inspection routine focused on drainage paths, scuppers, and downspouts. Clear any debris that slows water flow and check for silt buildup in gutters around parapets. Inspect around penetrations, flashings, and transitions from roofing to metric junctions or curbs. If coatings exist, test readiness with a simple water bead test in a shaded area to see if the surface still sheds water or stays damp. For aging low-slope roofs, avoid assuming coatings alone are a cure; evaluate whether the membrane is still solvent-welded, compact, and free of voids before selecting a restoration approach.
Roof coatings and restoration are present but less prevalent than full replacement and repair, suggesting homeowners should evaluate whether an aging low-slope roof is a true coating candidate. If a waterproof membrane shows signs of advanced wear, ply separation, or persistent leaks despite surface maintenance, replacement or targeted repairs become more cost-effective long term. When contemplating coatings, prioritize areas with sound substrate and reliable flashings, and avoid coating over failed seams or damaged insulation layers.
After a winter with heavy snow and a spring rainfall spike, prioritize the perimeter and penetrations where leaks most often start. If a leak flares up after a heavy storm, trace it to a clogged drainage path or a compromised flashing detail rather than assuming a coating alone will seal it. Maintenance should be practical and incremental: clear drainage, reseal critical joints, and reassess whether the existing system still meets the roof's seasonal demands.
Find specialists in TPO, EPDM, and built-up flat roofing systems for residential and commercial properties.
Chase Commercial Roofing Flat Roof Specialist
Serving
5.0 from 113 reviews
A1 Garden State Construction
(201) 655-3980 a-1gardenstateconstruction.com
Serving
5.0 from 106 reviews
Costs in this area are shaped by North Jersey labor pricing, disposal logistics, and the competitive but busy regional re-roofing market. When you price a full replacement, you're not just paying for shingles or tiles; you're paying for crew time, waste hauling, and material deliveries that must fit into a narrow winter-to-spring window. In Little Falls, those dynamics push projects closer to the middle or upper end of the typical ranges, especially if the project overlaps with post-winter leak season or spring storm activity. If a roof spans multiple elevations or has complex detailing, the price tends to climb due to extra setup, staging, and protection needs.
Asphalt shingles remain the most common and cost-effective choice, with typical ranges around 350 to 700 USD per square installed. Metal roofing sits higher, commonly 600 to 1,200 USD per square, and can be a smarter long-term value on a steep or high-wind roof. For stylistic or durability reasons, clay and concrete tiles run higher, roughly 1,200 to 2,600 USD per square for clay and 1,100 to 2,100 USD per square for concrete. Slate, the premium option, often lands in the 2,400 to 5,200 USD per square band. Fiber cement shingles provide a mid-range alternative at roughly 700 to 1,200 USD per square. Heavier materials like slate or tile are more sensitive to roof spacing, framing, and flashing details, and they tend to drive the job toward the upper end of these ranges.
Steeper older roofs, chimney flashing complexity, and skylight penetrations add labor time and staging costs, especially when working around snow melt or spring rain. The North Jersey market's strong demand means scheduling can slip during seasonal spikes, which can push crew availability and disposal costs higher than off-peak periods. If your roof has multiple penetrations or requires extensive underlayment or secondary moisture barriers, expect the numbers to rise a notch. Conversely, a straightforward asphalt replacement on a single-slope roof with minimal penetrations will typically sit closer to the lower end of the range, assuming no unexpected structural issues.
Start with a conservative estimate that accounts for weather-driven delays in spring and for the possibility of staged completion if storms hit during replacement. Ask for a breakdown that separates material cost from labor, waste disposal, and equipment mobilization, which helps illustrate how seasonal demand affects pricing. If a chosen material aligns with long-term durability in freeze-thaw cycles, consider a longer warranty or enhanced underlayment to mitigate future leak risk. In this market, a well-structured bid that reflects local conditions can prevent surprises when crews mobilize after a winter season.
Get a clear picture of your project costs upfront - no commitment required.
Chase Commercial Roofing Flat Roof Specialist
Serving
5.0 from 113 reviews
A full roof replacement in Little Falls typically requires a permit filed through the Municipal Building Department before work begins. Start the process early in the planning stage, because permit review can take longer than expected due to the town's scheduling and the seasonal workload around springtime. The permit package is not just a form; it's a snapshot of the project that helps the inspector understand the scope, setbacks, and impact on surrounding structures. Align your contractor's timeline with the permit calendar so tear-off and dry-in don't collide with a busy municipal queue.
The local review process commonly includes a rough or underlayment inspection and a final inspection, so tear-off and dry-in timing must account for municipal scheduling. In practical terms, you may see a mid-project check focused on how the roof deck and underlayment are installed, followed by a final walk-through once everything is sealed and weatherproofed. This sequencing matters in this area because Passaic River moisture and seasonal freeze-thaw cycles can stress a roof mid-renovation if fastening, ventilation, or flashing details aren't solid. Plan around these milestones with your contractor so weather windows aren't wasted and the project maintains a steady rhythm through increasingly variable spring rain.
Applicants may be asked for plan details, contractor licensing information, and practical inspector access arrangements, which can affect project sequencing. Have current licenses on file for any subcontractors, and be prepared to provide roofing plans or product spec sheets that confirm venting, insulation, and drainage details align with local expectations. On-site access is routinely needed for safe inspection of the attic, eaves, and flashings; arrange clear routes and secure areas where tools and materials will be stored. If the property uses shared driveways or a tight frontage, discuss access logistics with both your contractor and the inspector in advance so there are no surprises during the tear-off or final review. Clear communication helps avoid delays and keeps the project moving smoothly through Little Falls's permitting pace.
Little Falls homeowners should expect insurers and adjusters to closely review roof age, condition, and shingle type after wind or hail-related claims. The Passaic River valley moisture and exposure from the First Watchung ridge mean roofs endure more freeze-thaw cycles, which can accelerate wear. An aging roof or one with brittle shingles often shifts decisions toward partial repairs instead of full replacement, even when cosmetic damage is minor. The adjuster will weigh whether observed damage ties to recent weather or to preexisting wear, and that distinction can shape coverage outcomes.
Because North Jersey sees occasional wind and hail claim activity, photo documentation before and after storms can materially affect claim handling and replacement decisions. Take clear interior and exterior shots from multiple angles after a storm, and keep a dated record of any granule loss, lifted shingles, or flashing corrosion. If a roof shows soft spots or moss growth after spring rain, capture those signs quickly. Consistent visuals help the insurer separate storm-driven damage from long-term deterioration, which matters when decisions pivot between repair and replacement.
State-level insurer practices in New Jersey can vary by carrier, making policy language and depreciation treatment important when deciding whether to repair or replace. Some homeowners might find depreciation applied to certain components, or that some damage is deemed cosmetic rather than structural. Read the declaration page with care and note any terms that affect covered versus non-covered items, the timeline for filing, and how salvage or contractor negotiations might influence payout. The specifics of your policy can tip the balance between a modest fix and a full roof replacement after a harsh season.
After a storm, secure temporary protection if safe, then contact your insurer promptly to start the claim. Document integrity issues like wind-driven gaps or hail dents, and keep repair receipts and contractor assessments organized. If the roof is nearing the end of its usable life or shows repeated leaks, expect the conversation to include replacement considerations. Knowing your policy nuance now can prevent surprises when the weather finally shifts from winter to spring.
Connect with contractors who help homeowners navigate the claims process from damage assessment to final approval.
A1 Garden State Construction
(201) 655-3980 a-1gardenstateconstruction.com
Serving
5.0 from 106 reviews
Replacement projects are usually best planned for drier, milder periods because winter snow, spring rain, summer humidity, and fall wind each create distinct installation constraints. In this valley-forward area, timing matters: a dry stretch after thawed ground makes access easier and reduces tear-off mess on driveways and yards. You'll want to map windows when the forecast promises several consecutive days without heavy precipitation and moderate temps, so the new roof can cure and seal properly without repeated weather-driven pauses.
Summer heat and humidity in North Jersey can affect adhesive behavior and crew pace, especially on dark asphalt roofs. If a project runs into the hottest weeks, plan for midday pauses and ensure crews have shade and hydration. Dark shingles absorb more sun, which can push adhesive tackiness out of spec and slow application steps. Scheduling early starts and avoiding peak heat hours helps maintain a steady pace without compromising workmanship or warranty considerations.
Fall can be productive but stormy and windy conditions may tighten schedules and complicate tear-off cleanup in established neighborhoods. In residential blocks, debris control and neighbor access become real constraints as leaves drift and wind shifts. Have a clear buffer for potential weather delays and a plan for protecting landscaping and vehicles. Aiming for mid- to late fall with stable conditions often yields cleaner tear-offs and fewer on-site disruptions for neighbors, while still finishing before the onset of winter storms.
In this market, homeowners prioritize quick response, cleanup, and re-roofing experience over niche luxury specialties. You'll see a mix of family-owned and long-established firms, which matters when comparing warranty follow-through and post-job service. Because chimney work, emergency repair, and storm response are common here, verify that the roofer regularly handles flashing-heavy repairs rather than only basic shingle installs. In Little Falls, the Passaic valley moisture and spring storm patterns put a premium on contractors who can diagnose and fix leaks fast, while keeping yards tidy and debris out of the street.
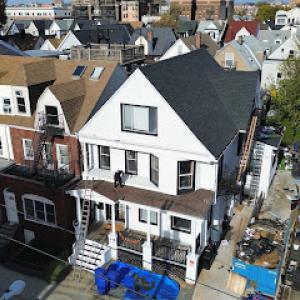
First, check how a candidate handles the typical roof styles in the area, from older steep-sloped homes to low-slope multifamily and commercial roofs. Look for firsthand evidence of weather-driven repairs, especially around chimneys, skylights, and vent stacks where flashing wears first. Ask for recent projects with similar exposure to the First Watchung ridge and valley moisture, and request photos or a quick on-site reference. You want a firm that can move from emergency tarping to a full re-roof in the same season if needed, without juggling trade crews or subcontractors who don't know the local quirks.
Because many jobs in this market hinge on timely response, prioritize firms that publish a clear plan for rapid mobilization after a storm, thorough cleanup, and a post-job service window for repairs or follow-up flashing work. Favor family-owned and long-standing firms that stay reachable after the project, stand by their flashing details, and can coordinate with chimney or masonry specialists if a project requires it. Ask for a concise maintenance checklist you can follow after installation to keep leaks at bay during freeze-thaw cycles. In this town, dependable follow-through is the real specialty that keeps roofs solid year after year.