Last updated: Apr 19, 2026
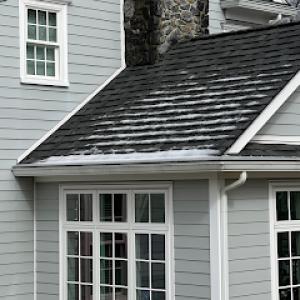
Summit's cold winters with snow and ice create recurring ice-dam risk at eaves where older insulation and ventilation details are less consistent. When snow sits on a roof and the attic isn't keeping the roof deck warm enough, heat rises and melts a thin layer of snow near the eaves. That melt refreezes as an ice dam, backing up under shingles and against the fascia and gutters. In homes with vintage construction or imperfect attic sealing, this creates a drip line that can turn into hidden water intrusion, saturating insulation, trickling into ceilings, and dampening walls. The consequence isn't just a few icicles; it's ongoing moisture that can compromise structure, trim, and interior finishes.
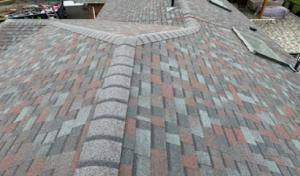
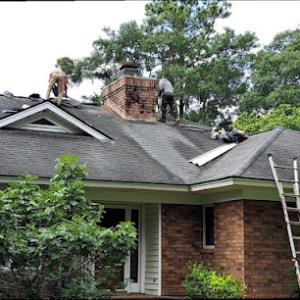
Freeze-thaw cycling in North Jersey commonly stresses flashing and underlayment first, especially around chimneys, valleys, and roof-to-wall transitions found on older Summit homes. Those areas endure repeated expansion and contraction cycles, which can loosen fasteners, loosen sealants, and open small gaps for water to migrate. The result is a cascade effect: a single compromised flashing detail becomes a pathway for snowmelt to travel laterally under shingles, between underlayment seams, and into via small rivulets behind siding or into attic soffit vents. If a roof has long, winding intersections or steep pitches common on century homes, the risk multiplies because more corners, crannies, and penetration points exist to trap and funnel meltwater.
Water intrusion tied to snowmelt rather than a missing shingle usually shows up as staining, damp insulation odors, or micro-leaks after every storm that ends with a warm afternoon melt. Look for softened drywall, peeling paint along ceilings adjacent to exterior walls, or paint-darkened spots near light fixtures in upper rooms. Inside the attic, check for damp insulation, dark patches around vent stacks, and mineral fibers that have become matted from repeated moisture. In winter, you may notice ice buildup along the eaves while the center of the roof remains free of ice-this asymmetry is a red flag that the insulation-ventilation envelope isn't doing its job, and meltwater is pooling where it shouldn't.
Addressing ice dam risk starts with the roof's envelope and its connection to the attic. Insulation depth and quality matter more here than in newer neighborhoods. If attic access reveals insulation that's compressed near the eaves or missing in critical zones, you're looking at a prime setup for heat loss and dam formation. Ventilation should maintain a dry, temperature-balanced roof deck; without it, warm interior air will keep feeding the dam cycle. In practical terms, seal leaks around attic hatches, penetrations, and lights; ensure soffit-to-ridge ventilation is continuous and unobstructed; and upgrade insulation where it's thin or missing. This is not cosmetic-it's a practical, ongoing defense against costly interior damage.
Flashing around chimneys, valleys, and roof-to-wall transitions is where the weakest links often reveal themselves first under freeze-thaw pressure. On aging rooflines, misaligned or weathered flashing can crack sealants, allowing meltwater to migrate into unprotected seams. Inspect these junctions with a careful eye: look for rust, loose metal, or degraded sealant lines that show gaps. Even small gaps can become major conduits for water during heavy thaws. If you see consistent dampness along these transitions after storms, treat it as a warning sign that flashing integrity needs attention now, not later.
Start with a targeted attic assessment focused on insulation depth, air leaks, and ventilation paths. Seal known gaps, upgrade selective insulation at the eaves, and confirm that baffles or vents are correctly positioned to deliver continuous airflow. Schedule a professional flashing inspection, with particular emphasis on chimneys, valleys, and roof-to-wall interfaces. If interior staining or dampness appears after a melt event, prioritize remediation of the roof's vulnerable seams before winter returns. The goal is a robust, well-sealed envelope that reduces the energy leak and breaks the dam cycle before it can start.
Spring storms in Summit bring wind-driven leaks that can show up hours or days after the rain starts, especially on older roofs with multiple layers and tall, tree-lined eaves. Drying and cleanup can stall repairs when crews are juggling a busy schedule, so you need a plan that prioritizes containment first, then a precise fix. If a leak is actively dripping, concentrate on temporary measures that seal the worst openings: tarping or plastic sheeting anchored away from the wind, and placing any available buckets or containers under active intrusion points. Do not wait for daylight if water is pouring in; contact a local emergency repair team that can respond the same day, even during peak repair periods.
Frequent rainfall means Summit homeowners must design reroof plans around drainage performance, flashing laps, and underlayment exposure windows. When water sits on a roof for longer, it finds weaknesses at flashing joints, dormers, and vent penetrations. In older homes, flashing laps can lift with wind or settle from thaw cycles, creating vulnerable seams that ice dams love to exploit. Plan for temporary mitigation that focuses on keeping water out of the attic first: prioritize intact underlayment coverage, ensure proper slope where possible, and verify that drip edge and gutters are clear enough to channel water away from the fascia. Expect that any exposed underlayment or shredded asphalt layers will demand prompt attention to avoid widespread intrusion.
Local contractor signals show emergency repair and storm damage work are especially active after notable weather events, reflecting how often roofs need rapid leak containment. If a hail hit accompanies the rain, or if attic insulation is damp, treat it as a red flag prompting a swift, staged response. Look for contractors who can offer a rapid damage assessment, immediate tarping, and a concrete plan for a proper permanent repair once the weather calms. Storm damage often travels along the ridge line or lantern vents, where wind-driven spray can exploit marginal seals; document with photos for the contractor to use in prioritizing sections that are most at risk.
You should have a simple three-step plan: (1) secure the leak with temporary weatherproofing as soon as possible, (2) arrange a same- or next-day inspection to pinpoint flashing laps, underlayment exposure, or drainage deficiencies, and (3) schedule the follow-up repair quickly to restore full protection before the next thaw cycle. When winter returns, you'll want a contractor who can mobilize fast and work around the busiest repair periods, ensuring that your home remains protected between storms.
Find local contractors experienced in assessing and restoring roofs after hail, wind, and severe weather events.
Mega Home Remodeling
(908) 656-1251 megahomeremodeling.com
447 Springfield Ave, Summit, New Jersey
5.0 from 35 reviews
Mega Home Remodeling provides comprehensive roof inspection and replacement services in Summit, NJ. Their skilled technicians use high-quality, durable materials to ensure your home is protected from the elements and enhance its curb appeal.

Jersey Eco Roofing
(862) 201-2021 jerseyecoroofing.com
Serving
5.0 from 54 reviews
Jersey Eco Roofing is a trusted roofing company in Springfield, NJ, known for expert craftsmanship and eco-friendly solutions. With over 6 years of experience, our licensed and insured team provides top-tier roofing services in Springfield, including repairs, installations, and replacements. As leading roofing contractors in Springfield, we’re committed to quality, durability, and customer satisfaction. We proudly serve nearby areas like Essex, Union, Morris, Bergen, and Passaic counties. Whether you need a minor fix or a full roof upgrade, our team ensures reliable results every time. Call today to schedule your free estimate and protect your home with confidence.
All Ultimate Construction
(201) 927-8224 allultimateconstruction.com
Serving
4.9 from 57 reviews
At All Ultimate Construction, we specialize in roofing, siding, chimney, gutters, masonry, and general contracting services in New Jersey. With over 20 years of hands-on experience, we're committed to delivering quality craftsmanship, durable results, and complete customer satisfaction. Whether you need a new roof, roof repair, chimney repair & restoration, siding, foundation, or masonry repair, you can expect the best services at the best prices. If you are experiencing a roof leak, don't hesitate to call us now. We are your local roof leak repair experts!

Novalis Roofing & Siding
(973) 908-8919 novalisroofingandsiding.com
Serving
4.9 from 319 reviews
Novalis Roofing & Siding provides premium roofing, siding, gutter, and solar solutions throughout Chatham, Summit, Madison, and surrounding New Jersey communities. As colder weather approaches, our expert team helps homeowners prepare for winter with thorough roof inspections, leak repairs, gutter maintenance, and full roof or siding replacements. With over 80 years of craftsmanship and a reputation for white-glove service, Novalis delivers durable, energy-efficient exterior solutions that protect and enhance your home in every season. Schedule your fall inspection today to ensure your home is winter-ready.
Cambridge Roof Repair
(201) 899-9917 cambridgeroofrepair.com
Serving
5.0 from 70 reviews
We are a family-owned roofing company specializing in asphalt shingle roofs, slate roofing, chimney repairs, skylight installations, and more. With years of experience serving Northern New Jersey, our goal is to deliver top-notch roofing services with a focus on quality, reliability, and customer satisfaction. We are fully licensed and insured, ensuring peace of mind for every project. Whether you need roof repairs, replacements, or new installations, we offer free consultations to help you find the best solution for your home or business. Contact us today for expert roofing services you can trust.
Michael J Harris
(908) 553-0284 www.mjharrisroofing.com
Serving
4.6 from 34 reviews
Michael J Harris, Inc is a third generation, family owned and operated roofing and masonry contractor serving Essex, Union, Middlesex, and Hudson Counties. Started in 1915 by Michael Harris's grandfather, the business thrives today because of the unmatched crafstmanship and service it delivers. When you call for an estimate, Michael will personally respond to your call, meet with you to discuss your options for repair and oversee the completion of the job. His level of knowledge for diagnosing the source of your roofing issue and providing you with the most effective solution is unmatched by competitors. If you want great service and and quality workmanship call Michael Harris directly today on his cell phone at (908) 553-0284.
MT Chatham Roofing & Siding
(862) 267-7322 roofingchathamnj.com
Serving
5.0 from 53 reviews
MT Chatham Roofing and Siding is the company for you if you are in Chatham, NJ, or the surrounding area. With 20+ years of experience, we provide many different services, so feel free to call us or check our website for more information.
Hayes & Sons Roof Repair
(862) 335-4333 hayessonsroofrepair.com
Serving
4.9 from 67 reviews
Expert residential roof repair services using high-quality materials for lasting results. Expert residential roof repair services using high-quality materials for lasting results. Professional commercial roof repair solutions with a focus on customer satisfaction and integrity.
Global Home Improvement
(908) 987-3147 www.globalhomeinc.com
Serving
4.8 from 127 reviews
Global Home Improvement services offers the best home improvements throughout Atlantic County, Bergen County, Burlington County, and the surrounding areas of North and Central NJ. We feature high quality products such as James Hardie Siding, Marvin Windows and Metal Roofing. Our lifetime exterior home improvements come with a lifetime material and labor warranty giving homeowners piece of mind with every install. If you're looking for Roof Replacements, Replacement Windows, Replacement Doors, Gutter Installation, and or Siding give us a call for a free no-obligation estimate of our services.
Legacy Commercial RoofCare
(862) 254-6947 www.legacyroofcare.com
Serving
4.9 from 55 reviews
Legacy Commercial RoofCare helps commercial property managers defer roof replacement while adding valuable years of service life to their existing roof structure with preventive maintenance solutions and coatings.
American Home Contractors
Serving
4.9 from 257 reviews
Americam Home is a GAF Master Elite certified roofing contractor and James Hardie preferred siding contractor. Based in Florham Park, NJ we offer GAF’s Goldem Pledge roof warranty with our full roof replacement services. Fast, accurate roofing and siding estimates. Roofing, siding, gutters, windows and doors are our specialty. We can help you design and home’s exterior. With over 20 years of experience we have built a strong reputation through detailed workmanship and responsive service. Servicing Morris County and surrounding areas. Need help with design and budgeting? We are here to help!

Select Roofing & Construction
(201) 757-6016 selectroofingnj.com
Serving
5.0 from 98 reviews
Select Roofing & Construction provides expert roofing, gutter, chimney, and siding services. We specialize in high-quality exterior home improvements designed to protect and enhance your property. Our experienced team is committed to delivering reliable craftsmanship and exceptional results for all your roofing and construction needs.
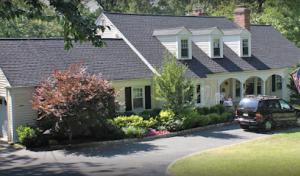
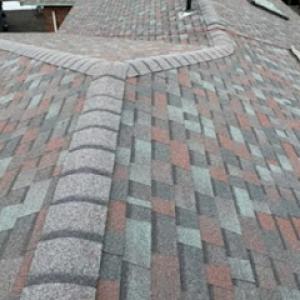
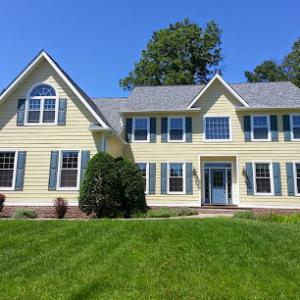
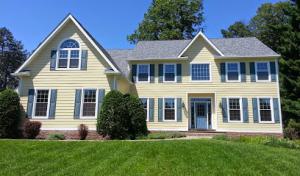
Asphalt shingles remain the practical workhorse for most Summit homes, especially those with tighter budgets and traditional rooflines. Yet the local market also shows metal, clay tile, concrete tile, wood shakes, and synthetic composites, reflecting the architecturally varied stock in older, high-value neighborhoods. When evaluating options, focus less on climate alone and more on how the material sits with the existing roof structure and the home's character. A steep, tree-lined street often means a roof that has endured decades of weather, so alignment with the house's silhouette is as important as performance.
Summit's humidity and frequent rain make moisture management under wood and synthetic systems a critical consideration. If a wood shake or shingle roof is on the shorter side or has exposed fasteners, look for enhanced underlayment and a solid deck with tight laps. For synthetic composites, select products with proven dimensional stability and a good end-to-end waterproof membrane beneath. In either case, ensure adequate attic ventilation and a continuous, well-sealed drip edge to minimize capillary draw and wind-driven rain reaching the structural deck. Regular inspection after wet seasons is prudent, paying attention to any soft spots or staining that signals moisture behind the covering.
Winter movement can reveal flashing weaknesses around heavier tile systems. Clay and concrete tiles offer excellent longevity and curb appeal but demand precise installation and robust flashing at valleys, chimneys, and roof-to-wall transitions. In Summit, where freeze-thaw cycles peak, ensure mortar-free, continuous flashings and properly secured hips and ridges. Metal roofs can handle movement well but require careful seam detailing and snow guards in areas prone to heavy drifting. For asphalt or synthetic options, confirm that flashing around roof penetrations is continuous and that resealing joints remains straightforward as temps swing.
Material choice is often constrained by existing roof structure and the need to preserve appearance on older homes. A retrofit must respect the original roof pitch, overhangs, and cornice lines. Clay and concrete tiles can transform the look while increasing weight, potentially requiring structural checks. Wood shakes suit homes with historic textures but demand maintenance to prevent cupping and decay. Synthetic options can mimic traditional looks with less maintenance, yet some styles still need careful detailing to mimic the original lines. The goal is a durable, watertight roof that honors the house's footprint without compromising its character.
Start with a visual survey of flashing integrity, especially around chimneys and skylights, and note any signs of water intrusion after storms. Assess attic insulation and ventilation so moisture moves out before it condenses on cold nights. If choosing a non-asphalt option, engage a local roofer experienced with Summit's mix of historic and contemporary designs to ensure the system aligns with the house's architecture and performs well in winter.
For an average Summit home, costs follow the local ranges: asphalt shingles run about 450 to 800 USD per square, metal typically 700 to 1200, clay tile 900 to 1800, concrete tile 800 to 1500, wood shingles or shakes 700 to 1300, and synthetic or composite shingles 500 to 900 per square. Those figures reflect the town's older, high-value housing stock and the steep, tree-lined lots that are common here, where longer runs and more complex rooflines are the norm rather than the exception.
Steep roof geometry and multiple levels found on many Queen Anne and Colonial Revival styles increase both material waste and labor time. In Summit, a roof with chimneys, dormers, and intricate flashing details tends to push the job toward the upper end of the local ranges. If the project requires specialized detailing to match existing architectural accents, you'll see a premium beyond the base square cost, especially with clay or concrete tiles that are heavier and slower to install.
Asphalt remains the most cost-efficient option, but older homes with historic detailing sometimes justify higher-end choices for longevity and curb appeal. Metal roofing offers excellent snow and ice performance in North Jersey winters, but the upfront costs are higher. Clay and concrete tiles add character and durability but demand a strong substructure and careful layout, which can raise both material and labor costs. Wood shingles or shakes provide a traditional look but require more maintenance in freeze-thaw conditions. Synthetic or composite shingles can balance cost and performance for steeper, detail-heavy roofs.
Winter and spring storms can create pricing volatility in Summit, as crews juggle tighter windows and potential delays caused by sudden cold snaps or heavy snowfall. Weather-related scheduling delays are common, so expect some variability in labor availability and project timing. Steady communication with the contractor helps, especially when a project crosses seasons or encounters ice dam risk scenarios that demand rapid sequencing of underlayment, flashing, and insulation components.
If ice damming and water intrusion have been recurring issues, prioritize a roof replacement that emphasizes effective ice dam protection, appropriate attic ventilation, and high-quality flashing at jetties, valleys, and chimney connections. Matching the chosen material to the home's architectural style and the local climate can save maintenance costs down the line, while ensuring the long-term protection of interior spaces.
Get a clear picture of your project costs upfront - no commitment required.

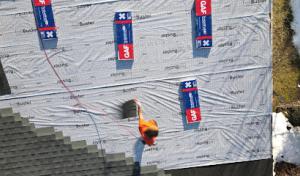
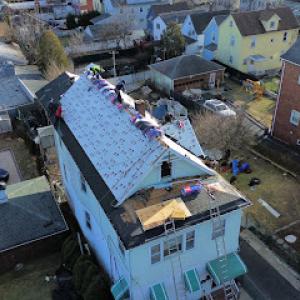
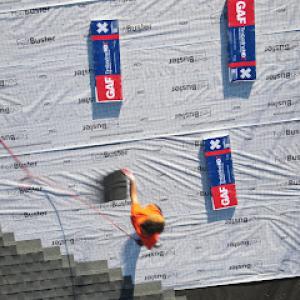
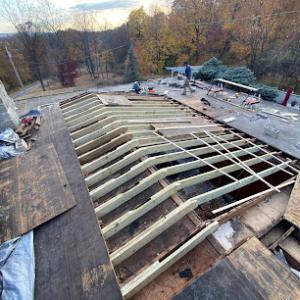
A full reroof project in Summit requires obtaining a building permit through the local Building Department. This isn't merely a checkbox to tick; the permit ensures that the replacement aligns with municipal codes, structural safety expectations, and the neighborhood's older, high-value housing stock. A permit also provides a formal record of work done, which can matter for future property transactions or if repairs are needed years later. Before any shingles are removed or mats laid, confirm the permit is opened in advance and that all required documentation is ready for review.
Permit processing times vary with department workload, so replacement timing should account for municipal review rather than assuming immediate start dates. The timeline can shift based on the size of the reroof, the materials chosen, and the complexity of details like steeper pitches or special flashing around chimneys and skylights. Plan for a window that includes the time to submit drawings or specs, respond to any requests for clarification from plans examiners, and obtain the final permit before procurement or on-site work begins. In busy seasons, expect longer review times; in quieter periods, the process may move more quickly, but never assume instant approval.
Inspections in Summit occur during and after the work to verify underlayment, flashing, venting, and drainage are properly installed. The on-site inspections typically verify that the roof decking is sound, the underlayment is continuous and appropriately lapped, and that all flashing details around vents, chimneys, and edges are integrated correctly to prevent leaks. Drainage checks ensure that the roof line and gutter connections will manage meltwater and ice dam risks appropriately for winter conditions. Schedule inspections so that trades can address any issues the inspectors raise promptly; delays here can cascade into weather-related hold-ups.
Coordinate with the contractor to align the permitting and inspection steps with a realistic weather window, especially in winter when Summit winters can affect ice and drainage performance. Have a clear plan for materials delivery and staging that keeps the project compliant with permit conditions. Keep an accessible site log for dates of inspections, any deficiency notices, and the corrective actions taken. If temporary access or filtration is needed for attic or crawlspace ventilation, arrange it early to avoid last-minute changes during permit review or inspection.
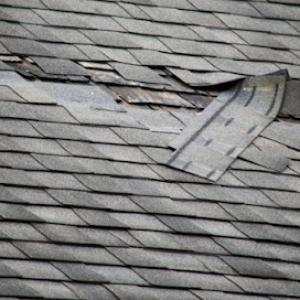
In Summit, the elevated storm and hail claim environment translates to more requests for documentation than in lower-claim regions. After a wind event or ice dam season, you may be asked to prove conditions before any work begins, so learn to capture clear, time-stamped photos of the roof, gutters, flashing, and any interior water intrusion. Begin right away: shots of damaged shingles, granule loss, and any staining on ceilings or walls help establish a timeline and the severity of impact. This city's older, high-value homes often rely on complex flashing details and steep tree-lined rooflines, making initial documentation essential to avoid later disputes about what caused damage.
Carriers often want storm-date evidence to distinguish a single event from ongoing wear. In Summit, where freeze-thaw cycles drive ice dam issues, it's common for multiple events to contribute to damage. Keep a simple, organized file: dated photos, weather reports, and notes about observed leaks. If possible, photograph the roof from multiple angles and near the attic hatch or crawlspace access to show the source of intrusion. After a storm, don't discard any damaged materials or close up entry points too quickly. Insurers may request the actual shingles, underlayment, or flashing remnants to verify the claim and assess repair scope. Early, thorough capture of materials helps prevent gaps in the record that could complicate coverage decisions later.
Adjuster timing can affect coverage decisions, so anticipate back-and-forth on the file. Respond promptly to requests for additional photos, receipts, or measurements. In older houses with steep pitches, taking interior photos of staining and mold risk areas can be equally important as exterior shots. If a contractor must remove or temporarily cover the roof, document those actions with photos and notes so the insurer can see continuity of protection and the reasoning behind any temporary measures. Keeping a careful, dated trail reduces the chance of surprises when the claim moves from investigation to settlement.
Connect with contractors who help homeowners navigate the claims process from damage assessment to final approval.
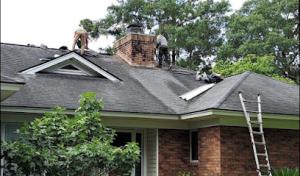
Chimneys are a dominant leak point on older homes in this market. The combination of masonry joints, surrounding brickwork, and a tall, exposed chase means flashing details can deteriorate faster than the main roof surface. In winter, freeze-thaw cycles exploit any gaps where mortar meets flashing, so you'll often see hairline cracks, loose step flashing, or corrosion on metal fascia pieces around the chimney. Start with a careful visual inspection after the last big thaw: look for weepage, dark staining, or spalling masonry at the base. If you notice staining on interior ceilings near the chimney, trace the line to the flashing at the chimney-to-roof transition. For a practical fix, focus on the chimney cricket or saddle if your roof has one, ensure counterflashing is properly embedded, and reseat or replace loose step flashing with corrosion-resistant metal. In Summit's climate, it's common to address both the flashing and the nearby mortar joints in a coordinated repair, rather than chasing leaks room-by-room.
Skylight repair is a meaningful specialty locally, and diagnosis often centers on penetrations rather than broad field-shingle failure alone. Inspect skylight flashing where it meets the roof, the plastic curb, and the sealant line on the interior side. Deterioration tends to show up as dried or cracked sealant, lifted shingle tabs around the base, or slight buckling of the curb. In many Summit homes, the edges of skylight openings are higher-stress zones, so you may find that the sealant-especially where the skylight frame meets the deck-needs replacement before the surrounding shingles fail. When repairing, match flashing to the deck type and reseal the skylight with a compatible, weatherproof sealant. If the glass shows condensation between panes or the curb sits uneven, call a skylight specialist to re-flash and square the curb, rather than attempting a DIY fix that risks broader leaks.
In the freeze-thaw climate, penetrations and transitions typically show problems earlier than the main roof surface. Pay particular attention to transitions around vent stacks, gas lines, and the attic access hatch where metal-to-shingle transitions carry extra load. Ice dams often start at these points, pushing water under flashing when snow remains on the field. Regularly clean clogged gutters and ensure downspouts drain away from the foundation, because backed-up drainage intensifies water intrusion at the ribbed edges and chimney base. When diagnosing, follow the water path from interior staining to the nearest penetration, then verify both the top and bottom seals and the continuity of flashing around that feature. A disciplined maintenance check twice a year-before winter and after spring-helps catch aging flashing before it leaks.
Find contractors experienced in skylight installation, flashing, and leak repairs to bring natural light into your home.
Flat and low-slope roofing is an active specialty in Summit even though pitched roofs dominate, indicating many homes have porches, additions, or rear sections that need different detailing. When evaluating these areas, treat them as a separate roof system from the main attic-and-peak roof. Inspect the low-slope surface for signs of past ponding, blisters, or mechanical damage to edge details and parapet walls. Note any intersections where shingles or membrane transitions meet steeper sections, as those junctions are frequent failure points.
Summit's frequent rainfall makes drainage and ponding control especially important on these low-slope sections. Start with a clean drainage plane: confirm that Gutters and downspouts are sized, connected, and clear of debris, and that overflow paths are unobstructed. Check the slope of the low-slope surface itself; even a small degree of runoff stagnation can lead to water infiltration behind edges or flashing. Install or refresh proper edge drainage details, including termination bars, countersunk screws, and secure terminations at terminations and penetrations. If a parapet exists, ensure coping is sealed and the flashing underneath is continuous to prevent seepage behind wall flashings during freeze-thaw cycles.
These areas often fail on a different timeline than the main roof, so homeowners should inspect them separately rather than treating the house as one uniform roof system. Favor durable, flexible membrane assemblies in this zone, with robust, continuously sealed flashing at penetrations, skylights, and transitions to steeper roofs. Use proper seam transitions and ensure any penetrations (vents, drainage, HVAC lines) have integrated kick-out flashing and drip edges that channel water away from interior walls. Regularly verify that caulking and sealants remain intact and that membrane seams stay watertight through winter cycles.
Create a simple seasonal checklist focused on these sections: remove debris from any scuppers or internal drains, inspect for blistering or ponding after storms, and monitor flashing for micro-cracks after freeze-thaw events. If ponding persists after rainfall, consider adjusting slope or upgrading to a high-performance membrane system. Track any interior signs of moisture around additions, and schedule a targeted inspection after heavy winter or spring rain events to catch issues before they escalate.
Find specialists in TPO, EPDM, and built-up flat roofing systems for residential and commercial properties.