Last updated: Apr 19, 2026
Cold winters in this neighborhood bring ice dam pressure at eaves and around gutter lines, which makes late-fall condition checks especially important before freeze-thaw cycles set in. If your roof is nearing the end of its life or has known vulnerabilities-like roof penetrations from chimneys or vent stacks-plan for a careful assessment before the first hard freeze. In practice, this means inspecting attic insulation and ventilation a few weeks before temperatures routinely stay below freezing, and addressing any moist decking or gaps that could worsen ice dam formation once snow begins to accumulate. If you already have existing leaks or damp spots, a targeted leak-prevention plan should be in place before the coldest stretch arrives. Scheduling a winter readiness check can avert last-minute shingle damage and reduce the risk of widespread water intrusion when the ice dam season hits.
Spring and fall are the most workable replacement windows in Union because summer humidity can affect decking moisture conditions while spring storms can interrupt tear-off and dry-in schedules. When the calendar flips to milder weather, you can more reliably set up replacement work without the high heat that can warp decking or soften asphalt during tear-off. Use this season to verify ventilation and underlayment integrity beneath any mixed roof designs commonly found on older homes. If a neighborhood storm hits late winter into early spring, you may encounter delayed access to your property or supply-chain hiccups for materials, so aim to finalize decisions and contracts before the peak spring storm period begins. Coordinating with a contractor who can adjust schedules in response to rain or wind helps maintain progress without compromising the dry-in phase.
Late summer into early fall remains a practical period for planning a reroof before temperatures drop. In practice, plan for a sequence that prioritizes a thorough tear-off, deck inspection, and underlayment installation while air and surface temperatures stay above the dew point at night. This is especially relevant for homes with steep slopes or complex rooflines where access and safety become more challenging as leaves accumulate and gutters clog. Fall also offers a predictable window to complete any necessary chimney or vent flashing work, which is critical in preventing water intrusion during winter storms. If a later autumn schedule is needed, ensure that a temporary protective layer or quick-seal patch is in place to carry you through early winter without exposing exposed decking or flashing to repeated freeze-thaw cycles.
Because Union sits in North Jersey's dense suburban corridor, storm-driven demand spikes after regional wind and hail events can tighten scheduling and extend lead times for full reroofs. If a big regional storm hits, expect contractors to shift their calendars, and understand that procurement or delivery delays can push a project out by days or even weeks. A practical approach is to lock in a preferred crew and a provisional start date well before the typical spring or fall rush begins, then maintain a contingency plan with alternate dates in case of weather-related setbacks. It helps to designate a single point of contact with the contractor to streamline communication when weather interrupts a tear-off or dry-in sequence.
Older stock in this area often features multiple penetrations-chimneys, skylights, vent pipes-that complicate a reroofing project. Before replacement, have the roof inspected for penetrations and flashing transitions around chimney collars, step-flashing at walls, and valley intersections where snow and ice tend to accumulate. Mixed roof designs mean some sections may require different materials or detailing to ensure consistent performance across the entire surface. In practice, this means staging work so that the most vulnerable areas-around chimneys and in valleys-are addressed early in the project, with subsequent work scheduled to complete the rest of the roof once flashing and underlayment have been properly installed. A thoughtful sequence reduces the chance of back-to-back leaks during the critical transition from tear-off to dry-in, especially in late winter or early spring when temperatures swing rapidly.
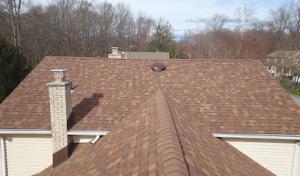
Many homes in Union feature masonry chimneys that rise through the roof line, often sharing the same aging mortar joints and brickwork as the roof itself. In these setups, leaks tend to concentrate at flashing where brick meets metal or membrane, not just across the field of the roof. When freezing temperatures set in, small gaps in old mortar can widen, allowing water to wick into the roof deck along those transition points. The consequence is more than a damp attic: compromised flashing can lead to stained ceilings, mold, and even structural rot in unseen pockets. A practical safeguard is to reflash and reseal the chimney chase every time a major roof project is underway, and to inspect brick-ledges and header joints for signs of spalling or mortar deterioration before winter returns. This is not a 'set it and forget it' detail; it demands periodic checks, especially after heavy snows or spring thaws.
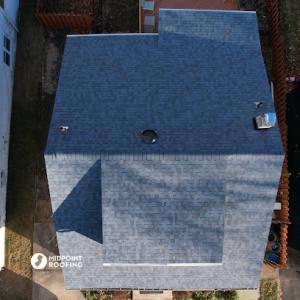
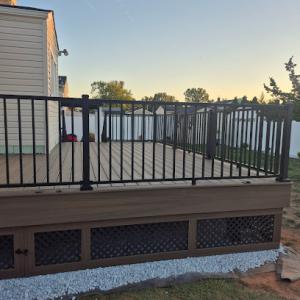
Union neighborhoods often blend a main pitched roof with lower-slope porches, dormers, or rear additions. That means one property may require different roofing details and ventilation strategies across different planes. Each plane experiences the elements differently: the low-slope sections shed water more slowly, while chimney shoulders and dormers create additional nooks where ice dams can form. The primary risk is mismatched materials or flashing details at these transitions, which invites leaks that spread along the seams rather than at a single point. When planning replacement, treat each plane as its own micro-system: verify that flashing, underlayment, and ventilation align across planes, and confirm that the ventilation strategy accounts for the added airflow needs of dormers and enclosed porch ceilings.
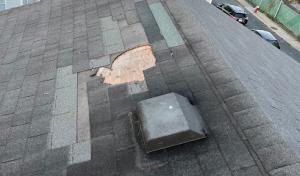
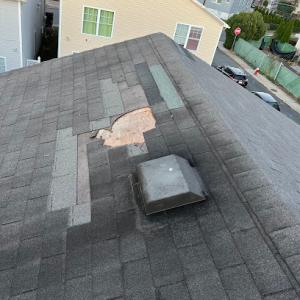
Older housing stock in this area routinely bears a higher count of penetrations-vents, skylights, flue pipes, and satellite dishes-that all introduce potential leak paths. As roofs age, sealants dry out, fasteners back out, and shingles pull away slightly around these penetrations. The cumulative effect is a web of small weaknesses that can channel water into attic bays and into living spaces during a thaw and freeze cycle. The prudent measure is to document every penetration during a roof assessment and examine the corresponding flashing and sealant work up close. A proactive approach targets not just the visible defects but the surrounding decks where shingles meet penetrations at awkward angles or where previously repaired patches diverge in color or texture.
Winters in this area swing between snow, ice, and rapid sun-warmed days that stress aging asphalt, concrete, or clay materials. A replacement window that spans late fall into early winter carries the risk of weather-driven delays and premature vulnerabilities in the interim. If a full replacement is not feasible before the season shifts, prioritize temporary leak prevention measures: reinforcing critical flashing points, installing temporary patching over especially vulnerable valleys, and ensuring proper temporary ventilation to mitigate ice dam risk. Spring windows for repairs or replacement demand attention to lingering moisture in attic spaces and to re-sealing any compromised transitions after the snowpack recedes.
Older rooflines often coincide with constrained attic spaces and uneven insulation patterns. In Union, improper ventilation near dormers and flat-to-pitched transitions can exacerbate condensation, warp decking, and accelerate shingle wear. Evaluate attic venting relative to the roof planes with mixed geometries, confirming that soffit, ridge, and gable vents provide balanced airflow. Where insulation is thin or displaced, seal and insulate to reduce interior humidity that contributes to ice dam formation during freeze-thaw cycles. Addressing ventilation now helps guard against repeated leaks along those trouble spots when Mother Nature swings back to winter.
Find specialists in TPO, EPDM, and built-up flat roofing systems for residential and commercial properties.
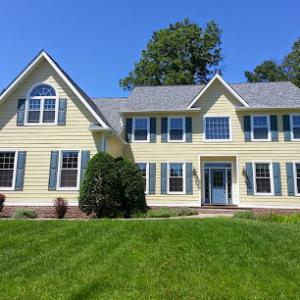
Asphalt shingles fit much of Union's existing residential housing stock and price expectations, which is why they remain the dominant reroof choice locally. In dense neighborhoods with multiple chimney penetrations and mixed roof lines, asphalt offers straightforward installation around vents, valleys, and flashing details. Modern asphalt shingles deliver strong wind resistance and solid hail performance for our spring storm windows. They also handle the winter freeze-thaw cycle reasonably well when installed with a solid underlayment and proper attic ventilation. For a homeowner evaluating reroof timing, asphalt provides predictable performance with a familiar repair approach, and it remains the practical option for many bungalows, capes, and two-story homes common in older sections.
Clay tile, concrete tile, slate, and synthetic alternatives appear in the market but require closer evaluation of structure, flashing details, and repair matching on older North Jersey homes. Tile and slate bring desirable aesthetics and durable lifespans, but their weight demands a structural assessment-often a retrofit or reinforcement is needed to avoid long-term stresses on existing rafters and added chimney details. Flashing around chimneys, dormers, and roof-to-wall transitions must be carefully accounted for, especially in homes with multiple penetrations. In several Union properties, repairs previously completed to accommodate these heavier materials may not align perfectly with original framing, so matching repair history becomes crucial for a cohesive result. Synthetic options can soften some weight and cost concerns, but still require meticulous flashing and underside support to prevent leak paths through older eave edges.
Aluminum roofing is relevant in Union's market as a lighter metal option for homeowners seeking durability without the weight profile of tile or slate. Aluminum can be a smart upgrade where a roof already carries significant height, intricate peaked sections, or where attic spaces are tight and ventilation is a priority. In homes with many dormers or steep pitches, aluminum sheets can lay into complex layouts with less structural load while offering good resistance to snow load and ice dam formation when paired with proper insulation and a solid drip edge. However, it is essential to verify compatibility with existing flashings and chimney details, ensuring that transitions remain watertight across seasonal freezes. A careful color and seam choice also helps preserve the home's historical character while delivering modern performance.
Many older homes show a mix of roof styles, where a steep main path meets a lower-slope addition or a dormered attic. For those properties, the best material choice often hinges on the ability to integrate flashing details, valley treatments, and end-lap configurations without creating misaligned leak paths. When considering any non-asphalt option, plan for a comprehensive assessment of chimney setbacks, vent stacks, and the original roof deck's condition. The right material, installed with compatible flashing and repaired matching on legacy sections, helps preserve the home's character while providing reliable protection through Union's four-season climate.
In this market, the typical cost landscapes you'll see break down by material in clear bands. For asphalt shingles you'll generally see roughly $350 to $700 per square. If clay tile is your choice, expect $900 to $1800 per square, and for concrete tile that rises to about $800 to $1600 per square. Synthetic or composite shingles tend to land in the $450 to $900 per square range, while slate options run significantly higher, roughly $1200 to $3000 per square. Aluminum roofing sits in the middle of the pack at about $700 to $1500 per square. These ranges reflect the mix of local crews, available replacement parts, and standard warranty expectations seen among Union-area suppliers.
Costs in practice tend to climb whenever a roof is more complex than a simple, flat overlay. Older homes here often have chimney flashing work to address, multiple roof sections to tie together, and steeper pitches that require extra safety and protection during tear-off. All of those factors push labor time up and can add hidden contingencies, such as resealing vent boot assemblies or converting valleys to reduce future leaks. In neighborhoods with multiple penetrations and narrower eave lines, material waste and staging space also become practical constraints, nudging a project from the lower end of the spectrum toward the middle and above.
Pricing can move upward when regional storm activity increases demand across Union and nearby North Jersey communities, especially during the busiest spring and fall reroofing windows. When crews are stretched thin by back-to-back projects after a heavy late-winter or early-spring thaw, you'll notice amplified material and labor costs. If you're timing a replacement around freeze-thaw cycles or anticipated mid-spring storms, expect a premium on both availability and scheduling flexibility. Planning ahead and securing a firm scope can help stabilize costs in these high-demand periods.
Midpoint Roofing
(973) 834-7570 midpointroofing.com
2204 Morris Ave Suite 302b, Union, New Jersey
5.0 from 111 reviews
Midpoint Roofing is a premier roofing contractor in Union, NJ. We specialize in roof replacement, roof repair, and a wide range of roofing services. We are located at 2204 Morris Ave Suite 302b, Union, NJ 07083 and service clients in many different areas of New Jersey, including Union County, North and Central NJ. Our team of experienced professionals has lead the roofing industry for 10+ years. We are fully dedicated to providing top-notch workmanship and exceptional customer service. We offer the best prices on roof repairs and roof replacement around and work with insurance and do all the work for you! Trust Midpoint Roofing to handle all your roofing needs with integrity and quality. Contact us today for a free estimate or inspection!

FX Home Remodeling
(908) 967-8850 fxhomeremodeling.com
Grandview Ave, Union, New Jersey
4.9 from 116 reviews
FX Home Remodeling – Roofing Contractor in Union, NJ FX Home Remodeling is a family-owned roofing company proudly serving Union County and surrounding New Jersey areas for over 20 years. We specialize in roof repairs, roof replacements, and new roof installations for both residential and commercial. Our team values honesty, quality, and craftsmanship, treating your home as if it were our own. We use only the best roofing materials, including GAF, Owens Corning, and CertainTeed, to ensure lasting protection and curb appeal. Services include: Roof Repair & Leak Detection New Roof Installation Roof Replacement Solutions Aluminum Seamless Gutters Gutter Cleaning & Maintenance Free Roof Inspections

Peter Contractor
(347) 992-4144 petercontractor-llc.com
Serving
5.0 from 445 reviews
At Peter Contractor, we offer expert construction, remodeling, and roofing services across New Jersey and New York. With over 21 years of experience, we specialize in new roofs, repairs, and full exterior and interior renovations for residential, commercial, and industrial clients. As a GAF Certified, fully licensed and insured contractor, we provide top warranties and reliable, high-quality work. From roofing and siding to concrete and brickwork—we do it all, at the best price and with care.
Raidex construction
(973) 380-4652 www.raidexconstructionllc.com
Serving
4.8 from 116 reviews
Raidex Construction is a family-owned roofing and exterior services company with over 15 years of experience. We specialize in roof replacements through insurance claims, affordable roof repairs, siding repair, and gutter services. Locally based and highly rated with 4.5-star reviews, we focus on quality over quantity and offer easy financing options to help homeowners improve and protect their homes with confidence.
Nunez Home Improvement
(908) 992-9261 www.nunezhomepro.com
Serving
4.9 from 142 reviews
Nunez Home Improvement is a licensed and insured roofing contractor serving Elizabeth, Union County, and surrounding areas in New Jersey. We specialize in roof replacement, roof repair, storm damage roofing, and emergency roof repairs. Our team provides free roof inspections, honest estimates, and high-quality workmanship using top-grade materials. Whether your roof has leaks, wind damage, or needs a full replacement, we deliver reliable and professional service every time. Call today for a free roof inspection and También atendemos en español. Ofrecemos inspecciones gratuitas de techos, reparaciones, reemplazo de techos y trabajos por daños de tormenta en Elizabeth y Union County

One Call 24-7 | Roofing & Restoration – Anytime. Anywhere. We’re There.
Serving
4.7 from 109 reviews
Peter’s General Construction dba One Call 24-7 brings over 25 years of trusted, licensed, and insured experience serving homeowners and property owners across New Jersey. We provide comprehensive home restoration and construction services, including: Roof repair & full roof replacement Gutter cleaning, repair & replacement Siding repair & replacement Windows & soffit repair or replacement Skylights installation & repair Chimney services Storm & water damage restoration Retail and insurance claim support for repairs and replacements Emergency services available 24/7 — from sudden roof leaks to storm damage, fallen trees, or water intrusion, our expert crews respond immediately to protect your home and prevent further damage.
Global Home Improvement
(908) 987-3147 www.globalhomeinc.com
Serving
4.8 from 127 reviews
Global Home Improvement services offers the best home improvements throughout Atlantic County, Bergen County, Burlington County, and the surrounding areas of North and Central NJ. We feature high quality products such as James Hardie Siding, Marvin Windows and Metal Roofing. Our lifetime exterior home improvements come with a lifetime material and labor warranty giving homeowners piece of mind with every install. If you're looking for Roof Replacements, Replacement Windows, Replacement Doors, Gutter Installation, and or Siding give us a call for a free no-obligation estimate of our services.
RSB Construction & Roofing
(908) 402-1835 www.rsbconstructionllc.com
Serving
4.9 from 79 reviews
RSB Construction, located on 420 Maple Ave, is the premier roofing contractor in Elizabeth, NJ, with over 35 years of experience under owner Alvaro's expert leadership. Serving Hudson, Union, Bergen, and beyond, our certified team specializes in roof repair, residential and commercial roofing, roof replacement, and installation. Whether you need asphalt, metal, or shingle roofing, we offer customized, affordable solutions backed by lifetime labor warranties and stellar customer service. Trust RSB Construction for top-quality workmanship, from roof leak repairs to complete installations. Contact us today for reliable, precision roofing services tailored to your needs.

Herts Roofing & Construction
(908) 206-4240 hertsroofingnj.com
Serving
4.9 from 114 reviews
Located at 20 Commerce Drive Suite 135, Herts Roofing & Construction is your trusted local roofing contractor, specializing in comprehensive roofing services. Whether you need expert roof repair, seamless roof replacement, or efficient new roof installation, our skilled team ensures exceptional quality for every project. We cater to both residential roofing needs, offering affordable new roof costs and detailed roof inspections. Our experience extends to various materials, including durable metal roofing and versatile flat roofing, adeptly addressing any roofing challenge. For urgent needs, our emergency roof repair services are always ready. Choose Herts Roofing & Construction for unrivaled craftsmanship and reliability.

Jersey Eco Roofing
(862) 201-2021 jerseyecoroofing.com
Serving
5.0 from 54 reviews
Jersey Eco Roofing is a trusted roofing company in Springfield, NJ, known for expert craftsmanship and eco-friendly solutions. With over 6 years of experience, our licensed and insured team provides top-tier roofing services in Springfield, including repairs, installations, and replacements. As leading roofing contractors in Springfield, we’re committed to quality, durability, and customer satisfaction. We proudly serve nearby areas like Essex, Union, Morris, Bergen, and Passaic counties. Whether you need a minor fix or a full roof upgrade, our team ensures reliable results every time. Call today to schedule your free estimate and protect your home with confidence.
Michael J Harris
(908) 553-0284 www.mjharrisroofing.com
Serving
4.6 from 34 reviews
Michael J Harris, Inc is a third generation, family owned and operated roofing and masonry contractor serving Essex, Union, Middlesex, and Hudson Counties. Started in 1915 by Michael Harris's grandfather, the business thrives today because of the unmatched crafstmanship and service it delivers. When you call for an estimate, Michael will personally respond to your call, meet with you to discuss your options for repair and oversee the completion of the job. His level of knowledge for diagnosing the source of your roofing issue and providing you with the most effective solution is unmatched by competitors. If you want great service and and quality workmanship call Michael Harris directly today on his cell phone at (908) 553-0284.
R & G Roofing
(973) 324-9461 rghomeservices.com
Serving
4.9 from 290 reviews
R and G Roofing is one of the Best roofing companies in New Jersey Essex County providing Roofing, Home Improvement, Roof Repair, Roof Replacement, Roof Installation, Roof Maintenance, Shingle Roofs, Flat Roofs, Commercial Roofing, Roofing Prices, Siding Installation, Vinyl Siding, Vinyl Siding Repair, asphalt, GAF, CertainTeed, Owens Corning, roof, roofer, gutter, gutters, gutter repair, gutter installation, gutter covers, leaf protection and any Skylight work replace or repair. Roofing Family Business serving all surround areas. We are the Top Contractor in Essex county committed to highest customer service in workmanship quality.
For a full reroof in Union Township, a permit is typically required and is generally filed by the roofing contractor with the Union Township Building Department. This means you'll want to confirm that the contractor will handle the permit application and keep a copy of the permit on-site during the project. The permit process helps ensure that the work meets local code requirements, including proper venting, underlayment, and fastening methods that are crucial for a winter-ready roof. Having the permit in place before materials arrive on site helps prevent delays caused by inspections or documentation gaps when winter weather is looming or a spring storm window opens.
A final inspection is usually required in Union to verify items such as venting, underlayment, and proper nailing before the job is considered complete. This final step provides an important checkpoint after the roof is installed, especially on homes with multiple penetrations from chimneys or vents and on mixed roof designs common in older neighborhoods. Make sure you and your contractor coordinate access to the attic and roof line for the inspector, and have any documentation ready that shows underlayment type and nailing pattern. If the project involves unusual details-such as a steep slope shielded by an add-on or a combo of clay or slate sections-the inspector will pay close attention to how those transitions are flashed and sealed.
Some Union reroof projects may also trigger mid-construction inspection checks, so scheduling and access coordination matter during active work. If a mid-construction review is anticipated, clear communication with the Building Department about expected milestones helps prevent hold-ups, especially during winter freeze-thaw cycles or spring storm windows when crews may be busier. Ensure that temporary access pathways are kept clear for the inspector, and that any temporary protections or tarps are in place to maintain safety and protect interior spaces during evaluation. Having a point of contact at the contractor's office who can coordinate with the inspector on short notice will reduce downtime and keep the project on track through Union's seasonal weather shifts.
Your roof faces its toughest tests when winter brings freeze-thaw cycles, followed by spring winds and hail. Snow piled high can melt and refreeze around penetrations, vents, and chimney arrangements, stressing flashing and seams. In spring, gusty days can lift loose shingles or tiles, and hail can worsen existing wear in a hurry. Autumn debris loading adds another layer of pressure as leaves back up gutters and overwhelm drainage paths, giving ice dams a chance to form if drainage is clogged. Each of these patterns can turn minor leaks into bigger problems if not addressed promptly.
In the Garden State, standard homeowners policies generally still cover roof replacement, but the adjustment process often hinges on a few key details. When evaluating storm claims, adjusters commonly want clear photos, an accurate sense of roof age, and a documented maintenance history. Missing or vague records can slow the process or lead to less favorable conclusions about fault or scope. For Union homeowners, having a concise timeline of when issues first appeared and what preventative steps were taken can make a meaningful difference.
Older or less common materials frequently draw closer insurer scrutiny. Slate, tile, and specialty systems demand careful, staged documentation to avoid disputes about pre-existing conditions or post-storm damage. If your roof contains chimney penetrations, flashing details, or mixed roof designs, the stakes are higher: any failure may be linked to installation nuances or aging components. Proactive photos, notes on recent maintenance, and a clear visual log of vulnerable areas help establish a solid baseline for claims.
Connect with contractors who help homeowners navigate the claims process from damage assessment to final approval.
Midpoint Roofing
(973) 834-7570 midpointroofing.com
2204 Morris Ave Suite 302b, Union, New Jersey
5.0 from 111 reviews

One Call 24-7 | Roofing & Restoration – Anytime. Anywhere. We’re There.
Serving
4.7 from 109 reviews
Union's mix of main roofs and lower-slope additions means drainage details are often a bigger leak factor than shingles alone. When high spots and low pockets align near chimneys or vent stacks, standing water can follow the path of least resistance and creep toward eaves and penetrations. Check transitions where a steep main roof meets a low-slope rear addition, especially around field seams and edge flashings. In late fall, confirm that drip edges and gutters are secured and that downspouts direct water away from fascia. If a low-slope area drains poorly, plan a targeted inspection after heavy rains or rapid thaw events.
Autumn leaf buildup is a practical roofing issue in Union because clogged gutters can force water back toward eaves and increase winter ice-dam risk on the same home. Create a routine: rinse gutters after peak leaf drop and again after the first hard frost, paying close attention to gutters above lower-slope sections where debris can seal water flow. Ensure downspouts are free of obstructions and that overflow paths are clear from under porch ceilings or entryways. A simple screen or improved gutter hanger can keep leaves from bridging the seam at edge details, which is a frequent leak trigger in older houses with mixed roof lines.
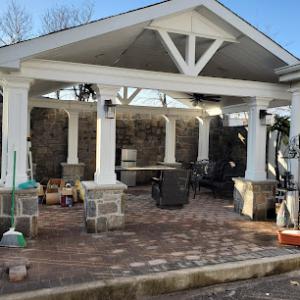
Low-slope rear sections, porch roofs, and transitions around additions need closer watch during humid summers because trapped moisture can affect membranes, decking, and edge details. Inspect membrane edges where the low slope meets vertical faces, and look for wrinkling or blisters that suggest moisture intrusion. If a porch or addition uses a different substrate, verify that the edge detailing remains sealed against seasonal humidity swings. In damp spells, run a quick check along eaves for any damp spots that didn't appear in dry weather.
Extend the life of your existing roof with reflective or waterproof coatings that protect against UV and moisture.

Garcia & Sons Roofing Company
(908) 460-8333 garciasonsleakdetection.com
Serving
4.8 from 75 reviews
The market in this area is heavily reroofing-oriented, so homeowners often judge crews by how quickly they respond after leaks or storms, not only by new-construction capability. When freezing cycles threaten indoor damage, a rapid triage and on-site assessment can prevent ice dam progression and added interior harm. Look for a crew that outlines a clear plan for initial tarp-and-tike inspection within 24 to 48 hours after a storm.
Cleanup matters locally because homes are closely spaced and many projects take place on occupied residential properties where driveway, yard, and neighbor impact are noticeable. Ask about daily end-of-day cleanup, protection for landscaping and driveways, and how debris and old materials will be restrained from falling onto neighboring yards or cars. A courteous crew will lay down walkways and use containment to minimize dust and debris in common areas.
Long-established and family-run companies are visible in this market, but homeowners still need to confirm who is handling permits, inspections, and flashing details on older chimney-heavy roofs. Clarify whether the same team covers the entire project or if subcontractors will perform parts of the work, especially on intricate chimney flashings and valley intersections.
In Union, timing a roof project around freeze-thaw cycles and spring storm windows helps prevent leaks during peak moisture periods. Choose a crew that can schedule a staging plan, protect vulnerable attic penetrations, and acclimate materials for the forecasted seasonal extremes. A practical coordinator will provide a realistic timeline and check-in points.