Last updated: Apr 19, 2026
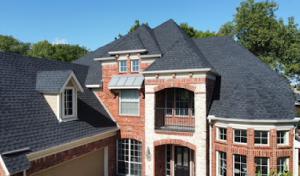
Garland sits in the Dallas-Fort Worth severe weather pattern where spring hailstorms can trigger sudden roof damage and a surge in claim activity. The moment the sky darkens and hail starts rattling the shingles, the risk isn't just cosmetic-hidden damage can compromise attic ventilation, insulation, and even the underlying deck. Because the area endures hot UV-heavy summers, shingles expand and contract with temperature swings, which can accelerate micro-cracking after a severe storm. Don't assume that a brief dent or a few granules lost means the roof is "fine"-hail damage often hides beneath the surface, especially on older roofs or those with fewer fasteners. In this market, a single storm can trigger a cascade of claims, so understanding what to document before the claim is filed becomes essential.
In this market, insurers often scrutinize hail damage documentation closely, including photos, roof age, condition, and depreciation schedules after major storms. A clean, chronological record helps a claim survive the adjuster's review without being pushed into depreciation or reduction for pre-existing wear. Start with a staged photo log: wide shots of the house and street to establish context, then close-ups of impact marks on shingles, gutters, and flashing. Include the roof edges and any visible signs of granule loss, as those are common red flags insurers watch for when determining replacement eligibility. Note the roof age and visible wear from the prior years; a long-lived, well-maintained roof may justify a full replacement after a severe hail event, but a roof near the end of its life may be treated differently. After major storms, the rhythm of adjusting in this region often means a flood of claims; having a precise, dated record helps prevent disputes over what is new versus what was pre-existing.
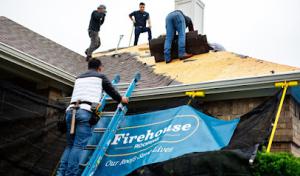
Because claim volume spikes regionally after hail and wind events, Garland homeowners can face contractor scheduling pressure and should document damage before temporary repairs alter evidence. Immediate, careful documentation matters. Take timestamped photos from multiple angles, and capture any interior signs of leakage-stains on ceilings, warped ceiling panels, or attic moisture. If leaks are present, document their location with a rough map inside the attic to guide the adjuster. Do not conceal damaged areas with quick tarp work or superficial fixes before an adjuster reviews the roof; temporary repairs can affect the assessment of wear and the true extent of storm damage. When scheduling temporary work, prioritize preserving evidence, such as leaving a visible, untreated impact area untouched in one section for the adjuster to inspect. If access to the roof is restricted, use a drone or high-resolution ladder photos to maintain a clear record without altering the scene.
Insurance scrutiny intensifies when the claim involves hail and wind phenomena common to the DFW corridor. Prepare a concise damage summary, including roof age, shingle type, and any prior repairs. If an adjuster questions depreciation, have documentation ready showing the roof's current condition and remaining service life. Choose a contractor who understands the local climate: they should be prepared to discuss impact resistance, flashing integrity, and the UV effects that degrade materials after repeated cycles of sun exposure. Be ready to provide the contractor's proposed scope of work, including roof deck replacement, flashing, underlayment, and acceptable fastener patterns that meet the region's wind exposure. The goal is a transparent, evidence-based path from storm impact to restoration that stands up to review, even as demand for crews remains high in the wake of a major event.
When you're evaluating the best window to replace a roof, the region's DFW rhythm matters more than in many other parts of the country. Summer heat stretches and ages certain materials faster, while the fall winds can expose weakened shingles to the elements just as winter cold snaps arrive. The typical local home stock-attics, radiant barrier installs, and tighter neighborhoods with mature trees-means that timing can influence not only the roof itself but how the project aligns with HOA expectations and neighbor schedules. The practical takeaway is that timing decisions should balance material performance, crew productivity, and the availability of a reasonably dry stretch for tricky tasks like underlayment and venting.
Garland roof replacement is often planned for cooler months because North Texas summer heat creates harsher daytime work conditions. Higher daytime temperatures push crews to shorten shifts or push more of the work into the early mornings, which can slow progress and inflate disruption to your daily routine. Cooler weather improves shingle handling, reduces the risk of heat-related fatigue, and helps sealants and underlayment cure properly. If you're coordinating with an HOA or coordination with neighbors, aiming for a late fall or early winter start can help ground the project in a predictable calendar before holiday traffic and winter weather shifts.
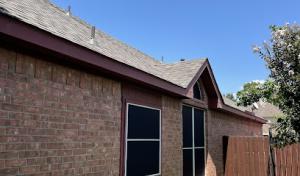
Summer heat in the Dallas-Fort Worth area accelerates aging in some roofing materials, making late-season inspections important even when leaks are not yet visible. With the heat, some shingles may show signs of granule loss, subtle curling, or accelerated wear at the edges. A thorough late-season inspection can catch these indicators before winter storms arrive, reducing the chance of surprise repairs when schedules tighten after a bad hail event. If you already know you have older shingles, a targeted fall inspection helps determine if a modest interim fix is warranted or if full replacement is the safer route before the cold sets in.
Fall wind events in this region can expose already-weakened shingles before winter cold snaps and occasional freezes slow repair schedules. September and October can bring gusty days that loosen edges or elevate the risk of shingle blow-off, especially after a harsh summer. Scheduling a roof assessment in early fall gives you a clear read on whether the structure will hold through the next season or if prep work-like fascia, vent resealing, or attic ventilation checks-needs to run in advance of the main replacement window. Keep in mind that strong fall winds can also reduce the amount of usable work weather in a single week, so having a contingency plan with your contractor helps keep timelines realistic.
Begin with a pre-season inspection to identify loose flashing, damaged shingles, or compromised underlayment. Align replacement timing with a stretch of dry weather in late fall through winter, avoiding peak heat days and the wettest parts of spring. Communicate with the contractor about staging areas, HOA notification timelines if applicable, and the expected sequence of work so neighbors understand when equipment and crews will be on your street. Finally, set aside a clear plan for debris containment and post-install inspection to ensure the new roof seals well through the first cold snaps and any early-season gusts.
Get a clear picture of your project costs upfront - no commitment required.
Bold Roofing - DFW's Best Roofing Contractor
(972) 380-9300 www.boldroofing.com
Serving
4.7 from 602 reviews
Inspiration Roofing & Construction
(214) 799-4793 www.inspirationroofing.com
3960 Broadway Blvd STE 232, Garland, Texas
5.0 from 128 reviews
We are a General contracting company working out of Forney, TX and surrounding communities. We focus on Roofing systems as well as interior and exterior remodel. We are a top rated roofing service provider, and from the first nail to the final creative touches our contractor and crew will turn your home into a modern, unique, and comfortable place to live. We proudly offer all types of roof replacement, full remodel, interior & exterior painting, fences, gutters, windows, garage doors, & more!
R2 Roof Guys
(214) 405-4396 www.r2roofguys.com
675 Town Square Blvd Unit 255, Garland, Texas
5.0 from 61 reviews
R2 Roof Guys is a family owned and operated roofing company since 1991 serving the DFW and surrounding area. We pride ourselves in workmanship and dedication to ensuring you and your family are kept safe and the job is done up to the highest standard.
Pro American Roofing
(945) 340-7256 proamericanroofing.com
226 Commercial St, Garland, Texas
4.9 from 152 reviews
Pro American Roofing serves DFW homeowners with storm damage inspections, insurance claim filing assistance, and full roof replacement. Our team accompanies you at the adjuster meeting, documents every detail, and fights for the full scope of your claim. If your claim was denied, we coordinate reinspection and guide you through the appraisal process. BBB A+ rated. 146 Google reviews at 4.9 stars. Free inspections. Serving Prosper, McKinney, Frisco, Plano, Southlake, Lewisville, Keller, and Little Elm.
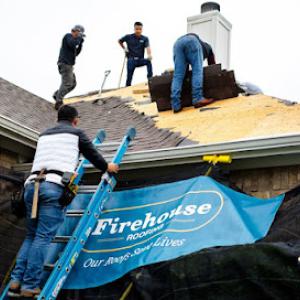
Firehouse Roofing
(214) 531-6944 firehouseroofing.com
423 W Interstate 30, Garland, Texas
4.9 from 55 reviews
For nearly three decades, FireFounded in 1997 and voted Best Roofer in DFW, Firehouse Roofing is the area’s leading expert in roof repairs. We provide the highest quality shingles, insulation, ventilation, gutters, and solar stock to make sure you are getting the best products installed in your home or business. Our knowledgeable team specializes in roof repairs, roof replacements, metal roofing, residential roofing, commercial roofing, gutter installation, and offers in-house financing. Firehouse Roofing stands by a 100% Satisfaction Guarantee 24/7. Whether it be residential or commercial roofing, Firehouse has got you covered. Call today to schedule a FREE inspection!
Wilco Contractors
(972) 303-8882 wilcoroofing.com
675 Town Square Blvd Bldg 1A Suite 200, Garland, Texas
4.9 from 85 reviews
Wilco Contractors is a black-owned, full-service roofing contractor in Garland, TX specializing in residential and commercial roofing, roof coatings, flat roofs, metal roofs, storm restoration, gutters, paint, siding, windows, hail & wind damaged roofs, attic foam, and blow-in insulation, and insurance claim assistance. Wilco Contractors is an A+ rated Business with the BBB and is an Owens Corning Preferred Contractor. Contact us today for a complimentary inspection!

Roof Experts
(469) 936-7663 roofexperts.com
601 N First St, Garland, Texas
4.8 from 86 reviews
Roof Experts, located at 601 N First St, is your top choice for professional roofing solutions, specializing in both residential and commercial roofing services. As leading roofing contractors near you, we excel in providing affordable and reliable flat roof repair, roof inspection services, and roof leak repair that ensure lasting protection. Our team of seasoned roofers is dedicated to delivering exceptional craftsmanship and customer satisfaction. Whether you're searching for commercial roofing contractors or dependable residential solutions, Roof Experts guarantees top-notch service tailored to your needs. Choose us for unmatched quality and affordability.

Peacock Roofing
(972) 362-4166 www.peacockroofing.com
1209 N.W.Hwy Suite 326, Garland, TX
4.9 from 34 reviews
Peacock Roofing, LLC is a leading roofing company serving the Garland and Rockwall County area that provides repairs, installation, and preventative maintenance. Call for an estimate!

Roofing subcontractor
4801 Gatewood Rd, Garland, Texas
5.0 from 14 reviews
Roofing subcontractor Asphalt roof's Metal roof's
Big "D" Roofing Company
(972) 495-8000 bigdroofing.com
131 E Buckingham Rd, Garland, Texas
4.7 from 31 reviews
Big "D" Roofing, Inc. is a roofing company that has been serving the Dallas/Ft. Worth since 1954. We dedicate ourselves in providing a great quality of roof for each homeowner, with roofers and products to protect your home.
Rowe's Roofing
(972) 276-1978 rowesroofing.net
5322 Anchor Bay Dr, Garland, Texas
4.5 from 19 reviews
Rowe's Roofing Tight roofs for right budgets. Local to N. Texas since 1992
Garland Roofing
(972) 278-1711 www.garlandroofing.com
2607 Industrial Ln, Garland, Texas
4.4 from 24 reviews
A family owned and operated business since 1964. The last thing anyone wants to do is worry about the roof over their head. So let us at Garland Roofing take care of it. Whether it be a new roof or a simple repair insurance or out of pocket, your satisfaction is guaranteed!
Capitol Roofing & Construction
(972) 474-8955 www.capitolrcllc.com
Serving
4.9 from 109 reviews
Family owned and operated serving the Dallas Ft. Worth Metro since 2009
Garland homeowners often compare bids against a mix of asphalt shingles, metal roofing, clay and concrete tile, wood shingles or shakes, and synthetic or composite shingles. The dominant local price ranges align with the broader DFW market but local project specifics-house age, attic ventilation, and existing roof complexity-tend to push final numbers up or down. In practical terms, you'll see asphalt shingles toward the lower end of the cost spectrum, with metal and tile options carrying noticeably higher per-square pricing. Storms and fast-turn insurance work can widen that spread for a short period after hail events, especially in neighborhoods with larger mature trees and HOA-driven reroof cycles.
Asphalt shingles are typically the baseline for Garland reroofs, offering straightforward installation and broad contractor familiarity. When choosing metal roofing, expect a higher per-square cost, but with potential long-term energy savings and excellent durability against hail. Clay and concrete tiles present a more premium option; they look distinct and can perform well in heat but require careful roof framing assessment and more specialized labor, which pushes price per square well above asphalt. Wood shingles or shakes carry a niche appeal for certain architectural styles, yet they demand more maintenance and can incur higher replacement costs if hail damage targets exposed surfaces. Synthetic or composite shingles try to blend reasonable price with enhanced hail resistance and longer life, but material quality varies, so a careful comparison of warranties and install requirements is essential.
Storm-driven demand spikes across the wider DFW market can push Garland reroof pricing upward after hail events, especially for fast-turn insurance work. In practice, this means a temporary tightening of crew availability and increased material lead times. If you're navigating a post-storm timeline, you'll want to plan for possible bid adjustments tied to urgency, shakeout of subcontractors, and potential higher disposal or specialty-fastener costs. A calm, well-documented insurance claim with dated photos and a clear scope helps mitigate price distortions when bids arrive quickly.
1) Start with the basics: estimate from the local material-cost table and your roof size in squares. 2) Add labor multipliers for heavier systems (tile) or specialty installs (steel, synthetic under certain warranties). 3) Factor in attic ventilation, decking condition, and potential reinforcement for heavier roofs. 4) Gather at least three bids and compare inclusions-underlayment, fasteners, ice-dam barriers, and warranty terms. 5) Include an emergency contingency for post-storm access or expedited timelines if insurance work accelerates. 6) Review your HOA expectations early in the process to anticipate any cosmetic or setback constraints on the final roof appearance.
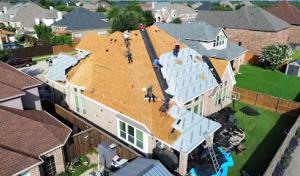
When planning a full reroof, the process is anchored in the City of Garland Development Services. A building permit is typically required for a complete roof replacement, and the permit tracks the project from start to finish. The permit ensures that the new roof installation complies with local building codes, material standards, and safety requirements. It also provides a clear record for future property transactions and inspections, which is especially helpful in storm-affected years when insurance conversations and HOA checks often intersect with permit status. Because Garland sits on the edge of frequent hail and wind events, having a properly issued permit helps avoid field disputes and delays later in the process.
Inspections are generally scheduled after permit issuance and again upon completion of the reroof work. The first inspection verifies that the roof deck is sound, underlayment is properly installed, and the chosen roofing system meets code and manufacturer requirements. The second inspection confirms that all components-from flashing to venting-are correctly installed and that the finished product adheres to the approved plan and applicable standards. Planning ahead for inspection windows helps prevent work stoppages, especially since weather and access can influence scheduling. If any discrepancies are found, the contractor will need to address them before the final sign-off.
Standard reroof jobs typically do not require a plan review, as long as the scope remains within the boundaries of a normal replacement (same footprint, same roof pitch, and no structural alterations). If the project expands beyond a routine reroof-such as adding skylights, changing roof shape, or altering load paths-the plan review process can kick in and may require additional documentation or calculations. In established neighborhoods, HOA rules frequently layer on top of city requirements. Some HOAs require submittal for architectural approval or a dated authorization before work begins. Even with a permit from the city, it is common to coordinate timing with the HOA calendar to prevent conflicts or delays in access for our crews and for any required exterior changes during the project.
Start the permit process early after selecting a roofing system, especially if a storm season has just passed and scheduling windows are tight. Have the contractor prepare a clear scope that stays within standard reroof parameters to avoid triggering plan review. Confirm the HOA approval status well in advance if the project sits in a neighborhood with active covenants. Finally, coordinate inspection dates with both the contractor's crew and the city's scheduling staff to minimize hold-ups, particularly during peak demand months when inspections can book out.
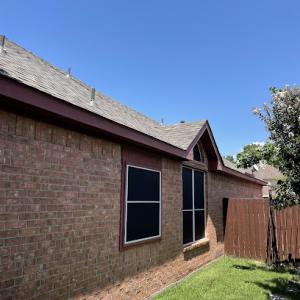
Asphalt shingles remain a dominant Garland choice because they fit the area's large volume of suburban reroof projects and insurance-driven replacements. They pair well with typical suburban roof lines and can be found in a wide range of styles to match existing homes without overwhelming the look of established neighborhoods. In tough weather cycles, asphalt shingles tend to hold up reasonably well against wind-driven rain and hail when a quality underlayment and proper installation are used. For many homeowners, the familiar installation process and available warranty options translate into predictable performance after severe weather events. When choosing an asphalt system, focus on impact-resistant options and confirm that the shingle class aligns with local wind considerations, especially after a major hail season.
Metal roofing is active in this market and is often evaluated by Garland homeowners looking for stronger performance under intense sun and recurring storm exposure. Metal panels can reflect heat, reducing cooling load in hot summers, and they typically resist hail damage more consistently than some other materials-though installation details matter for long-term performance. A metal roof can also help a home maintain its exterior appearance after a storm, which is a practical point for houses in neighborhoods with preserved facades. If choosing metal, consider panel profiles that handle Colorado-style wind gusts and ensure proper sealing at seams to minimize moisture intrusion after heavy rains.
Clay tile, concrete tile, wood shakes, and synthetic shingles are all present locally, but their suitability depends on how they handle Garland's hail, wind, and heat cycle rather than aesthetics alone. Clay and concrete tiles can offer strong longevity in hot conditions, but they may be more prone to hail-related cracking and require careful installation to resist wind uplift. Wood shakes provide a distinctive look but can be vulnerable to hail and humidity without proper maintenance. Synthetic shingles offer versatility and good impact resistance in some formulations, yet performance varies by product line. In each case, consider how the material behaves under repeated sun exposure and winter-spring storm cycles, and prioritize products with solid hail resistance ratings and proven wind uplift performance.
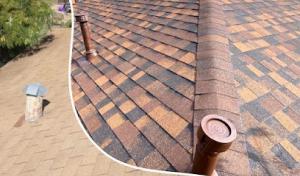
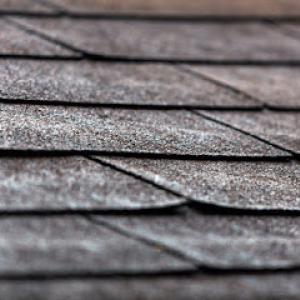
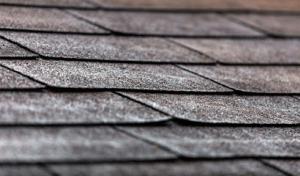
In Garland, repeated hail and wind exposure can create damage patterns that are easy to miss from the ground until an insurance inspection or leak reveals them. Sunken granules, bruised shingles, and lifted edges often hide under overhangs or along the lower slopes where gutters collect debris. Look for irregular colour changes, soft spots, and granule-free patches that don't match neighboring sections. A roof that looks sound from street level can carry unseen fractures that weaken its ability to shed water during a heavy storm. Plan for a careful, up-close check after storms, and document suspect areas before any contractor climbs the ladder.
Strong UV exposure in the Dallas-Fort Worth area can shorten the useful life of heat-sensitive roofing components even when storm damage is not obvious. Dark shingles may fade unevenly, seals around penetrations can dry, and underlayment may become brittle. The heat can accelerate wear on vents, boots, and flashing, especially where metal and roofing materials meet. In hot months, sun exposure compounds wind-driven damage, making ordinary wear look more severe than it is. If components feel unusually warm to the touch, that can signal accelerated aging.
Because many homes are in established neighborhoods with added penetrations and roof accessories, leak sources often involve transitions rather than only field shingles. The chimney, vent pipes, skylights, and roof-to-wall joints are common trouble spots. Look for caulk deterioration, raised nails, and misaligned flashing where two planes meet. A small drip at a ceiling can trace back to a seam or boot several feet away, so follow the line of water progress rather than focusing on the visible stain alone.
After severe weather, photograph from multiple angles, map the roof, and note any granule loss around downspouts. Keep a weather calendar of hail events and track repairs, as insurers frequently request history. When contacting a professional, require a detailed inspection that covers field shingles and transitions alike, with emphasis on flashing, penetrations, and attic ventilation. Maintaining a cautious, methodical record helps in navigating the insurance process and choosing repairs that truly restore performance. Keep all receipts and note any temporary measures you take.
Find contractors experienced in skylight installation, flashing, and leak repairs to bring natural light into your home.
R2 Roof Guys
(214) 405-4396 www.r2roofguys.com
675 Town Square Blvd Unit 255, Garland, Texas
5.0 from 61 reviews
Firehouse Roofing
(214) 531-6944 firehouseroofing.com
423 W Interstate 30, Garland, Texas
4.9 from 55 reviews

Peacock Roofing
(972) 362-4166 www.peacockroofing.com
1209 N.W.Hwy Suite 326, Garland, TX
4.9 from 34 reviews
In this high-claim North Texas insurance environment, hail and wind losses shape how carriers approach coverage terms and claim handling. After a major storm cycle, the tone from many carriers can shift toward tighter interpretation of roof-related damage, and that reality affects every homeowner's claim path. The weather pattern around Dallas-Fort Worth keeps your roof under repeated exposure, so you should prepare for a careful, sometimes slower, review rather than an automatic approval.
Homeowners should expect adjusters to review roof age and pre-loss condition carefully because DFW carriers often tighten scrutiny after major storm cycles. That means the documentation you gather now matters later: a roof with pre-existing wear or signs of aging can be treated as contributory damage, even if hail hits appear around edges. Be prepared to discuss previous repairs, venting, and flashing to avoid misinterpretation of newer impacts.
Detailed photo records, date-stamped storm notes, and prompt condition assessments are especially important in Garland because regional claim volume can delay or complicate approvals. Take clear daylight photos from multiple angles, include gutters, chimneys, and attic access, and store them with timestamps. Keep a simple storm diary: dates, wind speeds, hail sizes, and any on-site observations. A contractor's written assessment can help corroborate your own notes, reducing back-and-forth.
If a storm hits, initiate documentation within 24 to 48 hours when possible. Delays can create gaps that carriers later question. Maintain a centralized folder of all communications, estimates, and photos. Consistency in records helps prevent last-minute disputes and supports a smoother evaluation, even as the storm cycle continues to ripple through the local market.
Keep notes on contractor communication about report timing, replacement scope, and temporary protections. In the long run, thorough records reduce frustration and improve odds of a fair settlement.
Connect with contractors who help homeowners navigate the claims process from damage assessment to final approval.

Inspiration Roofing & Construction
(214) 799-4793 www.inspirationroofing.com
3960 Broadway Blvd STE 232, Garland, Texas
5.0 from 128 reviews
R2 Roof Guys
(214) 405-4396 www.r2roofguys.com
675 Town Square Blvd Unit 255, Garland, Texas
5.0 from 61 reviews
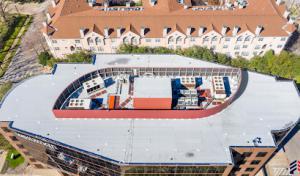
Although it stays primarily a residential reroof market, contractor signals show meaningful local demand for flat or low-slope work alongside standard pitched systems. In Garland, these roof types often show up in townhome clusters, ranch-style lots, and newer builds where flat roofs or low-slope sections are paired with solar arrays. If you're replacing shingles and considering a hybrid approach, plan early for the transition-especially where insulation, ventilation, and drainage are concerns. Solar-ready details can help avoid rework when panels are added or removed for roof maintenance.
Hail and wind events in the DFW area tend to impact flat sections differently than steep pitches. Low-slope surfaces can experience faster granule loss, exposed membrane seams, or punctures in reflective coatings, while solar mounting hardware can suffer if a storm shifts the racking or panels. After a severe event, inspect for ponding, edge ponding near parapets, and compromised underlayment. If shallow or flat areas are damaged, avoid long exposure times to standing water and temporary seal any openings to prevent interior moisture intrusion. For solar installations, check that panel bolts, rails, and flashing stayed locked in and that combiner boxes and wiring are dry and undamaged.
Solar roofing in this market matters for reroof timing, given panel removal and reinstallation needs. Plan a coordinated schedule with your roofer and solar installer so that the panel work aligns with deck replacement or membrane work. In established suburban neighborhoods, HOA rules can influence color, material, and mounting details, so confirm any covenants before ordering low-slope materials or panels. If the project involves flat sections, ensure the chosen membrane or SBS-modified asphalt products pair well with future solar maintenance access and common-area drainage angles.
Begin with a documented damage assessment that includes photos of any hail impact, edge damage, and flashing misalignments. Note any drainage changes on the low-slope portions and verify that surrounding landscaping won't impede water flow toward scuppers or drains. When selecting materials, ask about compatibility with solar racking and the ease of panel removal without disturbing the roofing membrane. Finally, keep a simple, homeowner-friendly record of all communication with contractors and the projected sequence for reroofing and panel work to smooth out weather-driven delays.
Find specialists in TPO, EPDM, and built-up flat roofing systems for residential and commercial properties.
Wilco Contractors
(972) 303-8882 wilcoroofing.com
675 Town Square Blvd Bldg 1A Suite 200, Garland, Texas
4.9 from 85 reviews
Rowe's Roofing
(972) 276-1978 rowesroofing.net
5322 Anchor Bay Dr, Garland, Texas
4.5 from 19 reviews