Last updated: Apr 19, 2026
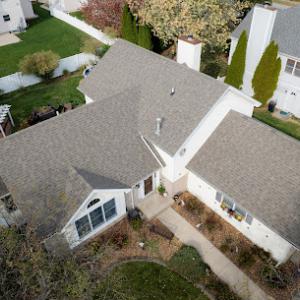
In Hobart and the broader Northwest Indiana market, wind and hail claims are a major driver of roof replacement decisions rather than age alone. That reality means your roof's fate often hinges on what happens in the hours and days after a storm, not how many years it's carried shingles. Spring hailstorms and high winds are a stated seasonal risk, making post-storm inspection timing especially important before leaks show up later. If a shingle edge or flashing takes a direct hit, the damage may not surface immediately but can become a costly, invasive repair soon after.
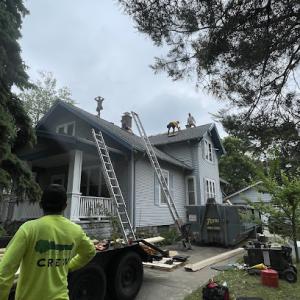
When the sky clears, an immediate, thorough roof check should be near the top of your to-do list. In Hobart, wind-driven granule loss, lifted shingles, and dented flashing are common indicators of more serious interior risks lurking beneath. Elevate a ladder carefully, and inspect from the ground for color changes, exposed underlayment, and visible gaps along the ridge and valleys. If a tree limb or hail impact left a visible dent or nick in the metal or shingles, treat that as a red flag requiring professional inspection before the next rain or freeze cycle. Delays can turn a survivable bruise into a leak path and then into water damage that compounds the claim scope and repair complexity.
Indiana carriers commonly expect thorough pre- and post-damage documentation, site photos, and quantified damage summaries before approving roof-related claim scope. Gather rapid, clear evidence: wide-angle exterior photos showing overall roof condition, close-ups of hail hits and lifted tabs, vent and flashing details, attic conditions if accessible, and any interior signs of moisture. Create a simple damage log with dates, storm intensity, and note locations of any compromised flashing, chimney/vent connections, and edge leaks. If a roof has multiple elevations or unusual shapes common in local homes, include plan-view sketches or lines of sight that explain how the storm affected different sections. This is not just for the initial claim-it streamlines the adjustment process and can prevent disputes over what is considered "storm-related" versus pre-existing wear.
A storm-driven replacement in this market tends to proceed faster with a contractor who understands the nuances of Northwest Indiana roofs, including how wind-driven hail interacts with common local assemblies. Look for crews that emphasize accurate flashing, venting, and nailing practices, matching the level of scrutiny the city often applies during replacements. Timing matters: a prompt, well-documented inspection and an organized claim package reduces back-and-forth with adjusters and minimizes the risk of partial scopes that leave you paying out-of-pocket later. In the aftermath of a spring storm, a clear, action-focused plan helps move from assessment to secure, long-lasting protection before the next season's cycles arrive.
Find local contractors experienced in assessing and restoring roofs after hail, wind, and severe weather events.
CMA Exterior Remodeling
(219) 331-0129 cmaexteriorremodeling.com
1025 W 8th St, Hobart, Indiana
5.0 from 24 reviews

Roman's Roofing
(219) 838-9111 romansroofing.net
405 Main St, Hobart, Indiana
4.8 from 348 reviews
We are a licensed, bonded, and insured home improvement company in Northwest Indiana, with years of experience in roofing, siding, windows, and other renovation projects. We serve Lake County Indiana and the surrounding towns and areas including; Cedar Lake, Crown Point, Dyer, East Chicago, Gary, Griffith, Hammond, Highland, Hobart, Lake Station, Lowell, Merrillville, Munster, Schererville, St. John and Whiting. We do the job right using quality materials and expert installers at a fair price. Your project will be completed efficiently and to factory specifications. We can help make your home maintenance free, more energy efficient, and the envy of your neighbors.
CMA Exterior Remodeling
(219) 331-0129 cmaexteriorremodeling.com
1025 W 8th St, Hobart, Indiana
5.0 from 24 reviews
CMA Exterior Remodeling specializes in residential Roof Service and Installation, and Exterior finish service/repair. We are the premier roof repair service with sucess in solving industry failure as well as providing service for routine maintenance. We specialize in repairing asphalt shingle roofs, we repair/service skylights,chimneys, sewer stacks, wall flashing, and other petrusions through roof. Our service is designed to enhance the appearance and functionality of your home's exterior finish with durable and long-lasting protection. We also do routine inspections and provide gutter cleaning service , and now offering solar panel cleaning ! (Basic No Chemicals)
Ruel Roofing & Siding
(219) 942-0611 ruelroofingandsiding.com
340 IN-130 #130, Hobart, Indiana
4.5 from 34 reviews
Ruel Roofing & Siding is a Roofing Contractor located in Hobart, IN. We specialize in Roofing Service, Shingle Roofs, Siding Service, Flat Roofs, Gutter Roofing Repairs, Roofing Repairs, Roofing Inspections, Rubber Roofs Service, Single Tear Off Service, and Roof Installation Service. We're Ruel Roofing & Siding, and we’re a premier roofing contractor for over 40 years.Located in Hobart, IN. We specialize in new construction, repair, and installation of roofing and siding. We’re licensed, bonded, and insured, so you can rest assured that your home or business is in good hands when you choose us. Contact us today for more information and services!
Artisan Quality Construction
(219) 400-3358 artisanqualityconstruction.com
330 N Lasalle St, Hobart, Indiana
4.8 from 17 reviews
We provide many services including roofing, asphalt shingle roofing, gutter installation, gutter repair, gutter replacement, downspout cleaning, asphalt shingle roof installation, asphalt shingle roof repair, flat foam installation, single ply roof installation, metal roof installation, wood shake roof installation, siding installation, home repair, and home improvement. Being a locally owned and operated business, we’ll arrive in a timely manner and provide work that exceeds your expectations. Customer satisfaction is our number one priority. We provide high quality work and make after service calls. We offer competitive pricing and provide free quotes.

Alpha Storm Solutions
(219) 945-9518 www.alphastormsolutions.com
3641 Randolph St, Hobart, Indiana
4.3 from 27 reviews
Alpha Storm Solutions provides roofing, roofing repair, siding, soffit, fascia, and gutter services to the NWI area since 2018. We work hand in hand with your insurance company to maximize your claim. Stop by to visit or call us today for a FREE property inspection.

Armour Construction
(219) 987-2023 www.armourconstruction.net
Serving
4.8 from 95 reviews
Armour Construction stands among Indiana’s most reliable roofing companies, known for honesty, precision, and five-star results. As a professional roofing contractor, we handle every project with care—from roof installation and roof replacement to repairs and inspections. Our team uses trusted materials and proven techniques built to handle Indiana’s changing weather. Every roof is installed with lasting protection, energy efficiency, and curb appeal in mind. At Armour Construction, you’ll find clear communication, dependable service, and craftsmanship that stands the test of time. Whether you’re upgrading your home or fixing storm damage, we make sure your roof and your experience are built to last.

STARS Roofing & Masonary
Serving
4.4 from 9 reviews
We are a 24/7 emergency service company servicing all of indiana & Chicagoland in all types of home remodeling including interior & concrete we are licensed-bonded-insured

Commercial Roofing Group Northwest Indiana
(219) 316-0404 commercialroofinggroupofnorthwestindiana.com
Serving
5.0 from 3 reviews
We offer all types of commercial and industrial flat roofing services, we have over 20 years of experience in the roofing industry, so call today for your free roof evaluation, We are licensed and insured. Same day service, Emergency roof repair available. Serving northwest Indiana and south Chicago
Edwin's Roofing & Gutters
(219) 292-4233 www.edwinroofing.expert
Serving
5.0 from 9 reviews
Edwin's Roofing and Gutters provides comprehensive roofing, gutter, and siding services in the Gary area. We serve homeowners and businesses alike, offering everything from new installations to repairs and cleaning. You can rely on our experienced team for quality workmanship, delivered safely, efficiently, and at a fair price. What sets us apart is our commitment to clear communication and dependable service, ensuring your peace of mind. With free estimates and prompt responses, we make property maintenance easy. Contact us today for a quote, and let Edwin's Roofing and Gutters take care of your property.

Stash Property Restoration
(219) 924-0266 stashpropertyrestoration.com
Serving
4.5 from 215 reviews
Stash Property Restoration is an interior and exterior full-service general contractor specializing in restoration, roofing, and remodeling in the Northwest Indiana and Chicagoland areas. Our top-notch team provides construction expertise, superior products, and an exceptional result from minor repairs to entire transformations. Your home has been our purpose for nearly 40 years. Contact us today to schedule a free in-home estimate! Available 24/7 via phone for emergency mitigation services.
Turnak Roofing
(219) 884-4612 turnakroofinginc.com
Serving
4.2 from 15 reviews
Since 1936, Turnak Roofing, Inc. has been a pillar of excellence in roofing services across Northwest Indiana. As your trusted local experts, we bring unparalleled precision and dedication to residential, commercial, and industrial projects alike. Our fully licensed and bonded team boasts extensive certifications, underscoring our commitment to quality. Whether you're in need of new roofing, repairs, or maintenance, turn to us for the highest standards of durability and craftsmanship. Discover peace of mind and exceptional service with Turnak Roofing, Inc.—your roofing specialists redefined.
Beaver Roofing
(219) 810-6170 thebestdamroof.com
Serving
5.0 from 83 reviews
Beaver Roofing is your local expert roofing contractor, proudly serving Northwest Indiana homeowners. Offering tailored roofing solutions — whether your home needs a roof repair or a full roof replacement. Our 'Dam Right It's Watertight' guarantees your roof will protect your family and home from the elements. Plus, our step-by-step approach makes the process smooth and stress-free. We’re proud to provide 'The Best Dam Roof' backed by quality, craftsmanship, and our word.
Cold winters in Hobart create repeated freeze-thaw cycling, a key local wear pattern that can open up shingle seals, stress flashing details, and worsen small leaks. This cycle grips the roof at the seams and around penetrations, then loosens them as water freezes and expands before refreezing. In practice, that means small creaks, tiny drips, and hairline cracks become recurring concerns each year. A roof that looks solid in late summer may show new signs of stress after a string of below-freezing fronts, so expect minor issues to reappear as winter temperatures swing.
Snow loads are a stated seasonal concern in Hobart, affecting both scheduling and how vulnerable older roof systems perform through winter. Accumulated snow can press down on vulnerable spots and slow-mickeling drainage, pushing water toward the most exposed flashing and joints. When planning winter-related work or inspections, anticipate that days with heavy snowfall or rapid thaw cycles may force delays or create spillover from gutters and valleys. A roof that has already withstood a few freeze-thaw cycles tends to show weaknesses sooner under snow load, and those weaknesses can complicate timely repairs if access becomes limited by weather.
Warm, humid summers follow those winter cycles, so roofs in Hobart are exposed to both cold-weather cracking pressure and summer expansion in the same year. The heat drives the asphalt or other sheathing materials to expand, which can open up marginal flashings and tighten seals that froze and contracted during winter. In other words, the same roof must handle cycles in two very different directions within a single year. Metal and shingle surfaces may show more pronounced waviness, cupping, or edge checking after a hot spell, especially on roofs with older underlayments or compromised venting.
When surveying a roof after winter or during a thaw, look for pinhole leaks along eaves and around penetrations where sealants have aged. Check valley metal and flashing pans for wrinkling, denting, or lifting, which common winter wind bursts can aggravate. Inspect vent stacks and chimney flashings for loose or corroded fasteners, since repeated freeze-thaw cycles tend to work fasteners loose over time. In summer, watch for soft or curled shingles and any early blistering if the roof has experienced rapid temperature swings. A careful, cycle-aware eye can catch issues before they become costly leaks.
To minimize stress from freeze-thaw cycles, perform a fall exterior quiet check focusing on sealants around vents, pipes, and dormers. Clear debris from gutters and downspouts to keep meltwater moving away from fascia and flashing, reducing ponding that magnifies freeze-thaw damage. In late winter or early spring, recheck flashing details where ice damming tends to lift seals, and address any signs of moisture intrusion behind siding or under attic insulation. Summers should be used to address sun-worn shingles, reseal exposed penetrations, and verify underlayment integrity, particularly on roofs with older materials or complex vent networks. Regular, seasonal attention helps a roof stand up to Hobart's distinctive rhythm of cold snaps followed by warm humidity.
When you can't wait, these contractors offer fast response times to stop leaks and prevent further damage.


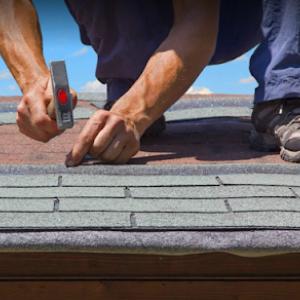
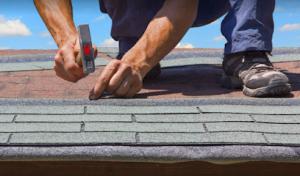
Asphalt shingles are the dominant practical choice in Hobart, and for good reason: they strike a balance between cost, availability, and repairability. In a climate shaped by Northwest Indiana freeze-thaw cycles and spring wind and hail, installation quality and sealing performance matter more than brochure lifespan. Look for a contractor who commits to precise nailing patterns, proper roof deck preparation, and upgraded underlayment in areas prone to ice damming. Pay attention to flashing at valleys, chimneys, and dormers, since winter moisture and thaw cycles stress seals differently than smooth summer weather. In this market, the value of a careful, weather-aware installation cannot be overstated.
Metal roofing is a strong fit for snow shedding and storm resistance, which aligns with Hobart's exposure to wind-driven hail and heavy spring storms. The material performs well when installed with attention to thermal movement: fasteners and panel edges must accommodate expansion and contraction through hot summers and cold winters. In this climate, the way the metal panels are sealed at joints, and the method used to seal penetrations (vents, skylights, and gutters), matters as much as the panel choice itself. A competent installer will address potential ice buildup at eave lines and ensure that the underlayment and venting integrate with existing attic moisture controls to minimize condensation.
Clay tile, concrete tile, wood shakes, and slate are present in the market data for Hobart, but their weight, brittleness, moisture behavior, or maintenance needs make contractor experience especially important in Northwest Indiana conditions. Clay and concrete tiles demand a structurally capable roof deck to handle weight, and both can crack under freeze-thaw stress or hail impacts if not properly specified. Wood shakes react to humidity and temperature swings, with potential for quicker deterioration if ventilation or drainage around eaves isn't optimal. Slate offers exceptional longevity but carries a high installation sensitivity to substrate condition and nail placement; missteps here can lead to costly repairs after winter storms. In all these options, work with a contractor who has a proven track record for careful fastener patterns, appropriate underlayment choices, and meticulous flashing details in the region's climate.
Hobbyist-level considerations won't suffice in Hobart's mixed exposure environment. The best roof choice depends on how the home sits on the lot, how wind and hail currents move across the street, and how well the attic moisture is managed through the seasons. For most homes, prioritize installation quality, proper sealing, and venting, followed by matching the material's behavior to the local freeze-thaw rhythm and spring storm intensity. A thoughtful selection paired with a reliable installer translates into a roof that stands up to Hobart's unique weather story.
Provided Hobart market ranges run about $350 to $550 per square for asphalt shingles, $600 to $900 for metal, $900 to $1400 for clay tile, $800 to $1200 for concrete tile, $500 to $800 for wood shingles or shakes, and $1000 to $1800 for slate. In Hobart, those numbers reflect the local labor pace, material sourcing, and the way crews sequence reroofs across a neighborhood after a storm. When planning, expect asphalt shingles to be the most common and the most budget-friendly option, with metal and tile offerings carrying higher material and installation windows. For homeowners facing more complex roof geometries or older structures, costs can drift upward quickly if specialty underlayment or precise flashing details are required to meet local expectations after severe weather.
Storm-driven demand spikes in Hobart can push scheduling pressure and pricing after spring hail and wind events, especially for full reroofing crews. In practice, that means a storm clear-up phase often coincides with tighter work calendars and shorter availability for crews to commit to a full reroof. If a roof shows widespread hail damage or wind uplift, the contractor may need to sequence material deliveries and crew time with caution, which can temporarily elevate project timelines and prices. Homeowners should anticipate limited window availability in the wake of a major spring or early-summer storm and plan accordingly for a faster-paced project start once a contractor commits to the reroof.
Hobart's mix of freeze-thaw cycles, spring wind events, and exposure to hail informs both material choices and installation details. Asphalt shingles are often favored for their balance of resilience and cost, while metal can offer longer life under wide temperature swings. Tile and slate, though premium, address longevity in a climate with freeze-thaw stress and wind-driven challenges. Expect additional care in nail patterns, flashing, and venting to be emphasized by local crews, especially on steeper pitches or roofs with unusual angles. Budget a cushion for higher labor intensity on larger or atypical roof designs, where precise nailing and venting become more critical to long-term performance.
Get a clear picture of your project costs upfront - no commitment required.
Artisan Quality Construction
(219) 400-3358 artisanqualityconstruction.com
330 N Lasalle St, Hobart, Indiana
4.8 from 17 reviews
A full reroof in Hobart typically requires a permit issued by the City of Hobart Building Department. Before any shingles come off or new decking goes on, a permit sets the stage for inspections, drainage considerations, and proper flashing details that are easy to miss during a rushed job. If the contractor skips this step, the risk isn't just a fine-it's the likelihood of a partial or failed permit record that can haunt you when you go to sell or refinance.
Once the crew finishes, the city conducts a final inspection that verifies underlayment, flashing, venting, and adequate nailing rather than treating reroofing as paperwork only. That means the inspector isn't just checking the visible layer of shingles; they verify that the layers beneath are properly fastened, sealed, and vented to prevent leaks and ice dams during winter cycles. In practice, this can translate into reworking certain details on the roof if the initial installation didn't align with the city's expectations for workmanship and safety.
Larger roofs or atypical designs in Hobart may trigger added documentation or plan review before work proceeds. If your home has an expansive roof reach, complex pitches, or unusual venting configurations, anticipate extra plans, drawings, or engineering notes to accompany the permit. The city's review is intent on preventing overlooked gaps where wind-driven hail, freeze-thaw cycles, or improper flashing could compromise the roof in the years to come. Expect conversations about eave closures, ridge vent strategy, and how newly installed materials tie into existing drainage paths.
To navigate this process smoothly, have your contractor prepare a clear, city-compliant submission that outlines the intended underlayment, flashing transitions, venting scheme, and nail patterns. Confirm with the contractor that the permit is filed before work begins and that a final inspection is scheduled promptly after installation. If any deviations from standard practice are proposed, ensure they are documented and reviewed as part of the permit package. This proactive approach reduces the chance of delays and helps protect the roof through Hobart's demanding freeze-thaw and wind-prone seasons.
In Hobart, wind and hail storms are more than temporary nuisances-they drive real insurance activity. Claims often hinge on the documented condition of your roof before and after the event, with insurers scrutinizing flashing, venting, and nail patterns as part of the evaluation. Expect a careful, photos-first approach from adjusters.
Adjusters in this market may ask for site photos and quantified damage details, so homeowners benefit from documenting conditions before temporary repairs or debris removal. Take wide shots of the roof from multiple angles, then close-ups of lifted shingles, granule wear, and any hail impact marks on gutters or siding. Keep records dated and organized.
Ice damming, wind uplift, and hail bruising can complicate repairs, especially after a freeze-thaw cycle. The difference between a simple repair and a full replacement often comes down to how well the damage is proven and how the roof structure appears in photos. Be prepared for a second review if initial findings leave any questions about concealed damage.
Coverage specifics and deductible treatment can vary by carrier, which makes scope review especially important before signing a full replacement contract. Understand what your insurer considers an eligible repair versus replacement, and ensure the scope aligns with the roof's actual condition. Misalignment can lead to unexpected out-of-pocket costs or delays.
Skylights show up as a notable trouble area in Hobart's contractor market, with flashing and leakage around these penetrations routinely addressed after wind, hail, and freeze-thaw cycles. The combination of seasonal stress and aging seals means skylight flanges, curb connections, and surrounding roofing material are common failure points. Expect to see recurring discussions about venting and flashing compatibility with the skylight curb, especially on older roofs or where vent pipes nearby share the same flashing plane.
In practice, the weakest link is where the skylight intersects the roof deck and wall plane. Look for degraded or missing step flashing along the side of the skylight, and for improper integration between the skylight flashing and metal edge flashings. Condensation and ice buildup can creep under gaps exposed by wind-driven rain, so inspect the sealant beads and the top flange for cracks or lift. If the chimney is adjacent, ice damming can push moisture toward the skylight from the masonry joint, amplifying leaks at that junction.
On reroof projects, expect the final inspection to scrutinize skylight and chimney penetrations closely. The contractor should show continuous, properly seated flashing around the skylight curb, with step flashing stepping up the sides and a compatible, weather-tight termination at the top. Confirm that any vent penetrations near the skylight are properly flashed and sealed, and that the roofing underlayment wraps up behind the skylight curb to prevent capillary wicking. For chimneys, ensure mortar joints are sound and that flashing integrates smoothly with the roofing material to resist freeze-thaw movement.
If a leak is suspected near a skylight, dry the area and inspect for crown gaps along the curb, missing or aged sealant, and any displaced shingles or tiles adjacent to the skylight. Have the flashing re-seated and resealed, and request confirmation that the skylight curb is flashed on all sides with compatible materials. When discussing repairs with a contractor, ask specifically about how they handle the transition between skylight flashing and the surrounding roof plane to withstand Hobart's freeze-thaw and wind cycles.
Find contractors experienced in skylight installation, flashing, and leak repairs to bring natural light into your home.
CMA Exterior Remodeling
(219) 331-0129 cmaexteriorremodeling.com
1025 W 8th St, Hobart, Indiana
5.0 from 24 reviews
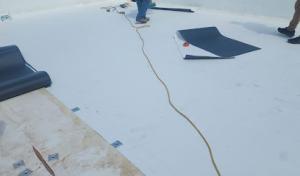
In Hobart, a meaningful share of homes and multi-unit properties rely on flat or low-slope roofs, so hiring with a contractor who actively works on low-slope repair or replacement isn't optional-it's practical. Flat-roof work tends to involve tighter tolerances around drainage, flashing transitions, and edge detailing, especially on rebuilds where wind-driven rain and hail can exploit weak seams. When planning a low-slope project, expect crews to emphasize careful membrane selection, edge terminations, and compatible color and flashing materials that hold up against our winter wind loads.
Winter snow loads and repeated freeze-thaw cycles in this region make drainage performance on low-slope sections more critical than on steeper main roof planes. A practical approach is to prioritize a tested drainage plan that accounts for pitch, scupper or gutter capacity, and overflow paths. Insist on properly mitered and sealed seams, thoughtfully placed penetrations, and robust edge metal. In one-story additions or attached garages, where slopes are often mixed, ensure the drainage strategy matches the adjacent roof area to prevent water pooling that can freeze and back up into flashing and penetrations.
Because inspectors verify underlayment, flashing, venting, and nailing on reroofs, mixed-slope homes and attached garage sections require careful scope planning rather than a one-size-fits-all replacement approach. Each low-slope zone should have its own detailing plan, including how flashing transitions from the main roof to the garage roof, how vents are routed, and where drainage paths intersect with parapets or wall terminations. The goal is a cohesive, code-conscious system that resists wind-driven water ingress and ice dam risk while preserving the integrity of adjoining steeper roof areas.
Find specialists in TPO, EPDM, and built-up flat roofing systems for residential and commercial properties.
Artisan Quality Construction
(219) 400-3358 artisanqualityconstruction.com
330 N Lasalle St, Hobart, Indiana
4.8 from 17 reviews
In Hobart, winter conditions can slow replacement schedules because snow, ice, and freeze-thaw cycles affect tear-off safety and installation consistency. Plan for potential weather-related delays and keep a flexible window for the project to prevent rushed work during cold snaps.
Tear-off and re-nail work becomes progressively harder as temperatures drop and ice forms on the roof. If a job must start in winter, expect shorter daylight hours and more careful shingle handling. It's wise to target work when daytime temps stay above freezing, and to clear the site of ice dams before crews arrive to minimize slip hazards and material damage.
Spring is a high-risk season locally because hail and wind can damage roofs just before or just after planned work, complicating timing and insurance documentation. Schedule during a stretch of calmer weather if possible, and have a contingency plan for windy or hail-prone days. If a claim is involved, keep documentation current and coordinate with the insurer to avoid gaps between assessment and replacement.
Summer heat and fall moisture are both listed local risks, so homeowners often need to balance installation conditions against attic ventilation and leaf-related moisture concerns. Hot attic temperatures can affect shingle, underlayment, and ventilation performance, while falling leaves create debris in gutters and vents. Schedule aim for mornings when heat is lower, and set up adequate attic venting prior to work to reduce moisture buildup.
Do not rush a tear-off after a storm; insist on a weather window that minimizes prolonged exposure to temp extremes. For insurance-backed projects, align the start with a calm stretch in spring or early summer, and keep contingencies for sudden weather changes. Prioritize crews trained for local conditions, including safe handling on slopes and around aged venting and flashing.
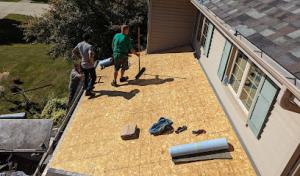
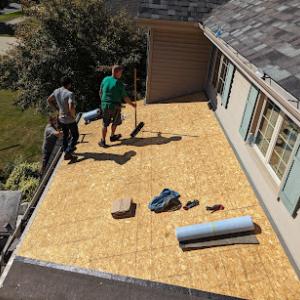
Re-roofing is the strongest contractor signal in this market, so you'll notice homeowners usually hire crews with solid replacement experience rather than niche new-construction work. Look for a track record of full tear-off, nailing patterns, flashing integration, and venting updates on homes similar in age and style to yours. A crew that has weathered Northwest Indiana winters and spring hail often handles the unusual strain of bite-sized seasonal storms better than a generic roof crew.
In Hobart, quick response after a storm is a real expectation, and cleanup after tear-off is just as important. Ask how long a typical job takes from start to finish, and whether debris containment and daily site tidying are included. A strong sign of local reliability is a crew that shows up with a plan for minimizing disruption, protecting landscaping, and removing all waste every day. If you've got a driveway or garage that doubles as a staging area, confirm they'll keep it clear and presentable throughout the project.
Long-established, family-owned firms are common here, and homeowners weigh local tenure alongside price. Check how long the company has been serving this neighborhood and who will be supervising the project on site. A local owner-operator or a small, tightly run team often translates to better on-site communication and accountability when weather windows compress and timing matters. You'll want a crew that can coordinate with neighbors, especially during windy days when sheet-metal and underlayment work need careful handling.
Before any shingles fly, request a detailed on-site assessment. The crew should map out the tear-off scope, ventilation upgrade needs, and flashing reinforcement tailored to wind-prone and hail-affected areas. Ask for written notes on their expected sequencing: removal, deck assessment, underlayment refresh, drip edge, and final flashing where snow and ice pileups stress eaves. A transparent plan helps align expectations and reduces surprises when the project hits spring wind gusts.
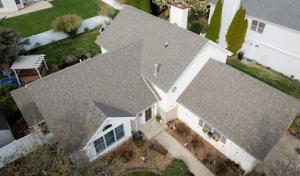
Hobart sits in the Northwest Indiana roofing market, where winter cold, spring storm activity, and humid summers all materially affect roof wear patterns. Freeze-thaw cycles push and pull at shingles and underlayment, while spring winds and hail can dent metal components and loosen flashing. The result is a roof that often shows accelerated granule loss, shingle cracking, and accelerated wear around penetrations like chimneys and vents. In practice, that means inspecting for wind-driven damage and hail impact after every major storm is essential, not just during routine maintenance.
The city's reroof process is more inspection-oriented than many homeowners expect because final approval checks installation details, not just completion. That emphasis matters for storm-led replacements: a roof is only as durable as how well flashing, ventilation, nailing patterns, and sealing are executed in the finished job. When evaluating bids, prioritize crews that explicitly walk through the flashing plan, venting adequacy, nail spacing, and underlayment warranty compatibility. A careful contractor will document each critical connection and show how the system resists water intrusion across seasons.
Local contractor specialization data shows homeowners most often seek help for storm damage, emergency repair, insurance coordination, and reroofing. In practice, this means you should expect a rapid assessment after a major wind or hail event, with a plan that addresses both immediate leaks and long-term durability. Look for teams with proven experience handling storm-related claims, who can translate weather-driven damage into a coherent reroof strategy that considers your attic ventilation, attic heat transfer, and overall roof slope.