Last updated: Apr 19, 2026
Dundalk sits on the Patapsco River-Chesapeake Bay side of Baltimore County, so roofs are exposed to humid marine air and wind-driven rain from coastal storm systems affecting the upper Bay. In this environment, storm-driven leaks don't always show up as a single gusher after a lull-water can travel along roof planes, under flashing, and sear into wall cavities before a visible drip appears. The combination of salt-laden air, Nor'easter winds, and freeze-thaw cycles makes moisture management a live concern for older rowhomes, capes, and low-slope additions.
Older Dundalk homes are especially susceptible to layered repairs, aging flashing, and vulnerable roof-to-wall transitions. Where multiple patches meet, seams can fail first during gusty rain events, and wind-driven spray can push moisture under shingles or under roof edge details. In many houses, leaks reveal themselves at eaves, near dormers, or along cornices where flashing has corroded or shifted. Coastal storms intensify this risk, so every post-storm period is a critical window to verify that the roof system is still performing as designed.
Act quickly after a storm to assess the roof and exterior envelope. Start with a straightforward, eyes-on check from the ground if safe: look for loose shingles, lifted edges, missing granules, and any staining along the fascia or soffit. If a ladder is used, have a second person stabilize it and avoid stepping on wet or mossy surfaces. Do not climb onto roofs that show signs of structural distress or missing framing support-these areas can be risky under any windy condition. In Dundalk, the combination of salt air and frequent Nor'easters means that even apparently minor flashing gaps can become active leak points after a storm.
The most common leakage points to inspect first are around roof-to-wall transitions, skylight or dormer flashing, and along roof edges where wind-driven rain can force moisture under the last layer of protection. Pay particular attention to metal step flashing at the intersections with walls, counter-flashing behind chimney openings, and the condition of sealants at perimeters. If the attic is accessible, check for condensation patterns, unusual dampness on rafters, and any staining on the underside of roof sheathing. In homes with low-slope additions, inspect valley areas and any previously repaired seams, as older layers often show wear first during heavy rain.
Documentation matters after a Bay-area storm. Take clear photos from multiple angles: roof face, flashing details, gutter attachments, and the interior signs of moisture on ceilings and upper walls. Focus on corners where wind-driven rain can push moisture inward, and on transitions where a patch might have degraded over time. Create a simple log noting the date, the storm's intensity (even a rough rainfall estimate), and what was observed inside and outside. This evidence-rich record helps with timely repairs and can guide the next steps when hiring a local contractor who understands the Bay's specific exposure.
If leaks appear, act on multiple fronts without delay. In the moments after a storm, place temporary waterproofing where safe-tarps over exposed roof sections can reduce further interior damage while a plan is set. Prioritize vulnerable lines of entry first: roof-to-wall transitions, flashing corners, and any area where interior staining begins. When choosing material replacements, consider systems that stand up to humid marine air and resist wind uplift; durability matters as much as appearance, given Dundalk's storm cycle. And remember: repetitive leaks during wind-driven rain often trace back to aging flashing or compromised transitions-address those first to stop the cycle.
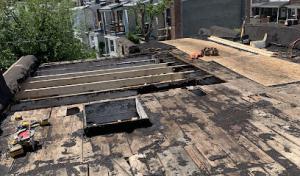
Dundalk's housing stock includes many rowhomes and modest detached homes with rear additions, porches, and low-slope sections that age differently than the main pitched roof. In these settings, low-slope areas absorb more moisture during Baltimore County's humid months, and winter ice can back up along the eaves where the addition meets the original structure. The cold, damp seasons often expose weaknesses in flashings and drainage that's been patched or neglected over the decades.
Low-slope roof areas in this part of the county are especially vulnerable when winter ice, spring rain, and clogged drainage combine on older additions. Look for standing water after a rain, soft or damp insulation in the attic above the addition, and dark staining along the edge where the flat roof meets the main roof. Transitions between the main roof and low-slope additions are a common weak point on older Dundalk homes because they concentrate flashing, runoff, and patch history in one area. If you see telltales like ice damming at the transition, or visible tar lines that don't extend fully, that's a signal to inspect the junction more closely.
Start with a walk-around after a heavy rain. Note any gutters that overflow or downspouts that discharge directly onto the roof edge. On rear additions, check the scuppers and overflow paths; blocked or undersized drains create the sort of moisture buildup that accelerates deck rot and edge deterioration. For the transition zones, pay attention to any gaps in flashing, mismatched sealant, or loose metal pieces. Older homes often have tar or field-applied cement at these points, which can crack or deteriorate with freeze-thaw cycles. If you find ponding water near the edge within 48 hours of rainfall, that area needs attention.
Begin with clearing clogged drainage and ensuring that gutters and downspouts funnel water away from the wall and foundation. Clean debris from the roof surface and inspect for membrane wear or punctures in the low-slope section. In transition zones, re-seal or replace deteriorated flashing, and consider upgrading to a single integrated flashing assembly that bridges the main roof and the addition without relying on patchwork. If the membrane appears aged, plan for targeted replacement of the affected portion rather than a full roof tear-off-this minimizes disruption to the home and helps protect the more vulnerable rear areas during the next storm cycle.
If the attic above the rear addition shows persistent dampness, or if ice damming recurs at the junction during February thaws, a professional should re-evaluate the flashing strategy and insulation details. A local roofer with Dundalk experience will know how the bay-facing humidity and salt-air exposure can affect fasteners, underlayment, and deck boards. Expect a careful assessment of the entire edge system first, then a plan that addresses the most vulnerable transition points before additional degradation spreads.
Find specialists in TPO, EPDM, and built-up flat roofing systems for residential and commercial properties.
High Quality Roofing Home Improvement
(202) 486-7217 www.highqualityimprovement.com
Two Offices Location: 8340 Old Philadelphia Rd,Rosedale, Maryland 21237, 6722 Holabird Ave, Dundalk, MD
5.0 from 15 reviews
1st Amazon C.S.LLC/ Roofing & More
(443) 804-7105 1stamazonconstruction.com
Serving
4.8 from 135 reviews
GMP Construction
(410) 772-4951 www.gmpconstructionmd.com
216 Sollers Point Rd, Dundalk, Maryland
5.0 from 92 reviews
GMP Construction offers service: Roofing Siding Gutters Framing Painting Concrete Demolition
MasterCraft Contracting
(302) 480-4811 www.mastrcraftroofing.com
Dundalk, Maryland
4.8 from 68 reviews
Remodeling professionals that specialize in solar, roof replacement, siding installation, window and door replacement, gutter & downspout installation, kitchen & bath remodeling, residential and commercial property renovation.
High Quality Roofing Home Improvement
(202) 486-7217 www.highqualityimprovement.com
Two Offices Location: 8340 Old Philadelphia Rd,Rosedale, Maryland 21237, 6722 Holabird Ave, Dundalk, MD
5.0 from 15 reviews
At High Quality Roofing we offer Free Roof Inspections. Free estimates with no obligations. we do roof replacement and roof lo repairs, more than twenty years of experience in roofing, We’re here to answer all your question about Roofing work as Shingles Roof Flat Roof Slate Roofs Skylights -Siding Gutters and Painting. also we do Interiors…………… Check out some of our customers about the experience they had with us. Deal directly to the roofer not sales person. Our estimates is 100% free and we can take care any type of work for you. At High Quality Roofing, we also offer Interior work as additions floors painting and much more!!. SERVING WASHINGTON DC AND MARYLAND !!!!!
J&F Construction
(443) 704-2510 jfconstruction2020.wixsite.com
7816 E Collingham Dr, Dundalk, Maryland
5.0 from 10 reviews
Minority owned business specialized in roofing, siding, flooring, house cleaning and maintenance. We at J & F construction are here to help and make our customers satisfied with our work. No job is too small nor to big that we can’t handle. Need free estimate call now to get set up and get an appointment with us. Roofing, siding, painting, cleaning, complete renovation, addition and new windows installations.
Mr. Lopez Roofing
Dundalk, Maryland
4.6 from 20 reviews
Mr. Lopez Roofing is a Roofing Company located in Dundalk, MD. We offer Roofing, Shingle Repair, Flat Roof Repair, Roof Installation, Residential Roofing, Commercial Roofing, Roofing Inspections, and other Roofing Services. Roof replacement is always a significant home repair, but we aim to move the process along as quickly as possible so you can enjoy your home again. Commercial roofing presents unique challenges, and we can manage everything from minor repairs to complete replacements. Contact us today for roofing in Dundalk, MD.

Bay Area Builders
(443) 695-6990 bayarea-builders.com
Serving
5.0 from 36 reviews
roofing and restoration
1st Amazon C.S.LLC/ Roofing & More
(443) 804-7105 1stamazonconstruction.com
Serving
4.8 from 135 reviews
*FREE ESTIMATES* I am Licensed, Insured, Bonded, & Minority Certified with over (20) years of experience in this Industry. I offer the following services: -Roof Certifications -Roof Inspections -Roof Repairs (All Types of Roofing) -Roof Replacement (All Types of Roofing) -Siding -Gutters -Downspouts & more
Roofs Are US
Serving
4.7 from 26 reviews
Local Roofing Contractors For Over 28 Years In Maryland. We specialize in Roof Repairs & Replacements, Siding Replacement and Deck Installations. Call Today To Schedule Your Fast & Free Estimate With Roofs Are Us!
Roofing Unlimited
(410) 501-5793 www.roofingunlimitedmd.com
Serving
4.4 from 15 reviews
Roofing Unlimited provides roofing, siding, skylights, gutters, downspouts, and 24-hour emergency services to the Baltimore, MD, area.
CRG Roofing & Siding
(410) 847-7663 chesapeakeremodelinggroup.com
Serving
5.0 from 507 reviews
Since 2000, Chesapeake Remodeling Group (now DBA as CRG Roofing and Siding) has been a reliable roofing company for Baltimore, Maryland residents and all surrounding areas. Whether your roof sustained damage in a recent storm or you are looking into a complete replacement as your roof nears the end of its lifespan, we’re the roofer to count on. We are a GAF Master Elite contractor affiliated with many top remodeling associations, including an A+ rating with the BBB, the National Roofing Contractors Association, and the National Association of the Remodeling Industry. We maintain our good standing with these esteemed organizations due to our commitment to always going above and beyond.
Toro Contracting
(443) 943-3007 torocontractingrllc.com
Serving
5.0 from 32 reviews
Toro Contracting is a roofing contractor based in Rosedale, Maryland, specializing in roof repair, full roof replacement, gutter services, siding installation, and emergency roof tarp after storm damage. We provide free roof inspections, honest estimates, and insurance claim assistance for homeowners affected by wind, hail, and water damage. Our team delivers high-quality results and reliable service in Baltimore, Essex, Dundalk, Parkville, White Marsh, and nearby areas.
Empire Home Remodeling
(443) 848-8449 empirehremodeling.com
Serving
5.0 from 40 reviews
Whether it's indoor, outdoor, commercial or domestic, Empire Home Remodeling provides roofing, gutter & window services to surrounding areas in Maryland. As certified roofing contractors, we strive to bring transparency, integrity, and quality to every customer. We recognize that home renovations can be confusing and stressful, which is why we vow to educate you on the quality of the products we use, and explain what is required to complete an installation every step of the way. Feel free to contact us today!
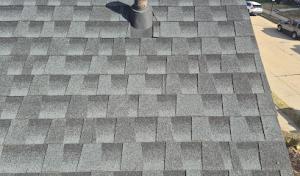
Asphalt shingles remain the practical backbone of most local homes. In this seaside-influenced climate, they accommodate the typical roof forms found on older rowhomes, capes, and low-slope additions without demanding heavier structural upgrades. They tolerate the freeze-thaw cycles and humid air, while offering straightforward maintenance and replacement when storm-driven leaks pop up after a heavy rain. When choosing asphalt, look for dimensional or architectural shingles with good nail sealant and a strong warranty, as these details matter for long-term waterproofing around chimneys, vents, and dormer penetrations. For homeowners facing moisture intrusion, a well-installed underlayment and proper attic ventilation amplify the shingle system's resilience against repeated salt-laden spray and driving rain.
Metal roofing can be a smart fit for a coastal-leaning environment, especially where you want fast shedding of rain and a durable surface. In Dundalk, the appeal grows when a metal roof sits over a simple footprint and a clean run of lines, minimizing potential wind-driven leaks. The real value, however, comes from how the metal is integrated with existing features such as chimneys, dormers, and additions. Older rooflines tend to complicate flashing, edge detailing, and valley work, so the success of metal here hinges on meticulous detailing at transitions and penetrations. If a metal option is considered, prioritize premium coatings and a design that accounts for expansion and contraction with seasonal humidity shifts. A professional who understands coastal wind patterns will pay careful attention to ridge venting and sealants that resist salt infiltration.
Clay tile and concrete tile can be visually striking and durable in dry climates, but their weight and rigid geometry often clash with Dundalk's typical roof shapes and older construction. If a tile choice is pursued, verify structural support and consider staged replacements to avoid overloading existing rafters. Wood shakes and synthetic products appear in the market, yet they are less typical for core housing stock due to weight, maintenance needs, and longer-term moisture sensitivity. Synthetic options may offer favorable moisture resistance and lower maintenance, but proper installation detailing remains essential, especially around eaves, soffits, and overhangs where salt air can linger. In all cases, ensure the chosen system can handle frequent Nor'easter winds and the spray zone influence near the bay.
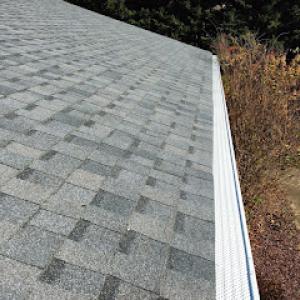
Storm-driven leaks often stem from aging penetrations and degraded flashing rather than the roof surface alone. Regardless of material, prioritize robust flashing around chimneys, dormers, valleys, and roof-to-wall interfaces. In older homes, roof deck condition matters; a careful inspection of sheathing for signs of moisture damage can prevent costly leaks after a harsh storm. Enhance moisture control with well-sealed gutters and downspouts that direct water away from fascia and siding, and consider a ridge or soffit vent strategy that keeps attic humidity in check without inviting condensation on cooler nights. For any system, a careful balance between material choice, local geometry, and transitional detailing will yield the most durable roof under the Bay's steady mix of wind, rain, and salt air.
In older rowhomes and low-slope additions, the combination of salty air and frequent freeze-thaw cycles can turn small drainage quirks into real moisture problems. When roofs aren't draining cleanly, meltwater refreezes at eaves and overhangs, forming ice dams that push water under shingles and into soffits. This isn't a distant threat; a few days of rapid temperature swing can let a minor gutter clog or slight pitch mismatch become a leak path. Regularly clearing debris from gutters, ensuring downspouts discharge away from foundations, and keeping a shallow slope clear in the eave line helps prevent that domino effect. If ice formation begins, address the eaves first and avoid driving water toward vents or attic openings.
Hot, humid summers in the harbor region can accelerate wear in underlayment and adhesives, especially on older roofs where materials have already endured salt spray and wind. Exposure-related drying and softening can shorten the window for a proper seal around vents, boot flashings, and transitions. The heat can also shift fasteners and loosen nail patterns if installation timing is rushed on exposed portions of the roof. Plan any mid-season work so that underlayment is not left exposed to peak afternoon sun for extended periods, and pair it with careful sequencing to allow adhesive bonds to cure in even, moderate warmth rather than in direct, prolonged sun.
Spring storm windows are risky for tear-offs in this area because heavy rain and wind can hit before replacement is fully dried in. A wet deck or damp underlayment after a late-winter thaw can compromise new layers before they cure, increasing the chance of hidden moisture locking in and later leaking through. If a full tear-off is scheduled in the spring, build in a contingency for drying days and consider staged removal to keep the roof from remaining open during the worst of the season. When a storm approaches, cover exposed areas promptly and avoid leaving a partially finished roof exposed to driving rain and gusty winds.
You'll want a simple, proactive cadence: after any significant freeze-thaw episode, inspect eaves, valleys, and low-slope transitions for telltale damp spots or small shingle lift. In summer, watch for adhesive ridges lifting or soft spots near ridge lines, which signal moisture intrusion and the need for closer inspection. Keep an eye on attic baffles and ventilation to prevent condensation from compounding the heat-driven stresses. A measured approach, aligned with the local climate rhythms, helps shore up vulnerable spots before minor issues bloom into costly repairs.
Dundalk falls under Baltimore County permitting rather than a separate city building department, so homeowners should expect county-level review and inspection procedures. When a roof project is planned, especially on older rowhomes and capes that sit close to the water, the county focuses on proper nailing patterns, underlayment, venting, and flashings to address storm-driven leaks. Your project success hinges on aligning with county codes and using qualified contractors who understand the Bay Area climate and salt air effects.
A full roof replacement generally requires a Baltimore County building permit, and contractors typically submit permit applications through the county's online system. Start by selecting a contractor who regularly navigates the county portal, gathers the required drawings, and highlights moisture-control details such as attic ventilation and secondary drainage. Keep in mind that the online system prioritizes accurate scope descriptions, material types, and anticipated start and end dates to smooth the review.
Inspections commonly include an installation or framing-stage review and a final inspection to confirm the roof work meets county code requirements. The framing-stage check focuses on structural integrity and proper attachment in wind-prone Dundalk environments. The final inspection verifies waterproofing details, flashing around dormers or chimneys, and the compatibility of new materials with existing masonry. Expect the inspector to look closely at ice-dam prevention measures and venting effectiveness, given Nor'easter-driven weather patterns.
Before applying, gather recent drawings or sketches showing attic layout, roof slope, and vent locations. Have a clear plan for underlayment type and drainage changes, if any, and ensure the contractor documents anchor points, step-flashings, and corner detailing. After submitting, monitor the portal for any plan corrections or additional submittal requests from the county. On inspection days, provide access to the attic and roof lines, and keep an unobstructed path for the inspector to verify connections and moisture control features.
Because Dundalk homes sit in a humid salt-air setting with late-winter freeze-thaws, county reviewers pay particular attention to corrosion-resistant hardware and proper sealing at roof-to-wall transitions. If the project involves replacing underlayment, confirm the county-approved material meets wind uplift requirements for low-slope additions common in the area. Knowing these nuances helps avoid delays and keeps storm-related moisture risks lower once the new roof is in place.
Asphalt shingles typically run about 350 to 800 USD per square, metal roofing about 700 to 1400, clay tile about 900 to 1800, concrete tile about 800 to 1500, wood shingles or shakes about 500 to 1100, and synthetic or composite shingles about 600 to 1100. In Dundalk, these figures are a baseline, not a promise, and actual numbers come with the specifics of your house. Older Dundalk rowhomes and capes often push per-square costs higher when tear-off, disposal, or intricate detailing is required.
Costs in Dundalk can swing based on older-home tear-off complexity, multiple roof sections and additions, chimney and flashing work, and whether storm demand has tightened scheduling across eastern Baltimore County. If you have a chimney chase, dormers, or a valley-heavy profile, expect extra labor and material costs. When spring storms drive demand, crews may band together tighter timelines, which can shift pricing and availability.
Budget-sensitive re-roofing is common in this market, but low-slope tie-ins, cleanup needs on tighter residential lots, and permit compliance can push pricing upward. If you're dealing with storm-driven leaks and moisture management on an aging roof, plan for a staged approach: address active leaks first, then schedule a full replacement in a way that minimizes disruption to the tight Dundalk lot. For tight lots, factor in debris containment and cleanup costs, and choose a contractor who can sequence work to reduce downtime.
Get a clear picture of your project costs upfront - no commitment required.
GMP Construction
(410) 772-4951 www.gmpconstructionmd.com
216 Sollers Point Rd, Dundalk, Maryland
5.0 from 92 reviews
High Quality Roofing Home Improvement
(202) 486-7217 www.highqualityimprovement.com
Two Offices Location: 8340 Old Philadelphia Rd,Rosedale, Maryland 21237, 6722 Holabird Ave, Dundalk, MD
5.0 from 15 reviews

J&F Construction
(443) 704-2510 jfconstruction2020.wixsite.com
7816 E Collingham Dr, Dundalk, Maryland
5.0 from 10 reviews
The local insurance environment shows moderate roofing claim activity from wind, hail, and Nor'easters, so homeowners should expect insurers to scrutinize storm timelines and damage photos. In a Bay-adjacent setting with salt air and frequent Nor'easter wind, the sequence of events matters: when a storm hits, when leaks become visible, and the timeline of any temporary mitigations. Documentation should be thorough but concise, with clear photos that capture edge details, flashing, and any interior moisture that traces back to the roofline. Keep a log of storm dates and any field observations, and align that with contractor notes to avoid gaps that could slow the claim.
Adjuster site visits are common after severe events in this region, and carriers may request both pre-work and post-work documentation before finalizing payment. Make sure pre-work photos show existing conditions and any pre-storm mitigation steps already taken. After work begins, maintain a separate record of materials delivered, timelines, and work crew notes. When the adjuster arrives, provide access to attic spaces and under-eave areas if safe, and have copies of prior inspection reports ready. The aim is to present a coherent story: what failed, when it failed, and how the repair or replacement aligns with the storm's impact.
Coverage terms can change after major storm periods, making it important for homeowners to review deductibles, exclusions, and depreciation treatment before authorizing full replacement. Depreciation and eligibility for depreciation holdbacks can influence the pace of reimbursement, especially after a long sequence of storms. If questions arise about which components are covered-underlayment, flashing, or vent seals-prioritize transparent dialogue with the insurer and the contractor. The goal is to secure a settlement that reflects actual damage without leaving unseen weaknesses exposed to future weather events. If a claim is denied or toward partial approval, request a written rationale and consider a second opinion from a qualified local roofer who understands the board and weather history of the neighborhood.
Connect with contractors who help homeowners navigate the claims process from damage assessment to final approval.
MasterCraft Contracting
(302) 480-4811 www.mastrcraftroofing.com
Dundalk, Maryland
4.8 from 68 reviews
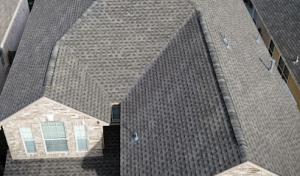
In older Dundalk roofs, masonry chimneys and patched penetrations often become leak points before the field shingles fail. When rain-driven wind hits, leaked seams can start at these weakened spots and run along framing, showing up far from the original penetration. Pay attention to cap flashing around chimneys, vent pipes, and skylight curbs, especially where mortar joints show cracks or where prior repairs were done in stages. If you see staining or soft decking near a chimney, poke a careful eye along the brick line and beneath the flashing to verify a seal remains sound.
Where skylights are present, they are especially vulnerable during wind-driven rain if curb flashing or surrounding shingles were previously repaired in stages. Inspect the curb for gaps, loose fasteners, or deteriorated sealant. Replacing weathered curb flashing with continuous, corrosion-resistant flashing can drastically reduce seepage. Keep an eye on the roof surrounding the skylight: look for lifted shingles, torn underlayment, or granule loss concentrated near the curb. If the skylight sits low on the slope, valance flashing should be inspected for distortion after storms, as runoff can pool and force water inward.
On Dundalk homes with additions, valleys and roof-to-wall flashing details often matter more than the shingle brand because they concentrate runoff from multiple roof planes. Inspect valley metal for signs of rust, seam separation, or wicking where the metal overlaps. Ensure step flashing along roof-to-wall transitions is intact and stapled down to prevent wind-driven lift. In additions, confirm that flashing planes align without gaps where new and existing sections meet. When in doubt, re-flashing the vulnerable junctions with continuous metal that extends several inches past each joint reduces risk of moisture tracking.
Set up seasonal checks after Nor'easters and winter thaws. Look for salt-bleached mortar near chimneys, displaced flashing, or damp spots on the inside ceiling below suspect areas. Address issues promptly to prevent moisture from migrating through patched penetrations or across shared roof planes.
Find contractors experienced in skylight installation, flashing, and leak repairs to bring natural light into your home.
High Quality Roofing Home Improvement
(202) 486-7217 www.highqualityimprovement.com
Two Offices Location: 8340 Old Philadelphia Rd,Rosedale, Maryland 21237, 6722 Holabird Ave, Dundalk, MD
5.0 from 15 reviews

F A Taylor & Son
(410) 477-5330 www.fataylorson.com
8304 Bletzer Rd, Dundalk, Maryland
4.3 from 10 reviews
1st Amazon C.S.LLC/ Roofing & More
(443) 804-7105 1stamazonconstruction.com
Serving
4.8 from 135 reviews
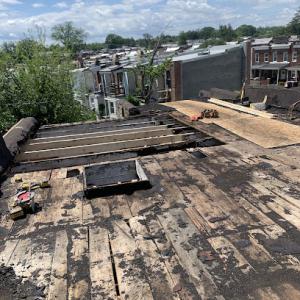
In this market, the work is largely re-roofing rather than new construction. You should target crews that are comfortable with tear-offs, patch history, and performing work on occupied homes. Ask specifically about their experience with older Dundalk-style rowhomes, capes, and low-slope additions, where moisture and salt air accelerate wear around flashing, valleys, and roof-to-wall transitions. Verify that they can handle the full scope from debris containment to neighbor-friendly work practices, not just the roof itself. A crew that can demonstrate a clear sequence of removal, substrate inspection, and reinstallation steps will reduce surprises once the old roof is up.
Dense residential neighborhoods mean debris control, driveway protection, and same-day dry-in matter as much as the finished roof. When you call around, request references from nearby projects and ask how they manage daily cleanup, tarp placement, and street or gate access. A practical plan should include protective measures for vehicles and landscaping, strict containment of dust and nails, and a defined workflow that minimizes disruption for neighbors who share the block. A reputable crew will outline a day-by-day plan and commit to keeping your property and driveway clear while they work.
Long-established and family-owned firms are visible in this market, but verification is essential. Confirm who will supervise the project on-site, who handles flashing and low-slope transitions, and how any patch work is addressed if underlying substrates show moisture or damage. Baltimore County permits and inspection steps will be part of the process, so ask for a clear point of contact for questions and a written scope of work that details materials, flashing details, and warranty coverage. In Dundalk, the right crew blends local know-how with steady on-site leadership to keep storms and salt-air from turning a good roof into a recurring problem.