Last updated: Apr 19, 2026
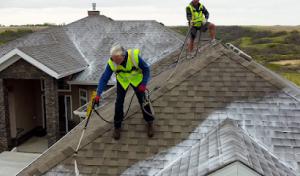
Trenton winters bring repeated snow, melt, and refreeze cycles that are specifically called out as a roof longevity risk in this city. When the temperature swings, meltwater can back up along the eave edge and refreeze into hard ice dams that push up under shingles and into the attic, the ceiling, and even interior walls. You'll notice it first as streaks or damp spots near the eaves, then as more pervasive staining, peeling paint, and mold in the attic. In a Downriver setting like ours, those cycles aren't occasional nuisances-they're a structural threat that accelerates roof deck rot and accelerates corrosion of flashing and vent components. The result is a winter-long pattern of wear that stacks up year after year if you don't address the underlying drainage and ventilation issues.
Edge protection and proper ice/water shield placement become practical issues you cannot ignore when a full replacement is considered. In colder months, the risk calendar shifts from "rare" to "almost inevitable." If you're keeping an older roof in service through winter, you're trading a temporary fix for a longer-term failure path. The simplest way to reduce this risk is to ensure you're not relying on a flaky sealant or a brittle layer that fails as ice grows or the wind drives more moisture under the edge. A robust ice barrier at the eaves and in likely ice-damming zones holds the system together long enough to get you through peak freeze-thaw cycles, and it buys you time for a proper, milder-month replacement if needed.
Because full replacements are better timed into milder months here, homeowners often have to manage winter leaks and after-install performance concerns before replacement season opens. That means you may be dealing with a slick ceiling in living spaces, damp insulation in the attic, and rising humidity that feeds frost buildup and attic condensation. Addressing these symptoms promptly-by sealing entry points, improving attic ventilation, and coordinating temporary weatherproofing-will limit ongoing damage while you plan a more durable solution. You should not postpone diagnosing a persistent roof leak that appears during thaw cycles; what starts as a slow drip can become a costly, wide-area failure once spring storms arrive.
Ventilation and insulation are not optional upgrades in Trenton. Frozen conditions and rapid melt cycles make proper attic breathing essential to slow ice dam formation. If your roof deck shows signs of warping, cupping, or soft spots after a thaw, those are red flags that the system isn't handling moisture correctly. A targeted approach that pairs a reliable ice barrier with improved intake and exhaust ventilation can turn winter from a mounting threat into a manageable season, giving your home a fighting chance until a full replacement can be scheduled in the milder months.
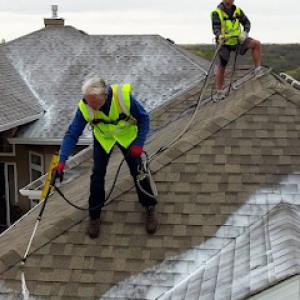
Spring in Trenton brings frequent storms and hail events, increasing both damage exposure and rain-related scheduling delays. The mix of older low-rise housing stock and the Downriver Detroit River breeze means some roofs bear the brunt of repeated freeze-thaw cycles left over from winter. Hail damage can hide under shingles or metal panels, and wind events can lift edges or loosen flashing. The result is a season where damage compounds quickly if left unchecked, and delayed repairs can spiral into bigger ice dam risks as temperatures swing.
Michigan roof claims in this market commonly involve hail or wind, and adjusters typically want roof age, prior-damage history, and photo documentation. A seasoned adjuster will look for signs that hail hit patterns align with your roof type-whether asphalt, metal, or synthetic shingles-and will note any preexisting conditions. Clear records of recent storm dates, stray granules, dented fasteners, and visible punctures can shorten review time. Expect questions about previous repairs, venting status, and attic moisture signs, since these details influence the scope of work.
Claim activity affects documentation expectations and timelines locally, even though there is no uniform statewide insurer pullback affecting every carrier. Photograph the entire roof from multiple angles, including close-ups of damaged areas and any flashing or venting issues. Capture interior evidence of moisture intrusion, attic staining, or lingering musty odors. Create a simple, dated log of storms with notes on observed leaks or water intrusion after each event. If you've had prior inquiries or previous claims, organize files so the adjuster can quickly verify history and avoid redundant questions.
In this market, response times can vary with the amount of hail events and weather-related scheduling bottlenecks. Do not assume a delay is unusual; use the lag as a prompt to gather documentation and keep notes ready for the adjuster. Timely communication matters: confirm when inspections can occur, and prepare access to attic and roof spaces. If contractors can't begin due to weather windows or supply delays, communicate updates promptly to avoid misinterpretation of stalled progress as neglect.
Begin by listing all storm dates this spring and documenting observed damage with photos and concise notes. Prepare a simple attic moisture checklist: any damp insulation, staining, or condensation. Have proof of roof age and any previous repairs organized so the adjuster can assess wear patterns versus new damage. Schedule inspections promptly after a storm, and coordinate with a trusted local contractor who understands the particular quirks of the area-ventilation, snow-melt cycles, and edge sealing matter for long-term performance in this climate. Acting quickly helps prevent small issues from turning into costly, extendable failures.
Find local contractors experienced in assessing and restoring roofs after hail, wind, and severe weather events.


Holbrook's Roofing
(734) 675-3456 holbrooksroofing.com
5588 W Jefferson Ave, Trenton, Michigan
4.7 from 27 reviews
Welcome to Holbrook's Roofing, Inc., a trusted name in roofing since 1980. Our commitment to Reputation, Integrity, and Experience sets us apart. Specializing in commercial roofing, we extend our expertise to residential areas too. Our services include roof inspections, replacements, gutter installations, siding, and windows. Proudly serving Trenton, Grosse Ile, Woodhaven, Brownstown, Riverview, MI, and surrounding areas. Elevate your property with Holbrook's Roofing - where quality meets durability.
Kincaide Roof Rejuvenate
(734) 407-1213 kincaideroofrejuvenate.com
Serving
5.0 from 73 reviews
Kincaide Roof Rejuvenate offers the best roof rejuvenation service in the area. We have over 30 years of experience with roofing, and our service will extend the life of your roof by up to 15 years. Our rejuvenating formula deeply penetrates the surface of the shingles and brings your roof back to life.
Napier's Home Improvement
(734) 676-6557 napiersroofing.com
Serving
4.8 from 95 reviews
For over 40 years, Napier’s Home Improvement has been Downriver and Southeast Michigan’s trusted, family-owned roofing company—and the oldest in Downriver. Three generations strong, we’ve built our reputation on quality workmanship, honest pricing, and treating every home like our own. From small repairs to full roof replacements, we always start with a free on-site estimate because we believe in transparency and lasting customer relationships. Your roof protects your family, and we take that responsibility seriously—roofing is our family legacy. Thank you for supporting Napier’s Home Improvement. Contact us today to schedule your free on-site consultation!
Hoffman Home Renovations & Roofing
Serving
4.6 from 30 reviews
Hoffman Home Renovations and Roofing is the premier choice for home improvement services in Wayne, Monroe, and Washtenaw counties. Whether you need a new roof or gutter system, Hoffman is committed to providing top-notch workmanship and ensuring the highest quality of materials. Their team of skilled craftsmen specializes in insurance repair, with extensive experience in kitchen, bathroom, and basement remodeling. With an unwavering focus on personalized customer service, Hoffman Home Renovations and Roofing is your trusted partner for any home improvement project.

5 River Roofing
(734) 231-7035 5riverroofing.com
Serving
4.8 from 18 reviews
5 River Roofing is a locally family owned and operated roofing company in Michigan. Our roof repair company has been providing services to all over the Michigan area since 1985 and can fix any part of any roof. At 5 River Roofing, we believe that doing it right matters, so trust us to masterfully address any roofing needs your property may have As a trusted roofing company serving customers in Michigan, we are available to meet all of your roofing needs, including 24/7 emergency service. Every customer is offered a free inspection to get started. Call us today and we’ll get back to you promptly. Residential, Commercial, Multi-Family, we can come to your property right now and give you a free no-contact roof inspection.
Bendelow Building Company
(734) 818-7941 bendelowbuildingco.com
Serving
5.0 from 47 reviews
Bendelow Building Company Roofing provides extreme value with certified replacements and repairs for residential and commercial shingled and flat membrane roofing in the Downriver area for over a decade. Certainteed Shinglemaster Installers. Owens Corning Platinum Preferred Installers. Certified GAF Everguard TPO installers. We also provide premium deck building services. We are Trex Certified Pro installers. We provide great service and products for a great price every day.

BrightView Construction
(734) 512-6546 brightviewconstruct.com
Serving
5.0 from 58 reviews
BrightView Construction is a trusted roofing company proudly serving Wyandotte, MI and the surrounding Downriver communities. As a skilled roofing contractor, the team specializes in roof repair, roof replacement, and emergency roofing services for both residential and commercial properties. In addition to expert roofing, the company offers siding solutions and professional gutter service designed to protect and enhance every structure. Committed to quality, BrightView Construction uses only premium materials and proven techniques to deliver long-lasting results that clients can rely on.

Crown Pro Construction
(313) 346-4749 www.crownproconstruction.com
Serving
4.8 from 44 reviews
Crown Pro Construction offers a full range of services, including roofing, siding, gutters, windows, gutter protection systems, and specialty roofing throughout the Detroit Metro area.
Advantage Roofing & Construction
(313) 986-1877 advantageroof.us
Serving
5.0 from 57 reviews
We are a full service commercial and residential roofing, siding, gutters and general building and home maintenance and installation company.
Chucks Roofing Company
(313) 386-8962 chucksroofingcompany.com
Serving
4.9 from 184 reviews
At Chuck's Roofing Company, we provide expert roofing and siding services to homes in Lincoln Park, MI, and the surrounding areas. As a trusted roofing contractor, we specialize in roof installations, repairs, and siding solutions designed to protect and enhance your property. Our team is committed to delivering exceptional craftsmanship and durable results that stand up to the elements. Trust our roofing company and siding contractors to keep your home beautiful, secure, and weather-resistant for years to come.
Avanti Construction
(734) 732-2985 avanticonstruction.org
Serving
5.0 from 14 reviews
We are a licensed and insured residential home improvement company dedicated to exceeding our customer's expectations. Our goal is to work with you in making your home improvement vision become reality. We also have a lot of experiance working with insurance companies and can help you navigate your home insurance claim to make sure you are getting everything you are entitled to. Having a contractor on your side can make all the difference and we are here to help relieve your stress and be your advocate for a fair and honest resolution. We are excited about helping make your home update dream project a reality. Call today 734-732-2985
AllPoint Construction
(734) 407-7110 allpointconstructionmi.com
Serving
4.6 from 642 reviews
AllPoint Construction is Metro Detroit’s trusted choice for quality home improvements, from expert roofing and siding to kitchen & bath remodels and custom additions. As a family-owned company, we take pride in craftsmanship, integrity, and creating spaces you’ll love for years to come. Whether you need a reliable roofing contractor after a storm, energy-efficient windows, or a dream kitchen makeover, our team is here to make it happen. Call today for your free estimate and experience why homeowners across Downriver and Southeast Michigan choose AllPoint Construction to build, repair, and remodel with confidence.
Winter in this area brings sharp freeze-thaw cycles that stress roofing systems and can compromise installation quality. When temperatures swing from above freezing to subzero, roofing materials can contract and expand in ways that challenge flashing seals and shingle laydown. Choosing a replacement window in milder months-late spring through early fall-gives crews a steadier environment to set and seal every seam properly. In that kinder weather, adhesive-backed products have a better chance to cure as designed, and the risk of post-install leaks is lower once the system is back in service during a Michigan winter. For repairs that need to line up with a cold-season freeze, plan ahead for extra drying time and potential temporary protections, but prioritize a full replacement in a stretch of dry, moderate days.
Trenton summers bring heat, humidity, and the daily risk of afternoon thunderstorms. Heat affects adhesive-backed roofing products, which can soften and shift if installations are forced to push through peak heat hours. Scheduling a replacement for mornings or shoulder-season weeks helps ensure materials set correctly and flashings are bedded with proper compression. Humidity can slow back-venting and drying times, so allow a window with good ventilation for sealants and underlayment to cure before a heavy rain event. If a crew must work in heat, ensure shady breaks and hydration, and avoid the hottest hours to keep quality from slipping.
Autumn in this area can swing quickly from mild to windy and wet, and leaf fall adds another layer of complexity. Late-season schedules often collide with stubborn debris lingering on roofs and in gutters, which complicates inspection and cleanup. If replacement stretches into October, plan for an extra wind-day contingency and a dedicated gutter clearance step before shingles go down. Wind events can lift unsecured materials or misalign temporary coverings, so the best practice is to complete the bulk of tear-off and installation before the heart of autumn storms arrive, with a final walk-through cleared of leaves and branches.
When you're lining up a replacement, coordinate several weather windows in a row, not just a single dry day. This gives the crew time to address any surprises-old decking, venting issues, or flashing that needs repositioning-without rushing through crucial steps. Consider a mid-season evaluation after major storms but before winter sets in to confirm that ventilation paths remain clear and that attic space continues to vent properly. If an urgent repair is needed to bridge a winter-ready system, target a brief, well-lit window in late spring or early fall to re-check sealants and flashing after the first freeze-thaw cycle of the season.
The goal is to match installation conditions to material performance, not to chase a shorter calendar. In this climate, a well-timed replacement that avoids peak summer heat and the pressure of late-fall storms supports longer-lasting performance. Plan with a local, detail-focused contractor who understands how winter ice dams can form when installation gaps or ventilation shortcomings exist, and who can tailor the schedule to fit your home's unique roof line and exposure.
Get a clear picture of your project costs upfront - no commitment required.
Asphalt shingles are the dominant practical choice in this market, aligning with the strongest local specialty demand among material-specific contractors. In Trenton's Downriver context, you'll commonly see asphalt in a wide range of neighborhoods and roof pitches, making it the most straightforward option for a fast, reliable replacement. Expect 3-tab or architectural profiles, with pricing typically in the range of 350 to 550 USD per square for a basic install. The key advantage here is value and availability; crews familiar with the winter freeze-thaw cycle know how asphalt responds to ice dams and can implement standard underlayment and ventilation strategies to minimize spring moisture issues.
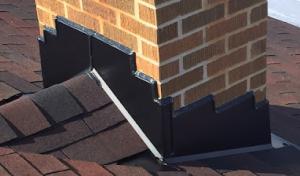
Metal roofs come up when homeowners want durability that withstands winter wind and debris, with a longer expected lifespan and faster shedding of ice and snow. For Trenton homes, metal installations are commonly used on mid-century bungalows and updated ranch styles where showpiece aesthetics aren't primary, but performance is. Pricing generally lands between 700 and 1,100 USD per square, reflecting material quality and the need for precise flashing around chimneys and vents. A metal roof can be a smart hedge against repeated freeze-thaw damage, provided the soffit and ventilation paths are kept clear to prevent condensation under the panels.
Clay tile and concrete tile offer distinct curb appeal in Trenton's neighborhoods with a traditional look that can complement brick and siding contrasts. These options perform well in freeze-thaw cycles when installed with proper underlayment and substrate support, though weight and roof structure suitability matter. Clay tile typically runs from 900 to 1,400 USD per square, while concrete tile sits around 800 to 1,300 USD per square. The trade-off is higher material and installation complexity; you should plan for adjustments to attic ventilation and potential structural reinforcement where the existing deck is marginal.
Synthetic or composite shingles are a practical middle ground between traditional asphalt and upscale tiles. They offer good performance in cold and wet seasons and can mimic more expensive looks without the same weight, which simplifies some retrofits. Expect costs from 550 to 900 USD per square. In a market where storm-driven demand spikes occur after spring wind or hail events, these materials can offer faster scheduling with reliable installation timelines compared to some heavier options.
Slate delivers long-term resilience against winter moisture and wind, but it comes with a premium price and significant structural considerations. In Trenton, slate is typically reserved for homes with the right roof structure and historical overlays. Prices range from 1,100 to 1,700 USD per square, reflecting weight, fabrication, and specialized installation requirements. If chosen, plan for extended lead times and meticulous flashing work to manage ice dam risks over many years.
Overall, when planning a replacement after winter or spring storms, you'll want to balance initial material cost with expected life, maintenance needs, and how each option handles ice dam risks in the local climate.
The most popular roofing material in the US. Find pros who install, repair, and replace asphalt shingles.
Pilgrim’s Professional Roof Repair Service
(734) 374-8756 pilgrimsroofrepairservice.com
Serving
4.8 from 60 reviews
You need a building permit for a full roof replacement, and the local building department will want to see a plan before they issue it. In this city, the review process can take 1-2 weeks in some cases, so you should plan for that downtime in your project schedule. If your attic or crawl space shows signs of improper ventilation, the plan review will flag it before any shingle goes on.
The roofing plan should outline underlayment, ice and water shield placement at eaves and in valleys, and ventilation strategy for the attic. Given the Downriver river climate, the city pays particular attention to how the roof is sealed against freeze-thaw cycles and how it drains in spring storms. Having contractor notes or product data ready for the inspector can help avoid delays.
A final inspection is used to verify proper installation and ventilation, and to catch items that stack up after the crew leaves. Inspectors may note venting or ice/water shield requirements, especially in homes with older ventilation practices or shallow attic space. If something isn't up to spec, the permit can't be closed until the issues are addressed, which can extend the project and expose the home to weather.
Coordinate your schedule with the building department early, and keep the contractor updated on any changes to roof design or decking. Make sure access to the attic and roof is clear on the inspection day, and have records of product specifications available. Missing or vague documentation can trigger a re-inspection, delaying final approval.
In Trenton, winter weather can pause work unexpectedly. If the permit sits too long without progress, the city may require reactivation, and snow or ice can complicate the final walk-through. Ensure your contractor has a clear plan for weather contingencies, including temporary protection from wind-driven rain and meltwater. The inspector will look for proper eave protection and continuous ventilation to handle the freeze-thaw swings that are typical along the riverfront. Being proactive helps prevent delays and water intrusion during the harsh mid-winter months. Document everything and keep copies on site for the inspector.
Trenton's Downriver Detroit River setting brings pronounced freeze-thaw swings, spring storm exposure, and an older, low-rise housing stock. These conditions emphasize material movement, edge sealing, and water-shedding performance more than milder climates do. Heavier systems such as slate, clay tile, and concrete tile are available here, but sit well above asphalt in the local mix. When choosing materials, prioritize how they handle ice dams, wind, and venting alongside their weight and installation details.
Asphalt shingles remain the most common choice in this market due to balance, ease of install, and broad compatibility with existing roof decks. For Trenton homes, the key is selecting a shingle with robust granule adhesion and a proven sealant performance to resist lifting during winter winds. Pay attention to edge flashing, valley integrity, and proper attic ventilation to reduce heat buildup at the eaves, which contributes to ice dam formation. In lower roofs with limited overhangs, ensure the eaves extend enough to shed snow and prevent meltwater from backing up under shingles.
Metal options perform well under freeze-thaw cycles when installed with careful detailing. Look for corrosion-resistant finishes and standing-seam designs that minimize penetrations. The fastening pattern should be chosen to accommodate thermal movement and wind loads common in this area. Metal roof edges and flashing require high-quality sealants and careful alignment at soffits and ridges to direct meltwater away from vulnerable eave lines, helping prevent ice dam buildup near gutters.
Clay and concrete tiles offer long-term durability and a distinct aesthetic, but their weight requires a solid structural backing and precise installation. In Trenton, these heavier systems can handle freeze-thaw stress when installed with appropriate underlayment and vented roof assemblies. Edge sealing and proper spacing between tiles are critical to prevent water infiltration at ridges and eaves. If you're considering these, plan for a roof deck that can support the increased load and for meticulous flashing around vent stacks and chimneys to counter ice dam risks.
Synthetic or composite shingles strike a balance between traditional asphalt and heavier systems. They generally install similarly to asphalt but can provide enhanced performance in edge sealing and UV resistance. For winter conditions, ensure the product's flexibility at low temperatures and its compatibility with existing flashing and ventilation details. Proper attic ventilation remains essential to minimize condensation and ice dam potential.
Slate offers exceptional longevity and a classic look, but its weight and fracture risk demand expert installation. In this market, slate sits at the high end of the spectrum and requires a reinforced roof structure, careful fastener choice, and professional snow-load assessment. Edge detailing and water-shedding performance near eaves are critical to prevent ice dam formation. If slate is chosen, work with a crew experienced in coordinating slate with modern underlayment and appropriate venting to handle Trenton's winter dynamics.
In Trenton, homeowners should expect insurers to focus on hail and wind documentation rather than a one-size-fits-all roof claim process. The Michigan winter cycles and Downriver exposure can drive rapid changes in roof condition, so carriers often zoom in on storm-specific damage rather than a blanket assessment. This means the claim path can vary noticeably from friendlier outcomes in different neighborhoods or climates.
Photos, roof age records, and notes on prior damage are especially important in this Michigan claims environment. Start with clear, timestamped images from multiple angles: overall roof, affected elevations, and any interior indications of leakage. Document visible fastener issues, granule loss, and shingle lifting. If a contractor has previously identified or repaired concerns, gather those reports and invoices. A simple notebook with dated observations can also help, especially if wind events or hail spatter are reported by neighbors.
Take photos as soon as possible after a storm, ideally within 48 hours for exposures like ice dams and wind-driven debris. Include ground-level shots of gutters, decks, and downspouts where shingle granules may accumulate. Keep a file of all storm-related communications from the insurer, including adjuster notes and sent documents. If there's an apparent mismatch between interior staining and exterior wear, record both sides to support a correlation for the claim reviewer.
Because local practices vary by insurer and company, Trenton homeowners should verify claim timelines and proof requirements early after a storm. Confirm required documentation with the adjuster, ask who will perform the inspection, and establish preferred contact methods. Prepare a concise damage timeline and align it with recent weather reports to avoid gaps in the narrative. This approach helps ensure the claim proceeds smoothly through the unique Michigan claims landscape.
Flat and low-slope roofing has a meaningful service presence in the area's contractor market, signaling that some homes or additions rely on these profiles for years of service. In winter, freeze-thaw cycles bite harder on transitions where the roof meets a wall, at edge details, and around any flashing that isn't truly integrated. A flat or low-slope section that looks fine in September can show signs of moisture intrusion after a heavy thaw, especially along seams and around penetrations. If you notice wet spots that appear well after a storm, don't assume they're from a single rain event-look for cumulative leakage around fasteners, seam tapes, or degraded membrane edges. In practice, it's wise to have a local pro evaluate suspected problem zones before spring storms intensify.
Skylights are a common source of leak trouble when installed on low-slope roofs, and local contractor specialization reflects that. The flashing around a curb or wall interface is where most leaks start, especially after the cold season when small freeze-thaw cracks open and shut with temperature swings. If you've experienced damp patches near a skylight, inspect the curb flashing for disengagement or torn sealant, and check the sidewalls for staining that trails along the caulk line. Routine maintenance should include resealing and ensuring proper drainage away from the curb. When a skylight is implicated, it's not unusual to find multiple small flaws rather than one dramatic failure-each adds up to steady moisture risk if ignored.
Freeze-thaw conditions in this area can make transitions, penetrations, and drainage details on low-slope sections more failure-prone after winter. Look for ice dam patterns near drain lines, where meltwater backs up and invites staining or soft decking. Transitions between a low-slope field and vertical walls, gutters, or parapets are common failure points if flashing is compromised or the membrane is punctured. A practical approach is to verify that all drain clamping rings are secure, that debris isn't clogging the scuppers, and that any penetrating devices-vent pipes, electrical penetrations, or vents-are sealed with materials rated for exterior use and compatible with the roof membrane. Small, persistent signs now can prevent larger leaks once spring storms return.
Find specialists in TPO, EPDM, and built-up flat roofing systems for residential and commercial properties.

Holbrook's Roofing
(734) 675-3456 holbrooksroofing.com
5588 W Jefferson Ave, Trenton, Michigan
4.7 from 27 reviews