Last updated: Apr 19, 2026
Winter in this part of southern Westchester brings snow, then relentless freeze-thaw cycles that push water into any weakness at the eave line and around flashing. Ice damming forms quickly when heat leaks from attic spaces unevenly, melting snow at the roof surface and refreezing at the edge. In Yonkers, the mix of older detached homes with attic spaces and varied rooflines creates uneven heat loss, which concentrates edge ice buildup and creates stubborn leak paths. The risk isn't limited to shingles: low-slope and attached urban-style buildings commonly experience ponding, blocked drains, and membrane stress that invite leaks when temperatures swing.
You should treat any dripping from the eaves, warm spots on the roof during a freeze, or new stains on ceilings after a thaw as signs to investigate now. On older detached homes, inspect attic insulation and ventilation-poor air movement lets heat escape to the roof edge, feeding ice dams. Look for missing or loose flashing around chimneys, skylights, and vent pipes, where melting water can back up under shingles or under the membrane. In low-slope and apartment-style areas, check clogged gutters and blocked roof drains after a heavy snowfall; ponding can press against membranes and push water inward through seams or corner details.
Your attic should have ample insulation and a clear ventilation path to keep the roof cold along the eaves. In Yonkers, you can reduce heat-driven damming by tightening the seal between living spaces and the attic-seal gaps around penetrations and ensure soffit intake is unobstructed. If your roofline steps or jogs, install additional drip edge or edge ventilation to minimize warm pockets that melt snow at the edge. For flashing details around chimneys and dormers, consider upgrading sealant and maintaining metal flashing so it sheds water smoothly rather than allowing it to puddle and back up under edge materials.
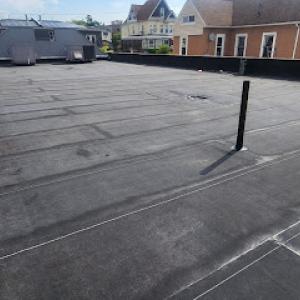
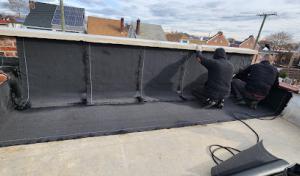
Winter drainage problems aren't confined to steep shingles. On low-slope and attached urban-style roofs, ensure that the membrane is intact and that any seam tape or flashing around perimeter edges remains watertight. Regularly remove debris from roof drains, scuppers, and internal gutters to prevent ponding that forces water toward seams and penetrations. If you notice standing water after a storm, don't wait for it to freeze and form ice dams; address the drainage bottlenecks quickly and have a professional re-evaluate the slope, waterproofing, and membrane integrity.
When a thaw ends and a new freeze hits, a small leak can become a large problem in a hurry. If you see active dripping from the eaves or hear water running inside walls, place a bucket under the leak and protect ceilings with tarps or plywood to limit further damage. Do not delay calling a local roofer who understands Yonkers' specific climate and building stock. A prompt assessment should focus on stopping further intrusion at the source-whether that means temporarily diverting water at the gutter line, resealing flashing, or patching a compromised membrane until a full repair can be scheduled.
A practical winter plan begins with targeted insulation upgrades in attic spaces that feed heat to the roof edge, combined with balanced ventilation to maintain a cold eave during freezing conditions. For steep slopes, inspect and reinforce edge details and flashing to prevent water from sneaking under shingles. For low-slope and attached homes, prioritize drain maintenance and membrane integrity, with attention to seams and terminations at walls and parapets. Regular winter inspections, especially after heavy snows or thaw cycles, can catch creeping issues before they become costly emergencies. In Yonkers, proactive maintenance that respects the local roofline variety and the freeze-thaw rhythm is the most reliable defense against ice dams and leak paths.
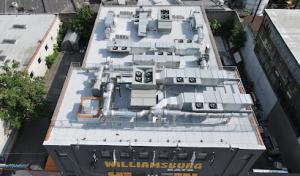
On the Hudson River corridor, roofs face wind-driven rain more than inland blocks, especially on elevated or more open sites where air can rush across rooftops. That exposure means fast-moving weather can push water under edge flashing, pry loose shingles, and stress ridge lines sooner than you'd expect in a calm suburban block. If yours sits on a hill or near an exposed channel, treat every storm as a potential test of your roof's wind resilience.
Spring and fall storms in this part of Westchester bring heavy rains and gusty winds that often reveal weaknesses at flashing, along ridges, around skylights, and in older shingle fields. Look closely after a storm for lifted shingles at the eave edges, loose or missing flashing around vents or chimneys, and any creasing or misalignment in the ridge cap. Low-slope sections can leak first where the roof deck meets wall assemblies, and valleys can trap leaves and debris that channel water into seams. In Yonkers, that combination of wind exposure and mixed roof types means you should check both steep-sloped and low-slope segments with equal scrutiny.
Localized hail does occur in the region, so you need photo documentation that distinguishes cosmetic marks from functional damage to shingles, tiles, metal panels, and accessories. Cosmetic dimples or surface scuffs can masquerade as repair-worthy damage when water intrusion is the real risk. Take wide shots that show the entire roof face and close-ups of each affected area, including flashing around vents, skylights, and roof penetrations. If you suspect impact damage on metal panels or tile edges, document the underside where feasible, since hidden dents can indicate compromised integrity.
After a significant wind or hail event, conduct a careful roof walk if safe to do so. Check eaves, rake edges, and the lower roof for lifted or curled shingles and any displaced flashing. Inspect around skylights and dormers for gaps where water could penetrate. For low-slope portions, look at seams, fasteners, and sealant joints; pooled water or a soft feel underfoot can signal compromised deck or membrane. If any area shows moisture intrusion, you should arrange a prompt professional evaluation-the sooner the assessment, the less collateral damage you'll endure from hidden leaks.
Treat roof edges, flashing, and ridge lines as primary defense points. In Yonkers, a proactive program that keeps flashing and sealants intact, and that reinspects after severe storms, pays off in fewer emergency leaks during the freeze-thaw cycles. When you plan a repair, prioritize solutions that address wind uplift and water shedding across both steep-slope and low-slope sections so the roof remains resilient across the full Yonkers winter cycle.
Find local contractors experienced in assessing and restoring roofs after hail, wind, and severe weather events.
J. Salvatore & Sons Roofing
1187 Yonkers Ave, Yonkers, New York
4.8 from 102 reviews
Power Roofing Yonkers
(914) 444-0066 powerroofingyonkers.com
14 Warburton Ave, Yonkers, New York
4.8 from 20 reviews
American Quality Contractor
(914) 608-4499 americanqualitycontractor.com
Serving
5.0 from 22 reviews
Skyward Roofing - Yonkers
(914) 915-8238 www.skywardroofing.com
277 Morsemere Ave, Yonkers, New York
5.0 from 85 reviews
Living in Yonkers and need a Roofing Contractor? Contact Skyward Roofing, we are close neighbors that desire to provide clients with Budget Friendly Roof Repairs that correct all problems or Visually Stunning Roof Replacements in any roofing style desired.
Madison Construction NYC: Professional Roofing & Home Solutions
(929) 461-9662 madisonconstructionnyc.com
52 Yonkers Terrace Apartment 7l, Yonkers, New York
5.0 from 52 reviews
Madison Construction NYC is a reputable Roofing Contractor in Yonkers, NY, with a history of serving the region for more than 15 years. We perform Roof Installation and Repairs, Inspections, Shingle Roofing, Gutter Installation and Repair, Siding, and Cladding works. Our professionals also provide professional Chimney Sweep, Chimney Services, Waterproofing, and Masonry services for residential and commercial works. As a general contractor and full-service construction company, we are dedicated to quality workmanship, quick turnaround, and competitive pricing. Customer satisfaction is always our number one concern. Call Madison Construction NYC today for dependable roofing and exterior solutions you can count on!
Uzma General Contractors | Yonkers Roofing Contractors
(347) 280-4937 www.uzmacontractinggroup.com
55 Beaumont Cir Apt 2, Yonkers, New York
4.9 from 115 reviews
Uzma General Contractors is a premier construction company serving Yonkers, NY, and the surrounding areas. Specializing in roofing, masonry, concrete, and waterproofing services, we provide expert craft skills tailored to your needs. As trusted Yonkers Roofing Contractors, we ensure your home or business has a durable, long-lasting roof. Our skilled General Contractors manage every project with precision, from start to finish. We also offer high-quality masonry and concrete work to enhance your property's value and strength. Additionally, our waterproofing services protect your investment from water damage. Count on Uzma General Contractors for reliable, professional construction services.
J. Salvatore & Sons Roofing
1187 Yonkers Ave, Yonkers, New York
4.8 from 102 reviews
At Joseph Salvatore & Sons Roofing, we've been a trusted presence in roofing and exterior services since 1921, offering rapid turnaround and affordable pricing. As a family-owned roofing and exteriors company, we provide our services to both residential and commercial clients in the tri-state area including Westchester, New York, and Connecticut. Let us alleviate your roof and exterior worries - contact us today and experience the professionalism our team brings to every project.
Empire Roofing of NY
(800) 318-6734 empireroofingofnewyork.com
30 Locust Hill Ave STE 1E, Yonkers, New York
5.0 from 27 reviews
Welcome to the Empire Roofing of NY Empire Roofing in NY is a professional roofing company that specializes in providing top-notch roofing services to homeowners and businesses in Westchester County, NY. We pride ourselves on being a trustworthy and reliable roofing contractor, committed to delivering the best possible service to our customers.
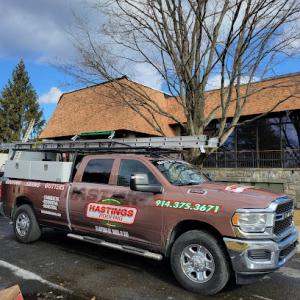
Hastings Roofing
(914) 375-3671 hastingsroofing.com
975 Nepperhan Ave, Yonkers, New York
4.8 from 36 reviews
Roofing Contractor in Westchester county NY. Roofing Siding, Gutters, Leaders. Slate, Spanish Tile, Copper
Power Roofing Yonkers
(914) 444-0066 powerroofingyonkers.com
14 Warburton Ave, Yonkers, New York
4.8 from 20 reviews
Power Roofing Yonkers provides expert roofing services in Yonkers, Bronx, and Westchester County. We specialize in roof repair, replacement, and installation for both residential and commercial properties. Our licensed contractors handle asphalt shingles, flat roofs, storm damage, and emergency roof leak repairs. We deliver fast, reliable, and clean service with top-quality materials and honest pricing. Whether you need a small repair or full roof replacement, we’re your trusted roofing contractor in Yonkers, NY. Contact us today for a free estimate and experience reliable, professional roofing backed by years of experience.
All roofing
Serving
5.0 from 17 reviews
All rofing. is a reliable and professional contractor in Yonkers, NY that offers a range of services to enhance the look and functionality of your property. Our experienced team specializes in roofing services, including repair and installation, to ensure your property stays protected from harsh weather conditions. We also offer gutter installation and repair services to ensure proper drainage of rainwater from your property. Our experts use high-quality materials to build decks that not only enhance the appearance of your property but also add value to it. Contact us today and get a free estimate. Roofing Contractors in Yonkers NY. Roofers in Yonkers NY. Chimney Installations in Yonkers NY. Chimney Repairs in Yonkers NY.
Bronxville Roofing Contractor
Serving
5.0 from 15 reviews
Bronxville Roofing Contractor is your local roofing specialist serving homeowners and businesses from our convenient location at 10 Park Pl, Bronxville, NY 10708. We focus on high-quality roof repair, complete roof replacement, and ongoing maintenance to extend the life of your roof and protect your investment. Our team works with popular systems such as asphalt shingles, slate, and flat roofs, using proven materials and modern installation techniques for lasting performance. We emphasize clear communication, honest assessments, and neat job sites, so every project is completed on time, on budget, and with meticulous attention to detail.
Evercote Home Improvement
Serving
4.6 from 11 reviews
Evercote Home Improvement provides quality roofings,Sidings,Windows and Gutters services to the 5 borough’s of New York City areas including Westchester county. Our team has over 25 years of combined experiences in installation and repairs of all types of roofing systems. Our services includes installation and repairs of Flat roofing systems,Shingle roofing systems and installation of sidings. We also specializes in installation of new replacement windows and skylights. We also install and maintains Gutters and Leaders for your home.
FH Roofing & Chimney
Serving
5.0 from 31 reviews
Roofs and chimneys bear the brunt because they must withstand extreme weather conditions, like snow, rain, etc. As a result, you’ll need to ensure your roof is in pristine condition. Likewise, your home’s gutter is responsible for ensuring sewage doesn’t back up. That’s where FH Roofing and Chimney enters the mix. We’re a roofing company based in NY. If you’re looking for a trusted roofing contractor to provide quality roof repair, gutter cleaning and installation, and chimney repair, you’ve come to the right place. FH Roofing & Chimney also offers skylight and deck Installation in Westchester County, NY. So call today to book an appointment for a free quote. Our roofers will be there to help you instantly.
American Quality Contractor
(914) 608-4499 americanqualitycontractor.com
Serving
5.0 from 22 reviews
American Quality Contractor is a leading roofing company dedicated to providing exceptional services and superior craftsmanship. With years of experience in the industry, we specialize in delivering top-notch roofing solutions that prioritize durability, aesthetics, and customer satisfaction. Our skilled team of professionals employs advanced techniques and premium materials to ensure every project exceeds expectations. From installations and repairs to inspections and maintenance, we are committed to delivering unmatched quality and reliability. Trust American Quality Contractor for all your roofing needs and experience excellence that stands the test of time.
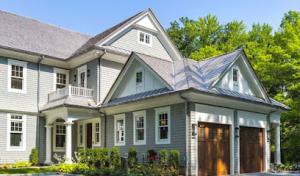
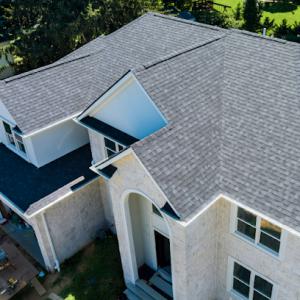
In Yonkers, the roof options range from classic asphalt shingles to modern metal, and from clay or concrete tile to synthetic shingles and even slate. The mix reflects hillside streets, dense older neighborhoods, and a mix of low-slope multifamily and traditional pitched homes. The climate brings serious freeze-thaw cycles that test leaks, flashing, and deck condition. Choosing a roof type that handles ice damming and rapid temperature shifts without compromising structural support is key.
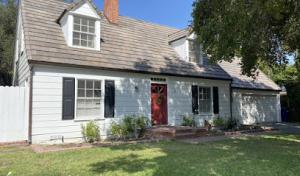
Asphalt remains a solid, practical option for many Yonkers homes, especially on traditional pitched roofs. Good installation with layered flashing at eaves and valleys helps reduce leaks during freeze-thaw weeks. If your roof deck shows unevenness, address that before shingle replacement, because gaps and warped boards magnify ice dam damage. For low-slope patches, ensure the underlayment is rated for flat or nearly flat sections, and consider a self-sealing ice-and-water shield at the eaves and flashing details.
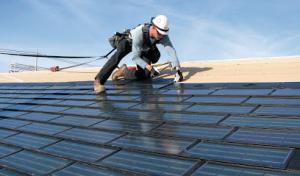
Metal is well-suited to Yonkers' mix of steep and low slopes, resisting ice buildup and shedding snow efficiently. Look for concealed-fastener systems or corrosion-resistant panels, and confirm that ridge venting and soffit ventilation align with the roof's design. On steeper hillsides, metal can be a long-term option, but ensure the flashing around chimneys, skylights, and transitions is robust. For slate or tile-adjacent properties, metal can serve as a protective overlay if weight and structure permit.
Clay and concrete tiles bring period-appropriate character to older neighborhoods while offering good freeze-thaw performance when properly installed. Weight is a critical factor here: the roof structure must be rated for tile loads, and deck condition must be solid to prevent cracking under freeze stress. Proper underlayment and flashing around parapets, dormers, and wall-to-roof intersections are essential to minimize leaks in harsh winters. Tile edges and penetrations need meticulous sealing to prevent water intrusion during thaw cycles.
Synthetic options provide a middle ground between traditional shingles and heavier tile alternatives. They can offer better impact resistance and lighter weight, which is helpful on aging decks. Ensure color and granule adhesion hold up to sun exposure on exposed hillside sections, and verify compatibility with existing flashing details to prevent potential ice damming along eaves.
Slate is a hallmark of certain architecturally appropriate homes in older neighborhoods. Weight and repair complexity demand careful deck assessment and high-quality flashing. Before replacement, ensure the roof structure can bear the load, and invest in precision flashing at all transitions to guard against leaks during recurring freeze-thaw events. Slate can be stunning, but the upkeep and expertise required are significant, especially for multitier or complex rooflines.
Provided local pricing ranges run from about $400 to $900 per square for asphalt shingles, $700 to $1200 for metal, $1200 to $1800 for clay tile, $900 to $1700 for concrete tile, $500 to $900 for synthetic/composite shingles, and $1500 to $3000 for slate. In Yonkers, those numbers are the starting point, not guarantees, and actual bids can drift based on roof complexity, accessibility, and the contractor's approach to waste handling.
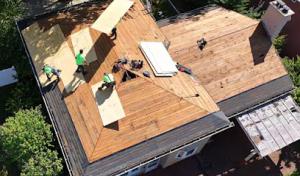
Costs in Yonkers can rise on older homes where tear-off reveals multiple prior layers, aging roof decks, chimney flashing issues, or structural preparation needs for slate and tile replacements. If the roof has been layered more than once, expect disposal fees to climb as crews remove and haul heavier debris. An aged deck may require plywood or sheathing repair, which adds labor and material time. Clay, concrete, and slate replacements are particularly sensitive to deck condition because roofers must ensure a solid, square substrate to support heavy tiles or slate without risk of future failures.
Dense neighborhood access, parking and staging constraints, and the city's mix of steep residential roofs and low-slope buildings can materially affect labor efficiency, debris handling, and disposal logistics. Narrow driveways or street parking restrictions may require off-site material staging or time-shifted crews, which can add days to a project timeline and slightly inflate costs. For steep slopes, additional safety equipment and specialized fall protection are common, nudging labor hours upward and charging accordingly.
Low-slope sections complicate water shedding and may demand additional underlayment or ice-dam mitigation measures, especially in the Hudson River corridor where freeze-thaw cycles grip gutters and eaves. When slate or tile are on the plan, expect structural reinforcement considerations and heavier materials that drive both cost and crew size. Synthetic or composite shingles offer a middle path for performance and cost, often favored in mixed stock neighborhoods, while metal can deliver long-term durability with a higher upfront price.
For a Yonkers project, start with the core roof area and then add allowances for tear-off, deck work, flashing, and waste disposal. Compare bids on similar scope: asphalt for budget-conscious replenishment, metal for longevity on exposed edges, and slate or tile where the structure supports the weight and the design calls for it. If the roof is older than 20 years, include a contingency for unseen underlayment issues or insulation upgrades, which commonly surface once work begins in late fall or early spring.
Get a clear picture of your project costs upfront - no commitment required.
Power Roofing Yonkers
(914) 444-0066 powerroofingyonkers.com
14 Warburton Ave, Yonkers, New York
4.8 from 20 reviews

A full re-roof in Yonkers typically requires a permit issued through the City of Yonkers Department of Buildings and Planning. That permit ensures the work aligns with local codes, not just the shingles and underlayment you choose. The permit process is not a formality you can skip or treat as a one-and-done task; it anchors the project to safety standards when hillside homes and mixed roof types are in play. Before any asphalt, metal, or tile is lifted, you should have a clear plan in hand that maps the scope to the permit request-otherwise you risk delays, rework, or a stop-work order if inspectors raise questions about changes.
Plan review and inspections are part of the local process, and homeowners should expect a final inspection after completion rather than treating roofing as a no-paperwork job. The plan review will look at more than just the new roof surface; it will consider penetrations, drainage, and how the new system interfaces with existing structures on a hillside setting prone to freeze-thaw cycles. Inspectors may request details on underlayment, attic ventilation, and any required bracing or structural adjustments if the scope includes skylights, dormers, or changes to deck or fascia framing. Work that ends up deviating from the approved plan-whether due to discovery of rot, an unexpected skylight update, or a different roof pitch-will need amendments, which can extend timelines and complicate approvals. Keep communications with the permit authority prompt and transparent to avoid those setbacks.
Because permit handling is city-specific in Yonkers, owners should confirm who is pulling the permit, what scope is listed, and whether related items such as structural repairs or skylight changes alter review requirements. The final signoff hinges on a completed job that matches the approved plan and passes a closing inspection. If you live in a hillside area or near a row of older homes, inspectors will verify that water drainage directs runoff away from foundations and into approved channels, reducing ice dam risk during cold snaps. A clean final signoff not only satisfies code, it protects you from compliance fallout that can surface years later if a change triggers a need for retroactive permits.
Your claim packet after a storm in Yonkers often hinges on precise documentation that shows the full leak path and the condition of every roofing component. Wind, hail, and frequent freeze-thaw cycles create complex damage patterns in hillside neighborhoods and dense older homes, where repairs have accrued over multiple decades. Insurers in this market expect not only surface evidence but a clear record of workmanship, roof assemblies, and flashing details. The consequence of gaps in evidence can be a protracted claim, a partial settlement, or a denial that leaves you facing out-of-pocket repairs during a stubborn Yonkers winter.
Adjusters in this region may verify not just surface damage but also how the roof was installed and how components interlock. When a roof shows mixed repairs on an older Yonkers home, the claim reviewer will look for consistent material compatibility, proper integration of chimneys and skylights, and the condition of hips, valleys, and eaves. If a previous contractor used competing products, that can complicate approvals. Be prepared to demonstrate that the current damage aligns with the reported storm events and that the roof system functions as a continuous path for water, not as isolated patches.
To strengthen a claim, document every potential leakage waypoint together with interior impact. Chimneys, flashing, skylights, and gutters should be photographed from multiple angles. Interior leak staining in ceilings, walls, and attic spaces often reveals how far the water has traveled during a freeze-thaw episode. Storms that push moisture behind gutters or under flashing can create hidden damage that only a comprehensive photo set and a clear contractor scope can expose. Organize your files so an adjuster can follow the leak path from exterior surface to interior evidence without guessing.
Keep a dated timeline of storms and repairs, and back up photos to a cloud folder labeled by location and date. If a part is replaced after filing, add a fresh photo set to preserve the chronology carefully.
Connect with contractors who help homeowners navigate the claims process from damage assessment to final approval.
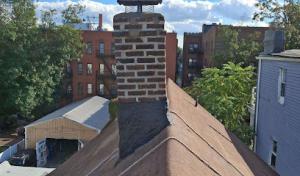
Chimney-related roofing work is especially relevant in Yonkers because chimney service appears heavily in the local contractor market, matching the city's stock of older homes with masonry penetrations. The mix of hillside streets and dense urban blocks means chase points and crown flashings take extra weather from freeze-thaw cycles. Leaks often trace back to aging joints at brick chimneys, deteriorating flashings where the roof and chimney meet, or improper transitions at nearby valleys and skylight curb areas.
On older houses, the roof decision hinges as much on flashing as on the field shingles. Inspect the chimney chase for cracked mortar or loose caps, and check the base flashing where it intersects the roof surface. Curb flashings around skylights and dormers should be sealed with continuous, corrosion-resistant metal and integrated with surrounding roof seams. Valleys and step-flashings near masonry penetrations are frequent leak paths after a mid-winter freeze-thaw event, so pay attention to any peeling sealant or gaps at those joints.
When a contractor recovers or replaces a roof section, ensure flashing at chimneys, skylights, valleys, and dormers is rebuilt or upgraded as part of the project. The best practice is to install continuous metal flashing that bevels up and over the chimney base and down the roof slope, with properly lapped joints and sealant-free seams that shed water outward. At skylights, demand a curb that is properly flashed into the roof plane with a waterproof membrane behind the curb and a durable cap seal at all fasteners. If a roof is being replaced in sections, insist that any compromised flashing be fully reworked rather than stitched into new shingles.
Seasonal checks after harsh winters are crucial. Look for shifting bricks, cracked sealant joints, and lifted shingle edges near penetrations. Clean debris from around chimney bases and skylight surrounds to prevent moisture retention. When ice damming shows up near these features, address it promptly with targeted heat cable recommendations and confirm the flashing remains watertight during re-insulation or re-deck work.
Find contractors experienced in skylight installation, flashing, and leak repairs to bring natural light into your home.
Uzma General Contractors | Yonkers Roofing Contractors
(347) 280-4937 www.uzmacontractinggroup.com
55 Beaumont Cir Apt 2, Yonkers, New York
4.9 from 115 reviews
J. Salvatore & Sons Roofing
1187 Yonkers Ave, Yonkers, New York
4.8 from 102 reviews
Empire Roofing of NY
(800) 318-6734 empireroofingofnewyork.com
30 Locust Hill Ave STE 1E, Yonkers, New York
5.0 from 27 reviews
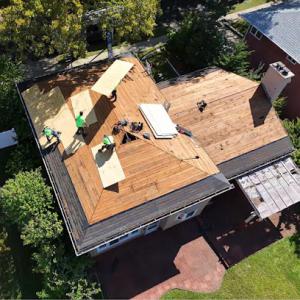
Late spring and early fall are the sweet spots for re-roof projects in this part of Westchester. In Yonkers, the bite of southern Westchester winters is real enough to complicate installation, and summers bring heat and humidity that can stress crews and materials. Planning a replacement during these shoulder seasons gives you milder temperatures, fewer weather-related delays, and better conditions for sealing and shingle adhesion on both steep-slope and low-slope sections. If you have an aging roof over a hillside or in a dense row of homes, targeting those windows also helps minimize disruption on adjacent properties.
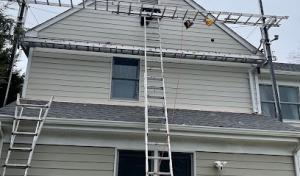
Winter work in this area is often about stabilization rather than a full, ideal replacement. Snow, ice, and short daylight windows make tear-off sequencing and dry-in tricky, so crews may focus on securing vulnerable areas, adding temporary coverings, or completing partial work that prevents leaks until better weather arrives. If a storm has left your roof compromised, expect a plan that prioritizes snow load reduction, ice dam mitigation, and stabilizing flashings first, with full replacement scheduled for the next clear season when crews can work efficiently and safely.
After major regional storms, it's common to see a surge of demand for emergency repair and storm-response contractors. Yonkers homeowners often face compressed timelines and tighter access during these periods. If you don't have an urgent leak, use the lull between storms to line up your preferred contractor, review your roof's vulnerable details (valleys, step flashing, drip edges), and align your project with a firm start date in the next favorable window. If you do have urgent needs, discuss stabilization plans that protect interior spaces and shed water while you wait for the optimal re-roof slot.
With a mix of steep-slope and low-slope sections common in Yonkers, timing becomes a coordination task. The team may sequence work to address the most leak-prone areas first, while scheduling the remaining sections to minimize disruption and ensure proper ventilation and drying times. Communicate about anticipated weather, available daylight, and any local access constraints to keep the project on track when windows open.
When you can't wait, these contractors offer fast response times to stop leaks and prevent further damage.
Power Roofing Yonkers
(914) 444-0066 powerroofingyonkers.com
14 Warburton Ave, Yonkers, New York
4.8 from 20 reviews