Last updated: Apr 19, 2026
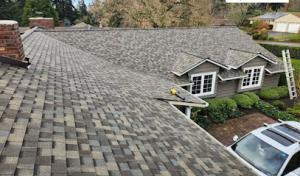
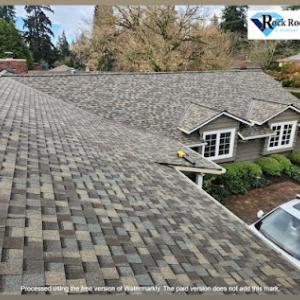
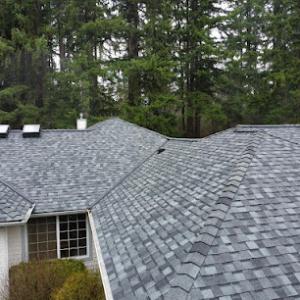
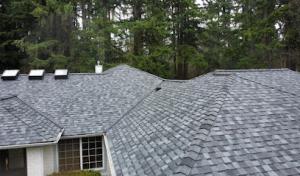
Kenmore sits in the Puget Sound marine climate, where long wet seasons and mild temperatures keep roof surfaces damp enough for moss and algae growth to become a primary maintenance issue. The recurring moisture plus shaded ridges and valleys means shingles don't dry as quickly as in drier parts of the year. This dampness is most noticeable on roofs with limited sun exposure, near Lake Washington, Swamp Creek, and the Sammamish River corridor. The result is a slower drying cycle, extended surface moisture, and a higher likelihood of edge lifting on shingles if moisture isn't managed well. Practical takeaway: treat roofs as a constantly damp environment, not a seasonal concern, and plan maintenance with the expectation of frequent, light cleaning and proactive moisture control.
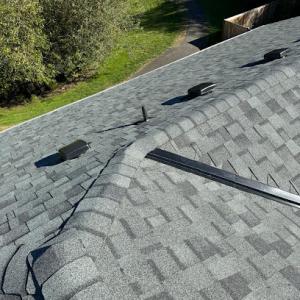
Neighborhoods with mature tree canopies bring abundant shade and debris that collect in valleys and gutters. Moss doesn't just live on the surface; it anchors in the micro-crevices created by moisture and shade, and it can lift edges where shingles meet at the eave or rake. In Kenmore, edges and corners are common trouble spots because moisture lingers in these zones longer than on the center slope. Regular inspection after heavy rain or windy periods helps catch early edge lifting before leaks form. Practical approach: walk the roof with a slow, careful eye, looking for soft or lifted shingle edges, dark damp spots near eaves, and moss clusters in valleys.
In this area, roof longevity is often limited less by sun damage and more by trapped moisture, poor attic ventilation, and moss-related edge lifting. Insufficient attic ventilation can create a warm, damp roof deck that compounds moss growth and accelerates shingle deterioration. The key is to pair intake and exhaust properly so the attic remains close to outdoor temperatures during wet seasons. Practical steps: confirm consistent attic venting across the entire roof plane, ensure soffit vents are unobstructed, and verify that ridge or high-side exhaust vents aren't blocked by insulation or debris. When ventilation is marginal, consider a focused upgrade rather than a full roof replacement.
Moss thrives in constant dampness and shaded conditions. The preferred approach is a combination of mechanical removal and preventive measures rather than aggressive chemical applications. In Kenmore, a light, iterative moss removal program works best: use a plastic scraping tool to lift moss with minimal shingle damage, vacuum the debris from gutters and valleys, and address the underlying moisture source. Avoid high-pressure washing, which can damage shingles and push moisture deeper into the roof deck. After removal, consider installing zinc or copper strips along the ridge line to inhibit regrowth, especially in shaded sections where moss tends to reappear.
Valleys and gutters collect leaves, needles, and small branches from nearby trees. If debris blocks valleys or gutters, moisture pools and seals in places not meant to hold water. In damp Kenmore conditions, ensure gutters are clean and valleys are free of obstruction at least twice a year, with an extra cleaning after peak leaf fall. Practical habit: keep trees trimmed back enough to reduce heavy debris loads while preserving the shade that temperates the microclimate but doesn't overwhelm the roof drainage system.
Given the climate and tree cover, a proactive cadence beats reactive repairs. Schedule a mid-fall and late-winter inspection window when moisture levels are high and shade is strongest. During each visit, note moss growth, edge lifting, ventilation status, and gutter condition. If moisture signs persist after basic cleaning and ventilation tweaks, plan a targeted repair to extend roof life in this shaded, moist environment.
In this area, roof claim activity tends to track regional wind and storm events rather than hail. Wind gusts up to modest hurricane levels aren't unusual around storms, and when they hit, rain intrusion often shows up after shingles loosen or blow back, or when flashing and ridge components are compromised. You'll notice elevated leakage risk after a storm that shifts branches or lifts edges, leaving gaps for water to find its way in. The practical move is to treat any post-storm wind event as a leak risk window: inspect visible edges, vent boots, and flashing from ground level when safe, and plan a quick onsite check if you have access to a ladder. If you detect lifted shingles or gaps around vents, address them promptly before the next rain band.
Winter rain and humidity in the north King County corridor can delay dry-in work and make active leak response more urgent because underlayment and decking can stay wet longer. Poor drying times prolong the exposure of the roof deck, increasing the chance that moisture will migrate into attic spaces or ceilings. Concrete and wood decks that stay damp can also promote moss and algae growth, compounding the problem. The urgent action is to treat any suspected leak as a moisture problem first: isolate the interior area, place towels or buckets to catch drips, and avoid attempts to force-dry with heat in damp conditions. If a roof is actively leaking during wet months, any temporary tarp or cover should be securely weighted and overlapped to shed water rather than channel it back under roofing edges. Dry-in work should be scheduled for the first dry window, but be ready to dry-in in stages if temperatures remain cool and humid.
Spring wind events commonly bring branches, needles, and debris onto roofs in this heavily treed part of the Seattle metro, creating puncture risks and drainage blockages. Even small punctures can become leaks quickly if debris holds moisture or blocks runoff at vents, valleys, or along the eaves. The immediate step after a windy spell is to do a targeted debris sweep from the ground if safe, focusing on valley corners, ridge lines, and around penetrations. From the attic side, listen for sudden increases in dripping or damp odors after a storm and pay close attention to signs of moss spreading in shaded, damp spots. Clearing debris helps maintain proper drainage and reduces the likelihood of punctures translating into active leaks.
In this climate, vigilance is a daily duty rather than a seasonal task. After each significant wind event, after heavy rainfall, or during the moss-prone months of damp conditions, run a quick, practical inspection routine: check ridge caps for looseness, test vent seals, inspect flashing at walls and chimneys, and confirm gutter alignment and downspout flow. If any moisture remains or signs of fast-traveling water appear, escalate to a targeted repair plan that prioritizes water intrusion sources and long-term ventilation improvements to curb future moisture buildup. Consistent, proactive checks are the best defense against the unique wind, rain, and leak patterns here.
Find local contractors experienced in assessing and restoring roofs after hail, wind, and severe weather events.
Rock Roofing | Trusted Residential & Multi-Family Roofing Experts
(425) 486-8683 www.rockroofing.com
Serving
4.8 from 73 reviews


Titan Roofing
(206) 591-4015 theroofingtitan.com
19525 61st Ave NE, Kenmore, Washington
5.0 from 130 reviews
Titan Roofing serves King and Snohomish counties with roof replacement, repair, cleaning, gutters, and TPO/PVC flat roofing. We prioritize accurate timelines, consistent updates, and quality workmanship. Financing options are available, and new installations include manufacturer-backed material and workmanship warranties. Book your inspection or get a quote today!

Chinook Services
(425) 290-8635 chinookservices.com
8244 NE 145th St, Kenmore, Washington
4.8 from 134 reviews
As a fully licensed, bonded, and insured company, Chinook Services guarantees peace of mind with every project. We are a team of exterior cleaning professionals dedicated to the safety of your property and our crew. Our comprehensive services include: Roof Cleaning (including moss removal, treatment & prevention), Gutter Cleaning (with gutter whitening & front cleaning), Exterior Washing (house washing, building washing & soft washing), Pressure Washing (for driveways, decks & more), Window Cleaning (windows, skylights & solar panels), and Interior Cleaning (carpet, upholstery, couch & dryer vent cleaning). We provide top-quality service in Kenmore, Lake Forest Park, Juanita, Kirkland, Inglewood, and nearby areas. Get a free estimate today
Roofing Formula
(425) 207-6016 www.roofingformula.com
Serving
5.0 from 149 reviews
Welcome to Roofing Formula! 😊 We're your friendly neighborhood roofing experts who believe that a sturdy roof is the foundation of a happy home. Our team is passionate about providing top-notch solutions because we care about your shelter as much as you do! Whether it's a minor repair or a complete overhaul, we're here to make your roofing experience as smooth and stress-free as possible. Let's build something great together! 🏠
Rock Roofing | Trusted Residential & Multi-Family Roofing Experts
(425) 486-8683 www.rockroofing.com
Serving
4.8 from 73 reviews
Established in 1998, Rock Roofing has been a trusted name in roofing solutions for over two decades. We are committed to providing top-tier services for both residential and multi-family properties. Our licensed and insured team specializes in installations, repairs, and maintenance, delivering tailored solutions with unmatched quality and durability. With a proven track record of reliability and excellence, we prioritize customer satisfaction, ensuring every project is completed on time and within budget. Whether you're upgrading your home or expanding your business, Rock Roofing is your dependable partner for long-lasting, professional results.
Suruka House
(425) 236-3462 surukahousecare.com
Serving
4.9 from 38 reviews
At Suruka House Care, we pride ourselves on being the best roofing company for your home repairs in Washington. Your satisfaction is our top priority – if you’re not happy, we’re not done. We won’t stop until your roof is perfect, and if something goes wrong, we’ll be back within 48 hours to make it right. From roof repairs to gutters, we’ve got you covered. As GAF-certified contractors, we offer the Silver Pledge, including a 50-year material defect warranty and a 10-year labor warranty. We also provide free roof inspections, estimates, drone inspections, and help with insurance claims. With us, you’ll experience seamless communication and total dedication every step of the way.
Silverlining Roof
(425) 209-9805 silverliningroof.com
Serving
5.0 from 353 reviews
BBB Accredited A- rated Family-owned company specializing in roofing replacement, install and repairs for residential and commercial project’s. ✔️ Eco-friendly ✔️ Free in-home estimate ✔️ Locally-owned & operated ✔️ 100% financing ✔️ Workmanship guarantee We offer financing Do you want to turn your large home project into an affordable monthly payment? Now with our Financing opportunity it will allow you to make your home improvements come true! With 19 years' experience in the market, our professionals are on hand to ensure you get the highest performance your roof can achieve, by means of optimized features and functionality.
Sky Roofing Renovations
(206) 853-1210 skyroofingrenovationsllc.com
Serving
5.0 from 58 reviews
Protect your largest investment with our reliable roofing services. We are a locally owned and operated roofing company currently serving Bothell, WA and surrounding communities. If you want to make your roof last as long as possible, it is vital that you never put off a roof repair. Small issues with roofing become big issues in a hurry. No matter how major or minor the repair you need, we are here to help. We offer roofing contracting, roof installation, and roofing repair.
Ferdi Roofing & Siding
(425) 671-7859 ferdiexteriors.com
Serving
4.9 from 103 reviews
Ferdi Roofing & Siding is a premier exterior construction firm specializing in high-performance roofing systems, precision-engineered gutter installations, architectural siding, bespoke windows and doors, custom deck construction, and finely executed exterior finishes. Crafted with care, executed with precision, and built to endure, each Signature Package project is guided by a rigorous attention to detail, material integrity, and long-term performance. By uniting advanced technical expertise with disciplined craftsmanship, we deliver exterior environments that enhance structural resilience, elevate architectural character, and age with distinction.
VBC Roof & Gutter
(425) 666-8380 vbcroofconstruction.com
Serving
5.0 from 60 reviews
At VBC Roof & Gutter, we provide complete exterior home services to keep your property protected and looking its best. Our team specializes in roof replacement, roof repair, and roof cleaning services, including moss removal and maintenance. We also offer gutter installation, gutter cleaning, and siding installation to improve your home’s appearance and function. Need interior work? We handle carpentry services and professional tile installation for kitchens, bathrooms, and floors. Contact VBC Roof & Gutter today for a free estimate and let us help you upgrade and protect your home!

Smart Choice Roofing
(425) 209-1877 www.smartchoiceroofing.us
Serving
5.0 from 23 reviews
As a homeowner, taking care of all your property’s maintenance can be overwhelming and time-consuming. One thing you can count on us for is your roof. Your property’s roof protects your home and family from the outside elements. Whether you need a roof leak fixed or it’s time for a roof replacement, ensure you’ve made the right choice with Smart Choice Roofing We provide our roofing services in Bothell, Washington, and surrounding areas to our many valued customers. Our vast knowledge and expertise provide you with the best roofing system for your project. Get in contact with us for a free quote. When you hire us, you’ve made the smart choice for your roofing contractor. Your home will thank you for it!
King Roof Care
(425) 543-8005 kingroofcare.com
Serving
4.9 from 115 reviews
King Roof Care is your trusted local roofing expert serving Kirkland, Bellevue, Redmond, Bothell, Woodinville, Seattle, and nearby areas. Our seasoned team excels in comprehensive roofing services, including roof replacement, roof repair, roof installation, gutter repair, and installation. We are fully licensed and specialize in tile, shingle, flat and metal roofs for residential and commercial properties. With a reputation built on service, safety, and dedication, King Roof Care is the name you can trust for all your roofing and gutter needs. Choose us, and experience the reliability of a local partner. Contact us at (425) 543-8005, and let us protect your investment with our expert roofing and gutter solutions.

Brixton & Windsor Roofing
(206) 888-3948 brixtonwindsorroofing.com
Serving
5.0 from 67 reviews
Roofing Contractor serving Bothell and the surrounding area. Experienced and Customer Service oriented. Providing Roof Replacement, Repairs and Maintenance.
In Kenmore, the local roof climate emphasizes persistent moisture, shading, and moss management. Asphalt shingles remain a practical fit, but their performance here depends heavily on algae resistance, proper ventilation, and regular moss control in shaded conditions. When choosing asphalt, look for a composition rated for algae resistance and for shingles that include built-in micro-venting features to help dry a roof after rain. The key in this environment is a system that breathes well so moisture doesn't linger in attic spaces or along roof planes. If you prioritize longevity in a shaded, moss-prone setting, pairing asphalt with a robust underlayment and a proactive moss prevention plan can keep facades and eaves clearer.
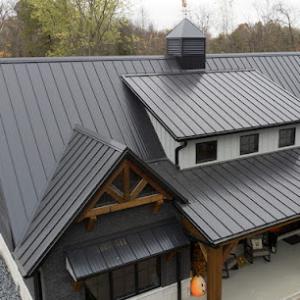
Metal roofing is locally relevant because it sheds water and debris well in the Puget Sound climate, but detailing around penetrations and condensation control matter in cool, damp weather. For Kenmore homes, metal panels offer a reliable path to rapid drainage and reduced moss attachment on exposed surfaces. The critical details live at the joints: ensure flashing is continuous and well-sealed at valleys, vents, and skylights, and that panel seams are properly seated to minimize condensation that can drip into soffits. Condensation control becomes particularly important in tighter, shaded rooflines where cool nights meet damp days, so look for integrated venting strategies such as ridge vents paired with eave intake to maintain effective air movement. A treated substrate or a breathable underlayment under metal can further manage moisture buildup, especially on re-roof projects.
Tile, slate, and copper appear in the market but require attention to structural load and installation planning because unusual roofing loads may trigger added review during permitting. In this climate, clay and concrete tiles offer distinctive aesthetics and durability, yet their weight demands a structural evaluation before replacement. Slate and copper deliver long-term resilience but introduce the realities of heavier ramp-ups in load calculations and the need for careful fastening in damp coastal air. Copper, in particular, can tolerate moisture well and develops a patina over time, but its thermal expansion must be accounted for at intersections and roof penetrations. When considering these premium options, a detailed assessment of roof framing, fastener selection, and expansion gaps becomes essential to prevent later leaks or movement in wet seasons.
Ventilation and moisture management threads run through every material choice. Shaded neighborhoods near Lake Washington and the Sammamish River often trap humidity, so attic ventilation must align with roof type to avoid condensation that can promote moss and wood rot. Ridge and soffit exchanges should be balanced, with baffles where necessary to maintain clear air channels. Moss control remains a practical daily consideration: illuminated, well-ventilated roof planes resist moss establishment better, while regular roof cleanliness and moss-preventive coatings can extend a roof's effective lifetime. In all material scenarios, the combination of moisture-aware installation, proper ventilation, and proactive moss management defines a durable, locally resilient roof.
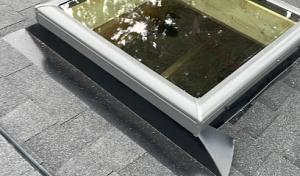
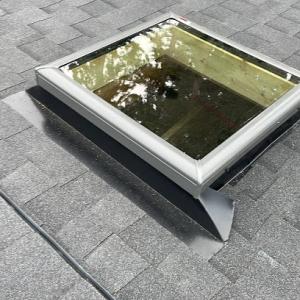
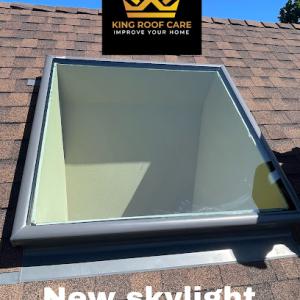
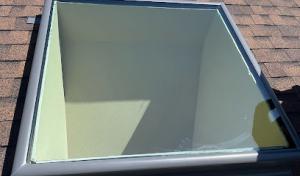
In this area, repeated wetting from frequent rain makes flashing around skylights, chimneys, and vent penetrations a bigger long-term issue than any sudden thermal shock. Skylight work is especially relevant in the contractor market, reflecting how common leak troubleshooting is around flashed openings in a rain-heavy climate. If a roof transition includes a skylight or vent stack, the expectation should be long-term performance, not a quick fix. Quality flashing is not optional; it's foundational to keeping water out where it tends to find any seam or joint.
What determines a leak before it becomes a visible problem is how well the flashing is integrated with the roof deck and the skylight curb. In a neighborhood with dense tree cover and persistent moisture, even minor gaps can become chronic drip points after years of wet seasons. The combination of moss, shade, and dew creates a schedule of maintenance that never truly ends. A seasoned local roofer will treat skylight flashing as a structural detail rather than a cosmetic add-on, paying careful attention to the transition from curb to membrane and ensuring the sealant is compatible with the local climate.
Vent penetrations-whether for plumbing, bathroom fans, or furnace intakes-present predictable failure routes when neglected. In the wet climate you live with, the surrounding flashing must cope with seasonal swelling and contraction, and the sealants must resist long-term moisture exposure without drying out. A common pitfall is assuming a once-done repair will endure forever. Instead, plan for periodic inspection and proactive resealing, especially after successive winters where freeze-thaw cycles and moss growth can push against sealant lines.
Homes in this area often need reroof planning that treats penetrations and venting changes as part of the project scope, not as minor add-ons. If a reroof is on the horizon, evaluate skylight curb condition, chimney flashing, and vent flashings as core criteria rather than afterthought improvements. A comprehensive approach reduces the chance of expensive callbacks and ongoing leaks, aligning the project with the climate's propensity to test every seam year after year.
A practical plan includes regular inspection after the wet season, proactive resealing, and targeted moss control around penetrations. When moss roots begin to intrude near flashing or vent edges, it's a signal that moisture retention is intensifying at those details. Addressing it early-not just when a leak appears-preserves roof integrity and minimizes invasive fixes later on. In this landscape, the goal is a roofing system that gracefully handles the rain-heavy, shaded environment rather than one that merely sheds water on the surface.
Find contractors experienced in skylight installation, flashing, and leak repairs to bring natural light into your home.

Titan Roofing
(206) 591-4015 theroofingtitan.com
19525 61st Ave NE, Kenmore, Washington
5.0 from 130 reviews
Rock Roofing | Trusted Residential & Multi-Family Roofing Experts
(425) 486-8683 www.rockroofing.com
Serving
4.8 from 73 reviews
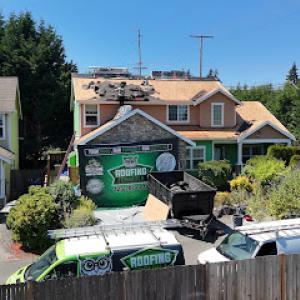
Reroof work in this area often centers on the dry summer window because installers need better conditions for tear-off, dry-in, and final sealing. In practice, that means scheduling tear-off tasks between mid-June and early September when the chance of a sustained rain spell is lowest. The dry stretch helps ensure shingles seat cleanly, nails are driven correctly, and flashing gets a solid, watertight seal before the next moist spell. Morning moisture can still linger on cooler days, so plan for a later start if dew or fog lingers, and keep crews moving efficiently to avoid a mid-day heat spike that can affect some materials.
Dry summer weather reduces rain delays, but asphalt shingle curing can still be affected by local temperature swings and morning moisture. If temperatures swing from cool mornings to warm afternoons, the crew may stagger applications so sealants andoota adhesive products cure within the manufacturer-specified ranges. Shingle growth control in shaded zones matters too; ensure proper ventilation at the ridge and eaves during installation to prevent heat buildup that can trap moisture behind new layers. Have fans or temporary ventilation on hand if the attic access allows for better cross-ventilation during the dry-in and sealing stages.
Winter and shoulder-season projects in the Puget Sound region often require more careful moisture management and can face longer scheduling queues after storms. In practice, that means allowing extra drying time for roof deck prep, using moisture meters to verify the deck is dry enough before laying underlayment, and having a contingency plan for weather-related delays. If a shoulder-season window opens for a week or two, use it for tasks that don't rely on a hard dry-out-at least for pre-tear-off work like roof inspection, deck cleaning, and debris removal. The goal is to keep the tear-off phase as dry as possible while you wait for a more favorable stretch.
Because coverage of tree canopies and frequent shade is common, sequencing matters. Start with a thorough moss assessment and remediation plan before tearing off. If moss levels are high on the existing roof, consider applying a moss-killing treatment during the dry period immediately prior to tear-off to minimize moss transfer to the new roof. Ensure gutters are cleared and drainage paths are ready to handle increased moisture once the new roof is in place. Proper sequencing reduces moisture retention around fasteners and flashing, contributing to a longer-lasting result in this humid, shaded climate.
Get a clear picture of your project costs upfront - no commitment required.
Chinook Services
(425) 290-8635 chinookservices.com
8244 NE 145th St, Kenmore, Washington
4.8 from 134 reviews
Provided local pricing ranges run about 350 to 650 USD per square for asphalt shingles, 700 to 1100 for metal, 900 to 1700 for clay tile, 600 to 1000 for concrete tile, 1100 to 2000 for slate, and 1200 to 2500 for copper roofing. In practice, the project will rarely be a straight material swap. The moist, shaded climate and frequent moss load mean even a simple re-roof can drift higher as crews address moisture intrusion and surface rot discovered during tear-off. Typical costs you'll encounter in this neighborhood reflect not only the chosen product but the extra moisture-related deck repairs, moss cleanup, and flashing replacement that often show up after the old layers come off. In short, a like-for-like replacement can become a moisture-and-moss package deal rather than a pure material swap.
Kenmore pricing is strongly affected by moisture-related deck repairs, moss cleanup, and flashing replacement because hidden rot and wet sheathing are common discoveries in this climate. Expect crews to pull back damp insulation, assess sheathing, and replace damaged sections. The sooner deck and fascia prep happens, the closer you stay to the lowest end of your material range. If moss has soaked into the underlayment or rafter tails, budget more for remediation and additional coating or treatment to prevent rapid re-growth. Ventilation needs are real here: insufficient attic airflow amplifies moisture problems and can push up replacement costs by requiring more extensive underlayment and ridge vent work.
Costs can rise during regional summer demand spikes when homeowners across north King County and the Seattle area compete for the same dry-weather installation calendar. That competition squeezes openings, drives crew rates, and can push projects into peak pricing windows. If you're aiming for a narrow dry spell, plan early and be ready to adjust material selection or scheduling to avoid the highest surge periods.
Reroof projects in Kenmore generally require a building permit through the City of Kenmore or King County, depending on jurisdiction and project specifics. Before any tear-off or material upgrade begins, verify the correct authority with the local permit desk, and confirm whether a plan review is needed for structural or venting changes. A clear permit path helps avoid delays when the short dry installation windows in this area pop up.
Understanding which agency handles the permit is essential. If the project sits within city boundaries, the City of Kenmore typically issues the permit, with inspections coordinated through the city's building department. If the home falls under broader county zoning or unincorporated limits, King County may be the proper authority. In any case, requesting a preliminary plan review can help flag moisture- control details, underlayment choices, and ventilation strategy early, reducing surprises as the project progresses.
Local reroof inspections commonly include underlayment or venting milestones and a final inspection after completion. The underlayment stage verifies that moisture barriers are correctly installed to withstand the Pacific Northwest's wet climate, while venting milestones confirm attic and roof-ventilation changes align with the home's existing ductwork and soffit configurations. A robust inspection sequence helps ensure moss prevention measures and proper moisture control remain effective throughout the life of the roof. Plan for a final inspection once all roofing material and flashing are in place, verifying leak integrity and overall workmanship.
Projects with unusual roofing loads or venting changes may require additional plan review, which is especially relevant for heavier materials such as tile or slate. In Seattle metro-area climates, weight can influence joist spacing, beam support, and local snow loading considerations. If a reroof involves changing vent locations, chimney terminations, or the interaction of attic baffles with soffit vents, expect extra scrutiny. Prepare detailed drawings showing framing, underlayment type, fastening methods, and vent routing to smooth the review process and avoid delays.
Before starting, gather site, design, and venting information for the permit office, and establish a clear inspection schedule with the chosen contractor. Maintain open lines of communication with the inspector and the permit desk, and keep any plan-review notes accessible on site. This approach helps keep a reroof project on track through Kenmore's moisture-prone, shaded roof environment.
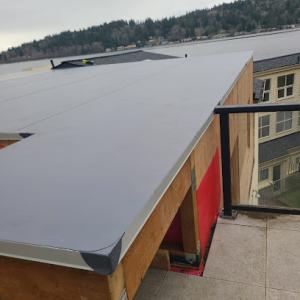
Find specialists in TPO, EPDM, and built-up flat roofing systems for residential and commercial properties.
Titan Roofing
(206) 591-4015 theroofingtitan.com
19525 61st Ave NE, Kenmore, Washington
5.0 from 130 reviews
In the Kenmore area, insurers typically focus on wind- and storm-related roof damage rather than hail, and they often request clear pre-loss and post-loss documentation. That emphasis means you may be asked to show how the roof performed under typical Puget Sound moisture, not just during a single storm. Clear records help prevent disputes about whether damage existed before a event or developed from ongoing exposure.
Carrier decisions in this region can turn on roof age, installation details, and whether damage is sudden storm damage or long-term moisture-related wear. A shingle or flashing issue that looks minor after a heavy rain may be read as wear from moisture if there is a long gap since installation or a known maintenance lapse. Understanding the age and the original installation specifics-such as underlayment quality and ventilation provisions-can influence how much is covered.
Homeowners should expect possible adjuster site visits and itemized scope requests after significant storm events affecting the north King County market. An adjuster may want to see attic ventilation, moss control records, and any prior repairs. The conversation will likely hinge on whether the damage ties to a recent wind event or to ongoing moisture-related wear that evolved over time. Preparedness reduces delays.
Keep clear pre-loss and post-loss documentation, including photos from dry periods and after storms. Note any moss growth and ventilation issues that could worsen moisture damage. When safe, document the condition of flashing, gutters, and underlayment. If you notice leakage or staining, contact your insurer promptly and schedule repairs within your dry window to minimize further moisture issues.