Last updated: Apr 19, 2026
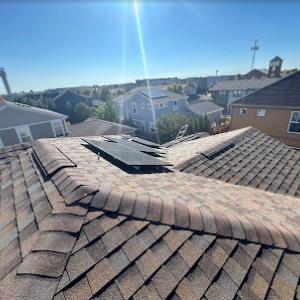
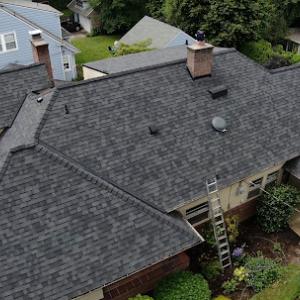
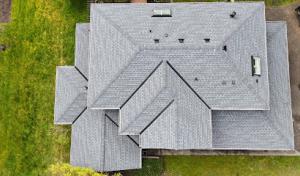
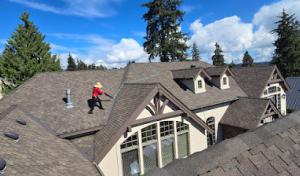
On this island, the wet Puget Sound climate brings frequent rainfall and mild temperatures that quietly favor moss taking hold on roofs. The steady moisture creates a damp roof deck, hidden leaks, and slow-drying failure that can sneak up during wet seasons. Because the rain never fully stops, a small issue can fester into a serious problem before you know it. If you have a steep roof with many skylights or vented dormers, the risk compounds as moisture can travel along interrupted ridges and into attic spaces where it's harder to see. You owe it to your home to treat moisture as an ongoing event, not a one-time fix, especially around vulnerable flashing details, penetrations, and roof-to-wall transitions.
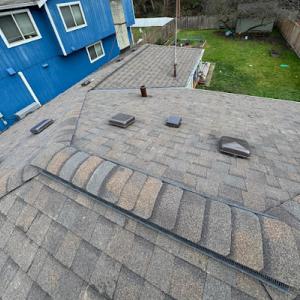
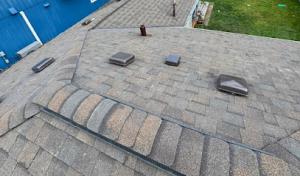
The island's heavy tree cover and shaded residential lots mean roofs stay damp longer than open hillside homes. Shade, pine needles, and fallen leaves accumulate quickly, creating a perfect moss nursery. Moss holds moisture against shingles and shakes, lifting and lifting the granules or fibers away from the protective surface. Debris acts like a sponge, feeding more moss growth and trapping moisture where leaks often begin-along valleys, near skylights, and at penetrations. You'll likely see moss first in valleys and along the drip edge, then spreading outward. If you notice dark, velvety patches or a lawn-like spread on your roof, treat it as a warning sign rather than a cosmetic issue. Moss and debris aren't just unsightly; they insulate moisture against the underlayment, accelerating rot and compromising attic ventilation.
Leaks don't announce themselves with dramatic drama on this island. They arrive as slow drips into attic spaces, musty odors, or sudden interior moisture after a heavy rain. The most common points of failure are around skylight flashings, vent penetrations, chimney connections, and where roofing materials meet vertical walls. When moss and debris accumulate, wind-driven rain can wedge under shingles and tiles, finding micro-cracks and lifting the edges of flashing. If you skip regular maintenance, a small breach can turn into a full leak during late-winter storms or the first heavy spring rain. The outcome is more costly and disruptive if a roof deck or plywood has soaked for months.
In this market, homeowners commonly time full replacements for late spring through early fall to reduce moisture risk during tear-off and dry-in. That window favors dry days, stable temperatures, and faster drying of new underlayment and decking. If you suspect replacement is needed, plan a schedule with a clear dry-in target and a robust plan for temporary weatherproofing. For those not replacing, the best practice remains a deliberate schedule of moss remediation, debris removal, and targeted flashing upgrades before the wet season returns in earnest. Avoid postponing a critical repair that keeps water away from the interior-delays can amplify rot, sagging, and insulation degradation.
Start with a thorough inspection focusing on moss growth patterns, debris buildup, and suspect flashings around skylights and vents. If moss covers more than a small area, use a non-pressure wash method or specialized moss remover to minimize damage to shingles or shakes, then follow up with a careful brushing to remove roots without snagging fibers. Clear gutters and downspouts to prevent ice dam formation and ensure proper drainage during the wet season. Inspect valleys and ridge lines for loose or missing granules, cracked sealants, or deteriorating underlayment where moisture can collect. Finally, ensure your attic has working ventilation and a functional roof vapor barrier to keep humidity from seeping into structural components. On a wooded island with persistent dampness, proactive maintenance today prevents expensive remediation tomorrow.
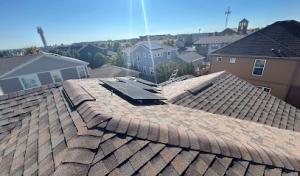
The dominant local materials are asphalt shingles, metal roofing, clay tile, concrete tile, wood shingles or shakes, and synthetic or composite shingles. On this island, the wet, moss-prone Puget Sound microclimate shapes everything from water shedding to maintenance cycles. Algae resistance and reliable drainage matter more than high heat performance. When selecting a roof, think about how easily the surface sheds moisture during constant rain, how well moss can be kept at bay, and how accessible it will be to perform periodic cleanouts or treatments. The goal is a system that dries quickly after storms and stays visually clear without frequent intervention.
Asphalt shingles are a common, practical choice for homes with varied roof lines and steep pitches. They shed water well when installed with proper flashing and a continuous ventilation path. Look for infrared-rated or algae-resistant varieties, and opt for a broader nailing pattern if the roof has challenging micro-slope spots. In a moss-prone setting, a durable granule surface helps resist staining and keeps the roof looking clean longer. Maintenance here centers on keeping debris off the surface and ensuring distal gutters remain free of clogs so water leaves the roof promptly rather than pooling on low-slope segments.
Metal offers excellent water shedding and wind resistance, with the added benefit of quick shedding during rain storms. For a moss-heavy climate, choose panels or shingles with factory-applied coatings designed to resist mildew and algae. A standing-seam or interlocking profile helps minimize leaks at fasteners, but it's essential to seal and maintain penetrations around chimneys and skylights. Metal roofs pair well with underslip ventilation and a solid underlayment, especially on steeper roofs where moss dries out less between storms and wind-lift concerns are lower. Regular moss removal on shaded sections remains part of routine care, but metal systems typically tolerate cleaning more readily than porous materials.
Clay tile brings a long service life and a strong, water-shedding surface when installed on a solid, well-ventilated deck. The weight is substantial, and fastener hardware should be chosen to resist corrosion in a damp climate. In wet climates, clay tiles can hide moss growth in shadowed valleys, so consider darker hues and consistent cleaning schedules. Slope and structural support are critical; a proper underlayment and vented attic space help manage moisture behind the tiles. If trees shade roofs, expect periodic leaf and moss removal to prevent moisture retention at joints.
Concrete tile shares many advantages with clay but can be heavier and more prone to cracking if the deck isn't reinforced. Water shedding remains strong with a smooth rake edge and proper valley detailing. In moss-prone regions, concrete tiles require vigilant moss management on north-facing surfaces and in shaded corners. A quality underlayment and careful flashing around skylights and vents reduce the risk of moisture wicking into the attic. Choose a texture and color that hides algae staining between cleanings, and plan for routine inspections after wet seasons.
Wood shingles or shakes fit the regional architectural vernacular, but moisture retention can shorten service life in a damp Western Washington environment. Expect more frequent treatment against moss, rot, and insect activity. If choosing wood, pick species with good rot resistance and apply a proven preservative cycle. Maintain a clear overhang and robust roof ventilation to keep the wood dry between storms. In shaded areas, consider more frequent inspections and potential replacement with a moss-resistant alternative when deterioration appears.
Synthetic or composite shingles offer design flexibility and often improved resistance to algae and moss compared to natural wood. They can mimic other materials while delivering a consistent surface for drainage. In a moss-prone setting, confirm the product's warranty against staining and verify that the system integrates with a reliable underlayment and ventilation plan. Combining a moisture-conscious installation with a regular cleaning schedule helps maintain both function and curb appeal.
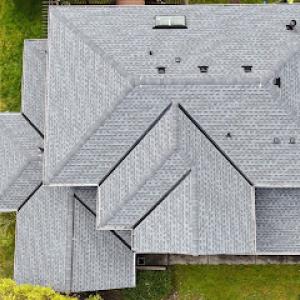
Evaluate each option against a few Mercer Island-specific priorities: ensure water shedding is immediate after rain, verify algae resistance ratings, and plan for an accessible maintenance routine. Check roof lines for areas prone to moss accumulation-north-facing terraces, dense canopies, and complex valleys-and choose profiles that minimize crevices where moisture can linger. For steep, skylight-rich roofs, prioritize reliable flashing details and a robust underlayment to reduce leak risk during the wet season. A well-chosen roof on this island should balance long-term durability with a maintenance plan that keeps moss in check and water moving off the surface efficiently.
Winter storms roll through with heavy rainfall and wind, and on this wooded island that means moisture finds its way into weak spots fast. You'll hear wind-driven rain hammering through penetrations, valleys, and transitions long before the sun comes back. On Mercer Island, leak calls after wind-driven rain often involve vulnerable penetrations and transitions rather than purely sun-aged field shingles. If you notice dripping from vents, flashing, skylight cuffs, or where the roof meets a chimney, treat it as an active risk that won't self-resolve with a dry spell. Do not wait for a lull in weather to inspect; plan a rapid assessment the first clear window and document with photos.
In this microclimate, moss and wet roofs disguise underlying failures. Start by examining ridge lines and drain terminations for dried-out sealant, displaced flashing, or rust on metal step and counter-flashing. Check around skylights and vents for damp decking or staining on interior ceilings below the corresponding roof plane. Pay special attention to transitions from flat to pitched areas and where a roof sheds overhangs or returns into vertical walls. Because storms drive moisture into these junctions, a small uplift in flashing or loose shingle tabs can become a fast-starting leak after a windy hour or two of rain. If you can safely access the attic, look for condensation patterns, dark patches, or musty smells that signal hidden intrusion.
Limit exposure by clearing nearby debris that could trap moisture at rakes and eaves, and ensure roof drainage is not blocked by leaves or moss mats. If you spot active staining or feel air coming through a seam, apply a temporary, temporary-seal method only as a stopgap and plan a professional assessment as soon as weather permits. Do not rely on caulk alone to seal large flashing gaps; improper sealing here invites quick failure under more rain and wind. Keep a log of dates, rainfall amounts, and any new drips, so a contractor can pinpoint the storm-driven sequence of damage.
Look for crews that understand how Puget Sound moisture interacts with steep, skylight-rich roofs typical here. Ask about experience with moss management, membrane transitions, and vent or skylight detailing, not just shingle repair. Request a dry-in or staged plan that prioritizes vulnerable penetrations first, then moves to field shingles. In a wet climate, a methodical, moisture-focused repair beats a quick patch that might fail again within a season. If scheduling is tight due to back-to-back storms, communicate that urgency clearly and confirm access safety for high climbs and moss-covered surfaces.
Consider reinforcing critical joints with corrosion-resistant flashing and upgrading underlayment where moss risk is highest. Regular, light maintenance between storms-especially after dry spells-helps prevent moisture buildup that accelerates deterioration. For homeowners, preserving dry attic spaces through reinforced attic ventilation and clear roof lines reduces hidden moisture stress and minimizes the chance of weather-driven wear turning into costly damage. On this island, proactive care after each winter storm saves interior comfort and structural peace of mind.
Find local contractors experienced in assessing and restoring roofs after hail, wind, and severe weather events.


Eco Roof Cleaning Renton
(206) 704-5019 ecoroofingnw.com
Mercer Island, Washington
5.0 from 81 reviews
Eco Roof Cleaning Renton is your local expert in eco-friendly roof and gutter maintenance. We specialize in roof cleaning, moss removal, roof treatment, gutter cleaning, and minor roof repairs using environmentally safe methods that protect your home and the planet. Based in Renton, WA, our team is committed to quality workmanship, outstanding customer service, and long-lasting results. Whether you're dealing with moss buildup or clogged gutters, we help homeowners maintain the value, safety, and beauty of their homes—without harsh chemicals. Call now for a free estimate and experience the Eco difference.

Golden Rule Roofing & Construction
(206) 556-4769 www.goldenruleconstruction.org
Mercer Island, Washington
4.9 from 80 reviews
Golden Rule Roofing & Construction offers a menu of contractor and construction services including roof maintenance, cleaning & repairs, composition and metal roof installations, gutters & downspouts installations, skylight installations, waterproofing, siding repairs and installations, deck repairs and installations. Our experienced team of experts will work closely with you to help you find the very best solutions, products and services to fit any home improvement or roofing need you may have.

Smart Roofing WA
(425) 515-3876 smartroofingwa.com
Mercer Island, Washington
4.9 from 33 reviews
Smart Roofing Solutions WA Our Washington customers love that we are an all-inclusive professional roofing and home repair service company offering: Roof Repair Gutter Cleaning & Installation Yearly Maintenance Cleaning Insulation Services Re-roofs Ask about our other home and roofing services

Three Tree Roofing
(425) 230-3300 www.threetreeroofing.com
Serving
5.0 from 46 reviews
Three Tree Roofing is proud to be the trusted Bellevue roofers that homeowners and businesses rely on. Our company approaches every project with a customer-centric focus. Our team brings years of experience, care, and craftsmanship to every project. We believe a strong roof does more than keep out the rain; it adds comfort, value, and peace of mind to your property. From asphalt shingles to metal and flat roofing systems, we provide solutions designed to handle the unique climate of the Pacific Northwest. What sets us apart is our commitment to clear communication, reliable scheduling, and treating every home like it is our own. At Three Tree Roofing, we are here to make sure your roof looks great, performs well, and stands strong for years
TH Roofing Company
(425) 866-4284 throofingcompany.com
Serving
5.0 from 41 reviews
H ROOFING COMPANY provides roofing solutions that will fit your budget, we serve residential and commercial projects, we do repairs, maintenance and even new construction. While we are in the development of the roof installation, we will always maintain communication with the owner of the work to keep informed about the progress. Always at all times we will give all our effort to do things right from the beginning and above all meeting the expectations of all our customers is one of our main objectives. At TH ROOFING COMPANY, our commitment is always to quality in workmanship, to use the best brands of roof manufacturers and in this way ensure the total satisfaction of all our clients.
Silva Roofing & Repair
(206) 592-2492 silvaroofingandrepair.com
Serving
5.0 from 18 reviews
Based in the heart of Des Moines, WA. Roofing services including roofing repair, replacement, and installation! Other roofing services include gutter installation, gutter cleaning, and skylight installation! Silva Roofing and Repair, LLC is a trusted family-owned business specializing in roofing and repair services. Our small yet dedicated team takes pride in delivering top-notch craftsmanship and personalized attention to every project. Whether it's a minor repair or a complete roof replacement, you can rely on Silva Roofing and Repair to provide reliable solutions tailored to your needs. Trust Silva Roofing and Repair to safegaurd your property! Contact Silva Roofing and Repair, LLC to get a free quote! Licensed and bonded.

Brooks Roofing & Repair
(425) 209-3829 brooksroofbellevue.com
Serving
5.0 from 35 reviews
Brooks Roofing & Repair provides professional roofing services in Bellevue for residential and commercial properties. Whether you need a quick leak repair, storm damage restoration, or a complete roof replacement, our experienced team delivers dependable solutions using high-quality materials. We work with all major roofing types and focus on long-lasting craftsmanship. Choose Brooks for trusted service and durable protection.
EA CONSTRUCTION LLC | Roofing Specialist
(425) 496-3158 eaconstructionwa.com
Serving
5.0 from 19 reviews
At EA Construction, we are your trusted roofing experts in Kirkland, WA, specializing in residential and commercial roofing services. Our team handles roof repairs, roof replacements, new roof installations, re-roofing, and roofing upgrades. Whether you need asphalt shingles, metal roofing, or flat roof solutions, we deliver high-quality results at competitive prices. Proudly serving Kirkland and surrounding areas. Contact us today for your FREE roofing estimate!

Washington Sequoia Roofing
(206) 488-0168 washingtonsequoiaroofing.com
Serving
5.0 from 81 reviews
Washington Sequoia Roofing is your trusted roofing company in the heart of Maple Valley, WA, proudly serving the surrounding communities within a 50-mile radius. With unwavering dedication to craftsmanship, we've become the local choice for roofing solutions. Our commitment is simple: we deliver results. We understand the unique demands of the Pacific Northwest climate and the importance of a sturdy, reliable roof. When you choose Washington Sequoia Roofing, you're choosing a team that cares about your home as much as you do. Our experienced roofers are skilled in handling everything from minor repairs and siding installation to complete roof replacements.

Guardian Roofing, Gutters & Insulation
(425) 600-1289 www.guardianroofing.com
Serving
4.6 from 110 reviews
Guardian Roofing, Gutters & Insulation at 3211 MLK Jr Way S offers expert roofing services in Seattle and beyond. With over 60 years of combined experience, our team specializes in roof repair, metal roofing, and replacement. Awards like GAF Master Elite and Owens Corning Platinum showcase our commitment to quality and customer satisfaction.
Eco Roof Replacement & Roof Cleaning
(206) 687-1699 ecoroofingwa.com
Serving
4.9 from 126 reviews
Eco Roof Replacement & Roof Cleaning is your trusted local expert for environmentally friendly roof replacement, moss removal, and roof cleaning services in Kirkland, Issaquah, and Redmond. We specialize in extending the life of your roof using safe, eco-conscious methods and high-quality materials. Whether you need a full roof replacement, pressure-free roof washing, or routine maintenance, our skilled team delivers reliable service with lasting results. We’re committed to protecting both your home and the environment—one roof at a time.
Rainier Roofing Company
(206) 347-8191 www.rainierroofingcompany.com
Serving
4.8 from 178 reviews
Rainier Roofing Company provides complete roofing services in the Seattle, WA area.
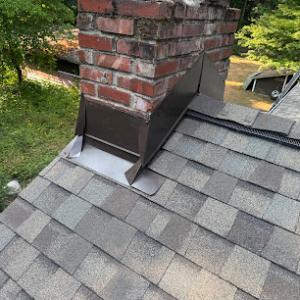
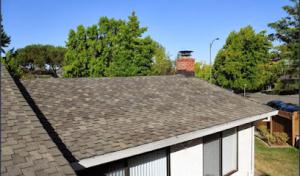
Skylight work is notably prevalent in this market, indicating that roof penetrations are a common homeowner concern locally. On a cluttered, spruce- and cedar-draped island, every skylight, vent, or chimney becomes a potential path for moisture if flashing isn't flawless. The wet climate drives a slow, persistent cycle of wetting and drying that first reveals minor gaps, then magnifies them when water lingers. If a flashing detail is marginal to begin with, a single heavy downpour or a weeks-long rainfall pattern can push a small drip into a visible interior stain.
In Mercer Island's rainy climate, flashing around skylights, chimneys, and similar penetrations is especially important because prolonged wetting can turn minor defects into interior leaks. The best strategy is to treat every rooftop penetration as a critical moisture barrier. Pay close attention to step flashing where the roof plane meets vertical stacks, and to the transition around skylight flanges. If a skylight is installed after the original roof deck, verify that the new flashing integrates with the old underlayment and that sealant joints are precisely adhered. When a roof ages and cedar gutters shed into the flashing zone, those organic residues can trap moisture and complicate drainage, inviting slow seepage that undermines even well-sealed seams.
Homes surrounded by trees often accumulate needles and organic debris upslope of penetrations, which can slow drainage and increase leak risk around flashing details. On a typical Mercer Island lot, pine needles collect along the upslope edges of skylight curbs and chimney bases, forming dry, fibrous blankets that hold moisture against the flashing and deck gaps. Regular inspection after storms or heavy winds is essential; look for trapped debris that can stagnate water and wick into seals. When you prune or manage surrounding branches, aim to maintain a clear drip line and reduce the amount of debris that can shed onto the roof deck and flashings.
Treat skylight and penetration maintenance as an ongoing seasonal task rather than a one-off repair. In wet months, inspect flashing seams for hairline cracks or lifted metal, and test the integrity of sealants with a gentle water spray near edges. After leaves fall, do a focused sweep of the flashing zones to remove organic matter that could harbor moisture. If a leak starts as a slow weep at a skylight curb, address it early with a precise re-sealing, rather than waiting for a full roof replacement. The goal is to keep moisture moving off the surface quickly and away from vulnerable joints, especially around skylights and chimneys that see the most traffic of water on a rainy year.
Find contractors experienced in skylight installation, flashing, and leak repairs to bring natural light into your home.

Golden Rule Roofing & Construction
(206) 556-4769 www.goldenruleconstruction.org
Mercer Island, Washington
4.9 from 80 reviews
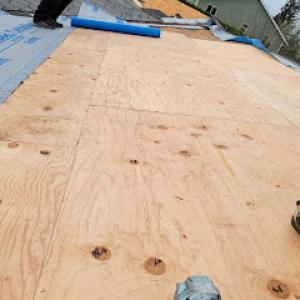
Late spring through early fall is the preferred replacement window locally because crews can better manage tear-off, underlayment exposure, and dry-in in lower-moisture conditions. This timing aligns with Mercer Island's damp but seasonal drying patterns, letting crews stage materials, protect interior spaces, and complete the dry-in before the heaviest fall rains begin. Keeping a tight schedule around a stretch of clear weather helps prevent moisture from lingering on the roof deck or around skylights, where moss can take hold and complicate a proper seal.
Spring can offer workable scheduling windows, but periodic rain still creates moisture concerns that affect staging and inspection timing. If a spring replacement is pursued, expect easier access for daylight and ventilation but plan for more frequent tarp adjustments and temporary edge protection. Inspections during wet intervals should focus on moisture intrusion risks around vents, penetrations, and any existing skylights. A successful spring job hinges on rapid coverage of exposed underlayment and a disciplined dry-in process when a dry spell arrives.
Fall and winter conditions on this island are wetter and more moss-prone, which can complicate both installation quality and post-install cleanup. Higher humidity and cooler temperatures slow adhesives and trap moisture on shaded roof faces. Moss is more likely to reestablish on damp days if gutters and valleys aren't cleaned in advance, so crews will emphasize thorough cleanup and moss mitigation during tear-off and after installation. In these months, crews often shorten each work day to maximize daylight and avoid long exposure of the interior to the elements.
To optimize results, coordinate with the crew on access routes and staging. On many properties, steep roofs and mature trees can drop needles and moss quickly; plan for daily cleanup and wheel-barrow or debris containment near driveways to avoid staining and debris buildup. Clear a path for equipment, and ensure that ground protection is in place where the work zone meets landscaped areas and walkways.
Finally, trust the dry-in phase. A Mercer Island roof needs a solid dry-in to prevent moisture migration through underlayment seams. Ensure the installer uses a breathable underlayment suitable for local damp conditions and provides adequate attic ventilation during the critical dry-in window, so moisture stays out of the interior and away from wood and insulation.
Get a clear picture of your project costs upfront - no commitment required.
Eco Roof Cleaning Renton
(206) 704-5019 ecoroofingnw.com
Mercer Island, Washington
5.0 from 81 reviews
EA CONSTRUCTION LLC | Roofing Specialist
(425) 496-3158 eaconstructionwa.com
Serving
5.0 from 19 reviews
Provided local cost ranges are per square: asphalt shingles 380 to 800, metal 700 to 1400, clay tile 1200 to 2100, concrete tile 1000 to 1800, wood shingles or shakes 700 to 1200, and synthetic or composite shingles 800 to 1300. On the island, those numbers are a starting point, not a ceiling. Materials that resist the moist, moss-prone environment tend to run toward the higher end when paired with premium underlayments and robust ventilation. If a roof needs significant skylight rework or chimney detailing, expect a modest bump beyond the base material range.
Costs on the island rise with complex residential rooflines, skylights, chimney details, and steep designs common in higher-end housing stock. The wet climate supports moss growth, so treatments and extra flashing can be part of the project, especially on older homes. Roofs tucked under tall trees require careful tarp and protection during replacement, which adds to labor and cleanup time. Dry-season demand concentrates work into a short window, which can stabilize or slightly raise pricing due to crew availability.
Project pricing is also affected by permit valuation-based fees, dry-season demand concentration, and cleanup logistics on wooded residential properties. Steep pitches complicate access and safety measures, sometimes necessitating additional equipment or staging. Skylight-heavy sections may need extra flashing, boot replacements, and careful sealing, pushing costs above simple square-foot estimates. If the house includes multiple roof surfaces with varying slopes or a mix of materials, the final price may sit above the lowest-material estimate.
For a practical budget, start with the material baseline and add for structure-specific challenges: steep areas, skylights, and chimneys. Expect a modest premium if the roof is integrated with high-end exterior finishes or custom detailing. Use the ranges above as a guide when comparing bids, and build in a cushion for moss management and thorough cleanup on a wooded property.
The most popular roofing material in the US. Find pros who install, repair, and replace asphalt shingles.
Golden Rule Roofing & Construction
(206) 556-4769 www.goldenruleconstruction.org
Mercer Island, Washington
4.9 from 80 reviews
A permit is typically required for a full roof replacement on this island. The local process is designed around protecting the island's wooded, moss-prone microclimate and ensuring drainage and moisture management are handled properly. Before any shingles are stripped or new underlayment laid, you'll want to call or visit the City of Mercer Island Building Department to confirm the exact scope that triggers a permit. The department handles intake, plan review, and the required inspections, so starting there helps align your timeline with the island's review cycles and avoids mid-project hold-ups.
The Building Department is your primary point of contact for roofing work. They review plans to verify slope compatibility, venting, underlayment choices, and flashings-critical details on a steep, moss-friendly roof. Plan review may involve clarifying access routes for equipment and ensuring that any alterations to drainage or gutter systems maintain proper water shedding away from the property and neighboring foundations. Inspections are scheduled to align with the sequence of work, so expect the department to request documentation of materials, installation methods, and moisture-control measures as your project progresses.
During the job, a rough inspection is commonly conducted to verify that framing, roof deck condition, underlayment installation, ventilation, and any temporary protective measures meet code requirements. After completion, a final inspection is conducted to confirm that the roof installation is properly finished, that flashing and skylight penetrations are sealed, and that all moisture-control details perform as intended in the local climate. Fees are based on project valuation and scope, so having an accurate project checklist helps keep the process smooth and predictable.
Coordinate with your contractor to maintain accessible space for inspectors to review attic spaces, venting, and drip edge, especially on steeper, moss-prone slopes where moisture movement is a central concern. Keep documentation organized-shop drawings, product data, and moisture-control strategies-so the Building Department can complete reviews without delays. Remember, the permit and inspection path is designed to protect your home against the island's wet season and moss-driven wear.
Rainy, moss-prone roofs on this island push insurers to focus on moisture-related damage and leaks rather than dramatic hail events. Mercer Island sits in a Western Washington insurance environment where routine roofing claims often follow storms and moisture-related damage rather than severe hail events. Coverage decisions hinge on the age of the roof, the extent of moisture intrusion, and whether the damage aligns with normal wear or a covered event. Insurers commonly request photos, roof age, and documented damage scope, and they may adjust payouts based on material type and remaining service life. Understanding that dynamic helps you set realistic expectations when a claim is filed after a wet season.
When a storm or persistent moisture triggers a claim, prepare a concise narrative of what failed and when it was first noticed. Take clear, timestamped photos of the roof, gutters, flashing, and any visible moss growth or staining from the ground and, if safe, on the roof. Include close-ups of damaged flashing, shingles cupping, and any signs of leaks inside the attic, such as staining or mold. Have records ready for the age of the roof, last maintenance, and prior repairs. Because coverage is influenced by material type and remaining service life, documenting the exact materials and their condition matters to the claim reviewer.
Steep, moss-heavy roofs common on the island can conceal slow leaks that complicate claims. Be prepared to show the scope: where moisture entered, how widespread it is, and whether damage penetrates underlayment or decking. The insurer will weigh the type of roofing material against expected longevity to determine payout scope. If there is mixed decking or multiple roof planes, map the affected areas clearly to avoid disputes about partial replacements.
Start with a concise incident report to the insurer, attaching photos and a roof-age record. Request an adjuster visit promptly after large storms when moisture and moss are fresh on the roof. During the inspection, point out moss-related moisture indicators, prior repairs, and any attic indicators of hidden leaks. If the adjuster notes discrepancies or unanswered questions, follow up with written clarifications and updated photos. Keep a running file of all communications and decisions to reference during settlement discussions.
After settlement, consider moss control and moisture management to reduce recurrence. Regular cleaning of moss-prone corners, improved drainage around roof edges, and suiting flashing and gutters to the island's wet climate help minimize future claims. Ensure routine inspections after heavy rain seasons so small problems are documented before they expand.
Connect with contractors who help homeowners navigate the claims process from damage assessment to final approval.
Flat and low-slope roofing is an active specialty in this market even though the city is primarily residential, indicating many homes have attached sections or modern roof areas needing different detailing. A careful eye is needed to recognize where the low-slope zones tie into steeper sections, because those transitions carry their own risks. In residential layouts on island neighborhoods, you may encounter membranes that extend under skylights, dormers, or clipped gables, all of which demand precise detailing to survive wet winters without premature wear.
In the rainy climate, drainage performance and ponding sensitivity make low-slope sections a separate maintenance issue from the main pitched roof. Standing water, even brief pauses on a membrane, invites accelerated wear and can accelerate edge or seam failures. On Mercer Island, seasonal dimity and moss growth amplify those concerns, so you should plan for regular inspection after heavy rains and before the wet season begins. Look for residual dampness near edges, flashings, and drains, and anticipate that runoff paths may shift over time as surrounding trees and moss alter shading and moisture patterns.
Transitions between low-slope membranes and steeper roof sections are important local leak points during prolonged wet weather. Caulking and sealant joints can degrade where slopes change or where meltwater encounters hidden voids. When evaluating a roof, prioritize the condition of these junctions, the integrity of flashing around skylights, and any membrane laps near vertical penetrations. Proactive checks before and after heavy rainfall help catch issues that otherwise would manifest as slow leaks that complicate attic spaces and interior drywall.
Find specialists in TPO, EPDM, and built-up flat roofing systems for residential and commercial properties.
EA CONSTRUCTION LLC | Roofing Specialist
(425) 496-3158 eaconstructionwa.com
Serving
5.0 from 19 reviews