Last updated: Apr 19, 2026
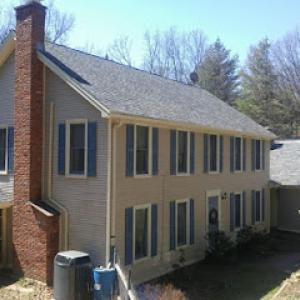
Cold winters and repeated freeze-thaw cycles bite at shingles, underlayment, and attic ventilation. When snow sits on a roof and melts from heat escaping the attic or sunny days, meltwater runs toward the eaves. If the eaves remain cold, that water refreezes, forming ice dams that back up drainage and push water under shingles. In this area, that cycle is a primary roof performance issue, especially on older sloped homes where attic insulation and venting aren't perfectly balanced. Each winter makes the problem more acute, and a single warm spell won't fix it-melting water can back up for days and creep under seams, flashing, and cresting ridges. The result is interior leaks that appear long after the snow has melted, often in rooms far from the original leak source.
You'll want to act the moment you notice a kum of icicles forming along the eaves or dark staining along the ceiling near exterior walls. Cracking or peeling paint near attic penetrations, frost on insulation, or a noticeable musty odor in the attic or upper living spaces are red flags. A telltale sign is meltwater that appears to back up at the eaves after a new snow event, even when the rest of the roof looks dry. Pay attention to ceiling bulges or paint discoloration in rooms beneath soffits or roof valleys. In this region, leaks often show up weeks after the snowfall, not right away, because the water is moving along the roof deck before it finds a way through to the interior.
Targeted insulation and ventilation matter more than ever here. Ensure the attic has continuous soffit-to-ridge ventilation and a well-sealed, moisture-rated roof deck. Seal any gaps around pipes, chimneys, and electrical penetrations, and consider adding radiant barrier or increased insulation in the attic to reduce heat escaping to the roof during winter days. Clear gutters and downspouts before the first significant melt, but do not weight the edges with ice. Install snow guards or a practical snow retention system if your roof design makes ice dams more likely. If you use heat cables, place them only where necessary and follow manufacturer guidelines to avoid creating uneven melting patterns that push water toward smaller, vulnerable seams.
Replacement timing in this area is commonly pushed into late spring through early fall to avoid moisture intrusion and weather delays tied to winter conditions. Scheduling a major repair or roof replacement outside the heart of winter minimizes the risk of moisture intrusion during the project and reduces exposure to freeze-thaw cycles that can compromise new materials. If a freeze-thaw cycle has already stressed the roof deck or flashing, addressing those concerns before the heavy rain of spring is essential. A proactive approach protects interior spaces and stabilizes the roof assembly against repeated cycles of melting and refreezing.
After the last significant melt of the season, conduct a careful roof and attic inspection or hire a local pro to verify flashing integrity, vent performance, and decking condition. Look for soft spots in the roof sheathing, loose shingles, or displaced flashing along eaves and chimneys. Document any leaks or staining while the weather is still cool, so repairs align with the next dry window. A focused, timely follow-up inspection reduces the chance that a winter's worth of freeze-thaw stress compounds into a larger, more invasive repair later in the year.
Spring in Vernon Rockville brings wet conditions and storm activity that can delay work and create hail-related repair demand. After long winters, roofs emerge into mud and thaw cycles, and crews often contend with lingering moisture and softer substrates. That combination increases the chance of re-staining leaks as high winds or heavier rains hit, especially on older slopes and near valleys where ice dams have started to form in prior seasons. When a storm arrives, the immediate impulse is to act, but rush leads to overlooked flashing, improper venting, or gaps that invite future leaks. Take careful notes of visible damage and document when and where leaks occur, because time spent waiting for better weather can still be counted against the claim if the insurer asks for a pre-loss picture timeline or a before-and-after comparison.
Connecticut insurance carriers commonly ask Vernon-area homeowners for roof age records, prior damage history, photos, and contractor estimates before deciding claims. The claim review hinges on tangible documentation that ties the loss to a verifiable event and to the existing roof condition. In practice, carriers often request a clear timeline: what damage was present before the storm, what new damage occurred after the event, and how the roof was performing in the months leading up to the loss. Photos should show close-ups of shingles, flashing around chimneys and vents, and any signs of sagging or loose components. If a roof has seen prior repairs, have records ready that show when, where, and by whom those repairs were made. The more precise the documentation, the less room there is for dispute when evaluating coverage and settlement.
Coverage outcomes in this market can depend heavily on pre-loss roof condition and material type, especially for older roofs and high-value systems like slate or tile. For slate or tile, insurers scrutinize the integrity of the underlayment and the risk of broken tiles during freeze-thaw cycles. A roof that already shows widespread granule loss on asphalt shingles or loose, curling edges in older installations raises questions during the claim review and can influence the scope of coverage. On the other hand, a well-maintained roof with up-to-date underlayment and intact flashing tends to support a smoother claim experience, even when storm activity causes additional damage. Understanding the existing condition-down to the specifics of nail lines, valley flashing, and vent boot seals-helps set expectations. If a contractor can provide an independent estimate that itemizes pre-existing issues versus post-storm damage, it can help clarify the claim's direction and reduce delays caused by disputed fault lines. Be prepared to explain how previous repairs were addressed and what remains at risk in the eyes of the insurer, particularly on multi-slope structures common in older Vernon Rockville homes.
Find local contractors experienced in assessing and restoring roofs after hail, wind, and severe weather events.
TJR Construction LLC | Best Roofing in Vernon, CT
(800) 766-3514 www.tjr-construction.com
Serving
4.9 from 56 reviews
C & C Roofing
(860) 610-9548 candcroofingllc.com
Serving
5.0 from 13 reviews
At C and C Roofing our mission is to provide top-quality roofing services to our residential and commercial customers, while ensuring their safety and peace of mind. We are committed to using the highest-quality materials and employing skilled professionals to ensure that every project is completed to the highest standards. Our goal is to build long-lasting relationships with our customers by providing exceptional customer service, honest communication, and reliable workmanship.
TJR Construction LLC | Best Roofing in Vernon, CT
(800) 766-3514 www.tjr-construction.com
Serving
4.9 from 56 reviews
TJR Construction is the leading roofing contractor in Vernon, CT, specializing in residential roofing, roof repairs, gutters, siding, vinyl siding, and storm damage restoration. We proudly serve homeowners in Connecticut, New York, Massachusetts, and Pennsylvania. With a focus on quality craftsmanship and exceptional service, we are trusted by clients in cities including Enfield, Windsor Locks, Somers, Stafford, Tolland, Hartford, Newington, Glastonbury, and beyond in Connecticut. Whether you need roofing repairs, a complete replacement, or storm damage restoration, TJR Construction is the expert you can rely on. Contact us today for a free estimate!
CB Roofing
(860) 454-7596 www.conventionalbuildersandroofing.com
Serving
4.9 from 58 reviews
CB Roofing has served Connecticut and Massachusetts since 1993, providing trusted residential and commercial roofing services. Based in Vernon and proudly serving Ellington, Tolland County, and surrounding communities, we specialize in roof replacement, new roof installation, storm damage repair, and insurance claim assistance. Our team also offers siding, chimney repair, skylights, gutters, and water damage restoration. As a licensed general contractor, we use top-quality materials, offer free estimates, and deliver dependable, long-lasting results.
All Brothers Roofing
Serving
5.0 from 11 reviews
All Brothers Roofing specializes in residential and commercial roofing services, offering installation, repair, and maintenance solutions. They use high-quality materials and employ skilled professionals to ensure durable and reliable roofs. Known for their exceptional customer service, All Brothers Roofing provides personalized consultations to meet specific client needs. They handle a variety of roofing types, including asphalt, metal, and tile. The company is committed to safety and compliance with industry standards. With a reputation for excellence, All Brothers Roofing guarantees satisfaction and long-lasting results.
Keith Gauvin Roofing
(860) 324-4843 www.keithgauvinroofing.com
Serving
5.0 from 764 reviews
Keith Gauvin Roofing is a residential and siding company providing roof repair, roof replacement, gutter installation, siding installation and skylight installation in Ellington, CT. With over 30 years of experience, Keith Gauvin is a leader in the roofing industry and provides roofing services to homes and in Ellington, Vernon, Stafford, Enfield, South Windsor, Somers, Windsor, Manchester, East Hartford, CT. Contact us at 860-324-4843. As a second-generation roofing contractor, Keith understands the importance of bringing value, integrity, and professionalism to every job. Please look at our 5-star reviews. We support many local charities and Little League teams. We are 100% committed to customer satisfaction.
The View Roofing, Siding & More
(860) 961-9845 theviewroofingsiding.com
Serving
5.0 from 85 reviews
Protect your largest investment with our reliable roofing services. We are a locally owned and operated roofing company currently serving Tolland, CT and surrounding communities. If you want to make your roof last as long as possible, it is vital that you never put off a roof repair. Small issues with roofing become big issues in a hurry. No matter how major or minor the repair you need, we are here to help. We offer roofing services, roof installation, and skylight installation.
Harmony Home Improvement
(860) 847-7455 www.harmonyhomeimprovement.com
Serving
4.3 from 65 reviews
Harmony Home Improvement is a veteran-owned exterior remodeling company specializing in roofing, siding, windows, doors, gutters, and deck building. We value the relationships we build with our customers. Our superior craftsmanship, access to manufacturer-backed materials, and dedication to customer service are why we're "The Most Trusted Name in Connecticut"!
Built by Burgiano
(860) 308-0022 www.builtbyburgiano.com
Serving
5.0 from 32 reviews
At Built by Burgiano, we believe your home deserves the best. That’s why we approach every project with the same care and dedication as if it were our own. As specialists in roofing, siding, gutters, windows, and chimney services, we ensure your home remains strong, beautiful, and built to last. From minor repairs to full-scale installations, our team is committed to quality craftsmanship, transparent communication, and honest service. No shortcuts, no hidden surprises—just dependable work from a team that truly cares. Looking for a contractor you can trust? Let’s make your vision a reality. Built strong. Built right. Built by Burgiano.
Frechette's Building & Remodeling
(860) 798-8385 www.frechettes.com
Serving
4.8 from 5 reviews
The Frechette Family has been serving the Manchester, CT area for over 40years. "Where customers and quality come first!" Specializing in Roofing, Siding, Windows, Kitchens, Baths, Additions, Finished Basements, Decks, Painting and much more! Wind , Water & Fire Damage Specialists
Rising Star Roofing
(860) 796-5668 www.risingstarroofing.com
Serving
4.9 from 268 reviews
Whether you need urgent repairs, help with an insurance claim, or you’re looking for the best and most reliable roof replacement, we can gladly help. With offices in South Windsor, CT, Lake Worth Beach, FL and Bonita Springs, FL, our experts are seasoned professionals in both commercial and residential roof replacement and repair. We handle all types of roofing systems including concrete, title shingle, flat, metal and more. We have gathered the most experienced team of professionals available to service any and all your needs year-round. We’re here to help you deal with the insurance restoration process, repairs, inspections, and installation of a new roof.
JTF Roofing & Remodeling
(860) 916-9487 www.jtfroof.com
Serving
5.0 from 7 reviews
JTF Roofing & Remodeling is family owned and operated. We specialize in repair/installation/replacement of roofs, skylights, siding, and decks.
JT home improvement
Serving
5.0 from 10 reviews
Commercial and Residential roofing and siding company.
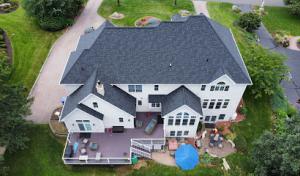
Asphalt shingles remain the dominant choice for Vernon Rockville reroofing projects because they fit the area's common stock of homes and the moderate replacement budgets typical of local neighborhoods. They install relatively quickly, handle the freeze-thaw pattern well when properly vented, and are easy to repair from year to year. When you're planning a winter-ready roof, choose architectural or laminated shingles for better wind resistance and a tighter overall seal against the cold months. A careful installation that includes adequate attic ventilation and a frost-proof ventilation plan helps reduce the risk of ice dams forming along eaves and rake edges. If a shingle upgrade is on the table, look for mid-range products with good granule retention and a higher chimney or vent clearance tolerance to account for the colder, dam-prone months.
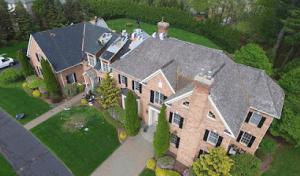
Slate keeps meaningful traction in this part of the state, where some older structures were originally built to support heavier roof loads. If a Vernon home has the structural capacity or existing slate heritage, slate can offer long life and a traditional aesthetic that aligns with preservation-minded replacement decisions. Keep in mind slate is heavier and requires a careful structural assessment before swapping from lighter materials. The weight difference matters for roof framing, deck condition, and the ability to anchor long-lasting fasteners into solid trusses. For homes that already enjoy historical character, slate can preserve curb appeal while delivering excellent durability in winter climates. If a full slate change isn't feasible, a high-quality synthetic slate can provide a similar look with more forgiving installation tolerances and easier weight management.
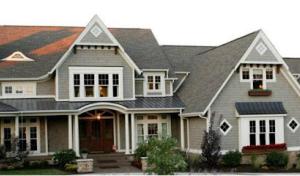
Metal roofing is increasingly considered in Vernon for its snow-shedding advantages and resilience through repeatedly freezing cycles. In winter, metal can help reduce ice dam risk by promoting rapid melt-off along the eaves, provided there is proper insulation and ventilation to manage interior humidity. However, summer heat and humidity affect handling and installation tolerances; the surface expands and contracts more noticeably, so installers must accommodate thermal movement and use compatible fasteners and sealants. If metal is chosen, plan for robust underlayment and a ventilated attic to maintain performance across seasons. The visual options range from standing-seam to corrugated profiles, allowing a roof that complements a range of architectural styles present in Vernon Rockville's housing stock.
Regardless of material, the winter climate demands attention to eave insulation, venting, and continuous roof-edge protection. Ice-dam prevention hinges on keeping soffits and ridge vents clear, ensuring there is a continuous path for warm attic air to escape without backing up along the roofline. In Vernon, prioritizing a well-sealed ceiling plane and a ventilated attic reduces thermal bridging that feeds ice dam formation. Coordinate with installers to verify that attic baffles, proper venting, and roof-to-wall detailing meet seasonal demands. A well-chosen material pair with thoughtful underlayment and effective ventilation will minimize winter leaks and extend the roof's dependable service life.
Typical Vernon Rockville material pricing runs about $350 to $700 per square for asphalt shingles, $700 to $1200 for metal, $900 to $1800 for clay tile, $800 to $1600 for concrete tile, $450 to $900 for wood shingles or shakes, and $1200 to $2500 for slate. Those ranges reflect the local mix of older, often steeper or multi-layered roofs, plus the facelift needed when a slate or tile roof is replaced with a compatible modern underlayment and venting plan. The cost per square is a practical way to compare bids, but pay attention to what each quote includes-tear-off, debris disposal, and flashing around chimneys and skylights can shift the tally quickly.
Costs in Vernon can rise when older homes require tear-off of multiple layers, decking repairs after winter moisture intrusion, or careful flashing work around chimneys and skylights common in the local contractor mix. If rot or gypsum underlayment shows up, expect additional substructure work to keep the roof watertight through freeze-thaw cycles. A careful contractor will price in ice-dam prevention details, such as venting upgrades and heat-tracing considerations, which can influence overall material and labor line items.
Scheduling pressure after winter damage or spring storms can affect labor availability in Vernon, while late spring through early fall usually offers the smoothest production window. In a town with robust winter conditions, a plan that aligns with a drier stretch after the worst of the melt helps avoid delays and weather-related surprises. If crews are rushing to finish before the first freeze, costs can creep up due to overtime or expedited materials.
Start with a dashboard of your preferred materials against the local ranges above, then attach a scope that includes tear-off, flashing around chimneys, and deck repairs if needed. Ask for a three-part price breakdown: materials, removal, and installation, plus a written notice of any potential cost boosters tied to unique features on the home.
Get a clear picture of your project costs upfront - no commitment required.
TJR Construction LLC | Best Roofing in Vernon, CT
(800) 766-3514 www.tjr-construction.com
Serving
4.9 from 56 reviews
Most reroof projects in Vernon require a building permit through the local Building Department. This isn't a formality to skip-the town uses it to verify that the project scope aligns with property lines, historical considerations on older homes, and the overall safety of the installation, especially for sloped roofs common in the area. Before any shingle scraps are hauled away or any tear-off begins, you'll want to confirm that the permit is filed, the contractor's license and contact information are on the record, and the project scope is clearly defined. A well-documented scope helps prevent delays when the inspector arrives and asks for specifics on venting, underlayment, and attic access.
The Vernon process typically requires up-to-date contractor information and a defined project scope before work begins. Expect to provide details such as roofing type, underlayment choices, attic ventilation plans, and a sequence of work that shows how the roof will be protected during winter weather. For homes facing the inland Connecticut freeze-thaw pattern, the scope should explicitly address ice dam mitigation measures, fastener patterns for the chosen roofing material, and any necessary secondary drainage provisions. A comprehensive scope helps the Building Department assess potential risks to adjacent structures and ensure that the installation will stand up to Vernon's seasonal cycles.
Inspections in Vernon are scheduled during and after the job to verify installation details and venting, with final approval issued at completion. The mid-project check is typically intended to confirm that the roof deck is solid, underlayment is properly installed, and attic vents align with code requirements. The final inspection centers on venting adequacy, flashing around chimneys and skylines, proper ice and water shield placement in valleys and eaves, and compliance with local wind and lateral load provisions. If the house has an older sloped roof, expect the inspector to scrutinize whether the existing venting system integrates with any new materials without creating cold-air backdrafts or moisture traps. Coordinating with the contractor to schedule inspections promptly helps keep the project moving and reduces the risk of weather-related hold-ups.
To streamline the process, have approval letters and product data sheets ready for the inspector. Documentation should cover the venting strategy, attic insulation details, and any upgrades to soffits or ridge vents. Since winter conditions intensify the impact of improper venting, be prepared for requests to adjust or reinforce vent openings, drip edge placement, and ice dam prevention features as part of the final approval. By aligning the permit and inspection steps with Vernon's climate realities, a completed roof will perform reliably through freeze-thaw cycles and winter storms.
Winter in the inland Connecticut landscape brings freeze-thaw cycles that expose weaknesses in aging roofs. When a homeowner files after a storm or a winter leak, roof age documentation becomes a critical piece of the claim. Adjusters expect to see a clear timeline of wear, prior repairs, and the roof's original installation date. If the shingles or underlayment show consistent deterioration that predates the event, a claim can be scrutinized or delayed. Having organized records, photos from multiple seasons, and professional assessments ready can help you avoid disputes that stall repairs.
Older roofs can look fine from ground level, but a closer look under the eaves often reveals granular loss, curled edges, or cracked flashing. In Vernon, those signs are red flags that adjusters may question, especially when the reported loss coincides with a period of heavy snow or ice dam activity. The stronger the evidence tying damage to the storm or freeze-thaw period, the clearer the claim path becomes. Consider a mid-winter inspection by a reputable pro to document problem areas before a claim is filed.
Slate and tile, common among higher-end homes in town, demand more detailed estimates and photo documentation. Material type directly influences coverage decisions, so insurers will look for precise, itemized descriptions of damage related to these specific products. Expect requests for close-ups of cracked tiles, broken slate sheets, and supporting structures. A calm, methodical record set that ties defects to the incident reduces the risk of denial or underpayment.
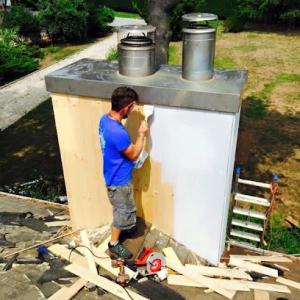
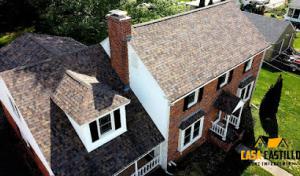
In Vernon Rockville, skylight work is a meaningful specialty, signaling recurring leak and flashing issues around penetrations. When you're surveying a roof with skylights, focus first on flashing around the curb, dome, or slate. Look for loose caulk, dried sealants, or gaps where the skylight meets the roofing surface. If interior signs appear-staining near the ceiling, irregular frost patterns, or damp spots around the skylight cabinet-check the curb flashing and the interfered seal where the flashing meets the shingles. Plan for the worst-case path of water along the plane and down into the interior, not just across the top.
Chimney-related roof detailing is also common locally, which matters on older Connecticut homes where flashing failures can mimic field-roof leaks. Inspect base flashing where the chimney meets the roof deck and the step flashing along each side. Cracked mortar joints can transfer movement to the flashing, so you may see rust stains or warped metal. If the brick is spalling or the mortar lines are changing seasonally, expect flashing to fail sooner rather than later. Coordinate flashing repairs with any nearby venting upgrades to minimize future leaks around the chimney throat.
Vernon homeowners with older rooflines often need repair scopes that focus on transitions, step flashing, and venting rather than shingles alone. Pay special attention to where roof planes meet walls, dormers, and vent stacks. Step flashing should tuck under adjoining shingles and seal against water flow rather than rely solely on surface sealants. For venting, ensure correct clearance and flashing around exhausts and attic intakes; improper venting can trap moisture and contribute to ice dam formation in winter. When planning repairs, prioritize the continuity of flashing and venting over cosmetic shingle replacements.
Find contractors experienced in skylight installation, flashing, and leak repairs to bring natural light into your home.
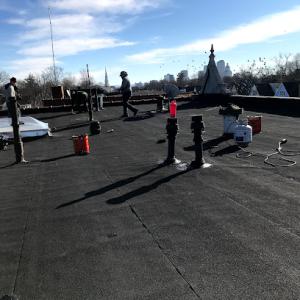
Flat and low-slope roofing is an active specialty in Vernon's market even though steep-slope residential reroofing dominates overall. Additions, porches, and attached garages frequently incorporate low-slope sections that sit right under expanding eaves or rooflines, making them a frequent point of failure after winter and spring thaws. Understanding how these surfaces drain-and how they interact with the main roof-helps you avoid costly leaks and repeated repairs.
Low-slope sections on additions and garages are especially vulnerable to standing water after wet spring weather. Ice dam pressure can push water toward joints where the low-slope panel meets vertical walls, and pooled moisture can creep under edges if flashing isn't continuous. In Vernon Rockville, where freeze-thaw cycles are common, those damp spots become crack points for underlayment and sealants that aren't rated for perpetual ice contact. Regular checks after storms help catch edge leaks before they penetrate to insulation or interior ceilings.
When a home combines a steep main roof with a low-slope addition, replacement planning must address different materials and drainage details on the same property. It's not enough to match color; you need compatible flashing, edge detailing, and a shared secondary drainage path that guides water from the low-slope area to a safe discharge point without crossing onto the main roof. That coordination reduces the risk of tuck-point gaps, seam failures, and premature wear where the two systems meet.
Seasonal inspections should focus on edge seal integrity, gravel-free drainage paths, and rust-free flashing around transitions. Clear debris from gutter drip edges on both roof types, and verify that downspouts direct water well away from the foundation. During spring thaw periods, test for soft spots or creasing along the low-slope surface, and plan prompt resealing or membrane attention if any area shows moisture staining or dampness behind soffits. Regular, targeted maintenance keeps the entire roof system performing as a unified whole.
Find specialists in TPO, EPDM, and built-up flat roofing systems for residential and commercial properties.