Last updated: Apr 19, 2026
Marshfield sits on the Massachusetts South Shore, where coastal storms and Nor'easters can pair wind-driven rain with winter freeze-thaw cycles that back water up at eaves. That means roofs face sudden deluges followed by cold nights that force water to refreeze at the edges, creating ice dams that push against gutters and seal gaps where moisture sneaks in. In neighborhoods near the Atlantic shoreline and around the North River and South River, wind pressures spike on exposed ridges and along eave lines, and any weak seam or damaged roof edge becomes a prime failure point after a storm. The key risk is not a single event but a rapid sequence: rain, wind, and then freezing air that makes small leaks turn into big drips inside the attic and ceiling.
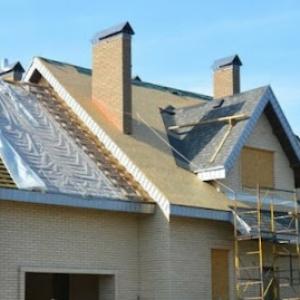
Edge details matter more here than in milder inland climates. Siding, fascia, and drip edge need to hold up to salt-laden air and shifting loads from wind-driven spray. If your roof deck or underlayment has even a minor defect, moisture can bypass superficial damage and chase along the attic through vents and penetrations. You should view every storm as a test of the roof's outer ring: ridgecaps, eave overhangs, and connection points to walls must resist wind uplift and shed water quickly, or you'll be chasing leaks long after the rain stops.
Winter brings ice dam formation that backs up at eaves and brackets heat loss with the roof's cold edges. In this climate, insulation quality in the attic and proper ventilation are non-negotiable. When warm attic air escapes, it melts snow near the center of the roof, and that meltwater runs to the colder eaves where it refreezes into dams. Those dams back up and force water under shingles, flashing, and around chimneys or vent pipes. Flooding at the edge accelerates deterioration of shingles, flashing, and gutter systems and can push water into soffits and interior walls if ignored.
Focus on edge details: ensure drip edge is solid and corrosion-resistant, flashing around chimneys and dormers is continuous and well-sealed, and shingles at the lower edges are intact and properly sealed to resist wind uplift. If ice damming has occurred, be cautious: do not chisel ice aggressively against roofing; instead, use safe, targeted methods to relieve pressure at the eaves and address heat loss from the attic to prevent recurrence.
The seasonal rhythm here features winter ice dams, spring wind and rain events, humid summers, and autumn coastal storms that can loosen shingles and drive debris onto roofs. This means a proactive, season-by-season plan is essential. In late fall, make a thorough inspection of edge flashing, gutters, and valleys. Clear debris that can trap water and ice and ensure downspouts direct meltwater away from siding and foundations. After a storm, perform a focused leak check in the attic-look for staining, condensation, or damp insulation around vents and chimneys. If any moisture is detected, address it immediately rather than letting it creep into the ceiling.
When a storm hits, quick action matters. If you notice active leakage after a Nor'easter, contain the area with a tarp or temporary sheathing to slow further intrusion while planning a repair. Pay attention to softened or cracked shingles near the eaves and any gaps where flashing might have pulled free. If icing forms along the eaves, avoid climbing on the roof during or after snow events; instead, prioritize safe removal from ground level and call a pro for a thorough assessment. The goal is to prevent a small leak from escalating into attic damage or structural moisture issues, which can compound in this climate when salt air and cold temperatures are in play.
You should align maintenance with the marine-influenced seasons: inspect edge details and flashing after major storms, verify gutter and downspout flow, check attic insulation and ventilation to minimize heat loss, and test for moisture in the attic after freeze-thaw periods. Keep an eye on areas around chimneys, skylights, and vent pipes where water can intrude if flashing or shingles are loosened by wind. If shingles show curling, cracks, or significant lifting near the eaves, treat them as urgent repairs rather than cosmetic issues. In this coastal, storm-prone area, a vigilant, proactive approach to edge protection and rapid leak response can save thousands in damage and keep living spaces dry through our increasingly volatile seasons.
In Marshfield, asphalt shingles dominate the landscape because they balance cost with practical replacement when storm wear takes a toll. Start by choosing a high-quality architectural or performance-grade shingle with strong wind resistance and good algae resistance for the salty air. Install with a solid underlayment and proper ventilation to reduce heat buildup and the risk of ice damming in winter. For coastal homes, look for a sealed or moisture-resistant underlayment and consider a thicker shingle layer to buffer against wind-driven fetch and blowing sand. Regular inspections after Nor'easters help catch loose edges or lifted tabs before leaks develop. In neighborhoods near rivers or open shorelines, pay special attention to flashings at valleys, chimneys, and skylights; these joints often suffer first in a salt-air environment. A well-sealed ridge cap and continuous drip edge protect the fascia boards from salt spray and standing water.
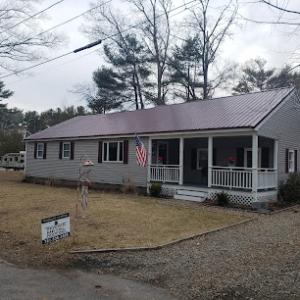
Metal roofing is especially relevant in this climate because coastal moisture and snow-shedding performance matter in a climate with snowy winters and humid summers. If choosing metal, opt for a coastal-rated panel system with corrosion-resistant coatings and a color finish that minimizes thermal expansion effects. Panels should run perpendicular to prevailing winds, with standoffs and sealants designed for humid air to prevent condensation pockets behind the panels. Install a continuous seam or interlocking system to reduce exposed fasteners that can loosen in salt spray. Ensure adequate attic ventilation and a properly sized underlayment to handle ice dam potential. Metal roofs shed snow more predictably, but heavy overnight freezes can still create ice dams at eaves if insulation is insufficient. Regular snow removal in extreme winters reduces the load and protects gutters and soffits. If you live near open shoreline or marsh edges, consider snow guards or snow retention devices to manage drifts above entryways and access points.
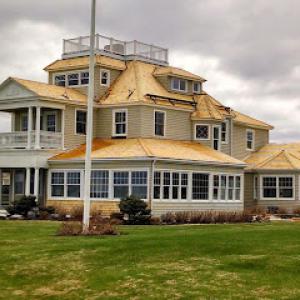
Wood shingles and shakes fit the traditional New England coastal aesthetic seen around the South Shore, but they need careful evaluation in a damp salt-air environment. Choose decay-resistant woods such as treated cedar and ensure factory-applied preservatives or post-installation sealing to slow moisture uptake. Install with a breathable, termite-resistant underlayment and ensure ventilation to prevent mold under the surface during humid summers. In the salt air, fasteners should be corrosion-resistant and properly spaced to accommodate thermal movement. Apply a maintenance coat or stain on a regular schedule to preserve the surface from salt spray and UV exposure. Coastal storm activity can lift edges or expose fasteners; conduct annual inspections, focusing on the ridges, hips, and flashings around chimneys. If rapid re-roof cycles are common here after storm wear, plan for more frequent maintenance and a resealing schedule to extend life in damp, salty air.
Synthetic or composite shingles offer a practical balance of durability and aesthetics in a salt-air climate. They often resist fading and cracking better than traditional organic shingles, while offering good wind uplift performance. When selecting synthetic products, verify UV stability, warranty terms for coastal use, and compatibility with standard underlayment and flashing details. Ensure the installation includes a robust underlayment, sealed flashing details, and proper attic ventilation to manage humidity. In areas with strong coastal gusts, emphasize wind-rated shingles and secure fastener patterns to minimize the risk of blow-off. Regular inspections after storms help identify micro-cracks or sealant failures early, preserving the appearance and integrity of the roof for years to come.
In this coastal South Shore setting, your roof replacement costs are driven more by climate and roof features than by a generic square footage. As a rule of thumb, asphalt shingles land around 350 to 700 USD per square, while metal roofing runs roughly 600 to 1100 USD per square. Tile systems - clay or concrete - sit well above those numbers and are far less common for Marshfield homes, often making them a less economical choice unless specifically desired for a historic look or extreme durability. If a contractor suggests a significantly different baseline, ask for a detailed breakdown tied to your local conditions and a measured roof layout.
Coastal storm events push Marshfield costs higher than typical inland estimates. After a Nor'easter or hurricane remnants pass through, quick-response crews and a surge in re-roofing projects across the South Shore can tighten schedules and raise prices for a short window. Expect higher call-back rates for wind-damaged edges, flashing, and chimney or skylight work, and plan for possible temporary increases in material and labor due to demand spikes. When storms are forecast, proactive scheduling can help avoid premium surge pricing, but it may still be wise to budget a contingency for urgent repairs that grow into full replacements.
Homes with complex rooflines, multiple skylights, protruding chimneys, and weathered decking present the most variable costs in Marshfield. Skylight and chimney work is a common cost driver here, since these features frequently require careful flashing, sealing, and sometimes partial decking replacement after moisture intrusion. Weathered decking, if discovered during removal, adds substantial labor and material cost because it changes the scope from a straightforward shingle swap to a full deck assessment and repair. If the roof includes valleys, dormers, or seasonally exposed eaves, expect additional fasteners, underlayment, and ventilation work to be factored in.
Asphalt shingles remain the most economical option for most Marshfield homes, balancing durability and cost, especially in the 350-700 per square range. Metal roofing offers a longer life and better resistance to salt spray and ice damming, with a typical range of 600-1100 per square, but installation can be more sensitive to roof geometry and edge details. Concrete or clay tile systems, while visually appealing and long-lasting, are a rare fit here due to higher weight, cost, and the need for structural reinforcement; when used, they can push total project costs well beyond asphalt or metal. Synthetic or composite shingles sit between asphalt and metal for cost and provide good durability against salt exposure and wind.
Begin with a thorough roof assessment, focusing on flashing integrity, chimney and skylight interfaces, and decking condition. Obtain three detailed bids that itemize underlayment, flashing, venting, and waste disposal as separate line items. Schedule work in drier shoulder periods to reduce weather-related delays without inviting storm-price spikes. If a storm is forecast, consider pre-storm preparations to minimize emergency dispatches and scope creep. Finally, discuss long-term maintenance options, such as periodic sealing of coastal salt spray points and selecting a color and profile that minimizes ice dam formation on your eaves.

Dempse Brothers Roofing
(781) 204-7831 dempseyroofingduxbury.com
Serving
4.9 from 29 reviews
Dempse Brothers Roofing delivers professional roofing services with a focus on quality and reliability. Our team handles everything from leak repairs and storm damage to full roof replacements, using durable materials and skilled craftsmanship to ensure lasting protection. We pride ourselves on clear communication, timely service, and dependable results that give homeowners peace of mind. Whether it’s a minor repair or a complete installation, Dempse Brothers Roofing is the trusted choice for roofing done right.
Affordable Roofing & Siding
(781) 927-5277 www.affordableroofingsouthshore.com
Serving
4.9 from 37 reviews
Affordable Roofing & Siding provides roofing and siding services to the Hanover, MA area.
MassTech Roofing & Building
(781) 232-3585 masstechroofing.com
Serving
4.9 from 62 reviews
For over 30 years, MassTech has provided roof installations and additions to homeowners and businesses in Massachusetts For over 30 years MassTech has been providing new roof installation, repairing roofs and providing roof inspections in the Boston area. We can handle any new roofing project you throw at us from asphalt and rubber to metal or cedar. Based in Pembroke, our crew is capable of roofing projects in the City of Boston, on the south shore and beyond. From single-story extensions to ambitious multi-level additions, our team seamlessly integrates new structures with existing homes.

Select Pro Contracting
(781) 754-4994 theselectpro.com
Serving
5.0 from 52 reviews
Select Pro Contracting is the go-to remodeler serving Pembroke, MA, and the surrounding areas. Our team of contractors offers unmatched craftsmanship, attention to detail, and excellent customer service. We are here to make your dreams a reality when it comes to completing home remodeling or commercial remodeling projects. We also specialize in roofing, siding, painting, and more. We take pride in staying up-to-date on the latest industry trends and techniques, allowing us to provide cutting-edge solutions that will impress everyone who sees them.
Blake Adams Roofing
(781) 733-8424 www.blakeadamsroofing.com
Serving
4.9 from 54 reviews
Blake Adams Roofing, located at 21 Highfield Lane, is a top-tier roofing contractor dedicated to delivering exceptional residential roofing solutions across the South Shore, Massachusetts. Specializing in roof repair, new roof installation, and roof replacement, we pride ourselves on reliable and quality service. Our expert team provides thorough roof inspections to ensure your roofing needs are fully addressed. We stand out among local roofers for our commitment to professionalism and community involvement. Whether you're searching for "roofing companies near me" or "roofer near me," choose Blake Adams Roofing for unmatched expertise and customer satisfaction. Contact us for your free roofing inspection today!
Legacy Roofing
(339) 214-1669 www.legacyroofingma.com
Serving
5.0 from 18 reviews
Legacy Roofing is your premier residential roofing contractor. Licensed, insured, and putting customer satisfaction above all else we eliminate the stress and worry most homeowners face when replacing their roof. Call today for a free quote!

Nor'East Services
Serving
4.8 from 24 reviews
Nor'East Services is a full service residential and commercial roofing and exterior company of over 40 years experience. Specialized in all types roofing, gutters, window, trim and siding. Visit our website, Facebook and Instagram to see all additional services we offer!

Craffey & Co Roofing
Serving
5.0 from 14 reviews
Craffey Roofing, your premier roofing contractor in the heart of Plymouth, brings unparalleled expertise and commitment to excellence in every project. With a legacy of craftsmanship spanning decades, our skilled team is dedicated to delivering top-tier roofing solutions tailored to meet the unique needs of our clients. From meticulous roof installations to swift repairs and thorough inspections, we prioritize quality materials and precision workmanship to ensure the longevity and resilience of your roof. At Craffey, we understand the significance of a secure and stylish roof, blending functionality with aesthetic appeal. Trust us for reliable, top-notch roofing services that stand the test of time.
Coastal Roof Experts
(781) 423-1439 www.roofingsouthshorema.com
Serving
5.0 from 7 reviews
Coastal Roof Experts South Shore MA is based in Quincy MA. We offer our services in the Quincy area, as well as on the South Shore; see our service areas page for more details. We do several types of residential and commercial roofing projects - new roof installation, roof replacement, and roof repair. We are able to manage of various exterior house projects for a fair price. We are more than a roofing company. We also repair and install skylights, gutters, siding, windows, and doors. Our professional roofers known for using the best materials, their workmanship, and providing top-quality service.
Revered Metal Roofing
(781) 536-4589 www.reveredroofing.com
Serving
5.0 from 82 reviews
Revered Metal Roofing is a full service, locally owned and operated business that provides friendly and reliable service with 100% customer satisfaction guaranteed. We specialize in Metal Roofing! Asphalt shingles and rubber roofing options are also available. Our expert craftsmen and trained installation staff have the experience and knowledge to install the roofing system your property deserves. Estimates are always free! Quality and affordable commercial and residential metal roofing products; metal panel, standing seam meat roof and our new metal shingle roofing line. Conveniently located on the South Shore service the lower Cape, Boston metro and metro west area
South Shore Roofing
(781) 923-1072 www.southshoreroofers.com
Serving
4.9 from 112 reviews
We are a locally owned & operated roofing company completing quality, long-lasting roofing projects for local customers for 15+ years. We offer both residential and commercial roofing services, including roof repair, installation, and replacement. We also offer roof maintenance services. South Shore Roofing employs top-of-the line roofing products and state-of-the-art techniques and design to give your home or business the beautiful look it deserves, while protecting it from damage and decay from New England's harsh weather. We proudly serve customers in Massachusetts, particularly on the South Shore, accept credit cards and offer financing through a third party. Contact us for a free quote for your roof restoration or construction needs.
Hannigan Roofing
(508) 209-1352 hanniganroofing.com
Serving
5.0 from 17 reviews
Hannigan Roofing: Your Roofing Experts For 25 years, Hannigan Roofing has been a premier roofing service in the Cape and South Shore areas. As a local, family-run business, we specialize in high-quality roofing solutions. Our experienced team ensures top-notch craftsmanship, using premium materials and innovative techniques. Customer satisfaction is our priority; we tailor services to your needs, emphasizing clear communication and reliability. Trust Hannigan Roofing for all your roofing needs and experience excellence in every detail.
When planning a full roof replacement, this area treats the project as more than a simple repair. A building permit is typically required, and skipping that step can lead to delays or enforcement actions that complicate storm-ready improvements. The permitting process helps ensure that the new roof system, deck attachments, venting, and underlayment meet local wind and snow load expectations, which are particularly relevant along the South Shore where Nor'easters and ice dam formation can stress vulnerable details.
Applications are submitted to the Marshfield Building Department with project details and contractor information before work proceeds. Gathered material should include the scope of work, approximate start and end dates, roof layout, and any new accessories like flashing, gutters, or attic insulation changes. The information helps the department verify that the proposed system is compatible with existing structures and winter conditions common to coastal marshfront neighborhoods. A licensed contractor with current registrations can streamline the review, since their records often cover required code compliance and inspection readiness.
Inspections are scheduled during and after installation, with final sign-off upon completion, so homeowners should confirm who is responsible for calling in each inspection. Typical milestones include an initial frame/underlayment or mid-roof inspection as the roof goes on, a moisture barrier or flashing check, and a final inspection after all shingles or panels are secured and any venting and eave details are in place. In a coastal climate, the inspector may pay particular attention to flashing around any chimney, sidewall intersections, and chimney or valley penetrations where salt air can accelerate corrosion or ice dam risk. To avoid gaps in coverage, confirm in advance which party (homeowner, contractor, or both) is responsible for scheduling each step and providing access permits if the property is gated or shared with other residents.
Because exposure from nearby rivers and open shoreline shapes roof longevity, align the permit plan with anticipated weather windows and access constraints. Having a clear schedule and contact plan for the Building Department streamlines approvals and reduces the chance of weather-driven delays. Keep copies of submitted plans and any amendments handy on-site so inspectors can quickly verify compliance as the project progresses.
Massachusetts insurers commonly want detailed roof age records, condition notes, and photos, which matters in Marshfield because storm-related roof claims often hinge on proving pre-loss condition. Keeping a clear file that traces a roof's age, previous repairs, and any signs of wear before a storm can make the difference between a straightforward claim and a dispute. Store copies of contractor estimates, material specs, and warranty language in a dedicated folder that travels with the house records.
Wind and storm claims can affect premiums and may trigger depreciation or coverage limits on older roofs, making documentation especially important before and after coastal weather events. In practice, that means you should be prepared to show what the roof looked like prior to a wind event, not just after. Photos taken from multiple angles, with a dated timestamp, help insurers assess whether pre-existing weaknesses were present.
Because Marshfield sees both winter damage and coastal storm exposure, homeowners should photograph shingles, flashing, skylights, and any interior leak staining as soon as damage appears. Salt-laden air accelerates corrosion and wear, especially around vent flashing and along edge details. Keep these images organized by date, and include close-ups of rust or granule loss to support a timely, accurate claim narrative.
Interior leaks often reveal themselves after a heavy Nor'easter or a sharp freeze-thaw cycle. Photograph ceiling stains, Warped plywood, and saturated insulation promptly, and document when the first suspicions appeared. Insurers may scrutinize post-event condition closely, so these records create a credible timeline that can prevent confusion about when damage actually began.
Given the exposure to salt air and seasonal freeze events, a steady habit of updating the roof's condition file pays off. After notable weather, add fresh images and notes about any new wear, loose flashing, or damaged seals around skylights. A reliable dossier helps bridge the gap between what happened and how it's interpreted by a cautious adjuster.
Connect with contractors who help homeowners navigate the claims process from damage assessment to final approval.


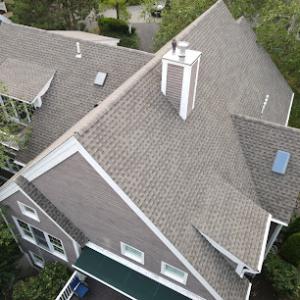
Skylight and chimney work is a common sight among local contractors after Nor'easters and winter winds. Flashing and curb details are meaningful local concerns rather than niche issues, because salt air and seasonal freezes accelerate wear around these penetrations. Knowing where these points tend to fail helps you plan proactive maintenance.
Flashing around skylights and where a chimney meets the roof are frequent leak culprits. In the wind-driven coastal rain Marshfield experiences, weak transitions at skylights, chimneys, valleys, and roof-to-wall intersections can fail faster than age alone. A small gap or loose seal can channel rain right into the attic, especially after a heavy storm.
Start with a dry day and a stable ladder position. Inspect skylight curb detail for cracks, loose sealant, or bulging flashing. Check chimney flashing where mortar meets metal, looking for lifted layers, rust stains, or tarry patches. Examine valley linings and the edge where the roof meets the wall-watch for dark stains indicating moisture intrusion.
When talking with a local contractor, emphasize flashing integrity at masonry penetrations and curb conformity around skylights. Ask for a written plan that details flashing material choices, curb flashing, step-flashing installation, and any roof-to-wall transition work. Confirm dedicated attention to wind-driven rain zones and potential baffles or drainage at the skylight shrouds.
Seasonally re-seal around skylights with materials rated for coastal conditions, and keep debris clear from gutters and roof lines near chimneys. If any flashing shows corrosion or movement after a storm, address it promptly rather than waiting for obvious interior signs. Regular checks before and after winter storms reduce the likelihood of surprise leaks.
Find contractors experienced in skylight installation, flashing, and leak repairs to bring natural light into your home.
Affordable Roofing & Siding
(781) 927-5277 www.affordableroofingsouthshore.com
Serving
4.9 from 37 reviews
Flat and low-slope roofing is active enough in Marshfield to matter, especially on additions, porches, and mixed-roof homes rather than only on commercial buildings. The combination of Nor'easters, salt-laden air, and winter ice events means these zones can be the first to show wear. A small ponding area or a missed flashing detail here can translate into faster membrane deterioration and hidden leaks that travel into the attic or interior walls. Keep an eye on any new or altered sections joined to a steeper roof, where transitions are most vulnerable.
Begin with drainage: confirm that low-slope sections shed water toward proper gutters and scuppers, not toward walls or sills. In Marshfield's humid summers, heat and moisture linger under the membrane; look for blisters, wrinkles, or signs of adhesive creep, and address them before the next season's heavy rain. Inspect the membrane edge where it meets steeper roof planes or dormers-transition flashing should be continuous, well sealed, and free of gaps. If you see loose laps or rust on metal components, treat these as alerts to possible leaks behind the surface. Schedule a proactive reseal or membrane topping when wear shows, not when a leak is already present.
Flashing where a low-slope section meets a steeper roof needs careful detailing. Copper, aluminum, or zinc flashing can resist salt air, but fasteners should be corrosion-resistant stainless or coated to withstand coastal exposure. Pay particular attention to penetrations: vents, exhausts, and skylights require reinforced sealant and backup tapes designed for humid environments. If a porch roof is tied into living space, ensure the transition is thermally and hydro-dynamically integrated to minimize ice dam risk during cold snaps.
In winter, plan a mid-winter inspection after heavy storms to catch damming or standing water early. In summer, monitor for heat-softened adhesives or degraded underlayments, especially on sunny, exposed runs. Keep gutters clear to prevent backing water from pooling on the low-slope surface. A neighborly reminder: treat these sections as an inspection-sensitive zone, since neglect here tends to show up as water intrusion sooner than on most steep roofs.
Find specialists in TPO, EPDM, and built-up flat roofing systems for residential and commercial properties.

Late spring through early fall is the favorable replacement window in this coastal setting because winter snow and freeze-thaw cycles complicate tear-offs and sealing. In Marshfield, the salt-air environment and frequent Nor'easters mean that any lingering moisture during your roof replacement can lead to hidden damage if the job runs too late in the season. Planning projects for late spring through early fall helps crews get optimal attic ventilation work, proper underlayment installation, and a solid seal before the next winter's storms. Trust contractors who understand how coastal air accelerates wear on shingles, underlayment, and flashing, and who time inspections so you're not left with soft spots as soon as leaves fall.
Spring can still bring high winds and heavy rainfall on the South Shore, so scheduling should account for weather delays even after winter ends. A storm-avoidance mindset matters: unplanned wind gusts can lift panels and test seals, while heavy rain slows tear-off work and can flood vulnerable roof lines. In practice, you'll want a window that includes several dry days in a row, with rooms below protected and moisture-prone attic spaces vented and tarped as needed. The exposure from neighborhoods near the rivers and open shoreline means blinds and eaves should be managed to minimize wind-driven debris at installation sites.
Autumn coastal storms can create a late-season rush for emergency repairs and replacements, which can tighten contractor availability. If a roof shows signs of advanced wear as storms approach, prioritize pre-season appointments and contingency scheduling. In Marshfield, you'll want to avoid a fall rush by locking in dates early, ensuring crews have daylight, and confirming that seasonal wind-driven rain won't interrupt critical flashing and sealant work near the eaves, valleys, and chimney lines.
Coordinate with roofing teams that have hands-on experience with salt-air corrosion and ice-dam risk. Ensure that crews plan for deck protection, attic ventilation checks, and drainage alignment so that sealed roofs hold up through the shoreline's winter conditions. Keep a backup plan for weather delays, and confirm access around any nearby trees or utility lines common to river-adjacent neighborhoods.
In this coastal South Shore setting, the right contractor knows how Nor'easters, salt air, and winter ice dams accelerate wear on typical homes with chimneys and exposed eaves. Choosing a roofer isn't only about a clean finish; it's about how well the crew anticipates salt-spray corrosion, wind-driven leaks, and debris from nearby rivers. Look for crews with a track record in storm-ready repairs and a habit of inspecting attic ventilation, ridge lines, and flashing where water can wend its way in during heavy gusts. A contractor's readiness to address hidden damage behind soffits or under deteriorated shingles matters as much as the visible surface.
Because market pressure favors rapid responses, you'll want to see how a contractor handles an active leak now, not just a promise for later. Ask for a documented plan that includes immediate tarp or drying-in steps, containment to protect interior spaces, and a timeline for a permanent fix. In occupied homes, temporary measures should minimize disruption, contain debris, and preserve insulation. If a project stalls, you need a transparent update rather than silence. A reliable crew uses proven drying-in practices and clearly communicates what homeowners should expect for the next steps and follow-up visits.
Residential work dominates locally, so request recent examples on occupied homes with similar penetrations, chimneys, and storm exposure. Ask to tour or see photos of finishes on houses with comparable roof lines and eave detailing. Hearing from neighbors who faced comparable conditions helps gauge whether a contractor consistently delivers durable results under salt-air and ice-dam pressure.
Warranty discussions matter here because local listings show some warranty-offering and manufacturer-certified presence, but not every contractor appears to compete on that basis. Clarify what the warranty covers, for how long, and how service is delivered if a problem re-emerges after an storm season. Ensure any warranty aligns with the materials used and the expected performance under coastal conditions.