Last updated: Apr 19, 2026
Painesville's Lake Erie climate bangs the roof with repeated winter freeze-thaw cycling. Each cycle can open shingle seals, stress flashing where walls meet the roof, and widen small penetrations around vents, skylights, and plumbing stacks. When heat from attic warms a sunlit section of the deck, the cycle freezes again at night, prying loose granules and loosening the first line of defense against water intrusion. That means even a modest leak today can become a larger problem tomorrow if the cycle continues untreated. The result is accelerated wear on asphalt shingles, but all roof types in the area feel the pressure: once seals begin to fail, rain and melting snow get a toehold and creep inward along the roof line.
Snow load is real here, and refreezing at the eaves is a primary local pathway to ice damming. As snow piles up along the eave, meltwater can back up behind a frozen edge and push under shingle tabs or into flashing details. The cold air slipping under the edge freezes the water at the fascia, creating an ice dam that stacks higher and higher with successive snow events. Interior leak complaints tend to spike during midwinter thaws followed by cold snaps, when meltwater refreezes and expands. The key warning signs are attic warmth anomalies (hot spots on the roof's underside after a cold night), icicles that form along the eave line, and damp patches on ceilings that appear after storms or rapid temperature swings. In practical terms, those symptoms are not just nuisances-they signal that a cycle of damage is advancing and requires immediate attention before a small issue becomes a costly repair.
The best replacement window in Painesville is typically late spring through early fall because winter conditions and wet weather can delay tear-off, dry-in, and inspection scheduling. If a roof is already showing signs of the freeze-thaw wear described above, planning a replacement during that milder stretch reduces risk of moisture intrusion during work and improves the likelihood of a thorough dry-in. Waiting for warm, dry days also helps materials perform as designed and keeps crews progressing without weather-induced delays. The winter season, by contrast, brings heightened risk: a rushed job to "tinish" leaks during a storm can trap moisture inside, and frost-heavy conditions complicate nail sealing and roof-penetration work. Prioritize a season when the attic can be properly ventilated, sheathing can dry, and flashing details can be inspected without the rush that derecho-like storms or surprise snowstorms impose.
Inspect from inside for signs of moisture along ceiling lines, especially under living spaces directly beneath roof lines with snow on the ground. Check attic insulation and ventilation to blunt heat loss that accelerates the freeze-thaw damage cycle. Clear leaves and debris from gutters to keep meltwater moving away from the fascia, and remove limited ice buildup with safe, steady methods before it can back up under shingles. If a leak appears during or after a thaw, treat it as urgent: identify source areas around vents, skylights, and flashing, and plan for professional assessment before the next freeze tightens any loosened joints. In a local climate where storm-driven failures are common, staying ahead of these patterns is the single most effective defense.
After spring thunderstorms roll through the lake, the risk isn't just in the loud cracks of thunder but in what you can't see from the ground. Bruising and granule loss on asphalt shingles and metal panels can hide under snow and glare, and those invisible hits can become leaks once warm days melt snowmelt and refreeze. The local contractor signal mix shows storm damage and emergency repair as the strongest specialties in this market, so homeowners often end up scrambling for help right after a storm, sometimes before an official assessment is scheduled. If you hear wind-driven hail or notice fallen debris, act quickly: avoid leaving shingles exposed for extended periods, and arrange a quick inspection with a contractor who understands the Lake Erie influence on your roof's condition.
Hidden bruising is common in this area, and it often travels beneath the surface where you can't see it from ground level. The ice-cycle pattern created by Erie's cold snaps can split fibers in shingles or loosen sealants, setting the stage for leaks when a rainshower hits. Hire a local roofer who can perform a careful, hands-on inspection that includes the ridge, eaves, valleys, and flashings, plus an up-close look at granule loss on shingle surfaces. A thorough photo log is essential: take wide shots of the entire roof and close-ups of suspected impact points, then share these with your adjuster. The goal is to show both the damage scope and the proposed material path, because adjusters in this market expect documentation that demonstrates how the repair will restore resilience against repeat storms and the freeze-thaw cycle.
Insurers in this region generally expect thorough photo documentation before and after repair, with adjusters reviewing both the damage scope and the proposed material choice. Prepare a clear narrative that ties the observed bruising, granule loss, and any shingle delamination to a storm event, not a slow deterioration. When you meet the adjuster, have the contractor's written assessment in hand, along with the photos, timestamps, and a proposed repair plan that addresses the most vulnerable sections-valleys, flashing, and any compromised underlayment. Communicate promptly if a temporary fix is necessary to seal a leak, but ensure those measures are documented and aligned with the final repair plan rather than as a stopgap that masks deeper damage. In this market, speed matters, yet accuracy matters more: decisive, well-documented action can prevent a small issue from spiraling into a costly failure during the region's next heavy storm.
Connect with contractors who help homeowners navigate the claims process from damage assessment to final approval.
Wade Roofing
(216) 375-7942 waderoofingandlights.com
8024 Butler Hill Dr, Painesville, Ohio
5.0 from 59 reviews
3 Daughters Construction
(440) 588-2716 3daughtersconstructionllc.com
7757 Auburn Rd #22, Painesville, Ohio
4.8 from 37 reviews
Walker Roofing & Construction
(440) 527-3039 walkerroofingandconstruction.com
Serving
4.9 from 215 reviews

Kingpin Construction
(440) 363-1490 www.kingpin-construction.com
927 Elm St, Painesville, Ohio
5.0 from 311 reviews
Kingpin construction is based out of Lake and Geauga county. We specialize in exterior and Interior home renovations. We offer roof repair, seamless gutters with leaf guards, siding, concrete, excavation, Christmas light installation. We take a lot of pride in everything we do from installations to customer service. We are here to protect your home!
Wade Roofing
(216) 375-7942 waderoofingandlights.com
8024 Butler Hill Dr, Painesville, Ohio
5.0 from 59 reviews
Wade Roofing is a roofing contractor in the Cleveland, Ohio area serving Lake County, Cuyahoga County, Geauga County, and Ashtabula County.
Biltmore Exteriors
(440) 291-2959 biltmoreexteriors.com
912 Riverside Dr, Painesville, Ohio
4.8 from 92 reviews
Since 1992 we have become Ohio’s prefered exterior contractor. Our focus is provide high quality materials, high quality labor with high quality service. For all your roofing, siding, gutters and window needs call Biltmore!

3 Daughters Construction
(440) 588-2716 3daughtersconstructionllc.com
7757 Auburn Rd #22, Painesville, Ohio
4.8 from 37 reviews
3 Daughters Construction is a family owned and operated residential and commercial roofing company servicing Ohio. We are factory trained in most roofing applications and repairs. Please contact us to see how we can service your roofing needs.
S.M Revolution Roofing
(440) 413-5823 www.smrevolutionroofing.com
Painesville, Ohio
5.0 from 9 reviews
Whether you require a complete roof replacement, repairs, or routine maintenance, our comprehensive range of services covers you. We specialize in residential and commercial roofing installations, utilizing the latest techniques and industry-leading products to provide long-lasting protection for your property. Customer Satisfaction: Our Top Priority At the heart of our success lies our unwavering commitment to customer satisfaction. We understand your roof is a significant investment, and we strive to exceed your expectations with every project. From transparent communication to timely project completion, we go above and beyond to ensure a hassle-free and rewarding experience.

Home Genius Exteriors
(216) 304-3600 homegeniusexteriors.com
1657 Mentor Ave Suite 203, Painesville, Ohio
4.1 from 9 reviews
Elevate your home with Home Genius Exteriors, setting the standard in Painesville by offering full-service solutions for roofing, siding, windows, doors, gutters and insulation. We support our veterans and communities by supporting local and national charitable organizations through our Home Genius Cares initiative. With an Owens Corning® Platinum Preferred designation, we also offer flexible payment options, industry leading warranties and a wide range of premium products tailored for your home. It’s time for a different experience, entrust your next home project to a genius and schedule your free inspection today!
Curb Appeal Roofing
(216) 577-2723 curbappealcle.com
Serving
4.8 from 34 reviews
Curb Appeal Roofing is your premier roofing contractor serving Cleveland, Ohio, and the surrounding counties of Cuyahoga, Summit, and Medina. As one of the leading roofing companies in Ohio, we specialize in a comprehensive range of roofing services tailored to meet your needs. Whether you require residential roofing solutions or multi-family roofing installations, we've got you covered. Our expert team is proficient in various roofing materials, including shingle, metal, tile, and flat roofs. We ensure top-quality workmanship in every project we undertake, guaranteeing durable and aesthetically pleasing results. From installations to repairs and replacements, we handle all aspects of roofing with precision and care.

Runyon & Sons Roofing
(440) 974-6810 runyonroofing.com
Serving
4.7 from 122 reviews
For over 60 years, Runyon and Sons Roofing has provided Northeast Ohio with comprehensive roofing solutions. Their expertise spans across residential and commercial properties, encompassing shingle, flat, and metal roofs. They tackle repairs of all sizes, ensuring the longevity and integrity of your structure. Located in Mentor, Ohio, their service area stretches across several counties, guaranteeing their commitment to the local community.
Roof Rejuvenate NEO
(440) 634-1822 www.roofrejuvenateneo.com
Serving
5.0 from 24 reviews
Welcome to Roof Rejuvenate NEO, the premier provider of roof rejuvenation solutions across North America. Whether you need a commercial or residential roofing contractor, we deliver top-quality commercial and residential roofing solutions. Roof Rejuvenate NEO is a trusted roofing contractor in Mentor, OH, specializing in restoring asphalt shingles, roof repair, and roof replacement. We offer expert roof rejuvenation solutions in Mentor, focusing on roof restoration, roof inspection, and roof maintenance. Our roof rejuvenator replenishes lost oils in asphalt shingles, enhancing resistance to mold, algae, fire, and environmental damage.
MBM Roofing
(440) 636-3101 www.mbmroofingllc.com
Serving
4.9 from 31 reviews
We are a family-owned commercial roofing company focused on serving our clients with the absolute BEST service, the industry leading, highest quality roofing systems, and doing business with integrity, honesty, respect, and with a smile! We treat our clients how we would like to be treated. Our goal? We want you to be so happy with our service and relationship that you choose to never use another roofing company. We strive to help people reach their potential, while building a business to the Glory of God.
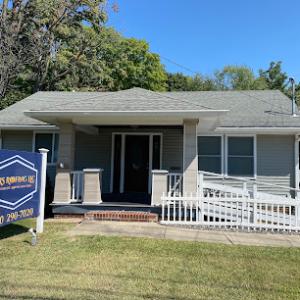
CRS Roofing
(440) 290-7020 www.crsroofingllc.com
Serving
5.0 from 51 reviews
CRS Roofing is a trusted, local roofing contractor proudly serving Mentor, OH and surrounding areas. We specialize in residential roof replacement, repairs, and storm damage restoration. Our team provides fast, free estimates and quality craftsmanship backed by full insurance, licensing, and Google Guarantee protection. Whether it’s a small repair or full roof replacement, we’re committed to honest service and lasting results.
RJK Roofing Solutions
Serving
4.9 from 73 reviews
RJK Roofing Solutions is a full-service roofing repair and replacement contractor providing their professional home improvement services to residents all throughout the Northeast Ohio area. Contact them today for a free estimate!
In Painesville, pricing for roof replacements and repairs tracks closely with the city's common material mix: asphalt shingles, metal, clay tile, concrete tile, wood shingles or shakes, and slate. The Lake Erie freeze-thaw cycle, plus winter ice dams and spring storms, pushes job scopes from simple re-cover to tear-off and dry-in, often with tighter scheduling windows after hail or high-wind events. Costs in this market also reflect steep residential rooflines, chimney flashing complexity, and the need to sequence work around weather delays. Typical project pricing aligns with the following per-square ranges: asphalt shingles from 350 to 900 USD per square; metal from 700 to 1200 USD per square; clay tile from 1600 to 3000 USD per square; concrete tile from 1100 to 2100 USD per square; wood shingles or shakes from 700 to 1200 USD per square; slate from 1800 to 3500 USD per square.
Asphalt shingles
Most homes in the area use asphalt shingles, making this the baseline option when storms drive demand. Expect prices to cluster toward the lower to mid end of the range if the roof is relatively straightforward and roofline is standard. If a tear-off is necessary or if attic ventilation and insulation meet tricky code checks, costs will drift up.
Metal roofing
Metal offers longer life and better ice-dam resistance, which matters after a harsh winter. In practice, metal projects can push higher when rooflines are steep or there are numerous penetrations (vents, skylights, chimneys). Schedule gaps may occur after wind events, as crews juggle tear-off, sheeting, and waterproofing steps.
Clay and concrete tile
Tile is common on higher-end or regional styles; clay tends to carry a premium for installation complexity and weight considerations. In Painesville, expect steeper pitches and additional bracing or structural checks to influence pricing, especially if a tear-off exposes existing rot or requires replacement sheathing.
Wood shingles/shakes
Wood adds character but needs careful maintenance to avoid rot and fire risk, particularly in humid seasons following lake exposure. Costs rise with ladder-style pitch and detailed flashing around chimneys and dormers.
Slate
Slate remains the premium option, with strong durability but substantial labor needs for removal of old roofing and careful installation around attic vents and chimneys. After hail or wind, slate work may extend into more time-consuming tear-offs and dry-in steps.
Storm-driven demand spikes can push scheduling and labor pressure higher in the area after hail or wind events, especially for tear-off and temporary dry-in work. In practice, inspectors and crews align around weather windows, so you may see tighter calendars and potential delays if a front brings back-to-back storms. If your roof carries a steep slope or multiple chimneys, plan for additional staging or weekend shifts to minimize weather exposure and protect the interior during the dry-in. For each material choice, a thoughtful sequence-tearing off, inspecting decking, flashing around penetrations, then applying underlayment and final shingles or tiles-helps mitigate later leaks caused by freeze-thaw cycles and lingering ice dam risk.
The City of Painesville typically requires a building permit for a full roof replacement rather than treating it as permit-free maintenance. This means you'll go through a formal process rather than a quick DIY refresh. The permit process is designed to track tear-off work and ensure proper venting, flashing, and ice-dam safeguards, which are essential in the Lake Erie climate. Expect weather delays and department backlogs to influence timelines, especially during winter storms and spring thaw.
Before you or your contractor file, have a clear plan: roof type, square footage, ventilation approach, and any changes to attic insulation or attic vents. The city requires basic project details up front, so gather the address, contractor contact, and a simple scope of work. If tear-off is involved, note whether any existing roof decking will be replaced. This information helps the plan reviewer understand the extent of the permit and the inspection sequence.
Submit the project details to the local building department with any required forms. In practice, most homeowners rely on their contractor to submit, but you retain responsibility for ensuring the application reflects the actual tear-off and replacement plan. Once submitted, you'll receive permit numbers and inspection windows to monitor.
Inspections are typically scheduled during tear-off and again after completion to close the permit. Plan for at least two inspections: one mid-tear-off to verify decking condition, flashing, and ice-dam mitigation measures, and a final closeout after the new roof is in place. Weather interruptions and department backlogs can shift these windows, so build in buffer time with your contractor.
After the final inspection, ensure the inspector signs off and that any permit card or digital record is updated. Save the approved paperwork with your project files. If wood decking or ventilation upgrades were performed, keep notes and receipts for future maintenance or resale.
Asphalt shingles remain a practical fit for much of the replacement market in this area. They're familiar, relatively quick to install, and widely available from local crews. However, the Lake Erie freeze-thaw cycles and winter storms can shorten service life if ventilation and underlayment are weak. In Painesville you'll often see attic pathways that don't move enough air, which concentrates moisture under the shingles and accelerates rot along eaves and rakes. To get the most from asphalt in this climate, choose an underlayment rated for cold weather, ensure the roof deck is solid and dry before install, and invest in a ventilation plan that keeps the attic near outside temperatures rather than letting it heat up in the summer. A well-sealed ridge vent or continuous soffit intake paired with an appropriate deck sealant reduces ice-related problems in winter and helps maintain shingle adhesion through temperature swings.
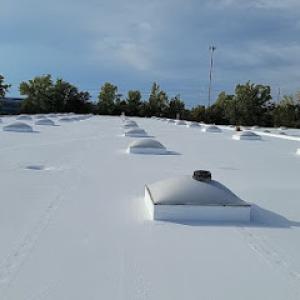
Metal roofing is a strong match for this market where snow shedding and wind resilience matter. In practice, metal can help limit the weight of accumulated ice and snow on steep pitches and obviate some ice dam risks when installed correctly. The key here is detailing at eaves, valleys, and penetrations. Ice dam formation often starts at a misfit between the metal and the underlayment or flashing, so gutters, drip edges, and kick-out flashing must be integrated with the panel seams. Valleys need appropriate flashing and a continuous seal to handle meltwater that can refreeze along cool nights. In this region, a corrosion-resistant coating and a properly spaced panel layout that allows movement during freeze-thaw cycles will reduce panel buckling and pre-mature wear. Budget-friendly metal options may tempt overlookers, but the paid-for design and flashing accuracy will determine long-term performance in wind-driven rain and heavy snows.
Clay tile, concrete tile, and slate are prevalent options in larger or higher-end homes, but they require more thoughtful execution in this climate. The heavier weights demand structural assessment to verify load capacity and joist spacing. In older homes around the lake shore, retrofit may be necessary to avoid deck sag or joint failure under winter loads. Specialized flashing at penetrations, chimneys, and roof-to-wall transitions is not a universal standard among all local crews, so ask about flashing convergence and compatibility with the existing venting and attic airspace. Repair skill matters, because replacing cracked tiles or slate involves precise cutting and matching, plus careful sealing to prevent water intrusion in freeze-prone periods. For homeowners considering these heavier options, it is worth aligning with a contractor who emphasizes sealing detail, wind uplift resistance, and long-term accessibility for maintenance.
Find contractors experienced in skylight installation, flashing, and leak repairs to bring natural light into your home.
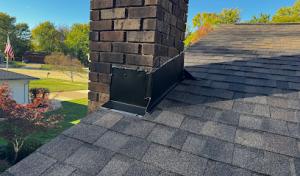
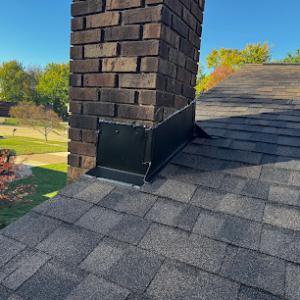
Chimneys and their connections to the roof are unusually visible on local homes, and that visibility isn't just cosmetic. In this market, damaged or improperly sealed masonry intersections tend to draw attention quickly after a storm or seasonal freeze. If the brick and mortar tee into the roof line, small cracks can become bigger water paths in a hurry, especially when winter winds gust across Lake Erie-adjacent air. Before you ever climb to inspect, remember that flashing and counterflashing around a chimney are doing two jobs at once: catching water, and keeping it from sliding under shingles. A small flaw here can translate into a leak that looks like it came from the shingles themselves, even though the real culprit is the transition.
Autumn winds in this area can tug at edges with stubborn ferocity. Rake, drip edge, and chimney counterflashing details are priority maintenance targets before the first heavy gusts. If the rake and drip edge aren't well fastened, wind-borne debris can pry tiny gaps open and let cold air and moisture work their way under the roof edge. Pay close attention to how the wind interacts with any low edge flashing near a chimney chase. Over time, lifting flashing can create a chain reaction: water finds a seam, then freezes, then expands, and you're left chasing a leak that traveled along the edge rather than dropping through the field of shingles.
Many leak calls in older Northeast Ohio housing stock trace back to flashing transitions rather than field shingle failure alone. That means you should inspect the seams where chimney, vent pipes, and roof edge meet the surface. Look for loose screws, lifted metal, or gaps at the counterflashing that sits between brick and shingles. A small repair here tends to be far more durable than waiting for a full roof replacement; it also prevents the telltale stains that typically start low and climb upward from a single flashing lapse. If you're unsure, a quick, careful scan from a ladder can reveal if a professional should re-seal and re-flash the critical transitions.
Storm and hail claims are common in this region, so homeowners should build a quick, repeatable documentation routine before the next freeze-thaw cycle and after any event. Start by taking clear photos of the entire roof edge from ground level and from a safe ladder height, noting any ice dam indicators, missing shingles, or loose flashing. Keep the same angles you'll use after a storm to show changes over time. In the attic, photograph any interior staining or dark spots near ceilings and along rafters, as these often signal hidden leaks that surface with thaw cycles. Store these images in a dated folder so you can demonstrate progression or sudden damage when an adjuster arrives.
Adjusters in this market commonly review whether the proposed repair matches the damaged area and whether the selected material is appropriate to the claim scope. When you file, accompany your estimate with a line-by-line map of the affected sections, including gutters and flashing, and note areas prone to ice damning-valleys, eaves, and experimented skylight interfaces. If the claim calls for material changes, be explicit about where each piece will go and how it aligns with the roof's existing slope and drainage plan. Keep a simple log of any temporary mitigations, such as tarping, and document the timing of these measures. Residential roofs in this region often experience freeze-thaw swings that accelerate damage around joints and hips, so point out any areas showing material delamination or fastener loosening.
Your photo set should include slopes, flashing, gutters, interior leak staining, and any temporary tarping because emergency mitigation is a common part of the local roofing workflow. Include close-ups of shingle tabs, nail heads, and ridge caps to verify wear patterns for storm-related claims. For each shot, attach a brief, dated caption describing what is visible and why it matters for the claim scope. Finally, assemble a simple, dated checklist of the event timeline, from notice of loss to last mitigation action, to help the adjuster follow the sequence of damage and repairs.