Last updated: Apr 19, 2026
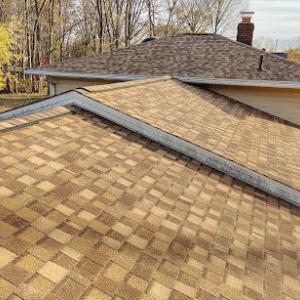
Mentor's position on Lake Erie subjects homes to lake-effect snow, winter wind, and repeated freeze-thaw cycles. Those conditions put unusual stress on shingles, flashing, ventilation, and ice-dam protection. The combination of heavy snow loads, gusty storms, and sudden thaws means every winter, a portion of roofs in town faces accelerated aging or sudden damage around roof penetrations and along eaves. This isn't theoretical-when the lake breeze shifts, shingles can lift, vents can strain, and flashing around chimneys, pipes, and skylights can fail. Expect wind-driven incidents to be a frequent trigger for insurance claims in this climate.
Ice damming is a recurring concern in Northeast Ohio, and Mentor houses feel the impact first-hand. Ice builds up at eaves when heat escaping from the attic melts snow, only to refreeze along the gutter line, pushing water back under shingles. Over time, that water can penetrate under flashing and lead to interior leaks. The stress from freeze-thaw cycles also forces joints and seals to work harder, creating hairline cracks that expand with seasonal temperature swings. In practical terms, you should pay attention to any damp spots on ceilings, dark streaks on walls near ceilings, or stained areas in the attic-these can signal an ice dam or flashing failure before a full roof replacement becomes urgent.
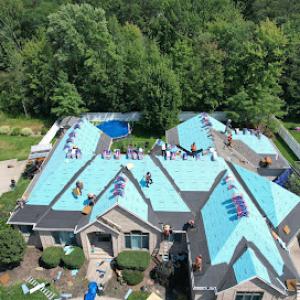
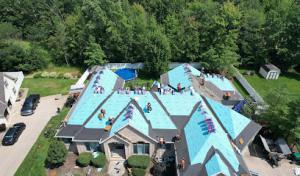
Hail and wind events are the main triggers for roof insurance claims in this area, so meticulous storm documentation is essential. After a storm, take wide and close-up photos of all roof surfaces, edges, and penetrations from multiple angles. Note any displaced shingles, lifted flashing, damaged vent boots, or gutter damage. If access is unsafe, arrange a professional inspection rather than climbing on the roof yourself. A timely, professional assessment helps distinguish wind-related damage from wear, which can influence coverage decisions. Keep a weather log, noting date, wind speeds, hail size, and any observed leaks. This habit can streamline the claims process and support your position when talking to your insurer.
If a storm has just passed and you suspect damage, you don't have to wait for a contractor to arrive to reduce further risk. Clear debris from gutters and downspouts to promote drainage, but avoid dislodging loose shingles or flashing. Place a temporary tarp or protective covering over exposed areas if you can do so safely, concentrating on areas around penetrations and along the eave line. If you see active leaking, capture the flow with buckets and towels to minimize interior damage, and schedule an emergency inspection as soon as possible. When you call for help, explain the storm event, the observed symptoms, and your attic's ventilation status so the contractor can target the most vulnerable spots.
The local contractor market reflects this need, with storm damage and emergency repair among the most prevalent specialties in Mentor-area roofing services. Look for a contractor with proven experience in ice-dam mitigation and flashing repair, not just cosmetic fixes. Ask for references that include projects completed in cold, windy conditions, and verify that the team is comfortable working around existing insulation and ventilation systems. A reliable contractor will perform a thorough post-storm assessment, identify ice-dam risks, and propose a staged plan that prioritizes emergency repairs to prevent further interior damage, followed by a robust solution for long-term protection. If you sense rush tactics or vague promises, step back and request a written assessment and timeline. This approach helps ensure that your roof can withstand the Lake Erie cycles for seasons to come.
Raw Roofing Solutions
7750 Division Dr, Mentor, Ohio
5.0 from 170 reviews
Raw Roofing Solutions is your trusted roofing contractor in Chagrin Falls, Concord, Mayfield, and nearby areas. We provide expert residential roofing, commercial roofing, roof repair, and more — including specialized solar roofing services. Homeowners and businesses choose us for our comprehensive roof warranties and affordable roof financing options. Looking for dependable Mentor, OH roofers? Contact us today for a free estimate! “We do this every ‘shingle’ day!”

Silver Lining Exteriors
(440) 290-7555 silverliningexteriors.com
7354 Lakeshore Blvd, Mentor, Ohio
5.0 from 162 reviews
Silver Lining Exteriors provides roofing, siding, windows, additions, and a variety of other exterior contracting services throughout Northeast Ohio and the Greater Cleveland area.
Powers Roofing & Exteriors
(440) 586-3644 powersroofs.com
7472 Tyler Blvd, Mentor, Ohio
4.9 from 268 reviews
Discover Powers Roofing & Exteriors in Mentor, Ohio, where quality and excellence converge to deliver unparalleled roofing and exterior solutions. Our passionate team is dedicated to protecting your sanctuary, one roof at a time. Whether it's a sleek shingle replacement or a complete exterior transformation, we blend craftsmanship with customer-centric care for an experience that reflects the strength and beauty of your home. Trusted throughout Lake, Geauga, and Cuyahoga counties, we stand ready to craft a unique roofing masterpiece that seamlessly integrates into your dreamscape.
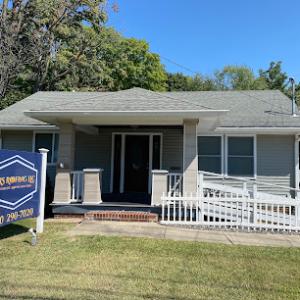
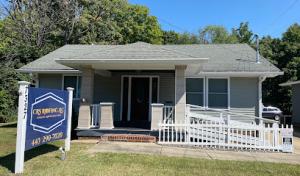
CRS Roofing
(440) 290-7020 www.crsroofingllc.com
7150 Hart St A9, Mentor, Ohio
5.0 from 51 reviews
CRS Roofing is a trusted, local roofing contractor proudly serving Mentor, OH and surrounding areas. We specialize in residential roof replacement, repairs, and storm damage restoration. Our team provides fast, free estimates and quality craftsmanship backed by full insurance, licensing, and Google Guarantee protection. Whether it’s a small repair or full roof replacement, we’re committed to honest service and lasting results.
MBM Roofing
(440) 636-3101 www.mbmroofingllc.com
8696 Tyler Blvd, Mentor, Ohio
4.9 from 31 reviews
We are a family-owned commercial roofing company focused on serving our clients with the absolute BEST service, the industry leading, highest quality roofing systems, and doing business with integrity, honesty, respect, and with a smile! We treat our clients how we would like to be treated. Our goal? We want you to be so happy with our service and relationship that you choose to never use another roofing company. We strive to help people reach their potential, while building a business to the Glory of God.

Runyon & Sons Roofing
(440) 974-6810 runyonroofing.com
8745 Munson Rd, Mentor, Ohio
4.7 from 122 reviews
For over 60 years, Runyon and Sons Roofing has provided Northeast Ohio with comprehensive roofing solutions. Their expertise spans across residential and commercial properties, encompassing shingle, flat, and metal roofs. They tackle repairs of all sizes, ensuring the longevity and integrity of your structure. Located in Mentor, Ohio, their service area stretches across several counties, guaranteeing their commitment to the local community.
Roof Rejuvenate NEO
(440) 634-1822 www.roofrejuvenateneo.com
8885 East Ave, Mentor, Ohio
5.0 from 24 reviews
Welcome to Roof Rejuvenate NEO, the premier provider of roof rejuvenation solutions across North America. Whether you need a commercial or residential roofing contractor, we deliver top-quality commercial and residential roofing solutions. Roof Rejuvenate NEO is a trusted roofing contractor in Mentor, OH, specializing in restoring asphalt shingles, roof repair, and roof replacement. We offer expert roof rejuvenation solutions in Mentor, focusing on roof restoration, roof inspection, and roof maintenance. Our roof rejuvenator replenishes lost oils in asphalt shingles, enhancing resistance to mold, algae, fire, and environmental damage.
C & S Construction/Snowplowing
7255 Industrial Park Blvd, Mentor, Ohio
4.8 from 27 reviews
When it comes to Roofing Contractors, Roof Repairs, Siding Services and more, no one compares to C & S Construction/Snowplowing. With years of combined experience, C & S Construction/Snowplowing has worked hard to build the trust of our clients in Mentor and surrounding areas. Visit our website to learn more or better yet, call us today!
Curb Appeal Roofing
(216) 577-2723 curbappealcle.com
9401 Hamilton Dr, Mentor, Ohio
4.8 from 34 reviews
Curb Appeal Roofing is your premier roofing contractor serving Cleveland, Ohio, and the surrounding counties of Cuyahoga, Summit, and Medina. As one of the leading roofing companies in Ohio, we specialize in a comprehensive range of roofing services tailored to meet your needs. Whether you require residential roofing solutions or multi-family roofing installations, we've got you covered. Our expert team is proficient in various roofing materials, including shingle, metal, tile, and flat roofs. We ensure top-quality workmanship in every project we undertake, guaranteeing durable and aesthetically pleasing results. From installations to repairs and replacements, we handle all aspects of roofing with precision and care.

Sure Seal Roofing
(440) 942-6999 suresealroofing.netlify.app
7834 Enterprise Dr, Mentor, Ohio
4.8 from 17 reviews
Residential roofing specialists in Northeast Ohio.
Lake Erie Roofing & Construction
9785 Old Johnnycake Ridge Rd, Mentor, Ohio
2.8 from 13 reviews
Lake Erie Roofing and Construction: Florida's Trusted Roofing Repair & Replacement Experts Protecting Florida homes and businesses with top-tier roofing services! Lake Erie Roofing and Construction specializes in expert roof repairs, addressing leaks, storm damage, and wear and tear promptly and effectively. We also provide seamless and durable roof replacements using quality materials for long-lasting protection. As a Google Guaranteed company, you can trust our commitment to excellent service and customer satisfaction. Beyond roofing, we offer comprehensive construction and window services throughout Florida. Contact us today for reliable roofing solutions you can count on!
Dynamic Roofing Solutions
(440) 525-0979 dynamicroofing.us
Serving
4.9 from 193 reviews
We are an established roofing contractor in Northeast Ohio that has built a foundation of quality service and a passion for leaving a lasting and significant legacy. We believe that every completed project is a direct reflection of our obsession, commitment to quality and work ethic. Our years of experience in providing superior roofing services in the Cleveland area have proven the best solution for all our clients. We offer a large number of residential roof repair services which includes roof replacements, roof repairs, and new construction roofs. Our focused and dedicated team of skilled workers will assess your roof honestly and identify all possible options to fit your needs appropriately.
Northeast Ohio winters can delay full replacement work because snow cover, cold-sensitive sealants, and icy roof surfaces complicate tear-off and installation timing. Ice buildup along eaves and in valleys makes fierce work hazards, so crews often pause until temperatures cooperate and melt cycles clear. If a roof is already open when a winter storm hits, protect exposed framing with temporary coverings and avoid opening during heavy snow events. Plan for shorter work windows, with potential extensions into early spring if conditions linger. At the same time, frozen perimeters and wind-driven snow can create micro-damages that justify early estimates for a full replacement once dry conditions return.
Spring in the Mentor area brings heavy rain and storm interruptions, which raises leak risk if a roof is opened and not dried-in quickly. Scheduling a tear-off in March or April should assume weather gaps of several days to a couple of weeks, depending on spring storm frequency. A strategic approach is to stage material protection, keep scaffolding dry-tarp ready, and favor a plan that completes the interior dry-in within a single dry stretch. If a leak is detected during spring storms, prioritize securing flashing, underlayment, and a rapid dry-in to minimize interior damage. Communication with the crew about preferred sequences-tarps first, then decking, then shingles-helps keep the project on track even with weather interruptions.
Warm, humid summers make attic ventilation and underlayment performance more important. Heat accelerates wear on felt or synthetic underlayment, and insulation moisture balance can shift quickly in a closed attic space. Ensure soffit and ridge ventilation remain functional during replacement to avoid trapped heat that can warp decking or compromise new shingles. If an active project runs into the peak sun of July, consider early morning starts and protective shade for crews to reduce heat stress and ensure sealants cure properly. Plan for possible afternoon rain to pause work and prevent prematurely exposed underlayment from weather exposure.
Autumn winds and falling debris can affect exposed roof areas during active projects. Leaves, branches, and wind-driven grit can clog gutters, valleys, and ventilation intakes, so a proactive cleanup routine matters. Schedule wind-heavy stretches away from critical stages like drying-in or shingle installation to minimize rework. Fall weather can swing quickly toward harsher conditions; having a contingency window for a final inspection and corrective steps helps preserve long-term performance as temperatures cool. Coordinate with the crew on securing loose materials during expected seasonal shifts to prevent wind-driven damage.
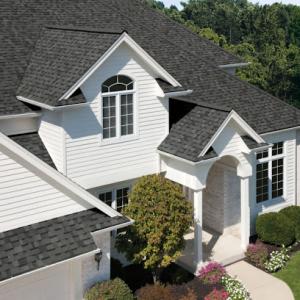
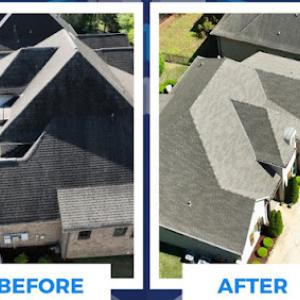
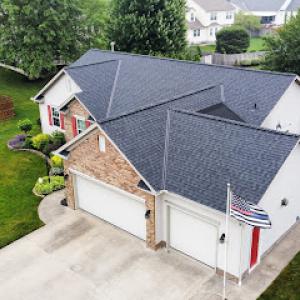
In Mentor, the climate shaped by Lake Erie's shoreline drives a steady rhythm of storms, ice dams, and freeze-thaw cycles. Asphalt shingles remain a dominant choice because they fit the area's large re-roofing market and typical residential replacement budgets. They can perform reliably when maintained, but attention must be paid to granule loss, wind-driven damage, and the wear that freeze-thaw cycles impose on the surrounding flashing and roof edge. When considering replacement after a storm or aging shingles, remember that asphalt has a practical balance between cost, ease of installation, and repairability that makes it a common fit for many local homes.
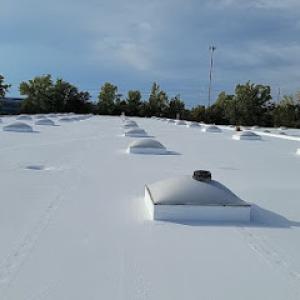
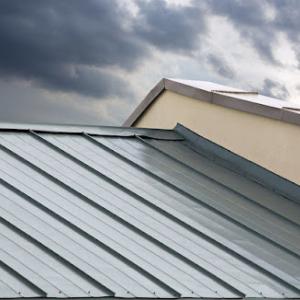
Metal roofing is increasingly chosen by homeowners who want better snow shedding and improved durability in Northeast Ohio weather. In Mentor, metal can dramatically reduce traction barriers caused by ice buildup along eaves and overhangs, and it tends to shed snow more predictably than other materials. However, the installation details matter as much as the material itself. Flashing at dormers, valleys, and transitions requires careful detailing, and a cold-climate installation benefits from a robust underlayment and proper roof-to-wall connections. Ventilation remains critical to prevent condensation and ice-dam formation beneath metal. If a metal roof is on the radar, plan for high-quality flashing, continuous ventilation, and strong snow guards where applicable.
Tile, wood, and synthetic products appear in the market, but each brings its own set of considerations in this lakefront climate. Weight becomes a central question when evaluating clay or concrete tile, especially on older structures or homes with limited structural capacity. Wood shingles and shakes offer a natural look but are more susceptible to moisture exposure, rot, and higher maintenance in winter conditions. Synthetic products provide versatility and sometimes lower weight, yet performance during repeated thaw-refreeze cycles and exposure to lake winds should be tested against local experience. In areas with heavy snowfall, ensure that the chosen material can handle the local snow load, and verify compatibility with existing ventilation and ice-dam protection strategies.
For any material, the roof system must work as a cohesive whole. Proper underlayment, effective ventilation, and a robust ice-dam strategy should be part of the installation plan. Storm damage scenarios, insurance-driven replacement decisions, and the timing of repairs all hinge on the compatibility between the chosen material and existing attic insulation, ventilation routes, and drainage design. A well-timed replacement after a damaging event should align with the home's overall envelope performance, ensuring that gutters, downspouts, and flashing details are refreshed or upgraded to support the new roof. This local approach helps address repeated freeze-thaw cycles and wind-driven events that stress shingles, flashing, and roof edges.
In this area, shuttering storms and lake-effect snow press roofs from every angle. Provided local cost ranges run about $350-$700 per square for asphalt shingles, $900-$1500 for metal, $1200-$2800 for clay tile, $800-$1800 for concrete tile, $500-$900 for wood shingles or shakes, and $450-$900 for synthetic or composite shingles. Those figures sit at the core of budgeting, but expect some drift depending on roof complexity, attic ventilation needs, and existing decking condition. Asphalt remains the most common, but a storm-damaged roof often triggers a higher-quality or faster-install option if insurance timelines demand quick scheduling.
Mentor's market sees price moves after hail or wind events when storm-driven demand spikes and homeowners compete for fast scheduling from responsive re-roofing crews. When a hailstorm hits, crews can book out days or weeks, pushing labor costs higher and skews in favor of firms with ready crews and material on hand. If a contractor is juggling multiple insurance-driven jobs, you may notice a tighter window for project start and a premium for expedited delivery. This is typical in a shore-adjacent climate where storms can cluster in a season, compressing timeframes and compressing margins.
Pricing can also move upward when older roof tear-offs reveal damaged decking, chimney flashing issues, or ventilation corrections that must pass local inspection. If decking is compromised, many residents discover the replacement needs to extend beyond shingles. Flashing around chimneys and vents can require additional metalwork or sealants, and proper ventilation upgrades become more likely as attic conditions shift after a major event or age-related wear. Each of these factors tends to add to the overall square-foot cost and can affect project duration, especially if access points are tight or crew parking is limited in busy neighborhoods.
For a homeowner facing insurance-driven decisions, it helps to price for a best-case, mid, and accelerated schedule. Having documents ready for the insurer, photos of the damaged sections, and a preferred material type can shorten delays that otherwise push costs upward through premium labor surcharges or material line-item changes. In practice, plan for a range that accounts for storm surge in scheduling and for the possibility of decking or flashing upgrades that align with inspection expectations.
Get a clear picture of your project costs upfront - no commitment required.
Raw Roofing Solutions
7750 Division Dr, Mentor, Ohio
5.0 from 170 reviews
Mentor's building department generally requires a permit for roof replacement work. The contractor typically files the permit, and inspections are commonly scheduled during the project with a rough inspection after decking and underlayment and a final inspection at completion. That means you won't be waiting until the end to confirm compliance; you'll engage with the process in stages so weather and ice-dam risks don't trip you up later. If a permit is not filed promptly, a later inspection can trigger delays or penalties, especially during the busy spring and early summer window when storms are common.
The rough inspection after decking and underlayment is designed to verify that roof decking is sound, underlayment is properly installed, and ventilation provisions meet local standards. In Mentor, storms and freeze-thaw cycles can expose decking weaknesses quickly, so the rough check is a good early warning. The final inspection occurs once the project is complete and all components-flashing, vents, drip edge, and shingles or panels-are installed. Inspections are typically coordinated with the contractor, but you should be prepared to accommodate access and provide any requested documentation, such as permit numbers or product specs.
Local compliance review places particular emphasis on ventilation, roof decking, and flashing details. Inadequate attic ventilation or improper flashing around valleys, chimneys, and skylines can lead to ice dam formation and accelerated wear in this Lake Erie's climate. If hidden deficiencies are uncovered during tear-off, the scope can expand to address them. That means a replacement might require additional decking repair, upgraded ventilation solutions, or upgraded flashing systems to ensure long-term performance.
Track permit numbers and scheduled inspection dates, and keep a clear line of communication with the contractor. If a rough inspection reveals issues, ask for a transparent plan and timeline to address them before work continues. On tear-off days, ensure attic access is clear so inspectors can verify ventilation and decking conditions without delay. Finally, recognize that the permit and inspection cadence is not red tape; it's a critical step to protect against hidden damage and to secure a durable, weather-ready roof for the Lake Erie's demanding climate.
Ohio is an active roof-claim environment after hail and wind events, so this area commonly sees insurers requesting concrete documentation. After a storm, you should start collecting detailed estimates, clear photos, and date-stamped notes that show the damage and the surrounding conditions. A calm, methodical photo run-roof surface, gutters, vents, flashing, and decking-helps an adjuster see beyond a quick gut impression. Keep a simple, dated record of when you first noticed damage and any temporary patches you applied to prevent further water intrusion. When materials are visible from the ground, a professional inspection can verify whether shingle granules, lifted tabs, or flashing deterioration are part of the claim. This approach helps you avoid later disputes, especially in a climate where lake-effect storms can produce spotty but real damage.
Insurers may review roof age and material type when settling claims, which matters in this area where asphalt shingles dominate but metal, tile, wood, and synthetic systems are also present. If your roof has already endured several freeze-thaw cycles, be prepared to address how that history contributes to the current condition. Include proof of recent maintenance and any prior repairs, along with contractor observations about ventilation and attic space. A clean, consistent file with scanned or clearly photographed documents reduces back-and-forth. If the adjuster identifies gaps in the original scope, you want to show where flashing, decking, or ventilation were examined and addressed. For many homeowners, the best outcome comes from a transparent, occupation-specific timeline tied to the storm event.
During the inspection, focus on details that can influence scope: flashing integrity around joints, decking softness, and ventilation adequacy to prevent future ice-dams. If the claim hinges on code-related items or required replacements, having a professional report that directly references these elements strengthens your position. Document any concerns the adjuster notes and request written follow-ups with clear, itemized steps. If a dispute arises, you will benefit from a well-curated set of photos and stamped notes that demonstrate the condition across seasons and weather cycles.
Connect with contractors who help homeowners navigate the claims process from damage assessment to final approval.
Raw Roofing Solutions
7750 Division Dr, Mentor, Ohio
5.0 from 170 reviews
Walker Roofing & Construction
(440) 527-3039 walkerroofingandconstruction.com
8887 East Ave, Mentor, Ohio
4.9 from 215 reviews
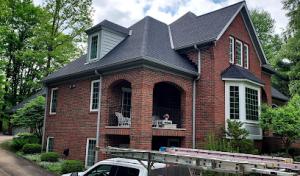
Chimneys remain a frequent source of trouble in this climate, where lake-effect snow and strong winds push moisture into vulnerable joints. In re-roofing projects, chimney flashing is often a focal point for contractors, and even small lapses can become ongoing leaks if a proper transition isn't achieved. The combination of masonry joints, settling bricks, and metal-to-fractory flashing requires careful fit, sealant choice, and step-flashing integration with the roof plane. If a chimney stack shows any moisture staining or spalling brick after a thaw, expect the worst when the next storm rolls in. A thorough inspection should look for loose mortar, tuckpointing needs, and any movement where the flashing meets the shingle line. In this market, hiring a crew with proven chimney and masonry experience matters-the wrong flashing detail can repeat leaks season after season.
Skylight openings are a magnet for wind-driven rain and drifting snow, especially when a roof is undergoing replacement. Skylight service is an active specialty in town, and improper flashing around these penetrations can create concentrated leak paths along glazing stops or under curb flashings. During re-roofing, ensure the skylight curb is square, the membrane is correctly lapped, and the curb flashing is integrated with proper sealants and kick-out details to shed both wind and meltwater away from the opening. In NE Ohio's cycle of freeze-thaw, even small gaps can widen into recurring interior dampness. Advise crews to test for wind uplift around skylights and to re-seal surrounding shingles with compatible materials designed for cold-weather performance.
Any vent, vent pipe, or satellite dish penetration carries a similar risk, especially where a roof line changes direction near a chimney or skylight. Freeze-thaw cycling can widen flashing failures at these points, turning minor weep holes into steady drips inside ceilings. The goal is continuous, cohesive flashing that ties into the roof deck, underlayment, and shingle overlaps. When you notice new staining after a storm or a quiet melt, treat it as a warning to re-check all penetrations promptly rather than hoping it won't return. This neighborhood has learned that early attention saves interior damage and repeated elevator-remediation costs.
Find contractors experienced in skylight installation, flashing, and leak repairs to bring natural light into your home.
Sure Seal Roofing
(440) 942-6999 suresealroofing.netlify.app
7834 Enterprise Dr, Mentor, Ohio
4.8 from 17 reviews
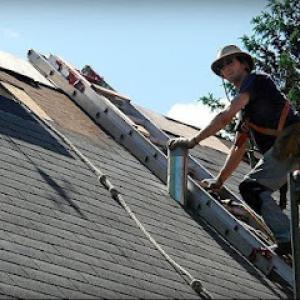
In Mentor, the contractor market is driven by re-roofing, storm response, and leak correction more than new construction. You want a crew that understands the Lake Erie's shoreline weather, not just a generic shingle swap. Look for firms with a steady residential focus, a track record of timely jobs, and eyes for details that prevent future leaks after a heavy snow year.
Start by confirming they have recent experience with storm-driven damage and ice-dam issues. Ask how they handle rapid mobilization after a leak is detected and how they protect interior spaces during weather-driven projects. A good crew will explain their temporary containment steps, material stock approach, and communication cadence while the job is active.
Quick response matters because occupied homes demand minimal disruption. Inquire about their crew size, typical on-site crew composition, and their clean-up protocol at the end of each day. When storms hit, you want a team that can tarp exposed areas, seal vulnerable flashing, and leave your yard and driveway clear of debris. A local firm with a reputation for prompt departure times and neat work tends to perform best in this market.
Long-established, family-owned firms with a residential focus are common here, and they often deepen trust through steady crews and predictable scheduling. Some contractors promote drone inspections and manufacturer-backed credentials. Ask for recent project photos or references from neighbors with similar homes. Verify that the crew adheres to manufacturer guidelines for your chosen roofing type and that they have a clear plan for wind-driven shingle exposure protection.
Request a written scope of work, a projected timeline, and a day-by-day contact plan. Visit at least two sites in progress, if possible, to gauge workmanship and site management. Decide on a primary point of contact and confirm who will supervise the crew on-site for safety and quality checks.