Last updated: Apr 19, 2026
Chesapeake sits in the South Hampton Roads weather pattern where spring and summer thunderstorms and tropical storm activity create recurring wind-driven roof damage concerns. That means a quick gust or a booming thunderstorm can lift shingles, pry flashing, or pry open small gaps that seem inconsequential at first. In humid heat, those tiny openings invite quick interior moisture intrusion if left unchecked. Attic humidity compounds the problem, and wet decking can accelerate mold development and wood rot even before a full storm signal is noticed. The coastal edge and inland tracts each carry their own timing-yet both demand vigilance and rapid response when a storm rolls through.
When a gusty line blows through, priority one is control of the active leak. If water is actively dripping, place a sturdy container under the leak and avoid walking on a compromised roof. Do not assume a small trickle is harmless-water seeks the path of least resistance and can travel along rafter bays to stain ceilings far from the initial impact. If the attic hatch is accessible, check for daylight or wind-driven air leaks that indicate missing or displaced shingles or flashing. In inland tracts and near tidal waterways alike, even a modest roof crease may widen with sustained wind, turning a minor nuisance into a full-on interior moisture issue within hours.
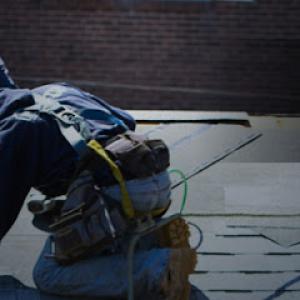
A rapid tarp or temporary cover is essential when heavy rain is anticipated or when a storm is still rumbling. Use a tarp large enough to extend beyond the affected area, secure it with weighted materials, and anchor with durable fasteners. If access to the roof is unsafe, focus on sealing the most vulnerable interior points-ceiling penetrations, attic access doors, and any visible daylight around ridge lines. While securing the exterior, photograph every affected area from multiple angles and note the date, time, and observed wind direction. Close-up shots of lifted shingles, damaged flashing, and deck moisture help support a future claim and speed up a response from a contractor.
The hot, humid summers create a perfect environment for moisture to linger once a leak begins. Wet decking acts like a sponge, and attic humidity can push and pull moisture through ceiling remains, attic gables, and soffits. If there is any signs of staining or warped plywood in the attic, treat it as a red flag-even if the visible roof appears superficially intact. Addressing moisture promptly reduces the risk of long-term rot, insulation degradation, and faster deterioration of roof deck components once the storm season returns.
Because the inland and coastal mix means storms can arrive on short notice, scheduling a full roof replacement after a major event often happens quickly, but requires careful triage. Start with a reputable local contractor who understands wind-driven leak patterns and knows how to read storm-driven damage indicators-like raised shingles along edges, loose flashing around valleys, and compromised drip edge hardware. In the interim, insist on a comprehensive moisture assessment of the attic and decking to determine whether plywood or OSB needs replacement or reinforcement before re-shingling. And keep the insurer's contact chain handy: a clearly documented sequence of events, dates, and visible damage can streamline the claim and ensure the right roofing materials are used during replacement, minimizing the risk of recurring leaks.
Consider the climate-driven realities when choosing materials and installation details. Wind resistance, proper nailing patterns, and flashing integration become crucial in areas near tidal waterways and low-lying zones. Metal roofs and high-wind-rated assemblies can offer robust performance against repeated gusts, but proper underlayment and flashing configuration remain essential. For shingle systems, ensure edge protection and valley flashing are sealed to withstand storm-driven spray and debris impact. A local contractor should verify that the roof pitch, spacing, and venting align with Chesapeake's storm profile to minimize future leakage risk.
In this area, storm-driven demand spikes after thunderstorms and tropical weather can tighten labor availability for re-roofing crews. That pattern shows up in price swings, especially in peak storm season when crews migrate between projects or push quick turnarounds. When reports of heavy rain or wind events circulate through the Hampton Roads market, materials may be in short supply and scheduling can push costs upward for a short window. Plan for a few weeks of variability in both material procurement and labor, and build contingency timing into the project schedule.
Asphalt shingles remain the most budget-accessible option, with pricing commonly cited at 350 to 650 USD per square. In Chesapeake, this range is a reliable baseline, but storm-driven demand can compress the lower end or push the middle toward the upper end during busy weeks. If the roof deck shows typical wear from humidity and occasional humidity-related staining, asphalt remains practical because repairs and nail-fastening labor stay straightforward. However, long-term coastal exposure can accelerate granule loss on some bundles, and that wear may influence the needed underlayment and flashing decisions.
Metal commonly runs 600 to 1000 USD per square. The speed of installation and strong wind resistance make metal a compelling choice after a major storm, when quick re-covering can minimize interior exposure. Local crews familiar with coastal winds often price metal higher during high-demand stretches, reflecting both material costs and the need for specialized installation. For homes in flood-prone parcels or with limited attic space, metal's lighter weight can be a practical factor, but verify structural implications with a local pro if the house shows signs of long-term humidity exposure.
Concrete tile prices typically run 700 to 1100 USD per square, while clay tile sits in a wider range from 900 to 1600 USD per square. Heavier materials demand more structural review and careful framing, especially on older homes with wood decking or marginal support. In Chesapeake, heavier roofing can also necessitate decking repairs due to long-term humidity exposure, which adds to both time and cost. Tile installations benefit from crews with tile-specific experience to ensure proper slope, underlayment, and wind-rated fastening. Expect higher labor fees during peak storm periods when specialized tile work is in demand.
Wood shingles or shakes run about 500 to 900 USD per square. This option can be appealing for a traditional look, but local humidity accelerates deterioration in vulnerable areas, and the material is more sensitive to moisture-related issues like rot and insect activity. When storms are frequent or when a roof is already showing signs of humidity damage, wood may require more frequent maintenance or reinforcement, increasing total project cost and complexity.
Slate sits at 1200 to 1800 USD per square. The premium performance against wind and moisture can be worth it on certain coastal homes, but this material is the most sensitive to structural readiness. In Chesapeake, slate projects often involve additional structural evaluation to ensure the framing and decking can support the weight, particularly after long periods of humidity exposure. Storm-driven demand can widen the price gap, as highly skilled slate crews are in high demand during and after major weather events.
Costs in Chesapeake can rise when older homes need decking repairs from long-term humidity exposure or when heavier materials require structural review and more specialized installation labor. Before choosing a material, assess the roof deck condition, attic ventilation, and flashing details to determine if additional repairs should be bundled into the project. If insurance documentation is part of the plan, keep a log of storm-related damages, including photos of decking and underlayment, as these records can influence the claim presentation and the scope of work the contractor recommends. In a storm-heavy climate, it is prudent to request a written phasing plan that aligns material delivery with crew availability, reducing the risk of weather-driven delays and cost escalations.
Area Remodeling
1605 Waterside Dr n, Chesapeake, Virginia
5.0 from 65 reviews
Roofing contractor siding contractor gutter installation gutter guard installation
Jayhawk Exteriors
(757) 963-6559 www.jhawkext.com
1824 Engle Ave, Chesapeake, Virginia
4.9 from 316 reviews
Jayhawk Exteriors provides roofing, siding, soffit and trim, window, and gutter services to Chesapeake, VA; Virginia Beach, VA; and the surrounding areas.
Roof Artistry
(757) 992-9311 roofartistry.com
1226 Executive Blvd Ste 101, Chesapeake, Virginia
5.0 from 57 reviews
Roof Artistry is a roofing contractor in Norfolk, VA servicing Norfolk, Chesapeake, Virginia Beach, and nearby areas. We are a local veteran-owned roofing company, specializing in shingle, slate, & flat roof repairs, leak detection, roof maintenance & prevention, and shingle roof replacements. All our work is guaranteed. Your trusted roofing company in Norfolk and Chesapeake has a business license, contractor’s license, and general liability insurance, with warranties offered on repairs and replacements. We also offer a 10% discount for real estate agents, property management, veteran, government employee, and senior citizens. Contact your reliable Norfolk and Chesapeake roofing contractor for a free estimate!

Gray Line Roofing
(757) 263-0232 graylineroofingva.com
713 Fenway Ave Suite 3, Chesapeake, Virginia
4.9 from 134 reviews
Gray Line Roofing is a veteran-owned roofing company proudly serving Chesapeake, VA, and Hampton Roads for over 10 years. Led by a licensed Professional Engineer and Class A Contractor, we specialize in Residential Roofing, Roof Replacements, Roof Repairs, and Emergency Roof Repair in Chesapeake, VA. Our expertise includes Asphalt Shingle Roof Installations, Flat Roofing, and Commercial Roofing in Hampton Roads. We’re also trusted Storm Damage Roof Repair Specialists in Hampton. Get a same-day, no-pressure estimate, enjoy flexible financing, and benefit from free shingle upgrades with a lifetime warranty. Call today for your free roofing estimate!
Atlantic Craftsman
(757) 780-5488 www.atlanticcraftsman.com
908 Business Park Dr Suite B, Chesapeake, Virginia
4.8 from 545 reviews
Atlantic Craftsman is Chesapeake’s trusted roofing and siding contractor with over 40 years of experience. We provide residential and commercial roofing, roof replacements, siding installation, gutter installation, window replacement, and storm damage repair. As a veteran-owned, Owens Corning Preferred Contractor, we deliver reliable craftsmanship, honest pricing, and long-lasting results. Serving homeowners across Chesapeake and Hampton Roads, we offer free inspections, financing options, and insurance claim assistance. Count on Atlantic Craftsman in Chesapeake, VA, for exterior home improvements that protect and enhance your property.
VA Commercial Roofers of Chesapeake
(757) 317-0221 www.vacommercialroofers.com
Chesapeake, Virginia
5.0 from 44 reviews
We are a multi generational, family owned roofing company with over 40 years of experience with all types of roofing. You cannot take your reputation with you when you go but you can leave it behind for your children and that's what we plan to do. Build something that can (and will) be passed down. This means that every job we do will be quality and at a fair price.

Wholesale Roofers Chesapeake
(757) 266-5981 www.wholesaleroofersva.com
2211 S Military Hwy Ste B, Chesapeake, Virginia
5.0 from 36 reviews
Wholesale Roofers Chesapeake is the #1 roofing company in Chesapeake Va. Our roofing company specializes in roof repair, roof replacement, and other roofing contractor services. We are the best roofer in Virginia Beach, Chesapeake, Norfolk, Portsmouth, Suffolk, Hampton, and Newport News. If you are looking for a “Roofer Near Me,” we are your best choice.
SlopePro Roofing
(757) 657-8059 www.slopeproroofing.com
3712 Profit Way Ste A, Chesapeake, Virginia
5.0 from 35 reviews
SlopePro is a professional roofing company in Chesapeake, VA servicing the Tidewater area. As a family-owned and operated company, we are committed to helping you make better roofing investment decisions. Our professional roofers specialize in both residential and commercial roof repairs and roof replacements. Call us today to schedule an inspection.
Clark Roofing & Siding
(757) 485-1000 clarkroofingandsiding.com
1755 W Rd, Chesapeake, Virginia
4.8 from 142 reviews
We are a Class A contractor. We do full roof replacements, siding replacement projects, and other exterior upgrades including windows. We offer superior quality workmanship and professional service. Our employees receive ongoing training to achieve the high standards set by Clark Roofing & Siding. We install all types of high-quality materials including Owens Corning shingles, LP Smartside ExpertFinish siding, vinyl siding products from multiple manufacturers, standing seam metal roof systems, copper roofing, windows, and Velux skylights and sun tunnels. No job is too big or too small. We help both commercial and residential customers with roofing & siding services in Chesapeake, Virginia Beach, Norfolk, Portsmouth, and NE North Carolina.
Best Choice Roofing
(757) 913-5029 bestchoiceroofing.com
2010 Old Greenbrier Rd Suite N, Chesapeake, Virginia
4.7 from 278 reviews
Best Choice Roofing is your trusted roofing expert and the Best Choice when it comes to choosing a roofing company with a commitment to impeccable customer service in the Chesapeake area. In business since 2009, Best Choice Roofing’s industry-leading contributions to the roofing industry include a customer-first mentality, a dedication to top-quality products and a leadership team focused on the growth of its people. Because of this framework, we have created a loyal base of customers all over the United States.
Premier Roofing & Siding Contractors
(757) 335-6950 www.premierroofingandsiding.com
1215 Bainbridge Blvd, Chesapeake, Virginia
4.6 from 193 reviews
Premier Roofing & Siding specializes in roof replacement, roof repair & maintenance, roof inspection, roof leak repair, hail damage, ridge vents & roof ventilation. vinyl siding, replacement windows, commercial roofing, and more. Call a roofing contractor for a free estimate if you live in Southside Virginia and Northern Carolina. If you've noticed missing shingles, leaks, or signs of wear and tear, it's time to call in the professionals. We provide comprehensive roof repair solutions that help prevent future damage and extend the lifespan of your roofing system. Trust us for local roof repair in Chesapeake, VA and surrounding areas, where our team of experts will work tirelessly to restore your roof's integrity and protect your home.

Patriot Exterior Solutions
(757) 426-5200 patriotexteriorsolutions.com
553 Graphite Trl, Chesapeake, Virginia
4.6 from 128 reviews
Patriot Exterior Solutions - Your Local Roofing, Siding, Window & Gutter Experts! At Patriot Exterior Solutions, we specialize in complete exterior home improvement. From durable roofing and stylish siding to energy-efficient windows, custom exterior trim, and reliable gutter systems, our team delivers quality solutions designed to protect and enhance your home. Call today or Book online for a Free Estimate!
When a full roof replacement is planned, a building permit is required through the city's Building Permits Department. This is not treated as routine, no-fuss maintenance; it triggers formal review and documentation. The permit makes sure the work follows the local code, rain or shine, and that the new roof system will stand up to Chesapeake's humid coastal conditions, frequent thunderstorms, and wind-driven events. Starting the process early helps prevent delays during bad weather or after a storm when contractors are in high demand.
The local process relies on inspections to verify that the project meets code and local standards. Work typically has a progression of inspections, with a final inspection used to close out the permit and confirm full compliance. If adjustments are needed, the inspector will note them and require timely corrections. Because storms and wind-prone events are common here, the final walk-through often focuses on fasteners, underlayment, flashing, and roof edge details to ensure leak resistance and wind uplift performance.
Contractors commonly need to provide license information with the application. Depending on the scope, mitigation details may be requested-such as temporary protections for neighboring properties, debris containment, and provisions for moisture control during installation. Having these items clearly documented helps prevent hold-ups at intake and reduces the risk of a stop-work order once inspections begin. A reputable contractor will coordinate the timing of permits, inspections, and project sequencing to align with storms and inconvenient weather windows typical to the coast.
You should start by compiling the project address, contractor licensing, and proof of the contractor's insurance, then complete the permit application with the Building Permits Department. Expect a review period that may include plan checks or questions about the chosen roofing system, penetrations, and venting. Schedule inspections with the city early and pin down available windows that avoid peak storm times. Keep the site neat and accessible for inspectors, and have mitigation measures ready-like tarps, temporary drainage, and clear pathways-to minimize moisture intrusion during construction.
In a coastal, storm-prone climate, documenting mitigation measures and keeping a transparent paper trail helps with post-storm insurance needs and any code-related questions. After the work is done, the final inspection confirms the installation meets local wind resistance and water intrusion requirements, reducing the chance of rework due to code issues or weather-related damage in the near term.
In this part of the coast, wind and hail losses get close scrutiny from carriers and adjusters. Those storms can arrive fast, ripping at loosening edges or lifting shingles just enough to start a slow leak that isn't obvious until heavy rains hit. The mix of inland neighborhoods and low-lying pockets near the Elizabeth River means insurers are accustomed to a wider range of damage, but that also means your roof is under a sharper lens when it comes to eligibility and settlement timing. If your shingles sit near the end of their life, or if the roof is a premium material like tile, metal, or slate, adjusters will be more proactive in reviewing the overall risk and long-term performance of the roof system.
Insurers commonly weigh roof age and material type when setting premiums or renewal terms. In this market, a roof that looks older or has mismatched sections can shift into a higher-risk category, even if the rest of the house seems solid. Premium materials are present in many Chesapeake homes, and that matters when a carrier assesses replacement needs or residual value after a storm. The age and condition become not just a matter of aesthetics, but a signal about likelihood of ongoing leaks and additional interior damage. That reality makes proactive maintenance and timely addressing of weak spots more than just a matter of comfort-it can influence how the policy behaves after the next thunderstorm.
Adjusters want clear, dated proof of what happened and when. A straightforward, organized record speeds things and reduces back-and-forth that can delay approvals. Start with dated photos that show the storm timing, visible uplift, and any flashing damage at the joints, valleys, and chimney lines. Interior evidence matters too-if water has penetrated the deck or attic, capture the exact route of the leak and any staining on ceilings or walls. In this climate, wind-driven leaks can travel along roof lines before appearing inside, so a careful, methodical approach to documenting both exterior and interior effects is essential. Keep a simple, chronological log of when damage was first noticed and who you contacted, including notes on any quick temporary repairs you attempted to slow further intrusion. The clearer the scope of loss and the stronger the photo record, the less room there is for misinterpretation when the adjuster assesses a claim. This is especially critical if you have a roof that combines standard shingles with higher-end materials, where each section may be treated differently in the claim process.
Connect with contractors who help homeowners navigate the claims process from damage assessment to final approval.
Atlantic Craftsman
(757) 780-5488 www.atlanticcraftsman.com
908 Business Park Dr Suite B, Chesapeake, Virginia
4.8 from 545 reviews

VA Commercial Roofers of Chesapeake
(757) 317-0221 www.vacommercialroofers.com
Chesapeake, Virginia
5.0 from 44 reviews
Clark Roofing & Siding
(757) 485-1000 clarkroofingandsiding.com
1755 W Rd, Chesapeake, Virginia
4.8 from 142 reviews
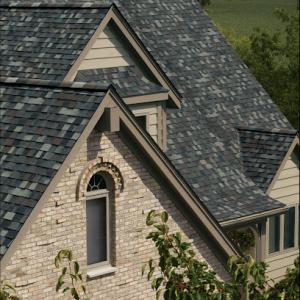
Chesapeake's dominant residential roofing mix includes asphalt shingles, metal, clay tile, concrete tile, wood shingles or shakes, and slate, giving homeowners a wider-than-average material decision set. That variety lets you tailor a roof to local weather patterns, neighborhood height restrictions, and personal taste. Asphalt shingles remain the most common and straightforward choice for balancing cost, repair familiarity, and local availability. Metal roofing offers excellent wind resistance and a longer service life, which matters when thunderstorms roll through and tropical systems push through the region. Clay and concrete tiles bring a distinct curb appeal and good heat resistance, but require careful structural consideration and proper underlayment to handle moisture movement and wind uplift. Wood shingles or shakes deliver a traditional look but demand diligent maintenance to guard against moisture intrusion in humid summers. Slate stands out in higher-end homes thanks to its durability, yet its weight and specialty labor must be planned for ahead of time.
Hot, humid summers accelerate aging in moisture-sensitive assemblies, making ventilation, underlayment choice, and flashing quality especially important when comparing materials. For asphalt shingles, prioritize a ridge vent strategy and a high-quality underlayment to manage seasonal humidity and sudden downpours. Metal roofs benefit from robust flashing around chimneys and vent stacks, plus careful seam sealing to deter wind-driven leaks during squalls. Clay and concrete tiles shed heat well but add weight and require structural verification, plus curved battens and proper edge details to prevent moisture pockets near fasteners. Wood can be an aesthetic asset in the right areas, yet it is more prone to mold and decay if ventilation or drainage is compromised. Slate performs well in damp conditions when installed with appropriate underlayment and rain-screen techniques, but the heavy tiles necessitate a solid structural assessment before replacement.
Heavy materials such as clay, concrete, and slate are less common than shingles but remain relevant in parts of the city with higher-end custom homes, where replacement planning must account for weight, accessory compatibility, and specialized repair labor. When evaluating these options, check for compatible underlayment, flashing systems, and attic ventilation that can accommodate heavier assemblies without compromising performance. For any choice, ensure that wind resistance details, flashing at penetrations, and proper attic ventilation are front and center in the installation plan to mitigate storm-driven leaks and rapid wear in this coastal, storm-prone climate.
Explore specialists in steel, aluminum, and standing seam metal roofs built to last 50 years or more.
Clark Roofing & Siding
(757) 485-1000 clarkroofingandsiding.com
1755 W Rd, Chesapeake, Virginia
4.8 from 142 reviews
Chesapeake's mix of inland neighborhoods and coastal exposure means timing your replacement matters. Summer heat can push crews to start early but also complicate installation conditions when shingles expand, tar papers soften, and adhesives struggle in extreme heat. Thunderstorms and tropical activity impede tear-off and dry-in schedules, so planning around those weather windows helps avoid delays and rework when tarps and hoses must be in constant use.
Winter freeze-thaw cycles in this region stress flashing and roof edges. Minor defects often become more visible after colder weather, even though winters are milder than farther inland. Look for hairline leaks along eaves, bird-dropping patterns on the fascia, and loose or slipping shingles that crop up after a few cold snaps. If a roof is already showing signs of movement or edge issues, replacement becomes a more reliable option than waiting for a minor repair that might fail during the next cold cycle.
Autumn rain can slow roofing work in Chesapeake, so homeowners trying to avoid both peak storm season and late-year weather delays often schedule replacements before the most active summer pattern or early enough in fall to avoid repeated rain interruptions. The goal is to finish a tear-off before late fall storms, when wind-driven rain is more common and days shorten, making roof work harder for both crew and material drying times.
If the roof is nearing the end of its expected life, replacement is often the most reliable long-term move-especially in a coastal-humid climate where fast-response re-roofing matters after a strong storm. Consider the roof's age, shingle granule loss, underlying decking stability, and the condition of flashing around chimneys, skylights, and edges. When multiple components show wear, replacement typically protects against repeated leaks and wind-driven damage.
Finally, align the replacement with a window that minimizes disruption to your daily routine. A dry, moderate period reduces the chance of rain delays and allows time for proper drying-in and inspection before the next storm front moves through. In a coastal-pattern climate, a well-timed project can mean fewer callbacks and a more durable result.
In the wake of strong storms, ridge caps often fail first, followed by worn shingle tabs and compromised flashing transitions. The short span of the ridge on many inland and coastal-edge roofs means gale-force gusts can lift and curl, creating open seams where water can enter quickly. Roof edges-the eaves and rake lines-bear the brunt of airborne debris and soak-down winds, so small gaps there become large problems fast. On aging roofs, these failure points turn into recurring leak paths after every storm, reminding you that a handful of vulnerable spots can drive a larger problem.
The humid climate turns minor penetrations around skylights, chimneys, and vent boots into stubborn leaks. Trapped moisture in roof assemblies can linger longer, feeding mold, wood rot, and corroded fasteners. Even a seemingly tiny gap becomes a channel for moisture to travel laterally under shingles or underlayment, and it can be weeks before a dry season fully dries the attic space. In practice, you'll often notice delayed moisture symptoms-staining, musty odors, or warmth around penetrations-long after the wind has passed.
Freeze-thaw cycles and hot humid summers exert opposite pressures on metal flashings and edge details. On homes that have already undergone multiple repair cycles, these components become brittle or warped, opening seams where water can seep in behind shingles. Corner or hip edge flashings can crack, while step flashing at transitions loses its seal, letting wind-driven rain ride up the slope. When metal fails at the edges, the damage often accelerates along the roof line, making timely intervention essential.
Pay attention to the smallest signs of movement at ridge caps, flashing transitions, and edge metal after storms. Regularly inspect around skylights, chimneys, and vent boots for lift or corrosion. If a wind event leaves visible gaps or looseness, prioritize a careful reseal or professional assessment before the next storm arrives.
Find contractors experienced in skylight installation, flashing, and leak repairs to bring natural light into your home.
Clark Roofing & Siding
(757) 485-1000 clarkroofingandsiding.com
1755 W Rd, Chesapeake, Virginia
4.8 from 142 reviews
J.D. Wiggins
(757) 439-7057 jdwigginsinc.com
2924 Bruce Station Ct, Chesapeake, Virginia
4.8 from 17 reviews

Although most homes in this market favor pitched roofs, local contractor signals show a meaningful flat and low-slope service presence, especially on additions, porches, garages, and some mixed residential-commercial properties. Those low-slope areas sit at the edge of humid coastal patterns where storm-driven rain can pool and move under seams if drainage isn't prioritized. Plan for these edges as you plan the addition, not as an afterthought to the main roof.
In the humid climate, drainage-related wear shows up sooner on low-slope sections. Check that scuppers and edge drains stay clear after heavy downpours, and verify that internal gutters are sized to handle the localized volume of a storm surge or tropical-fed rainfall. Seams and flashing are common failure points where roof-forced water can migrate toward the interior. A practical rule is to inspect flashing at least twice a year and after every major storm, focusing on the transition from high to low surfaces.
Homeowners with mixed roof systems often need replacement planning that treats the low-slope portion separately from the main shingle or tile field. Because gradients and drainage strategies differ, a single, uniform replacement approach can underperform. Coordinate schedule and material compatibility so the edge system integrates well with the field roof, preserving wind resistance and ensuring the low-slope area doesn't become a recurring leak source.
Routine inspections should emphasize the edge of the low-slope area, particularly after thunderstorms and coastal damp spells. Look for dried-out sealant joints, compromised step flashing at wall intersections, and any evidence of ponding near penetrations or vents. Keep drain lines clear and confirm that any expansion joints accommodate movement without creating leaks. Consider a targeted maintenance plan that assigns higher inspection frequency to these zones.
On additions, choose materials that tolerate temperature swings and moisture cycling without brittle joints. Common failures include seam separation, improper fastening at the edge, and inadequate termination at transitions to steeper sections. A focused inspection cadence, combined with proactive sealing and flashing refreshes, helps the low-slope portion age more gracefully in this coastal-humid environment. In this market, coordination between edge and field details is the key to long-term reliability.
Find specialists in TPO, EPDM, and built-up flat roofing systems for residential and commercial properties.
VA Commercial Roofers of Chesapeake
(757) 317-0221 www.vacommercialroofers.com
Chesapeake, Virginia
5.0 from 44 reviews
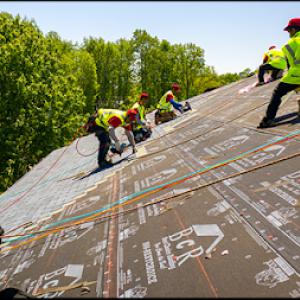
When a storm hits and the humidity-saturated air carries a pulse of rapid wind, Chesapeake sees a split between crews that can stabilize a roof quickly to stop leaks and crews that will follow through with a complete, code-compliant re-roof. The former is focused on temporary, water-shedding measures, tarping, and securing loose materials so a home can get through the next few days of bad weather. The latter is prepared to remove old shingles, inspect sheathing, and install a full roof system designed to hold up under the local coastal humidity and storm patterns. Your decision should hinge on whether the immediate priority is stopping further interior damage or delivering a durable, long-term solution.
In neighborhoods where driveways, landscaping, and family-oriented lots are common, cleanup is not an afterthought. Look for a contractor that explicitly includes debris containment and removal in the scope, with tarps to shield landscaping and clear pathways after tear-off. Ask how debris will be controlled during storm cleanup, how waste will be disposed of, and who handles the final driveway and yard sweep. A crew that leaves a yard looking like it didn't just weather a storm is a practical choice when neighborhood pride and family routines matter.
Long-established, family-owned companies tend to offer a steadier presence when storms recur and quick repairs are needed. Local tenure translates into a greater likelihood of follow-through on warranty work and after-storm service calls, which matters when wind-driven leaks reappear or a re-roof needs inspection after a hurricane season. When evaluating bids, weigh not just the upfront scope but the durability of the warranty and the reliability of the team to return for inspections or repairs long after the project is done.
Ask for recent local projects with similar exposure to coastal humidity and frequent thunderstorms. Request references you can contact about storm responses, cleanup thoroughness, and how promptly the contractor addressed any post-install concerns. Verify that the crew carries proper liability insurance and workers' compensation coverage, and confirm who will supervise the job site from start to finish. A neighborhood-friendly contractor will provide a clear schedule, consistent communication, and a plan that keeps driveways and yards accessible during work.
Inquire about how the stabilization phase is coordinated with the full re-roofing schedule, what debris-control measures will be used, and how temporary protections align with expected weather windows. Clarify who is responsible for securing permits, if applicable, and how on-site cleanup is guaranteed upon project completion. Finally, confirm the point of contact for storm-related follow-ups and how warranty support is delivered if issues surface after the weather pattern shifts again.