Last updated: Apr 19, 2026
Moorestown roofs face a dual threat: winter freeze-thaw stress and spring-to-summer storm interruptions. Replacement timing matters because installation quality hinges on weather windows-and a rushed job after a storm can leave underlying issues exposed. When temperatures swing from freezing nights to warm days, shingles and flashing expand and contract. If a roof is replaced during a cold snap, the risk of improper sealant curing and misaligned flashings increases, creating leak pathways right as spring storms roll in. If it's delayed until after a series of storms, the crew may have to work around soaked decking, which can compromise attic ventilation and long-term performance. Plan for a window where asphalt, metal, or tile installations can proceed with minimal moisture intrusion and optimal shingle or tile seating.
Local contractor signals show emergency repair and storm damage work are highly prevalent, indicating homeowners routinely require rapid response after wind-driven rain and storm events. In Moorestown neighborhoods, branches, shingles, and gutters are common storm casualties, and a missed flash line near chimneys or vents becomes a leak magnet within days of a gusty afternoon. The takeaway is practical: keep a trusted storm-response crew on standby during shoulder seasons and after major nor'easters or thunderstorm lines. If a storm exposes missing granules, lifted edges, or loose flashing, the window to reseal and reflash without disruption shrinks quickly. Delays increase the risk that moisture reaches the attic or interior structure, forcing invasive repairs that could have been avoided with prompt action.
Cold-weather cycles in South Jersey can turn small flashing or shingle defects into active leaks as trapped moisture expands and contracts. A shallow gap around a vent pipe or a misfit corner where a valley meets two roofing planes can silently collect water during a freezing night and then fail under thaw. In a Moorestown home with heavier slate or tile elements, those margins are even more sensitive: misalignment under a tile apron or a corroded step flashing can channel meltwater directly into the roof deck. The risk amplifies when a patchwork repair was done previously with mismatched materials or inadequate sealant, creating a durable weak point that leaks as soon as temperatures swing. Regular inspection after storms and every significant freeze-thaw cycle helps catch these failures before they cascade into ceiling stains or mold.
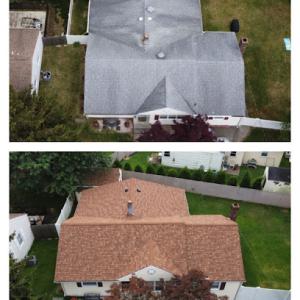
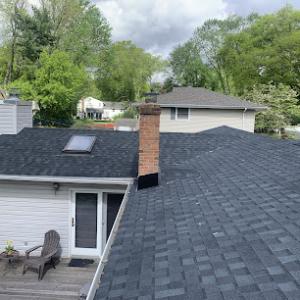
After a storm or a freeze-thaw event, inspect visible roof edges for lifted shingles, damaged flashing around chimneys, skylights, and vents, and any adjacent interior signs like damp spots on the attic floor. Look for granule loss in gutters and downspouts, which can indicate shingle wear and accelerated aging. If loose flashing or warped metal is spotted, treat it as a high-priority repair item rather than a cosmetic fix. On slate or tile roofs, check for cracked or displaced pieces near hips and ridges; even a single cracked tile can become a leak conduit with freezing rain or thawing moisture. Prioritize addressing these issues promptly to prevent a small leak from turning into structural water damage.
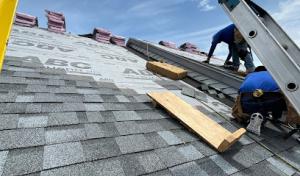
Aim to align replacement work with milder, dry spells in late spring or early fall when possible, reducing the risk of weather-induced delays and ensuring proper sealant curing. If a storm watch is in effect during a scheduled window, coordinate with the contractor to adjust the start date or switch to a temporary protective strategy, such as roof tarping, to minimize exposure. In neighborhoods with older, architecturally varied homes, ensure the chosen roofing system matches the home's historic look and weight load, particularly for slate or heavy tile replacements that demand careful structural assessment before a switch to lighter materials. The core objective is to complete replacement when conditions allow thorough resealing, proper nailing patterns, and precise flashing integration-so the roof can withstand Moorestown's spring storms and endure through the next freeze-thaw cycle.
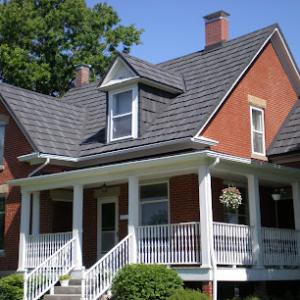
Moorestown's older housing stock often features slate, clay tile, and concrete tile as viable replacement categories rather than rare, boutique choices. That means you may be weighing heavy options against the more common asphalt, but the weight and historical character of those materials matter. When a roof is nearing end of life, slate or tile can be a fitting match for the curb appeal and long-term durability you expect from a well-built home on a wind-drenched South Jersey street. The catch is that not every roof deck was designed to carry these heavier systems without adjustments, so the decision point sits at the intersection of history, structure, and the realities of Moorestown's weather.
On an older home, replacing with heavy tile or slate requires careful verification of structural suitability. The dead load added by slate or clay can be substantial, and the attachment details must align with how the roof was framed and braced decades ago. In practice, this means a plan review or a structural assessment is not unusual, and the local approach often scrutinizes whether the underlying structure can safely bear the new weight. If the deck, rafters, or supports show signs of age or previous modifications, reinforcements may be needed to prevent sagging, movement, or stress on flashings during freeze-thaw cycles.
Moorestown's climate, with freeze-thaw cycles and storm-driven events, makes timing a practical concern when installing heavy systems. Replacing a roof in late winter or early spring carries the risk that lingering cold, moisture, or fluctuating temperatures will complicate installation and adhesive performance. Conversely, mid-summer heat can strain materials and fasteners during curing or installation. The choice of slate or tile should be paired with a realistic replacement window that respects a solid, dry work environment and allows for proper sealing and flashing to withstand the next season's weather events.
Heavy systems demand meticulous attention to how the roof meets walls, chimneys, vents, and skylights. Flashings must be integrated with a consideration for potential movement between roof sections, and the choice of underlayment becomes more critical to prevent leaks during cold snaps or driving storms. In addition, older homes may have masonry or brick façades that interact differently with tile or slate, so parapet and ridge detailing often requires bespoke solutions rather than off-the-shelf kits. The goal is a joint that remains watertight through the township's typical freeze-thaw pattern and a storm season that can test the most robust seal.
When you're contemplating slate or tile, prioritize a contractor who combines firsthand local experience with a clear plan for attachment, load paths, and flashings. Expect a thorough assessment of whether the existing roof structure can support a heavier system without compromising insulation, ventilation, or attic access. If the house has multiple generations of additions, checks for consistent framing support and unified attachment at eaves and hips become essential. The choice should balance architectural harmony with durable, responsible construction that stands up to Moorestown's weather, rather than a purely aesthetic upgrade. The resulting installation, properly executed, can preserve the character of an older home while delivering dependable protection for years to come.
Find contractors who specialize in clay and concrete tile roofs, known for their durability and curb appeal.


Moorestown's cost spread is wide because the local material mix ranges from standard asphalt shingles to premium slate and tile systems that require specialized labor. For asphalt shingles, expect roughly 350 to 650 USD per square. Metal roofing sits higher, typically 700 to 1,200 USD per square, while clay tile runs about 1,400 to 2,600 USD per square. Concrete tile is usually in the 1,100 to 2,100 USD per square range, and wood shingles or shakes run about 500 to 900 USD per square. Slate sits at the top, commonly 1,600 to 4,000 USD per square. In practice, a homeowner can see a broad spread even within a single street, because existing roof emotions-from a simple one-story house to a multi-level, architecturally varied attic-drive material selection and teardown needs.
Costs can rise when older Moorestown homes need decking repairs, custom flashing around chimneys and dormers, or structural review for heavier replacement materials. If the deck or framing shows weakened rafters or soft spots after freeze-thaw cycles, replacement bills can climb quickly, since structure supports must be ready for heavier systems like concrete or slate. Premium flashing around penetrations-chimneys, dormers, and header joints-adds labor time and material, and architectural details common in Moorestown homes often require more meticulous, custom-fitted work. For premium materials, the labor pool with the right expertise is smaller locally, which further pressures the price.
Storm-driven scheduling pressure in South Jersey can affect labor availability and project timing, especially after periods of widespread wind and rain damage. After a big storm, crews are in high demand and may charge premium or book out weeks ahead, influencing both initial timelines and total project duration. Freeze-thaw cycles in winter can constrain when crews safely replace decking or set heavy tile without risking damage to underlayment or flashings. If a replacement must happen quickly due to a leak or wind damage, expect expedited labor premiums and potentially expedited material delivery fees.
Start with a material-focused plan: match your architectural style and attic use to a material that can perform in freeze-thaw conditions while staying within budget. Get two or three detailed quotes that itemize decking, flashing, and any necessary structural work, especially if the house has dormers or chimneys. Build a contingency for storm scheduling-allow a buffer of a few weeks to accommodate weather windows and crew availability. Finally, consider phased replacements if the roof is of mixed materials, prioritizing areas with active leaks or significant damage to minimize short-term disruption and cost escalation.
MLM Home Improvement
341 New Albany Rd #103, Moorestown, New Jersey
4.9 from 856 reviews
MLM Home Improvement is a premier storm restoration company specializing in full replacements for roofing, siding, and gutter systems. We offer free, no-obligation inspections and estimates to assess storm damage and provide transparent recommendations for replacement solutions. Our expert team is dedicated to delivering exceptional quality and service in every project we undertake.
Erie Home
1247 N Church St # 8, Moorestown, New Jersey
4.7 from 172 reviews
Since 1976, Erie Home has manufactured, supplied, and installed the best-performing roofing on the market. By providing ironclad warranties and convenient financing, we ensure that every homeowner we work with receives top quality service and value for their homes and properties. Erie Home professionals are the roofing company of choice in the greater Philadelphia, NJ area. Whether you need roof inspections or roof damage repair services, Erie Home has been the go-to roofing contractor for nearly 50 years because of our attention to detail and dedication to making sure our customers are satisfied with their results. Contact us today for a quote and see why we're the trusted roofing company Philadelphia counts on.

American Construction Roofing, Siding & Windows
(856) 531-1304 amconstruct.com
770 Marne Hwy Ste 3C, Moorestown, New Jersey
5.0 from 29 reviews
American Construction Roofing, Siding and Windows is a family owned and operated business offering the finest quality Moorestown roofing and construction services. We have built a solid reputation based on our commitment to providing the best when it comes to roofing, siding, and windows in the area. At American Construction Roofing, Siding and Windows, you’ll find skilled carpenters and project managers that are trained in the best techniques on the market today. They use materials of the highest quality, and employ respectful and dedicated staff that truly listens to your needs.
JMC Contractors
(856) 397-6984 jmc-contractorsinc.com
Serving
5.0 from 23 reviews
JMC Contractors is a licensed and insured roofing contractor providing professional roof replacement, roof repairs, storm damage restoration, and exterior services for residential and commercial properties. We specialize in asphalt shingle and flat roofing systems, flashing repairs, gutters, and downspouts. Our team is committed to honest inspections, clear communication, and quality workmanship on every project. Whether you’re dealing with roof leaks, aging materials, or wind and storm damage, we guide you through the process from inspection to completion. We use high-quality materials and follow manufacturer and local code requirements to deliver long-lasting results. Serving Maple Shade and surrounding New Jersey areas

Nu Look Roofing, Siding, & Windows
(856) 335-7654 nulookhomedesign.com
Serving
4.6 from 280 reviews
At Nu Look Home Design, we believe finding a trustworthy contractor should be the easiest part of your home project. For over 20 years, we have been the trusted partner for over 50,000 homeowners, making the remodeling process stress-free. We offer free estimates with 3D renderings, personalized product selection, flexible finance options, comprehensive warranties, and a proven 13-step production process. With transparent, line-by-line pricing, you’ll know exactly what you're paying for. Our responsive and accountable team ensures your satisfaction with a lifetime transferable warranty and our Peace of Mind Guarantee, where you don't pay until the job is completed to your satisfaction. Choose Nu Look and experience the difference.
Under The Sun Roofing & Solar
(609) 534-0339 underthesunrs.com
Serving
5.0 from 55 reviews
Enhance Your Home's Exterior: From roofing to solar, siding, gutters, and beyond, we're your one-stop solution for all exterior needs. With a commitment to quality and sustainability, our expert team delivers tailored services to elevate your home's aesthetic and energy efficiency. Contact us today for a consultation!
Hammond Roofing
(609) 923-2527 www.richardhammondroofing.com
Serving
5.0 from 127 reviews
Hammond Roofing is the trusted local, licensed, and insured Southern New Jersey roofing contractor near you. In business since 1994, we are dedicated to helping property owners find the exterior solutions they’re looking for. As one of the top rated South Jersey contractors, we offer professional residential roofing, commercial roofing, roof repair, gutter, gutter repair services, and much more! You can depend on our team to finish your job professionally and efficiently at a great price."
Ricci Brothers Roofing
(609) 381-4173 www.riccibrothersroofing.com
Serving
4.8 from 73 reviews
We are a locally family owned roofing contractor proudly serving South Jersey & Philadelphia homeowners and businesses. We specialize in roof replacement, roof repair, leak detection, storm damage repair, and emergency roofing services. Our experienced team works with asphalt shingles and flat roofing systems, delivering quality workmanship, honest pricing, and dependable service on every job. Whether you need a full roof replacement or fast repairs after severe weather, we’re here to help. We proudly serve Camden County, Gloucester County, Burlington County, and surrounding South Jersey communities including Cherry Hill, Moorestown, Haddonfield, & Cinnaminson. Contact us today for a free roofing inspection and estimate.
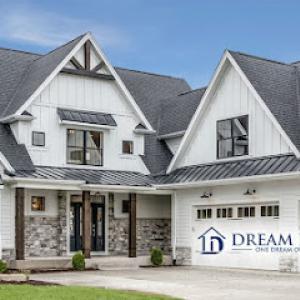
Dream Home Roofers
(856) 565-3859 www.dreamhomeroofers.com
Serving
4.6 from 406 reviews
We are a residential roof replacement company. We replace asphalt shingle roofs and install new gutters and fascia. Give us a call to discuss your roofing needs.

Home Genius Exteriors
(267) 214-5490 homegeniusexteriors.com
Serving
4.8 from 1089 reviews
Elevate your home with Home Genius Exteriors, setting the standard in Cherry Hill by offering full-service solutions for roofing, siding, windows, doors, gutters and insulation. We support our veterans and communities by supporting local and national charitable organizations through our Home Genius Cares initiative. With an Owens Corning® Platinum Preferred designation, we also offer flexible payment options, industry leading warranties and a wide range of premium products tailored for your home. It’s time for a different experience, entrust your next home project to a genius and schedule your free inspection today!
Family Remodeling Group
(609) 605-1126 familyremodelinggroup.com
Serving
5.0 from 38 reviews
Family Remodeling Group is a fully licensed and insured local contractor providing Comprehensive Exterior Services across Southern New Jersey and Eastern Pennsylvania. We also specialize in storm damage insurance claims along with interior remodeling services.

J. Cwanger
(856) 795-5480 www.jcwanger.com
Serving
5.0 from 91 reviews
J. Cwanger, Inc. is a fully insured roofing and siding business that has been in operation out of the Southern New Jersey area for several decades. We will provide you with a free itemized quote on your home, and ensure that all of your questions are
A full roof replacement in Moorestown typically requires a permit submitted through the Moorestown Township Building Department. Before any shingle, tile, or metal work begins, your contractor should file the permit and ensure all forms reflect the scope, including any structural or weight considerations for heavier materials like slate or concrete tile. The permit review can help catch local nuances, such as load calculations and required documentation for specialty roof assemblies, which can save a delay once work starts.
Local inspections are conducted during progress and at completion, with attention to underlayment, ventilation, flashing, and fastening rather than only the finished surface. During the project, expect inspections after major milestones: roof deck preparation, underlayment installation, and before final covering is secured. An emphasis on proper underlayment choices and ventilation is essential in this climate, where freeze-thaw cycles stress roofing systems. Your inspector will look for adequate attic ventilation, correctly installed ice-and-water shield where applicable, and proper nailing patterns to ensure the roof can withstand seasonal temperature shifts and storm-driven wind events.
Some Moorestown properties may trigger additional plan review or material-weight verification, especially when slate or tile systems are involved. If slate or clay tile is specified, the Building Department may require structural verification or a formal weight calculation to confirm the existing framing can support the roof's total load. In such cases, expect faster coordination with plan reviewers and potential requirements for engineered standoff details, purlins, or reinforced sheathing. Communicate openly with the roofer about whether the existing structure has documented capacity, and be prepared for longer lead times if amendments to framing or attic ventilation are needed.
Storm seasons in this area bring wind-driven contact with neighboring structures and tree branches. During inspections, the planner may check hip and ridge continuity and flashing around chimneys, vents, and skylights to prevent leaks in first thaw after a heavy storm. Ensure your contractor coordinates with any nearby utilities or exhausts to avoid conflicts or damage, and confirm that temporary protections are in place to minimize weather exposure between stages.
Storm-related roof claims are common in this part of New Jersey, so Moorestown homeowners benefit from documenting damage immediately with photos, permit records, and a clear project timeline. Start with a dated visual record: photos from several angles of the roof edge, flashing, gutters, vents, and interior signs of leaks. Keep a simple log noting when the issue was first noticed, weather events that could have caused damage, and any interim temporary fixes. If you have prior roof inspections, gather those reports to show pre-storm conditions.
Your claim package works best when it tells a connected story: how the storm or freeze-thaw cycle progressed to the point of damage, what was observed by professionals, and how the project will be executed. New Jersey's insurance market has seen carrier volatility and rate increases, but there is no universal statewide roofing pullback, which makes documentation quality more important than assumptions about blanket denials. Include inspection findings from a licensed roofer, a dated statement of conditions, and any evidence of wind uplift or leak progression. If a previous repair was attempted, document that work with receipts and photos to avoid disputes about preexisting damage.
For Moorestown claims, adjuster reviews are better supported when homeowners can show inspection findings, permit compliance, and dated evidence of wind or leak progression. When you contact the insurer, provide the best possible package first: a summary of the damage, a copy of the roof inspection, and the suggested scope of work. Ask for a written assignment of benefits if appropriate, and request a detailed, line-by-line adjuster report. If the adjuster requests a second opinion, arrange a follow-up inspection with a roofer who can corroborate the findings and present a mutually agreeable scope.
Freeze-thaw timing matters because repeated cycles can worsen shingle uplift, flashing gaps, and deck damage. If you notice leaks that track with melted ice or sudden temperature swings, flag those developments in your log and share them with the adjuster. In practice, a well-timed claim that connects the storm event to visible deterioration tends to move more smoothly than one driven by generic deterioration. Keep notes of any delay or communication gaps, and respond to requests promptly with the most complete documentation you can assemble.
Connect with contractors who help homeowners navigate the claims process from damage assessment to final approval.
MLM Home Improvement
341 New Albany Rd #103, Moorestown, New Jersey
4.9 from 856 reviews

In neighborhoods with older, architecturally detailed rooflines, skylights are a common source of leaks if not integrated carefully during a re-roof. You'll want to inspect the roof deck around any skylight opening for signs of prior water intrusion, especially after freeze-thaw cycles. Choose a skylight with a solid curb, proper flashing integrated into the roof slope, and a flashed edge that matches the surrounding shingles or tiles. Ensure the contractor lays a continuous waterproofing seal where the skylight meets the chimney stack or wall transitions, not just small patches. Poorly sealed edges can trap moisture behind decorative trim and lead to slow, creeping leaks that damage attic insulation and ceiling finishes before a drip appears inside living space.
Moorestown's mix of older homes means many chimneys adjoin varied roof planes and wall materials. The transition areas between chimney masonry, siding, and the roof deck are particularly vulnerable to water intrusion if flashing is overlooked or poorly formed. Expect multiple planes meeting at odd angles; these corners require bendable, continuous flashing that follows every contour. If chimney originally relied on mortar for waterproofing, plan for an updated, dedicated flashing boot and counter-flashing that extend well beyond the old sealant. In windy months, cap joints and step flashing can shift, creating micro-movements that invite leaks. A thorough re-flashing strategy now prevents costly damage later.
Flashing is where most Moorestown roof failures begin during storms and freeze-thaw cycles. The local housing stock with slate, tile, and detailed eaves demands attention to every wall transition, chimney throat, skylight curb, and valley intersection. Ask for a full plan that includes continuous metal flashing along hips and ridges, integrated with roofing material at all penetrations, and a robust sealant schedule that accommodates seasonal movement. The goal is a seamless interface that sheds moisture, rather than trapping it behind trim, mortar joints, or decorative details. If a contractor hesitates on any transition, treat it as a red flag-these spots are the most telling when a storm has passed.
Find contractors experienced in skylight installation, flashing, and leak repairs to bring natural light into your home.

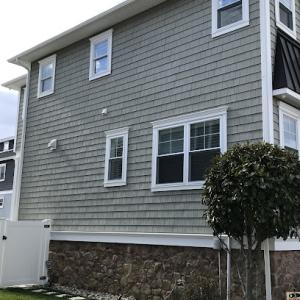
Although Moorestown is primarily a pitched-roof market, local contractor signals show a meaningful number of firms handling flat or low-slope roofing and roof coatings. This means you may encounter low-slope sections on additions, porches, or mixed-roof homes. Understanding how these areas behave differently from the main roof helps you plan for drainage, moisture control, and longevity. In practice, low-slope zones can trap water longer and respond differently to freeze-thaw cycles, so they deserve careful attention during design and replacement planning.
Low-slope portions require attention to slope, edge detailing, and connection to the steeper portions. Ensure a continuous rainwater path that prevents ponding, with properly integrated gutters and downspouts that can handle typical South Jersey precipitation patterns. When a low-slope section ties into a steep roof, flashing must bridge the transition cleanly to avoid leaks at the junction. For additions or porches, specify a membrane system that provides seamless redundancy across penetrations and perimeters, since movement and aging joints are common failure points in mixed-roof configurations. In Moorestown, freeze-thaw cycles emphasize the need for robust seam integrity and reliable drainage during the winter months.
Coating or restoration discussions are most relevant in select low-slope areas rather than as a default solution for the city's dominant steep-slope residential roofs. Coatings can extend service life on chosen patches, but they should be evaluated only after a careful assessment of substrate condition, insulation, and ventilation. For practical results, focus coatings on discrete, well-supported low-slope sections where flashing is solid and membrane integrity is otherwise strong. In all cases, ensure compatibility with existing materials and verify that seasonal temperature swings won't compromise adhesion or performance in winter and early spring. Regular inspections after major storms help confirm coatings are performing as intended and that no hidden leaks are developing at transitions.
Find specialists in TPO, EPDM, and built-up flat roofing systems for residential and commercial properties.