Last updated: Apr 19, 2026
DeSoto sits in the Dallas-area hail and wind claim zone, so spring storm damage often drives roofing decisions more than age alone. That means a roof that looks fine may still be carrying hidden shingle granule loss, hail dings, or soft spots under the surface. After the last major North Texas hail event, the re-roofing demand in southern Dallas County surges quickly, and that rush can push contractors to crowd schedules, skip early inspections, or stretch crews thin. You need to see damage early, document it thoroughly, and be ready to move fast when the claim window opens.
Because spring hail can create widespread, multi-property demand, your ability to file complete, accurate insurance documentation matters as much as the damage itself. Photos, notes on workmanship failures, and a clear record of impact points help your claim ride the adjuster's desk without delay. In DeSoto, weather windows shift dramatically from week to week. After a storm, appointments fill within days, and available replacement slots vanish within a couple of weeks. If you wait for "perfect" conditions, you may lose the best window for scheduling a timely replacement before the next heat spike. The goal is to strike while the demand is high but the coordination with a reputable roofer remains feasible, protecting your home from further weather exposure and minimizing the risk of delays that could drag into the peak heat.
Summer heat follows the spring hail season in this area, so homeowners often have to balance fast claim documentation with installation timing during very hot conditions. Shingle manufacturers and crews push to complete projects quickly, but extreme heat can strain materials and workers alike. Plan for a start date that allows for a cool-morning or shaded-work window, and choose a crew that prioritizes safety and material handling in high temps. If the claim agrees to a replacement, coordinate a start date that preserves good drying conditions and avoids the hottest stretch of the day, especially on roof sections with shallow slopes or complex penetrations. You'll also want to avoid scheduling during the height of heat if possible, because blistering asphalt, lifted nails, and rapid shingle expansion can complicate an install and later warranty claims.
First, secure a pre-approval with your insurer based on a preliminary assessment from a trusted local roofer who understands the typical bump-and-brush nature of DeSoto's storms. Second, request two or three viable installation windows once the claim is approved, prioritizing a slot early in the week and mornings when temperatures are cooler. Third, ensure your roofer provides a clear sequence: move quickly through temporary protections, remove damaged materials, inspect decking for moisture, and replace underlayment and flashing with attention to wind- and impact-rated details. Fourth, communicate openly about the weather forecast. If a heat spike or rain front threatens progress, the team should adjust the schedule rather than press ahead and risk quality or safety. Finally, keep a dedicated contact for your project. In this market, a named supervisor who can report daily progress helps prevent miscommunication and protects your timeline against commercial backlogs.
If a contractor cannot show prior work with hail-related criteria, or cannot present a credible plan to handle high-summer conditions, consider alternatives. Rapid, low-effort bids, or promises of instant replacement without proper claim documentation, are cues to pause. The right local crew will insist on a formaled inspection, a documented scope, and a realistic installation plan aligned with both your insurance claim and DeSoto's spring-to-summer weather cadence.
4 U Roofing & Construction
(469) 620-0010 www.4uroofing.us
Serving
5.0 from 38 reviews
4 U Roofing and Construction, a veteran-owned and family-operated business, has been enhancing homes in Glenn Heights, TX, since 2009. We offer a full range of services, including roofing, painting, handyman solutions, gutter installation, fence contracting, kitchen and bathroom renovations, cladding, and drywall. With a strong commitment to quality craftsmanship and customer satisfaction, our skilled team ensures every project is completed with precision and care. At 4 U Roofing, we take pride in making your home the best it can be.
Texan Roofing & Exteriors
(469) 722-1586 www.texan-roofing.com
Serving
4.8 from 18 reviews
At Texan Roofing and Exteriors, we pride ourselves on providing top-notch roofing services to the residents of Ellis County and Dallas County. With years of experience in the industry, our skilled team is dedicated to delivering quality workmanship and exceptional customer service. Whether you need roof repairs, replacements, or installations, we’ve got you covered. Trust us to protect your home with durable and reliable roofing solutions. Contact us today for a free estimate!
DeSoto Roofer
(469) 727-8621 www.desotoroofers.com
Serving
5.0 from 7 reviews
A locally owned and operated business serving Desoto and the Dallas areas. Call today for free quote.
USA Roofing
Serving
5.0 from 27 reviews
USA Roofing is a reliable roofing company serving Dallas-Fort Worth and surrounding areas since 1979. Family-owned and fully insured, we specialize in residential and commercial roofing services, including roof inspections, storm damage repairs, and full roof replacements. Our certified roofing contractors use quality materials for lasting results. Whether you're in Ellis County, Fort Worth, Arlington, or anywhere in DFW, USA Roofing is your trusted local roofer. Call now for a free roof inspection!
EDP Roofing
Serving
4.8 from 17 reviews
EDP Roofing is a family owned and operated three-generation commercial roofing company. We proudly serve businesses of all sizes throughout Dallas TX and surrounding areas. Providing the highest quality workmanship in the industry, we oversee all phases of the job from start to finish. As a result, you get personalized attention, quality materials and trained installation for best in class service.

Texas State Commercial Services
(214) 605-3925 tscs.govprofile.com
Serving
4.5 from 14 reviews
Demolition, Painting, Janitorial Services, Tree Trimming, Roofing, Landscaping, Pressure-Washing, Debris Removal, Fire/Water Restoration, Tape & Float.

Max Exteriors
(469) 779-7325 maxexteriors.com
Serving
4.6 from 55 reviews
Max Exteriors is a professional roofing and exterior contractor based in DeSoto, TX, serving the entire Dallas–Fort Worth metroplex. We provide residential and commercial roof repairs, roof replacement, storm and hail damage restoration, insurance claim assistance, emergency roofing, siding installation and repair, gutter installation, and exterior repairs. Our team offers free inspections, fast response times, and quality workmanship backed by warranties. Max Exteriors proudly serves DeSoto, Dallas, Fort Worth, Arlington, Irving, Plano, and surrounding DFW communities. Contact us today to schedule a free inspection.
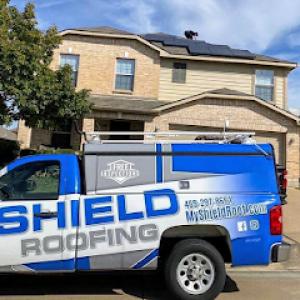
Shield Roofing & Solar
(469) 297-8684 myshieldroof.com
Serving
5.0 from 202 reviews
Shield Roofing & Solar stands as a beacon of excellence in residential roofing and solar solutions. Known for our expert roof repair and new roof installation, we are the roofing company you can trust. Our roofing contractors are committed to quality in every roof replacement or roofing repair service. As a solar company, we integrate solar energy seamlessly with our roofing services with solar shingles, providing sustainable and innovative solutions. Choose us for your roofing needs and join our many satisfied clients who know that choosing us among other roofing companies, ensures their homes are well-protected. Shield Roofing & Solar's unwavering commitment is to elevate your home's performance and protection.
JM Builders & Roofing
Serving
5.0 from 27 reviews
Roofing is the #1 Service we provide to those in Ellis County and Greater Dallas Metroplex. Whether roofing your home after a storm or building a custom roof project, we can help! We work with all insurance organizations & make the process easy, while covering all the details. Custom Remodeling is our #2. Whether it's a new updated bathroom, new flooring, or a new patio addition, we specialize in taking your custom concept to creation.
The Last Roof Construction Company
(214) 435-8536 lastroofingcompany.com
Serving
5.0 from 24 reviews
If I left the card at the door your roof looks like it qualifies for a new roof we only knock on doors that we feel like we can get a new roof. We would like to check the roof for free to give you an honest assessment. If it does not need a new roof we will tell you. Again, we don't charge anything. If they do not get you a new roof from the insurance company. The roofs are Gaf timberline hdz..They come directly from home depo that way you know, the roof has come directly from the factory to your house. Most roofers by the cheapest materials all the roofs come with z ridge and Cobra. Attic ventilation is very important for a new roof roofs can get up to a 150°. Again, let us check the roof for free. There is no charge. Thank you 📞
Hester Roofing & Gutters
(972) 223-3018 www.hester-roofing.com
Serving
4.3 from 6 reviews
We specialize in all phases of the roofing process, from roof repair to re-roofing, from maintenance programs to complete roof overhauls.
From On High Roofing & Construction
(469) 992-0047 www.reggietheroofer.com
Serving
5.0 from 46 reviews
We're here to help. Honesty, Integrity, and Trust are the pillars we are founded upon. Let us work with you to ensure your project is completed to your satisfaction.
The Dallas insurance market has elevated hail and wind claim activity, which affects DeSoto homeowners through tighter underwriting and higher deductibles in some areas. That shift shows up not only in what the carrier will approve, but also in how quickly a claim is reviewed after a spring storm. When a hail season hits, the local pool of adjusters and inspectors can become stretched, and communication gaps become more common. The practical consequence is that timely, well-documented information on the roof matters more than ever, because decisions hinge on precise details rather than general impressions.
Homeowners in DeSoto should expect carriers to require thorough photo documentation, date-of-loss details, and clear separation of storm damage from older wear. Take high-resolution photos from multiple angles, focusing on dented fasteners, granule loss, and any arching or cracking on shingles, tiles, or metal panels. Keep a dated log of storm events, including wind speeds if you tracked them or local weather reports you relied on. For the claim file, you want to demonstrate which issues appeared right after the hail and which issues were present before it. In practice, that means organizing photo batches by storm date and attaching meteorological notes or service invoices that timestamp the event. Clear labeling and a concise damage narrative help the adjuster quickly separate fresh impact from natural aging.
Because some carriers have adjusted coverage terms in high-risk North Texas markets, policy language on cosmetic damage, depreciation, and deductibles can materially affect roof replacement decisions in DeSoto. Cosmetic dings may or may not drive replacement depending on the insurer's interpretation, the type of roof, and the extent of denting versus functional impact. Depreciation language matters if the policy includes actual cash value versus replacement cost options. In practice, a homeowner should be prepared to discuss whether minor cosmetic blemishes will trigger full replacement or be considered part of wear-and-tear. If the carrier leans toward depreciation or partial payoff, you'll need a clear, dated claim file that differentiates between immediate storm-induced damage and ongoing deterioration from wind-driven debris and sun exposure.
With a surge of claims after typical DeSoto hail seasons, adjusters may prioritize speed over depth in some cases. You can help keep the process fair and efficient by having a living list of verified damage, a clear scope of recommended repairs, and documented estimates from reputable local contractors. If the adjuster questions the need for full roof replacement, you'll want to present evidence of repeated impacts, accelerated wear in vulnerable sections, and the inspection notes from a licensed roofer who specializes in evaluation after hail. Remember that the timeline for decisions can stretch when weather windows narrow, so proactive preparation and organized documentation can prevent misunderstandings that delay essential work.
Connect with contractors who help homeowners navigate the claims process from damage assessment to final approval.
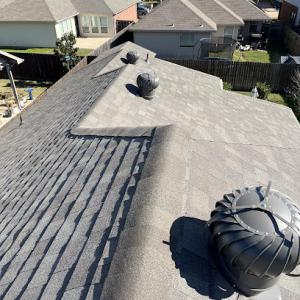
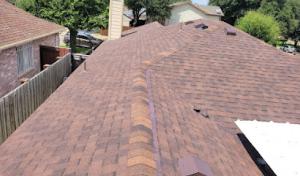
Asphalt shingles are the dominant practical choice in this market, and for good reason. In the spring hail belt, you'll see residential roofs with asphalt continuing to hold up well when installed with a solid underlayment and proper attic ventilation. The key practical detail for DeSoto is granule retention: hail can knock granules loose, accelerating aging and masking signs of underlying mat damage. When inspecting after a storm, look for bald spots or shiny patches where granules have sloughed away, and plan timely replacements before leaks begin. Choose architectural or laminate options if possible, since they tend to hold up better under high heat and curb appeal demands. A roof installed with a quality sealant and correct nailing pattern will resist wind uplift and maintain surface integrity through the hottest months.
Metal roofing is present in this market and can appeal to homeowners trying to improve heat performance during long, sunny summers. In Desoto's climate, metal reflects a portion of the sun's energy, reducing attic temperatures and delaying heat transfer into living spaces. For hail resistance, metal panels generally perform well, though the edges and fasteners deserve attention; a soft hail strike can dent panels or loosen fasteners if screws aren't properly sealed. When selecting metal, look for a coated, rust-resistant finish and concealed fasteners to minimize potential water intrusion points. If budget permits, a standing-seam profile reduces exposed edges and can simplify maintenance after storm events. Proper attic ventilation remains essential to prevent heat buildup under any metal roof.
Clay and concrete tile appear in the local material mix, but North Texas hail can crack individual tiles and make matching repairs more complicated than with standard shingles. Tile roofs deliver strong resistance to wind and offer excellent longevity, yet a single large hail impact can create a domino effect of cracked tiles and broken clips. In practice, this means your inspection after a hail event should focus on tile integrity and the condition of the mortar or fasteners holding the system together. When replacing damaged tiles, matching color and profile in a large home kit becomes a priority for aesthetics and resale value. Consider a roof with a robust tile underlayment and a contingency plan for tile-by-tile repairs, since patchwork is more common than with asphalt.
In a market shaped by repeated spring storm claims, the emphasis is on documentation, inspection, and proactive maintenance. After a major hail event, document every area affected with dated photos and keep an organized record for insurance conversations. Regular inspections should target granule loss, fastener integrity, flashing around chimneys, and valley joints, regardless of roof type. A steady maintenance routine reduces the likelihood of accelerated wear during the Dallas-area storm season and makes eventual replacement smoother if and when needed. The practical aim is to preserve the roof's protective layers while keeping the attic and ventilation assembly in good condition to combat both heat and moisture stress.
Typical DeSoto pricing follows Dallas-area ranges, and you'll notice the numbers move a bit with storm activity. Asphalt shingles run roughly 320 to 640 USD per square, depending on brand and warranty. Metal roofing sits higher, about 700 to 1200 USD per square, with longer life and improved hail resistance offering value when a hailstorm season hits. Clay tile tends to land in the 900 to 1700 USD per square band, while concrete tile clocks in around 750 to 1400 USD per square. If your home carries wood shingles or shakes, expect roughly 650 to 1100 USD per square. Synthetic or composite shingles present the most affordable option in this part of the market, typically 500 to 900 USD per square. In DeSoto, those ranges are not just theoretical: on a typical home in a storm-prone spring, the final bill can push higher due to weather-related material demand and the need for faster crew scheduling.
Spring hail drives demand spikes that ripple across the Dallas market and land in DeSoto as well. When a major hail event happens nearby, you'll notice longer lead times for replacement crews and, in some cases, increased labor quotes as crews compete for limited days off the calendar. If your insurance claim aligns with hail damage, the project scope can grow to cover more than cosmetic replacements-especially if underlayment and attic ventilation are compromised by impact patterns or if flashing around chimneys and vents shows additional wear. Expect the same roofing material choices to shift only in timing and availability rather than fundamental pricing logic: the same shingles or metal options stay on the table, but you may see premium bids from out-of-town crews trying to cover a tighter schedule.
Storm work often reveals hidden issues once the old roof is removed. In DeSoto, it's common to need more than a straight shingle swap: replacing deteriorated underlayment, addressing ventilation adequacy, and upgrading flashing where leaks are suspected or confirmed. These items can add to the per-square cost, but they also reduce the chance of future leaks after the next Texas hail event. If you're evaluating bids, ask each contractor to itemize underlayment, ventilation improvements, and flashing work so you can compare apples to apples. And if you're choosing material, remember that the starting per-square price is just the tip of the iceberg; the final number reflects the full scope, local labor dynamics, and how aggressively a contractor schedules around peak storm periods.
Don't let upfront costs delay a critical repair - these contractors offer payment plans to fit your budget.
Robinson Brothers Roofing & Construction
(469) 940-4602 robinsonroofing.site
Serving
4.8 from 75 reviews
A full roof replacement in DeSoto typically requires a permit through the City of DeSoto Building Department after project submission. Before any ladder work or material delivery, confirm your contractor has pulled the permit and that plans are on file with the city. The permit packet usually includes details about roof type, ventilation, underlayment, and flashing, so expect questions about attic space and roof deck conditions. If an imminent storm is driving urgency, make sure the permit is initiated first because city review can affect project timing and inspection windows.
Inspections are generally not a one-step signoff; they are staged during construction and again at final completion. This means you will see inspectors come by more than once, typically while the crew is working on ventilation, underlayment, and flashing, and then again after the new roof is installed. Schedule these visits in advance with your contractor and factor in potential weather delays common to spring hail season. The staged approach helps ensure every critical detail aligns with city standards, not just the visible surface.
In this market, the city's inspection focus goes beyond the outward appearance of new shingles. Inspectors verify proper attic ventilation and intake/exhaust balance to prevent heat buildup and moisture issues. They also check underlayment coverage, fastener patterns, and the installation of flashing at valleys, chimneys, and transitions to walls. Because DeSoto's climate and storm history emphasize durability, expect questions about ventilation baffles, ice/wumen barriers where applicable, and secure sealing at roof-to-wall connections. Contractors who plan for these checks from the start will pass more smoothly.
Your contractor should anticipate the city's review, not surprise it. Ensure the project plan includes detailed ventilation calculations, underlayment type and laps, and flashing details with accompanying diagrams if required. Keep a central folder of permits, inspection dates, and any city feedback. After each inspection, address any notes promptly so the next visit can proceed without rework. Clear records and proactive communication with the building department reduce delays during the critical replacement window.
At final completion, the inspector will confirm that all components meet code and that workmanship supports long-term performance in a hail-prone environment. Once the last inspection is signed off, you'll receive a certificate of compliance. This documentation can be valuable for insurance records and future maintenance planning, particularly after a heavy spring storm season. Keep the permit finalization documents in a readily accessible spot for future reference.
The long, bright afternoons of DeSoto summers turn roofs into solar furnaces, especially on dark asphalt shingles that soak up heat. That heat slows crews, hardens sealants, and can cause shingles to sit out of place longer than you expect. For homeowners, this means scheduling with a weather eye on mid-afternoon temperatures and planning extra hand-offs for materials as they move from truck to roof. The result is a tighter work rhythm rather than a rushed sprint, with a premium on secure, careful sealing once the sun starts to drop.
In North Texas, crews often need to stage work carefully after hail season because extreme roof-surface temperatures can change how quickly materials are handled and sealed. The same radiant sun that bakes a dark roof can cause fast curing of adhesives and sealants, which, if rushed, may lead to lapses in waterproofing. Contractors with experience in this climate space out the work, bring additional shade or cooling breaks, and verify that every seam remains protected as temps swing between hot afternoons and cooler evenings.
Replacement timing in DeSoto is not just about weather windows; it is also about avoiding quality problems that can arise when summer heat follows a spring storm backlog. If a roof is still fresh from a backlog, sitting in late spring heat can stress fasteners and flashings before the roof has fully settled. A careful, staged approach-allowing sufficient curing time for sealants and ensuring proper ventilation during the hottest days-helps maintain long-term performance and reduce post-install callbacks when the calendar flips to peak season.
Because DeSoto inspections emphasize flashing details, leak prevention around penetrations is a bigger local quality checkpoint than a cosmetic afterthought. Focus on chimney bases, wall-to-roof transitions, and the edges where roof surfaces meet different planes. In spring hail season, weak or poorly seated step and counter-flashing around chimneys can fail under wind-driven rain, letting water migrate down into the attic even when shingles still look sound. Pay close attention to flashing at any abutments along the eaves and parapets, where thaw cycles and heat buildup can separate sealant and create micro-gaps. If you notice paint or sealant cracking around a flanged flashing, treat it as a red flag.
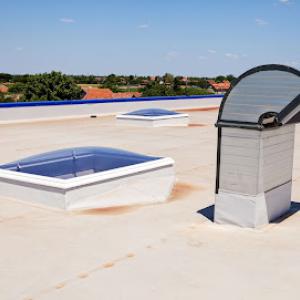
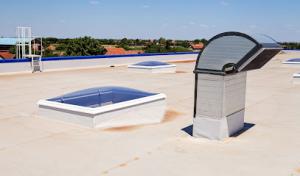
Skylight units become a high-priority leak point after hail and windy events. Curb flashing must be continuous and properly crimped to the curb itself; any misalignment invites water intrusion at the nail line or seam. In many DeSoto homes, skylights sit near roof transitions or under complex valleys, where even small imperfections can channel water into attic spaces during north Texas storms. Inspect the perimeter caulking and the factory seal around the skylight dome; degraded sealant is a common sign of impending leaks. If flashing appears corroded, bent, or lifted, plan for timely resealing or flashing replacement rather than patching the surface.
When you perform a self-check, start with a dry day after a hail event and run a quick rain test by directing a garden hose along flashing lines and skylight seams. Look for water marks in the attic around chimneys, vent pipes, and wall penetrations. In the attic, pay attention to staining, mold, or damp insulation near penetrations, not just on the roof surface. Tighten loose flashing screws with care, reseal any gaps with a compatible sealant, and replace deteriorated step or counter-flashing where visible. If the flashing looks suspect but you're unsure of the integrity, bring in a roofer who can perform a live-load inspection during a controlled water test.
After a hail or wind event, document any changes to flashing and skylight seals with photos, and schedule a quick assessment if you notice fresh leaks or attic condensation. Because wind-driven rain can expose weak flashing at chimneys, walls, and transitions even when field shingles seem intact, address suspected failures promptly to prevent long-term damage. A proactive approach keeps the roof structure secure and minimizes downstream interior issues.
Find contractors experienced in skylight installation, flashing, and leak repairs to bring natural light into your home.
Robinson Brothers Roofing & Construction
(469) 940-4602 robinsonroofing.site
Serving
4.8 from 75 reviews
In this market, flat and low-slope roof work shows meaningful demand on additions, porches, and some commercial-style sections. When a project touches a low-slope area, the rest of the roof isn't automatically serving as a perfect match, and the attachment details often drive longer-term performance.
Low-slope sections in DeSoto are vulnerable when spring hail is followed by heavy rain, because drainage and seam details become critical under North Texas storm patterns. During a replacement or repair, pay close attention to how water moves across any transition from shingles to flat areas, and ensure that terminations and flashing have ample slope and proper sealing.
These roof areas often need to be evaluated separately from the main shingle field during replacements and insurance inspections. A separate scope helps avoid overlooked damage at step-downs, parapets, and porch hoods. Have the contractor document any punctures, deflection, or deck moisture that may not be visible from a standard roof inspection.
For additions and porch roofs, specify a distinct drainage plan and a compatible membrane or underlayment that tolerates higher exposure to debris and vegetation strands common in this area. Confirm that fasteners, penetrations, and joints are rated for continued movement and temperature swings typical of North Texas summers.
Drainage details are the frontline defense in these sections. Ensure seams are adequately sealed, with attention to edge pans, edge metal, and curbs. Verify that any transitions from pitched to low-slope surfaces are reinforced with robust flashing and secondary drainage paths to prevent ponding.
During claim reviews, insist on a focused assessment of low-slope areas, particularly where hail damage could mask underlying moisture. Documentation should spotlight the condition of penetrations, parapets, and any new or re-seated flashing, so the insurer can see a complete picture of the roof's condition. Consider coordinating replacement timing with the spring storm calendar to minimize disruption and maximize long-term performance.
Find specialists in TPO, EPDM, and built-up flat roofing systems for residential and commercial properties.
Robinson Brothers Roofing & Construction
(469) 940-4602 robinsonroofing.site
Serving
4.8 from 75 reviews

When hail hits, speed matters, but so does thorough debris removal and securing the site. A reputable local contractor will outline a clear plan for tarping, waste disposal, and coordination with the insurer. Watch for crews that arrive without ladders, dumpsters, or proper safety gear-these red flags show up after the first storm and can linger through multiple claims. Your neighbors in the same zip code often tell you which teams finish work on time and which ones bounce between properties, leaving you with unfinished details and unanswered questions about flashing and ventilation.
Warranty is more than a brochure in this market. In DeSoto you need a firm that stands behind flashing, ventilation, and shingle alignment, because city inspectors review those details during installation. Ask for written coverage that aligns with each component, from underlayment to ridge vent to drip edge, and request a detailed post-install checklist you can keep for your records. A solid warranty should include clear expectations for response times if leaks or wind damage recur within the coverage period, even after a storm-driven roof replacement.
The local market includes many long-established and family-owned firms, which can matter to homeowners trying to avoid short-term storm chasers after major hail activity. Favor firms with a steady local footprint and a track record on nearby streets, not just a flashy pitch. Ask for references from nearby homes, verify insurance and licensing through local directories, and note how long the crews have worked under the company name. A decades-long team typically means stable workmanship and better coordination with city inspectors.
Create a screening plan focused on storm-readiness, documentation, and re-roof volume management. Compare how each contractor documents pre-inspection, material warranties, and installation details. If you notice reluctance to discuss crew supervision or a clear clean-up protocol, treat it as a warning and keep looking. In DeSoto, operating with a contractor who understands the spring hail cycle and the cadence of city inspections can save you headaches when the next storm arrives.
In the Dallas hail belt, a hail-damaged roof often comes with solar equipment that has seen the same storm harshness. Coordination matters most when a roof claim coincides with mounted solar gear, so the scope aligns for underlayment, flashing, and penetrations to be fully addressed before the final city signoff. Solar-integrated roofing exists here, but it isn't dominant, which means the interplay between roof trades and solar trades can slow progress if not planned. A clear plan helps ensure the roof and solar system endure the next spring storms without rework.
When a hail claim leads to a reroof, you want the solar array treated as part of the same project scope. Start with a unified assessment that captures shingle or panel mounting locations, flashing details around penetrations, and the condition of drip edges and underlayment. The solar installer should review roof deck access, vent placement, and any required structural tweaks in light of the new roofing. In practice, this means a single process where the roofer and the solar technician walk the job together, marking penetrations and coordinating wind-rated flashing to avoid later leaks around mounts.
Spring storm seasons in the Dallas area can backlog both roofing crews and solar trades. Plan ahead so the roofing replacement can progress to a point where the solar system can be re-mounted or re-energized without delay. If possible, schedule the solar work to occur during a lull in weather or after the roof deck and underlayment are in place and weather-tight. Understanding a realistic timeline for both trades helps avoid a gap where the roof is finished but the solar system can't be safely reinstalled.
Before signoff, verify that all penetrations are properly flashed, underlayment is continuous, and any skylights or vents were treated in a way that accommodates future solar hardware. Ensure the solar racking interface is compatible with the new roof profile and that any warranty documentation reflects coordinated work. A common pitfall is misaligned flashing around railings or mounting feet; double-check that the final configuration passes a thorough inspection with both trades represented on the wait list.
Find contractors who integrate solar panels or solar shingles into your roof for long-term energy savings.