Last updated: Apr 19, 2026
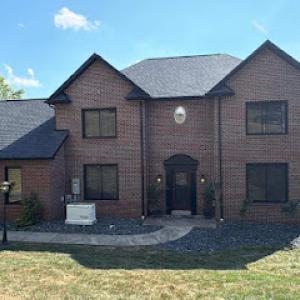
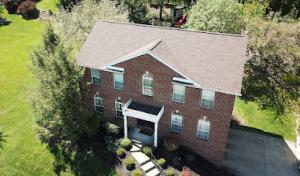
The Allegheny Valley sits in a valley that amplifies cold winter winds and the repeated freeze-thaw cycles that are a daily reality for roofs here. In this area, water wicks into small gaps and micro-cracks, then freezes and expands, slowly prying shingles loose and stressing flashes around chimneys and vent pipes. That cycle is especially punishing on legacy homes perched on hillside lots, where shade from mature trees and occasional wind-driven storms push moisture into attic spaces and eaves. Understanding this local climate helps homeowners anticipate where leaks are most likely to begin: along the rake edge, at penetrations, and where old decking carries hidden fatigue from years of moisture exposure. The result is a need for proactive attention to the durability of underlayment, the condition of roof decking, and the integrity of flashing before a harsh season arrives.
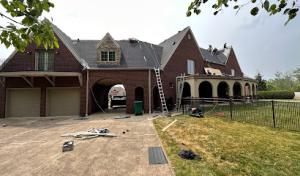
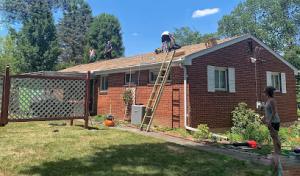
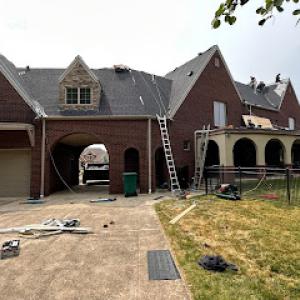
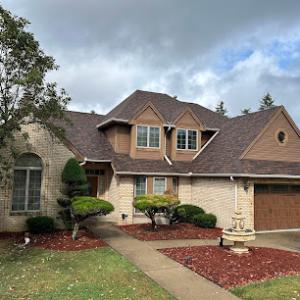
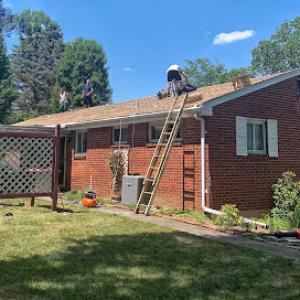
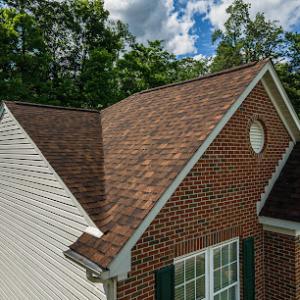
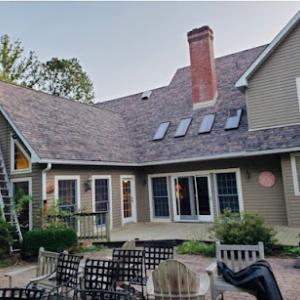
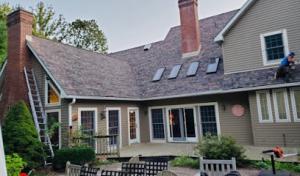
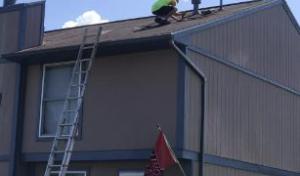
Older residential neighborhoods in this part of the valley carry character and challenge in equal measure. Tear-off work on these homes often uncovers decking that's softened, warped, or stained from long exposure to moisture and temperature swings. Beneath the visible shingles, flashing around chimneys, skylights, and vent stacks can succumb to corrosion or improper detailing that began decades ago. Once those layers are exposed, a careful assessment becomes essential: if decking shows signs of rot, it needs to be replaced, not merely covered over with new shingles. That replacement area must be properly vented and spaced to prevent warm attic air from warping neighboring boards and inviting further moisture problems. In practical terms, expect a thorough inspection of rafter tails, collar ties, and any knotty wood that may have absorbed more water than it should have. This is where a careful local eye makes the difference between a durable fix and a recurring leak.
Spring in this part of the country often arrives with wet, unsettled weather that can delay roof work and stretch the window for safe tear-off. Summer heat can push asphalt shingles to soften in mid-day sun, which complicates installation and quickens the need for proper nailing and sealant performance. Autumn brings its own rhythm: heavy leaf fall from mature trees clogs gutters and valleys, allowing damp debris to accumulate in corners and around flashing. Local contractors plan around these patterns, prioritizing inspections and minor repairs before the wet spring resumes, then coordinating full re-roofs after leaf fall when access is clearer and weather is cooler. For homeowners, a practical approach means scheduling a mid-spring inspection to identify weak spots, followed by a fall check to clear debris and verify flashing still seals against the last round of autumn storms.
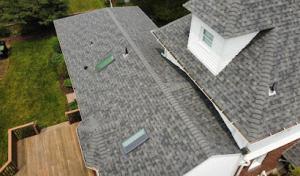
When evaluating a roof in this region, start with a cautious exterior scan at the high points: ridge lines, chimney flashing, pipe penetrations, and the transition from the wall to the roof line. Look for hairline cracks along edges where snowmelt tends to pool and refreeze, plus any lifted shingles that reveal underlayment or deck below. On the interior side, pay attention to attic insulation and venting: signs of warmth or moisture buildup in the attic often indicate a lingering leak path that exterior fixes should address. If decking looks spongy or soft to the touch, treat those areas as candidates for replacement rather than patching. In older homes with multiple penetrations, ensure step and counter-flashing were integrated properly; substandard flashing is a common source of water intrusion after a decade of freeze-thaw cycles. A methodical, line-by-line assessment-starting at the most exposed edge and moving inward-helps identify where a single small leak may originate from, long before it becomes a noticeable stain inside the living space.
The local setting rewards preventive care. Keep gutters and downspouts clear to prevent backed-up water from seeping into soffits and vulnerable decking. Install or maintain high-quality underlayment and ensure proper venting in the attic to balance condensation from cold external air with the heat of the attic space. For hillside properties, tree management matters: prune mature trees to reduce leaf buildup and wind-driven debris that can injure shingles and clog valleys. When planning any roof work, allow for the possibility that decking near exhausted areas may need replacement, and budget accordingly for a thorough flashing refresh around all penetrations. Finally, establish a predictable maintenance cadence: annual roof health checks, a mid-spring inspection after the heaviest rains, and a late-fall review to clear debris and confirm seals before winter returns. In densely built neighborhoods, where older homes share walls and alignments, a small improvement in flashing detail at one house often helps neighboring structures, reinforcing a resilient local roofscapes network.
Western Pennsylvania freeze-thaw cycles can open shingle seals, stress flashing, and expose weak roof decking in New Kensington re-roof projects. Over time, nightly freezes push water into tiny gaps, then thaw cycles pull that water back out-creating micro-cracks that spread. On aging homes perched above the Allegheny, those cycles are not just inconvenient; they corrode the integrity of the deck and underlayment long before a visible leak appears. In this climate, a small leak today can become a full interior soaking next storm season if the decking has already weakened.
Spring storms bring heavy rain and wind that often turn small flashing defects into active interior leaks. The combination of vigorous gusts and saturated, warming days causes shingles to shift, nails to back out a bit, and flashing to loosen where it meets walls, vents, and chimneys. When a roof is already stretched by previous winters, a single storm can push a minor seam to the brink, letting water travel along the underlayment and into attic spaces or ceilings. This is especially true on older steeply sloped homes that crowd hillside lots where wind funnels through vented attic spaces.
Local contractor activity strongly indicates that storm damage and emergency leak response are common homeowner needs in this market. After a tough winter, crews see a spike in requests for rapid leak control, temporary patching, and trips to re-secure flashing around chimneys, dormers, and vent pipes. The pattern repeats: a storm pressure surge reveals a concealed weakness, a quick fix buys time, and a proper repair or reroof addresses the root cause before more interior damage occurs. This is not theoretical here-this market often requires decisive, timely action to prevent attic and ceiling rot.
In this climate, prevention hinges on treating both the shingles and the surrounding metalwork as a system. Start with a seasonal inspection that prioritizes edge shingles, ridge caps, and any flashing where roofs meet walls. Look for granule loss, curling edges, and small gaps along vent bases and chimney hips. If you notice any looseness or gaps, address them before a storm arrives; a tiny seam gap can become a cascade of leaks after a heavy rain. Pay special attention to the deck: if any soft spots or visible sagging appear, those areas should be evaluated urgently because the decking bears more water weight and freeze-thaw stress than older, intact sections.
During the spring, consider a staged approach: repair small, visible defects promptly to prevent further water intrusion, while planning a more comprehensive remediation for areas showing widespread wear. If you observe recurring damp spots in the attic or ceiling, initiate a targeted inspection of the attic ventilation and insulation as well, since improper ventilation compounds freeze-thaw damage by trapping moisture.
If multiple flashing joints show movement, if you detect persistent moisture in the attic after a rain, or if you notice seasonal patterns of leaks following storms, escalation is needed. An experienced local roofer can trace leaks back to the source, confirm decking integrity, and recommend a plan that stabilizes flashing, re-secures seam areas, and addresses any compromised underlayment. In this market, timely, informed responses minimize containment costs and protect the structural core of the home.
Find local contractors experienced in assessing and restoring roofs after hail, wind, and severe weather events.
APO Construction & Roofing
(724) 991-5698 www.apoconstructionroofingllc.com
New Kensington, Pennsylvania
5.0 from 31 reviews
G&G Construction Group
(412) 500-6995 ggconstructionpgh.com
New Kensington, Pennsylvania
4.8 from 24 reviews
APO Construction & Roofing
(724) 991-5698 www.apoconstructionroofingllc.com
New Kensington, Pennsylvania
5.0 from 31 reviews
APO Construction & Roofing is a licensed and insured company based in Pittsburgh, PA, with 25 years of experience serving residential and commercial clients within a 80-mile radius. We specialize in general construction, roofing solutions, interior and exterior remodeling, flooring, siding, and custom deck projects. Our team serves communities including Monroeville, Bethel Park, Cranberry Township, and Mount Lebanon, offering reliable solutions tailored to each project’s needs.
Hoffman Roofing
New Kensington, Pennsylvania
4.6 from 30 reviews
Hoffman Roofing is a reputable and experienced roofing services provider dedicated to delivering top-quality roofing solutions to residential and commercial clients for the LOWEST PRICE. Contact 412- TUF-ROOF anytime for free estimates.
G&G Construction Group
(412) 500-6995 ggconstructionpgh.com
New Kensington, Pennsylvania
4.8 from 24 reviews
G&G Construction Group provides roofing, decking and siding services to the Greater Pittsburgh and surrounding areas.
Patterson Construction
1698 Lincoln St, New Kensington, Pennsylvania
4.5 from 17 reviews
Family business with over 40+ years of experience We work in the following areas Arnold Brackenridge Deer Lakes Ford City Freeport Kiki Area Kittaining Leechburg Lower Burrell Monroeville Murrysville Natrona Heights New Kensington North Hills Oakmont Penn Hilla Plum Sarver Springdale Verona Roofing, Siding, Decks, Game Rooms, Gutters, and more.
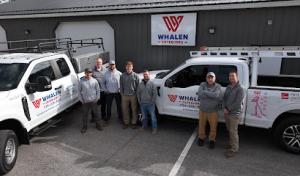
Whalen Exteriors
(724) 335-8515 whalenexteriors.com
Serving
4.9 from 270 reviews
Whalen Exteriors provides roofing and exterior replacement services of the best kind in New Kensington, PA. Founded in 1982, we have a wealth of experience and relationships in the industry that make it possible to produce work of the finest quality. Committed to our belief in doing things the right way, we guarantee professionalism, integrity and impeccable service in everything we do. When it comes to your roof, we’re happy to guide you through the replacement process. We serve clients with residential, multifamily, and commercial roofs. As your preferred exterior contractor, we install roofing, gutters, siding, and windows. Contact your reliable Pittsburgh roofing company for a free estimate!
Roofing & Remodeling America
(412) 510-7606 www.roofingandremodelingamerica.com
Serving
5.0 from 15 reviews
At Roofing & Remodeling America, we are your trusted local experts in roofing, siding, windows, and remodeling, proudly based in Harrison City, PA, and serving Pittsburgh and its surrounding areas. Our mission is to provide top-quality materials, expert craftsmanship, and outstanding customer service, ensuring your home improvement experience is seamless and stress-free from start to finish.
Buccos Roofing
(412) 618-0409 buccosroofing.com
Serving
5.0 from 16 reviews
Buccos Roofing was founded in 2012 by Dan Easton, Mark Easton and Ernie Comfort. Together, the three Peters Township natives set out to serve the greater Pittsburgh community and never looked back. What once was a three-man, one truck crew, working out of a garage, is now an enterprise spanning the greater Pittsburgh area. They attribute their success to hard work, good friends, and family. Today, Buccos Roofing is home to over 25 roofing contractors and additional staff. Together, our team of experts work hard to provide our customers with the best roofing and exterior renovation experience possible. Our mission is to deliver reliable and enjoyable services to each of our clients, prioritizing their needs first.
Foglia Builders
Serving
4.8 from 126 reviews
Foglia Builders is a trusted roofing & remodeling contractor serving Pittsburgh, Cheswick, Monroeville, and Penn Hills, PA. With over 25 years of experience as a family-run roofing company, we provide expert roofing services, including roof repair, roof replacement, roof inspection, new roof installation, roof maintenance, and 24-hour emergency roof repair. We specialize in roofing shingles, gutter installation, and expert siding installation, including aluminum siding and siding repair. Our team also includes skilled deck builders and skylight installation experts. Accredited by the BBB and an Owens Corning preferred contractor, we deliver quality craftsmanship and lasting results. Contact us today for a free quote!
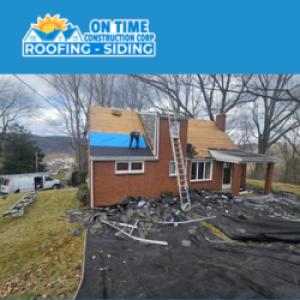
On Time Construction
(774) 826-5319 ontimeconstructioncorppa.com
Serving
5.0 from 41 reviews
On Time Construction offers contracting services including commercial and residential roofing, rubber roofing, soffit, fascia, gutters, decks, siding, windows, doors, interior and exterior. We pride our company on reliability, great communication, integrity, and quality work. We look forward to earning your business, feel free to give us a call today!
Salco Roofing & Seamless Gutters
(412) 609-4516 salcoseamlessgutters.com
Serving
5.0 from 102 reviews
We aim to provide Pittsburgh and surrounding residents with dependable, high-quality seamless gutter systems and roof installations. Guaranteeing excellence over profits, we focus on functionality, integrity, and an honest deal for our neighbors. Call Salco for residential new roof and gutter systems, fascia and soffit repair, roof and gutter installations, repairs, insurance claims, and storm damage. Edit bio
Bachman's Roofing & Solar
(412) 744-8390 www.bachmansroofing.com
Serving
4.9 from 270 reviews
Bachman’s Roofing & Solar, is a family-owned and operated business for over 50 years. It prides itself on excellent customer service, exceptional products, and expert installations. Bachman's offers a variety of services including roof repair, roof replacement, solar installation, siding, skylights and more! Visit our website to receive a quote on your residential or commercial improvement project today!
Doing It Right Roofing Powered by Valor
(724) 639-7663 www.roofingcontractorpittsburgh.com
Serving
4.7 from 263 reviews
Doing It Right Roofing is committed to excellence in every aspect of our business. We uphold a standard of integrity bound by fairness, honesty, and personal responsibility. Our distinction is the quality of service we bring to our customers. Accurate knowledge of our trade combined with ability is what makes us true professionals. Above all, we are watchful of our customers' interests and make their concerns the basis of our business.
Asphalt shingles are the dominant practical choice in New Kensington because they fit the region's common residential housing stock and the local contractor base is heavily oriented toward re-roofing. The typical hillside homes with shallow-to-mid pitch roofs and older decking respond well to standard asphalt systems. They're familiar to local crews, easier to inspect after freeze-thaw cycles, and they balance performance with available maintenance resources. If your roof has seen a few harsh winters with spring storms, asphalt shingles offer predictable repair paths, simple flashing adjustments, and a straightforward way to restore leak resistance without a full structural overhaul.
Metal is present in the market and can appeal to homeowners prioritizing snow shedding and durability through western Pennsylvania precipitation cycles. In this valley climate, metal can shed snow more reliably than some other materials and may resist wind-driven leaks when installed with proper underlayment and flashing detail. The trade-off is that metal requires precise installation around eaves, chimneys, and vent stack penetrations. If your roof is already showing decking wear or has complex angles from historical additions, metal may demand more upfront coordination with experienced local metal installers to avoid air gaps and thermal movement problems. For many hillside homes, metal is worth considering only if you have access to a crew that understands the local freeze-thaw behavior and the specific flashing needs around valleys and ridges.
Tile, wood shake, and synthetic products exist locally but are more selective choices because older homes may need structural review, specialized flashing work, or more careful maintenance planning in freeze-thaw conditions. Clay and concrete tiles bring durability and a distinct curb appeal, but they add dead load that older framing might not comfortably support without reinforcement. Wood shakes offer a traditional look, yet they demand regular maintenance to prevent moisture intrusion and rapid degradation in freeze-thaw cycles. Synthetic shingles can mimic natural materials while offering lighter weight and sometimes better resistance to cracking, but they still rely on solid decking and careful detailing at penetrations. In short, these options can work for well-preserved, structurally sound roofs, but require upfront assessment of decking condition and a longer, more meticulous maintenance plan.
Start with a professional roof inspection that focuses on decking condition, frost damage, and flashing around chimneys, vents, and valleys. If the deck shows widespread soft spots or repeated leaks after winter storms, prioritizing a full deck assessment and a system that provides robust underlayment and seamless flashing will pay off. For a home with a straightforward layout and solid substructure, asphalt shingles offer the most reliable balance of performance and repairability in this climate. If snow management is a primary goal and the framing supports it, a well-installed metal roof can be a viable path, provided the installation accounts for the local details. For anything beyond a straightforward rebuild, involve a contractor who can map out the precise flashing transitions and verify that the chosen material will hold up through the typical Western Pennsylvania freeze-thaw cycle.
Regardless of material, plan for regular inspections after severe storms and each winter transition. Pay attention to ridge cap integrity, flashing around penetrations, and the condition of any synthetic underlayment chosen for additional protection. In older neighborhoods with hillside exposure, routine cleaning of debris from eaves and valleys helps prevent ice dams and drain-blocking buildup. With a thoughtful approach and a locally trusted contractor, the right roof choice can deliver lasting protection against New Kensington's seasonal stresses.
When you map out a replacement, use the per-square pricing ranges that locals see most often: asphalt shingles from 350 to 700, metal from 700 to 1300, clay tile from 1300 to 2100, concrete tile 1000 to 1800, wood shingles or shakes 550 to 900, and synthetic or composite shingles 500 to 900. Those numbers reflect how the hillside timber and aging homes with varied rooflines drive material choices and overall bang-for-buck. In practical terms, a 1-square (100 square feet) section of asphalt might come in closer to the lower end if the roof deck is solid, while premium metal or tile plugs in higher due to fasteners, underlayment, and specialized installation.
Costs in this area often rise after a tear-off exposure reveals rotten decking from long-term moisture intrusion and freeze-thaw cycles. The freeze-thaw pattern is a recurring western Pennsylvania issue, so expect a higher bill if plywood or deck boards need replacement once old shingles are stripped away. Budget for deck repair or replacement as part of the project, not as an afterthought, because failing decking accelerates leaks and complicates insulation performance.
Pricing can move upward after spring storm periods when demand for re-roofing, emergency repairs, and insurance-related work increases across the local contractor pool. In practice, that means spring and early summer can be busy, and a contractor may schedule earlier or charge a premium for expedited work. If timing is flexible, you may capture better material pricing, but be prepared for scheduling shifts if a storm cluster hits the area.
For a straightforward asphalt replacement with a solid deck, plan around the 350-700 per square range, plus minor underlayment or venting adjustments. If metal or tile is chosen to address long-term durability against freeze-thaw cycles, expect higher per-square pricing and a longer installation window. In cases with deteriorated decking, add decking costs into the overall estimate, understanding that the total can rise meaningfully. A practical approach is to set a contingency of 10-20 percent above the initial quote to cover unexpected decking or insulation work while maintaining a realistic timeline.
Don't let upfront costs delay a critical repair - these contractors offer payment plans to fit your budget.
Doing It Right Roofing Powered by Valor
(724) 639-7663 www.roofingcontractorpittsburgh.com
Serving
4.7 from 263 reviews

In this hillside community, a roof is more than protection from rain-it's a buffer against freeze-thaw cycles and spring storms that can crack decking and push water into your attic. The local reality is clear: a building permit is typically required for a full re-roof rather than treating the project as informal maintenance. Skipping that step can mean you're working against the very issues you're trying to fix, especially when the weather tightens up and reveals hidden decking damage.
Before any shingle or metal starts flying, you or your contractor should submit the permit application with project details and contractor information. The process is not a formality here; it's a practical safeguard against missteps that can lead to leaks after the first thaw. In New Kensington, the permit is your record that the work complies with local code expectations and the specific climate challenges of the Allegheny River foothills. If the folks reviewing the plan spot underlayment gaps, ventilation omissions, or flashing mismatches, you'll face delays or the need to correct issues before the job can continue.
Reroof projects are evaluated with a close eye on material compliance, underlayment, ventilation, flashing, and the ability to handle energy and moisture movement across seasons. The inspectors look for proper underlayment choices that can stand up to repeated freeze-thaw cycles, adequate attic ventilation to prevent condensation, and flashing details at hips, valleys, chimneys, and vent pipes. In this climate, even small lapses in flashing or ventilation can turn a storm-driven leak into a long-lasting problem, especially on older homes with compromised decking.
The process includes a final inspection to close the permit, confirming that the installed roof system meets the expected standards and that any observed decking or structural concerns identified during the work are satisfactorily addressed. If a deck or plywood shows signs of rot or water damage, inspectors will require remediation before the permit can be closed. That final step is not merely bureaucratic; it's what separates a roof that lasts through a brutal winter from one that leaks under the first heavy snow or spring thaw. The consequence of bypassing or mishandling inspections is not only a potential suspension of work, but a higher risk of ongoing moisture intrusion and accelerated wear on a roof that stands between you and harsh seasonal weather.
Storm, wind, and hail claims occur in western Pennsylvania, so New Kensington homeowners should expect insurers to closely review pre-loss roof condition and maintenance history. In this hillside town, aging decking and seasonal freeze-thaw cycles can amplify damage after a hail event or strong wind gusts. A claim can hinge on whether prior repairs and attic insulation meet expected standards, and whether the roof showed signs of wear before the storm. If a roof has shallow fastener work or soft spots in decking, that scrutiny becomes decisive for the claim outcome.
Adjusters in this market may request photo documentation and may want the existing roof torn down far enough to evaluate decking condition before approving full replacement scope. That means you should be prepared for access to the attic and sustained permission to inspect core structural areas. Having clear photos of shingles, vents, flashing, and attic insulation can help, especially when a storm event coincides with a long period of neglect. Be ready to demonstrate that the roof was maintained with proper debris removal, flashing resealings, and any prior repairs that might affect decking integrity.
Pennsylvania insurance market conditions can affect available coverage options and deductible structures, making documentation of wind-resistance features and storm damage especially important. If the policy language is strict about wind uplift, or if endorsements exist for storm-related water intrusion, your file should reflect the roof's alignment with those terms. The goal is to prove that the roof performed as designed under normal wear for the region, and that new damage is tied to a qualifying weather event rather than pre-existing deterioration.
Keep a dated, detailed record of all maintenance and any repairs, including contractor notes and photos from different seasons. After a storm, document every area that shows impact-shingles, flashing, gutters, and decking access points. If an adjuster requests access to the attic or deck, cooperate promptly, knowing that the deeper inspection often drives the claim's scope. In this market, clear, organized documentation can be the deciding factor in separating a routine repair from a full replacement.
Connect with contractors who help homeowners navigate the claims process from damage assessment to final approval.
Salco Roofing & Seamless Gutters
(412) 609-4516 salcoseamlessgutters.com
Serving
5.0 from 102 reviews

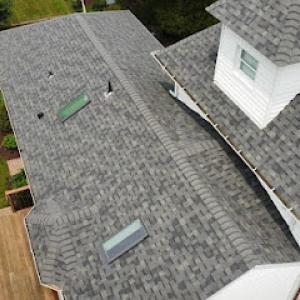
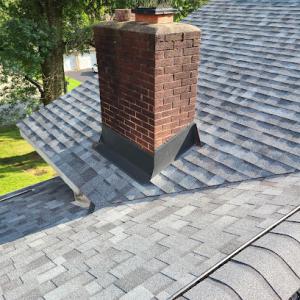
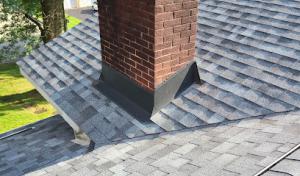
In New Kensington's older housing stock, roof penetrations such as chimneys and skylights are common leak sources when flashing ages or separates during freeze-thaw movement. The combination of slope, old decking, and seasonal temperature swings means these spots often start dripping even when the main field shingles still look solid from the ground. Local contractor signals show meaningful demand for skylight work and chimney-related roofing coordination, indicating these details are a real homeowner concern here. Keep an eye on where flashing meets the roofing surface, not just the visible shingles around it.
During spring rain events, the first visible leaks frequently appear at penetrations before anything on the main roof shows obvious failure. Look for damp ceiling spots, stains along chimney or skylight edges, and small rust spots on metal flashing. Outside, check if flashing around the base of the chimney or the skylight has lifted, buckled, or detached from the vent flashing boot. Ice damming near these points can force water under flashing, so inspect eaves and the joints where the flashing meets vertical walls as the thaw begins.
From a safe vantage point, examine the skylight curb and the chimney boot for signs of movement or separation. Gently run a fingertip along the edge where flashing meets shingles to feel for roughness or gaps. Look for granular loss on surrounding shingles exactly where flashing sits, since that can indicate accelerated wear near penetrations. If you notice moisture trails down the interior or staining near the chimney chase, or if the skylight glass fogs in damp weather, plan a targeted inspection of the flashing and sealant.
If flashing shows signs of lifting, or if the skylight or chimney flashing is cracked, loose, or appears to be decked over with moss or debris, arrange a detailed inspection with a roofer who understands freeze-thaw cycles and old decking. A focused resealing, flashing reflash, or curb rebuild can prevent cascading leaks during the next thaw and spring downpour. For homes with multiple penetrations, a coordinated flashing plan that ties together chimney, skylight, and vent connections often yields the best long-term protection.
Find contractors experienced in skylight installation, flashing, and leak repairs to bring natural light into your home.
Porch roofs, rear additions, and other low-slope areas sit under the same freeze-thaw cycles that hammer the main roof, but they drain differently and age more quietly until a leak shows up. In this hillside housing stock, standing water and membrane wear show up first on these sections, especially after heavy spring storms. Local homes often have flatter or lower pitches where water tends to linger, so the failure patterns are distinct from the steep main roof.
Before touching shingles, check how these roofs shed water. Look for pooling that persists after a shower, sags in the edge, and clogged scuppers or gutters. Inspect the deck for any soft spots or rot around penetrations like skylights, vents, or chimney flashings. A sound deck is the foundation for a long-lived low-slope roof, and weak spots can lead to leaks that track into living spaces faster than on a steeper roof.
Low-slope sections rely heavily on proper flashing along edges, transitions, and penetrations. Revisit terminations at connections to the main roof, walls, and any metal edging. In colder months, ice and snow can back up under flashing or into seams, so ensure sealant lines are continuous and intact. Pay special attention to the perimeter flashing where a small gap becomes a big leak.
Flat or low-slope roofs here often use membranes that wear from wind-driven rain and ultraviolet exposure. A routine inspection twice a year-after winter and after a heavy spring storm-helps catch compromised seams, punctures, or edge failures early. If you see cracking, fishmouths, or loose edges, plan timely repairs rather than a full rebuild to extend life.
A notable share of local contractors specializes in flat-roof work, reflecting the common need for these secondary sections. When arranging help, verify experience with low-slope materials, proper substrate preparation, and seamless transitions to the main roof. For porch and addition roofs, you'll benefit from a crew that treats these areas as a distinct system with careful attention to drainage, deck integrity, and weatherproof detailing.
Find specialists in TPO, EPDM, and built-up flat roofing systems for residential and commercial properties.
Nick Letters Home Improvements
(412) 781-4667 www.nicklettersroofing.com
Serving
5.0 from 52 reviews
The local market is crowded with quick-response re-roofing companies, so you should verify who will actually handle tear-off, cleanup, and permit coordination before signing. Look for a crew that shows up with a dedicated tear-off team, a clear plan for debris containment, and a project manager who can be reached during the job. In this area, it's common to see outfits that offer fast quotes, but you want a contractor who can commit to responsible waste handling and on-site protection from the freeze-thaw cycle and seasonal storms.
Because cleanup-included and affordable positioning are common in this market, bids should be compared for scope details rather than assuming all proposals include the same disposal and site protection standards. Ask for a written breakdown that shows tear-off, disposal method, protection of landscaping and structures, attic ventilation checks, and a defined post-roofing clean-up protocol. A solid bid will spell out who does what, when, and how debris is contained during heavy winds or sudden hail events typical of spring storms.
Long-established, family-owned, manufacturer-certified, and drone-inspection-equipped firms all have a visible presence locally, giving homeowners several ways to screen for experience and documentation quality. Prioritize contractors who can document recent projects with photos or drone footage, and who maintain an updated roster of manufacturer certifications. This helps ensure the crew knows how to address decking and underlayment concerns that often surface after a harsh winter. When you interview, ask about storage for materials on-site, protection strategies for nearby property, and a clear plan for addressing any decking or moisture issues uncovered during tear-off.